
Popular categories
Looking for a yarn?


Comments / Questions (19)
![]() Claudie wrote:
Claudie wrote:
Vous dites qu'il faut faire À.2a et À.2b dans le même arceau. Je ne comprends pas car la base n'est plus droite de cette façon. Merci
23.10.2022 - 20:09DROPS Design answered:
Bonjour Claudie, crochetez A.2a en début de rang sur l'endroit (fin de rang sur l'envers), répétez ensuite A.2b jusqu'à l'arceau du milieu, puis crochetez A.2c dans cet arceau du milieu, crochetez A.2d jusqu'au dernier arceau et terminez par A.2e (fin de rang sur l'endroit). Au tout début, juste après A.1, vous crochetez 3 fois A.2b et 3 fois A.2d en largeur entre A.2a/A.2c et entre A.2c et A.2e. Bon crochet!
24.10.2022 - 08:48
![]() Corinne Serre wrote:
Corinne Serre wrote:
Bonjour, j'ai bien compris qu'il faut faire une augmentation sur tous les rangs en brides. Faut-il en faire également sur les rangs en doubles-bride en faisant 2 groupes de doubles-brides en début et en fin de tous les rangs. Merci de votre précision
16.10.2022 - 14:36DROPS Design answered:
Bonjour Mme Serre, répétez les diagrammes en hauteur, autrement dit: crochetez et augmentez comme dans A.2a (au-dessus du 1er arceau du début du rang sur l'endroit), répétez A.2b jusqu'à l'arceau du milieu, crochetez A.2c au-dessus de l'arceau du milieu, répétez A.2d jusqu'au dernier arceau et crochetez A.2e dans ce dernier arceau. Quand ce 1er rang est terminé, tournez et crochetez le rang suivant sur l'envers (en lisant de gauche à droite); continuez ainsi, et quand les 6 rangs sont terminés, reprenez-les au 1er rang de la même façon. Bon crochet!
17.10.2022 - 10:02
![]() Jenny wrote:
Jenny wrote:
Written pattern please in English
01.03.2020 - 00:24DROPS Design answered:
Dear Jenny, we only have diagram to this pattern, but you will find here how to read crochet diagrams. Happy crocheting!
02.03.2020 - 11:41
![]() Trudi Wetzel wrote:
Trudi Wetzel wrote:
WHY OH WHY is there NEVER written instructions????? Diagrams are beyond me. There are a lot of us out here who want written directions. You are missing a wider audience.
22.09.2019 - 22:34DROPS Design answered:
Dear Mrs Wetzel, The DROPS patterns are knitted and crocheted by thousands and thousands of people around the world. We understand however that in certain countries, with different knitting/crochet traditions than Scandinavia, our patterns might be written in a way that differs from what some are used to. But of course we want everyone to understand our patterns, so that’s why we have created an extensive library of tutorial videos as well as step by step lessons that explain how to follow the techniques we use and how to read the diagrams in our patterns. Give them a try!
23.09.2019 - 09:54
![]() Faby Torres wrote:
Faby Torres wrote:
Te felicito por la buena voluntad de compartir los paso a paso eso ya no se ve la gente es muy mezquina en cambio tu haces la diferencia, gracias
09.09.2019 - 14:55
![]() Hélène wrote:
Hélène wrote:
Oui, pardon, un rang de DB, on ne le voit pas sur la photo. On a l'impression que l'on s'arrête sur un rang de DB du diagramme...?
23.07.2019 - 12:31DROPS Design answered:
Bonjour Helene! Effectivement, c'est un rang de DB du diagramme. Bon travail!
23.07.2019 - 18:46
![]() Hélène wrote:
Hélène wrote:
Bonjour, très bien, merci. Comme il n'y a pas de photo du coin j'avais un doute. La finition est une rangée de B ou on s'arrête sur le diagramme au niveau d'un groupe de B ?
23.07.2019 - 09:14DROPS Design answered:
Bonjour Hélène, pour finir vous crochetez un rang de dB (double brides). Bon crochet!
23.07.2019 - 10:11
![]() Hélène wrote:
Hélène wrote:
Bonjour, pour réaliser le diagramme A2, faut-il bien faire A2a et A2b juste un fois en bas de A2 ? Existe-t-il une vidéo ? Merci
22.07.2019 - 00:31DROPS Design answered:
Bonjour Helene, en répétant A.2 en hauteur, vous crochetez toujours A.2a et A.2b au-dessus du 1-er arceau, ensuite vous répétez A.2b jusqu'à l'arceau du milieu, A.2c au-dessus de l'arceau du milieu, répéter A.2d jusqu'à ce qu'il reste 1 arceau, A.2d et A.2e au-dessus du dernier arceau. Comment lire les diagrammes crochet vous trouverez ICI. Bon crochet!
22.07.2019 - 21:16
![]() Marilyne wrote:
Marilyne wrote:
Bonjour vous avez de beau modèles le problème est qu il ne sont pas pratique dans les explications même parfois décourageant
26.03.2019 - 16:07DROPS Design answered:
Bonjour Marilyne, avez-vous déjà consulté notre FAQ? Vous la trouvez en bas de chaque modèle, n'hésitez pas à poser votre question ici si besoin, et surtout, pour toute assistance personnalisée, votre magasin DROPS vous aidera volontiers, vous pouvez le contacter par mail ou téléphone si besoin. Bon crochet!
27.03.2019 - 08:17
![]() Renée wrote:
Renée wrote:
Je suis déçue pad la laine recommandée pour ce modèle, dommage le chale est beau
22.03.2019 - 16:46
|
||||||||||||||||||||||||||||
Vintage Chic#vintagechicshawl |
||||||||||||||||||||||||||||
 |
 |
|||||||||||||||||||||||||||
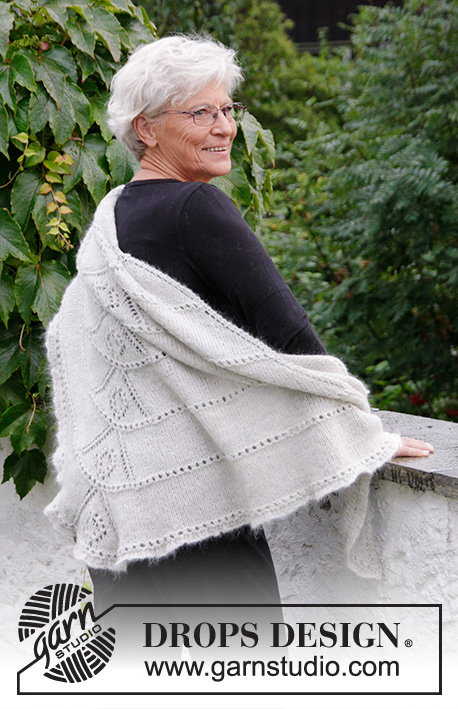
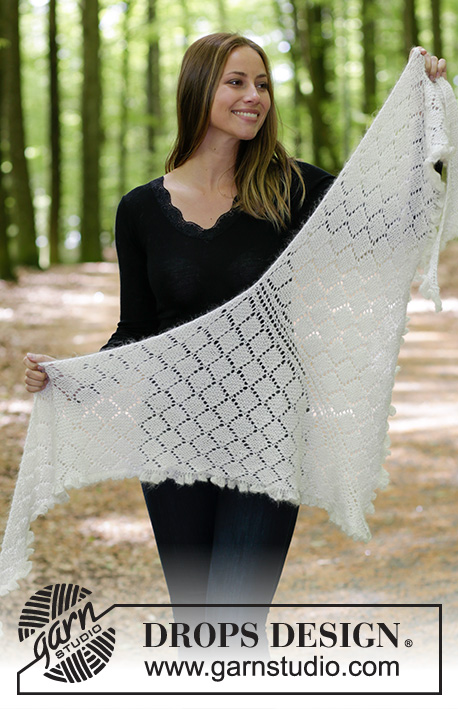
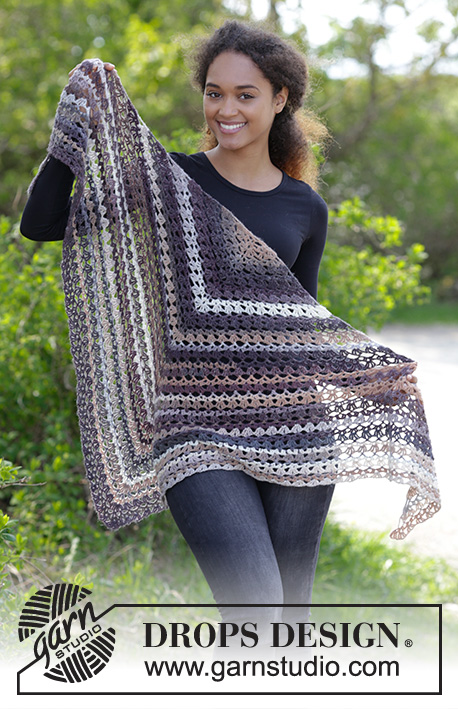
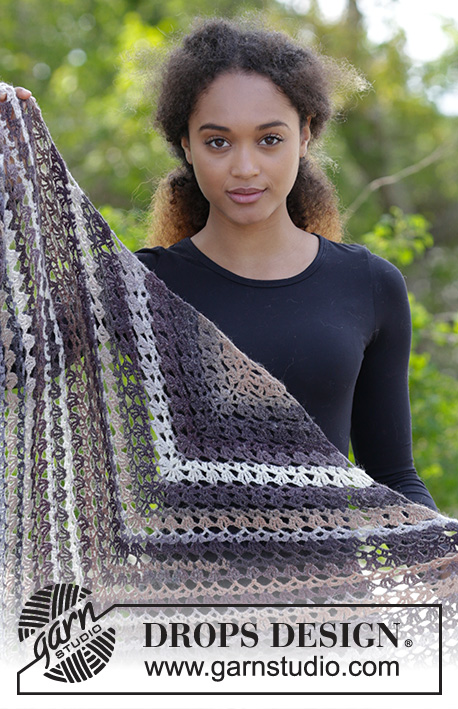
Crochet shawl with fan pattern. The piece is worked in DROPS Delight.
DROPS 179-20 |
||||||||||||||||||||||||||||
|
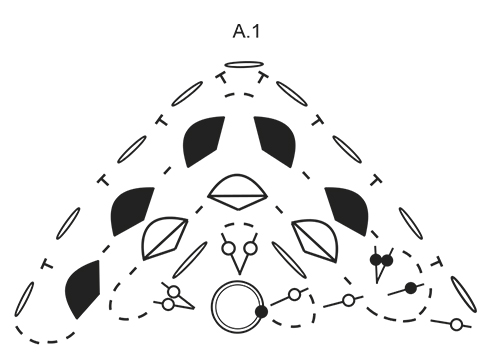
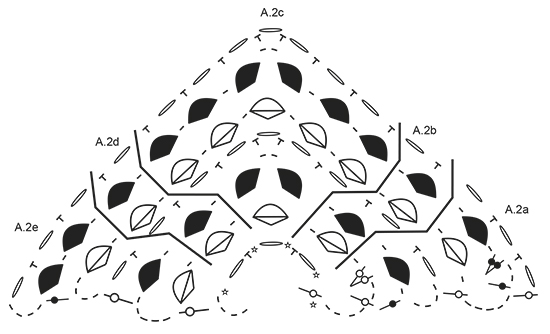
INFORMATION FOR THE PATTERN: PATTERN: See diagrams A.1 and A.2. ---------------------------------------------------------- SHAWL: The shawl is worked back and forth from the middle of the edge at the top of the shawl and down to the tip. Work 5 chain stitches with hook size 4.5 mm and Delight and form them to a ring with 1 slip stitch in the first chain stitch. Continue back and forth according to diagram A.1. When A.1 has been completed, work as follows: Work A.2a and A.2b over the first chain-space, repeat A.2b over the next 3 chain-spaces, work A.2c over the next chain-space (= middle-space), repeat A.2d over the next 3 chain-spaces, work A.2d and A.2e over the last chain-space. REMEMBER THE CROCHET TENSION! When A.2 has been completed in height, repeat A.2 in height upwards with increases, i.e. work as follows: Work A.2a and A.2b over the first chain-space, repeat A.2b as far as the middle-space, work A.2c over the middle-space, repeat A.2d until there is 1 chain-space left, work A.2d and A.2e over the last chain-space. Repeat A.2 in height with increases until the piece measures approx. 75 cm measured along the middle-space. Finish with a row of double treble crochets, cut and fasten the strand. |
||||||||||||||||||||||||||||
Diagram explanations |
||||||||||||||||||||||||||||
|
||||||||||||||||||||||||||||
|
||||||||||||||||||||||||||||
|
||||||||||||||||||||||||||||
Have you finished this pattern?Tag your pictures with #dropspattern #vintagechicshawl or submit them to the #dropsfan gallery. Do you need help with this pattern?You'll find 7 tutorial videos, a Comments/Questions area and more by visiting the pattern on garnstudio.com. © 1982-2025 DROPS Design A/S. We reserve all rights. This document, including all its sub-sections, has copyrights. Read more about what you can do with our patterns at the bottom of each pattern on our site. |
||||||||||||||||||||||||||||


With over 40 years in knitting and crochet design, DROPS Design offers one of the most extensive collections of free patterns on the internet - translated to 17 languages. As of today we count 314 catalogues and 11822 patterns translated into English (UK/cm).
We work hard to bring you the best knitting and crochet have to offer, inspiration and advice as well as great quality yarns at incredible prices! Would you like to use our patterns for other than personal use? You can read what you are allowed to do in the Copyright text at the bottom of all our patterns. Happy crafting!
Post a comment to pattern DROPS 179-20
We would love to hear what you have to say about this pattern!
If you want to leave a question, please make sure you select the correct category in the form below, to speed up the answering process. Required fields are marked *.