
Popular categories
Looking for a yarn?


Comments / Questions (11)
![]() Kari wrote:
Kari wrote:
Hvordan strikker man tommelen på vottene? Jeg er vant med å strikke selbuvotter, men der er det like mange masker foran og bak. Her skulle man bare legge opp 1 ekstra maske når man har satt av tommelkilen. Det blir ikke fint, og det må være noe jeg gjør feil. Kan dere være så snill å lage video på hvordan dere strikker tommel, hele tommelen!
05.11.2022 - 17:25DROPS Design answered:
Hei Kari. Ta en titt på videoen som allerede er lagt til denne oppskriften. Om du ser på tiden 00:55-00:59 ser du første økningen. Øk på hver side av de økte maskene på hver 2.omgang totalt 5-6 ganger = 54-60 masker. Om du igjen ser på videoen på tiden 03:14, ser du hvordan maskene har blitt satt på1 tråd og at det strikkes opp nye masker bak tommelen. I DROPS 180-19 skal det bare strikkes opp 1 maske. mvh DROPS Design
07.11.2022 - 11:20
![]() Jette wrote:
Jette wrote:
De 3 første og 3 sidste masker på pandebåndet hvordan strikkes de på vrang pinden ???
25.08.2022 - 17:23DROPS Design answered:
Hei Jette. Strikk de 2 første og 2 siste maskene rett, både fra retten og fra vrangen. Les evnt forklaringen under RETSTRIK (strikkes frem og tilbage – gælder pandebånd) øverst i oppskriften. Når det gjelder 3. maske og 3. siste maske strikkes disse vrang fra retten og rett fra vrangen. mvh DROPS Design
29.08.2022 - 09:37
![]() Maiken wrote:
Maiken wrote:
Hei. Hvordan skal vrangen strikkes på pannebåndet på de 3 første og siste maskene?
27.06.2022 - 18:33DROPS Design answered:
Hej Maiken, De 2 rillemasker i hver side strikkes ret både fra retsiden og fra vrangen, 1 maske vrang (fra retsiden) strikkes ret fra vrangen :)
29.06.2022 - 10:06
![]() Paulina wrote:
Paulina wrote:
W przypadku opaski brak informacji, jak przerabiać 3 pierwsze oraz 3 ostatnie oczka na stronie lewej. Domyślam się, że tak samo, ale nie jest to wyjaśnione.
13.04.2021 - 19:02DROPS Design answered:
Witaj Paulino, 2 pierwsze i 2 ostatnie oczka w rzędzie są zawsze przerabiane na prawo (ścieg francuski). 3-cie oczko od brzegów jest przerabiane na lewo na prawej stronie robótki, a na prawo na lewej stronie robótki. Pozdrawiamy!
14.04.2021 - 12:54
![]() Ann-Helen wrote:
Ann-Helen wrote:
Prøver meg på pannebånd og har strikket 1 diagram ferdig. Er det feil i oppskrifta eller skal man legge opp kun 26 masker. Synes det høres veldig lite ut. Det rekker ikke rundt håndledd engang når man får sydd endene sammen.
11.02.2021 - 21:32DROPS Design answered:
Hej Ann-Helen, du strikker pandebåndet over de 26 masker og fortsætter frem og tilbage til det når rundt om hovedet :)
16.02.2021 - 15:04
![]() Margaret wrote:
Margaret wrote:
When doing the thumb increases for the smaller size of left mitten I found that doing them n each side of the 22nd stitch didn't match the right mitten or the photograph. Should the pattern perhaps read 'on each side of the 20th/22nd stitch' ? Thank you for all the lovely patterns.
17.10.2020 - 16:02
![]() Kathy Pratt wrote:
Kathy Pratt wrote:
Where did the diagram charts go? I was using this pattern yesterday and now I can't find the charts.
12.02.2020 - 01:29DROPS Design answered:
Dear Mrs Pratt, they are back, it's now working normally again, please try again. Happy knitting!
12.02.2020 - 08:14
![]() Laura Hämäläinen wrote:
Laura Hämäläinen wrote:
Kaavioita ei näy. Lapasten koitan tehä mutta kuva kaaviota en löydä.
09.09.2018 - 17:58DROPS Design answered:
Nyt piirrokset aukeavat.
11.09.2018 - 14:19
![]() BERENGUER wrote:
BERENGUER wrote:
Vos explications sont géniales... et astucieuses. Un vrai guide pour toute tricoteuse ! Merci à vous pour ce travail. Cordialement - Lucie
23.08.2017 - 09:49
![]() OLIVON wrote:
OLIVON wrote:
Kit premier frimas à tricoter impérativement.
01.07.2017 - 16:39
|
||||||||||||||||||||||
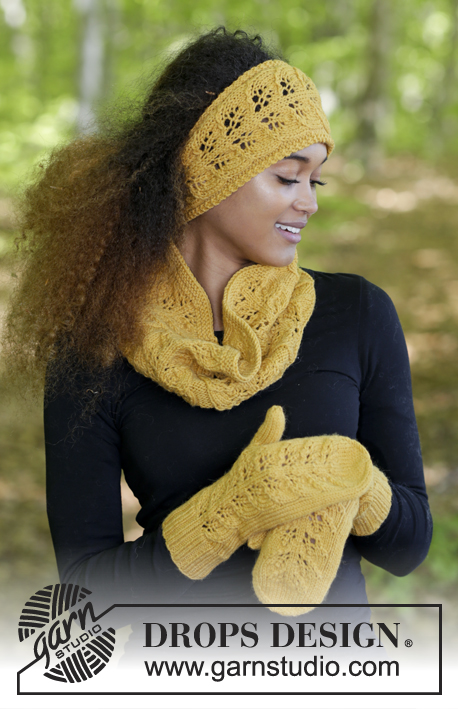
Goldenrod#goldenrodset |
||||||||||||||||||||||
 |
 |
|||||||||||||||||||||
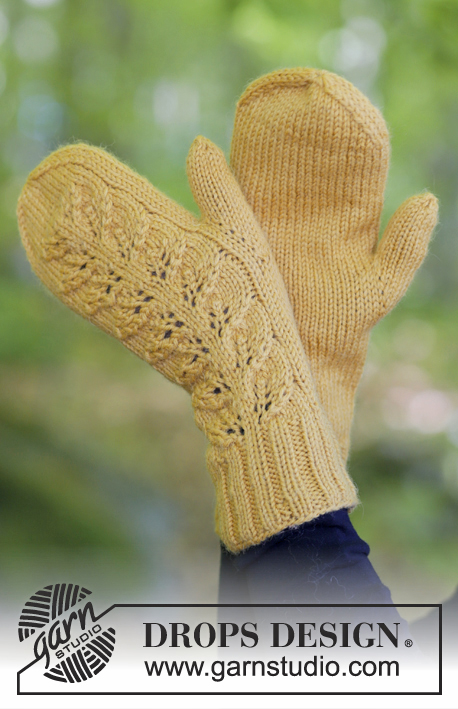
The set consists of: Knitted head band, neck warmer and mittens with leaf pattern. Sizes S - XXXL. The set is worked in DROPS Lima.
DROPS 180-19 |
||||||||||||||||||||||
|
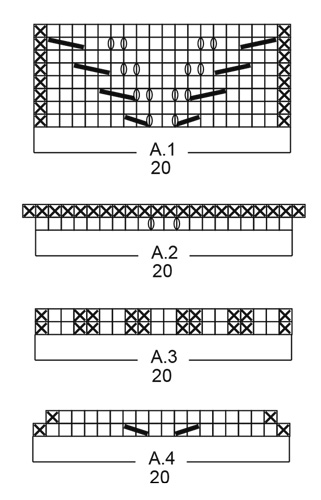
INFORMATION FOR THE PATTERN: RIDGE/GARTER STITCH (worked back and forth – for head band): 1 ridge = Knit 2 rows. RIDGE/GARTER STITCH (worked in the round – for neck warmer): 1 ridge = 2 rounds. Knit 1 round and purl 1 round. PATTERN: Head band: See diagram A.1. Neck warmer: See diagrams A.1 and A.2. Mittens: See diagrams A.1, A.3 and A.4. The diagrams show all the rows in the pattern seen from the right side. INCREASE TIP (for mittens): Increase by making 1 yarn over, on the next round knit the yarn overs twisted to prevent holes. DECREASE TIP (for mittens): Decrease as follows (start 3 stitches before the marker thread): Knit 2 together, knit 2 (the marker thread sits in between these 2 stitches), slip 1 stitch as if to knit, knit 1, pass the slipped stitch over the knitted stitch. ---------------------------------------------------------- HEAD BAND: The piece is worked back and forth on the needle and sewn together to finish. Cast on 26 stitches with needle size 4 mm and Lima. Work 1 RIDGE – see description above, then work as follows – from the right side: 2 stitches garter stitch, purl 1, A.1 (= 20 stitches), purl 1, 2 stitches garter stitch. REMEMBER THE KNITTING TENSION! Continue this pattern until the piece measures 48-50 cm, work 1 ridge and cast off. Sew the cast-on and cast-off edges together. ---------------------------------------------------------- NECK WARMER: The piece is worked in the round with circular needle. Cast on 132-154 stitches with circular needle size 4 mm and Lima. Work 2 RIDGES – see description above, then work as follows: * A.1 (= 20 stitches), purl 2 *, work from *-* to the end of round (= 6-7 repeats of A.1 in width). REMEMBER THE KNITTING TENSION! Continue the pattern until the piece measures 18-20 cm. Work A.2 over A.1, the purl 2 stitches are continued as before = 144-168 stitches. Work 2 ridges over all stitches, then cast off with knit. ---------------------------------------------------------- RIGHT MITTEN: Cast on 46-50 stitches with double pointed needles size 3 mm and Lima and knit 1 round. Then work as follows: * Purl 2, knit 2 *, work from *-* over the next 24-28 stitches, work A.3 (= 20 stitches), knit 2. Work in this way until the rib measures 6 cm. Change to double pointed needles size 3.5 mm. The next round is worked as follows: Work 24-28 stitches stocking stitch and decrease 2 stitches evenly over these stitches, A.1 (= 20 stitches) and 2 stitches stocking stitch = 44-48 stitches. Continue the pattern in this way. REMEMBER THE KNITTING TENSION! When the piece measures 13-14 cm increase 1 stitch on each side of the first stitch on the round for thumb – READ INCREASE TIP! Increase on each side of the increased stitches every 2nd round a total of 5-6 times = 54-60 stitches. Now place the 11-13 thumb stitches on 1 thread. Continue in the round as before, AT THE SAME TIME as you cast on 1 new stitch at the back of the thumb on the next round = 44-48 stitches. When the mitten measures approx. 23-25 cm (you can try the mitten on if necessary, there is 4cm left before finished length), work A.4 over A.1 = 42-46 stitches. Continue with stocking stitch over the stitches in A.4. Insert 1 marker thread at the start of the round and 1 marker thread after 21-23 stitches. Now decrease 1 stitch on each side of both marker threads – READ DECREASE TIP. Repeat the decreases every 2nd round, 3 more times and then every round a total of 3 times = 14-18 stitches. Cut the strand, pull it through the remaining stitches, tighten and fasten well. The mitten measures approx. 27-29 cm. THUMB: Place the 11-13 thumb stitches back on double pointed needles size 3.5 mm. In addition, knit up 4 stitches behind the thumb = 15-17 stitches. Work stocking stitch in the round until the thumb measures 4½-5 cm (you can try the mitten on if necessary, there is now approx. ½ cm to finished length). Knit all stitches together 2 and 2 on the next 2 rounds = 4-5 stitches. Cut the strand, pull it through the remaining stitches, tighten and fasten well. LEFT MITTEN: Cast on and work as for right mitten, but increase for thumb on each side of the 22nd-24th stitch on the round. |
||||||||||||||||||||||
Diagram explanations |
||||||||||||||||||||||
|
||||||||||||||||||||||
 |
||||||||||||||||||||||
Have you finished this pattern?Tag your pictures with #dropspattern #goldenrodset or submit them to the #dropsfan gallery. Do you need help with this pattern?You'll find 30 tutorial videos, a Comments/Questions area and more by visiting the pattern on garnstudio.com. © 1982-2026 DROPS Design A/S. We reserve all rights. This document, including all its sub-sections, has copyrights. Read more about what you can do with our patterns at the bottom of each pattern on our site. |
||||||||||||||||||||||


With over 40 years in knitting and crochet design, DROPS Design offers one of the most extensive collections of free patterns on the internet - translated to 17 languages. As of today we count 325 catalogues and 12298 patterns translated into English (UK/cm).
We work hard to bring you the best knitting and crochet have to offer, inspiration and advice as well as great quality yarns at incredible prices! Would you like to use our patterns for other than personal use? You can read what you are allowed to do in the Copyright text at the bottom of all our patterns. Happy crafting!
Post a comment to pattern DROPS 180-19
We would love to hear what you have to say about this pattern!
If you want to leave a question, please make sure you select the correct category in the form below, to speed up the answering process. Required fields are marked *.