
Popular categories
Looking for a yarn?


Comments / Questions (22)
![]() Karen wrote:
Karen wrote:
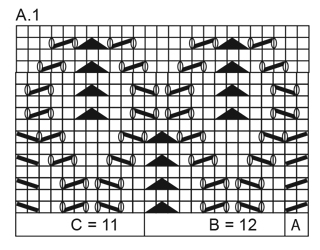
How do I do line 9 of the pattern for My Fairy Booties ? I cannt do B x 2 as the( make a stitch slip 1 stitch knit 1 stitch pass slipped stitch over knit stitch make a stitch )instruction goes across B and C sections of the pattern ?
22.02.2026 - 23:33DROPS Design answered:
Hi Karen, The decreases in line 9 in the diagram are in knitted sections so will not affect the pattern. Regards, Drops Team.
23.02.2026 - 06:43
![]() Mirjam wrote:
Mirjam wrote:
Heb nog steeds niets gehoord, neem aan vanaf middenachter?
06.10.2022 - 12:50
![]() Mirjam Goudswaard wrote:
Mirjam Goudswaard wrote:
Goeden avond, Ik ben nu bij de voet en heb 3.5 cm gebreid en heb 54 st. op de naald staan en nu moet ik gaan minderen maar waar op de naald begin je met :NAALD 1: 3 recht,1 steek recht afhalen, 2 recht samen ...... Hoor graag van jullie. Groetjes Mirjam
28.09.2022 - 21:29
![]() Pia Frensdorf wrote:
Pia Frensdorf wrote:
Starten på sektion A.1.C volder mig problemer. Jeg starter med 11 masker, men ender med 12. Jeg læser diagrammet sektion C således: 2 ret, slå om, 1 maske løs af - strik 1 ret - træk den løse maske over, slå om, 1 ret, slå om, 2 ret sammen, slå om, 2 ret, 1 maske løs af - strik 1 ret og træk den løse maske over. Er det korrekt? Sektion A og B kan jeg godt få til at passe.
23.05.2022 - 18:18DROPS Design answered:
Hej Pia, A.1C tælles sammen med A.1A, det vil sige at når du tæller antal indtagninger i diagrammet, så stemmer det med at du har samme antal omslag efter hver omgang. God fornøjelse!
25.05.2022 - 13:18
![]() Berbett wrote:
Berbett wrote:
Encore merci ! malgré tout je comptabilise toujours encore 2 m en trop à le fin du rang endroit en décalant les marqueurs. Je dois faire une erreur que je ne parviens pas à comprendre. Bien cordialement. Berbett
08.03.2022 - 11:55DROPS Design answered:
Bonjour Mme Berbett, essayons autrement: 2 m ens à l'end (= A); 2m end, 1 jeté, 1 dim, 1 jeté, 1 m end, 1 jeté, 1 dim, 1 jeté, 2 m end, 1 double diminution (= 12m = B x 2), 2 m end, 1 jeté, 1 dim, 1 jeté, 1 m end, 1 jeté, 1 dim, 2 m end, 1 dim (= 11 m = C); au tour suivant, placez vos marqueurs: après 2 m (A), après 12 m (B) x 2; il reste 11 m (C). Bon tricot!
08.03.2022 - 21:52
![]() Berbett wrote:
Berbett wrote:
Bonjour ! désolée se devoir revenir vers vous... j'ai bien compris votre réponse en décalant le marqueur de A. Mais en continuant j'ai à nouveau 13m dans le 2eim B (au lieu de 12) et 12 m dans C (au lieu de 11). Si je décale les marqueurs j'aurai 2 m en trop à la fin du rang. En tout cas un grand merci à vous pour votre patience.
08.03.2022 - 09:08DROPS Design answered:
Bonjour Mme Berbett, la 1ère maille de B est attribuée à A = vous tricotez le 1er B sur 12 mailles (la 1ère maille du 2ème B est attribuée au 1er B), vous tricotez le 2ème B sur 12 mailles, la dernière maille du 2ème B sera la dernière maille de C = vous tricotez C sur 11 mailles, vous avez bien 2 + 12 + 12 + 11 = 37 mailles. Bon tricot!
08.03.2022 - 11:24
![]() Berbett wrote:
Berbett wrote:
Bonjour, Merci pour votre rapide réponse mais je comprends pas les réponses. Je pose bien les marqueurs lorsque j'ai les 37m. Ex pour A : 2 m. entre les 2marqueurs puis je diminue à la 1ere ligne du diagramme il n'en reste qu'1. Puis tour en m. endroit, 3eim ligne comment diminuer alors qu'il n'en reste qu'1 ? En B 12m. : 2m, 1 j, 2m ens., 1 j, 1 m, 1j, 2 m ens., 1 j, 2 m, 1 m glissée 2 m ens. et glissée les tricotées ens. égal 13 m (1 de trop) ? Bien cordialement. Berbett
07.03.2022 - 13:00DROPS Design answered:
Bonjour Mme Berbett, la diminution de A va être compensée par le 1er jeté de B = autrement dit, quand vous tricotez A, tricotez: 2 m ens, 1 m end, placez votre marqueur = 2 m et continuez ainsi; vous devez avoir 12 m pour chaque B et 11 m pour C; ainsi votre nombre de mailles sera toujours juste. Dans vos 13 m de B, la 1ère de ces 13 m doit être la 2ème m de A. Bon tricot!
07.03.2022 - 20:07
![]() Berbett wrote:
Berbett wrote:
Bonjour, Je ne comprends pas le diagramme. Je débute avec 37 m et à la fin de la 1 ère ligne j'en ai 39. A = 2 m ens. comment tricoter à nouveau 2 m ens. alors qu'il n'en reste plus qu'1, 2 lignes plus haut. B=12m. j'en ai 13m à la fin idem C=11 j'en obtiens 12. Merci pour votre aide.
05.03.2022 - 22:25DROPS Design answered:
Bonjour Berbett, pensez à bien faire attention au nombre de mailles pour chaque diagramme, car les mailles vont être attribuées à l'un ou l'autre diagramme, par ex; A. doit être toujours sur 2 mailles, B sur 12 et C sur 11 m. Mettez bien un marqueur après chaque rapport de sorte que vous pouvez bien contrôler votre nombre de mailles, le nombre de diminutions doit correspondre à celui des jetés (12 diminutions au total (avec 2 x B) et 12 jetés). Bon tricot!
07.03.2022 - 09:55
![]() Noomi Thomsen wrote:
Noomi Thomsen wrote:
D.v.s. Det er kun A.1B (=12m) som skal strikkes to gange 👍🙂
07.06.2021 - 00:03
![]() Noomi Thomsen wrote:
Noomi Thomsen wrote:
Der står at diagrammet er over 37 masker, men tæller vi masker i diagrammet, så er det over 39 masker ?
06.06.2021 - 22:42
|
||||||||||||||||
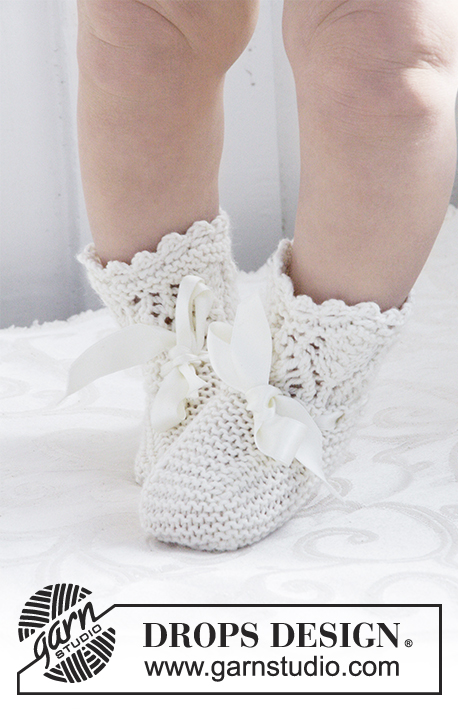
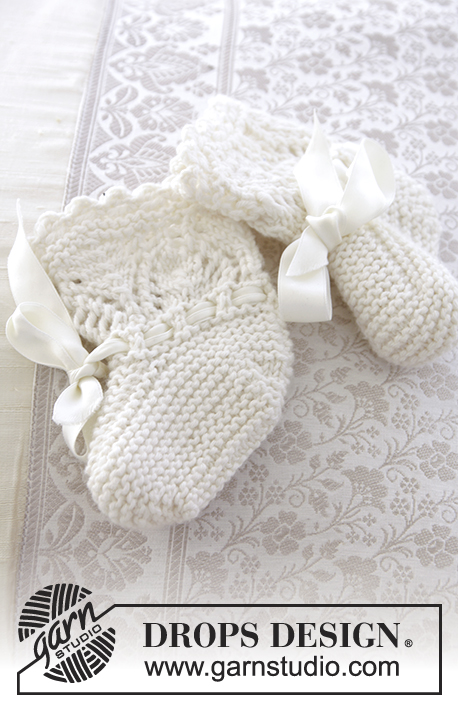
My Fairy Booties#myfairybootiessocks |
||||||||||||||||
 |
 |
|||||||||||||||
Knitted baby socks with lace pattern for Christening or special occasions in DROPS Cotton Merino. Sizes 15 -23.
DROPS Baby 29-2 |
||||||||||||||||
|
RIDGE/GARTER STITCH (worked in the round): 1 ridge = 2 rounds. Knit 1 round and purl 1 round. RIDGE/GARTER STITCH (worked back and forth): 1 ridge = knit 2 rows. PATTERN: See diagram A.1. ---------------------------------------------------------- SOCK: The piece is worked in the round with double pointed needles, top down. Cast on 42 stitches for all sizes with double pointed needles size 3 mm and Cotton Merino. Work 2 RIDGES – see description above. Knit 1 round where you decrease 5 stitches evenly along the round in all sizes = 37 stitches. The next round is worked as follows: Work pattern according to diagram A.1A (= 2 stitches), A.1B (= 12 stitches) a total of 2 times in all sizes and finish with A.1C (= 11 stitches). Continue the pattern in this way. REMEMBER THE KNITTING TENSION! When A.1 has been completed 1-1-1-2 times in height knit 1 round where you decrease 5-5-1-1 stitches evenly along the round = 32-32-36-36 stitches. Purl 1 round and knit 1 round. The next round is worked as follows: * Knit 2 together, 1 yarn over *, repeat from *-* the whole round (= edge of holes for the silk ribbon). Knit 1 round and purl 1 round. Then knit 1 round where you decrease 2-0-2-0 stitches evenly along the round = 30-32-34-36 stitches. Cut the strand. FOOT: Place the first 11-12-12-13 stitches at the beginning of the round and the last 11-12-12-13 stitches at the end of the round on a thread = 8-8-10-10 stitches left on the needle (= mid top of foot). Work 10-10-12-14 ridges back and forth over these stitches (= 20-20-24-28 rows and approx. 4-4-5-6 cm of garter stitch). Cut the strand. The next round is worked as follows (from the right side): Knit the 11-12-12-13 stitches from the thread at the beginning of the round, knit up 1 stitch in each ridge along the side of the mid piece (= 10-10-12-14 stitches), knit the 8-8-10-10 stitches at the front of the foot, knit up 1 stitch in each ridge along the other side of the mid piece (= 10-10-12-14 stitches) and knit the 11-12-12-13 stitches from the thread at the end of the round = 50-52-58-64 m. Purl 1 round. Insert 1 marker on each side of the middle 8-8-10-10 stitches at the front. Continue working garter stitch in the round AT THE SAME TIME as you increase on the first round 1 stitch in each side, on the inside of the 2 markers so that there are 10-10-12-12 stitches on the mid piece = 52-54-60-66 stitches. When you have worked 3-3½-4-5 cm from the markers in front (finish after a round with purl), work as follows: ROUND 1: Knit 3, slip 1 stitch as if to knit, knit 2 together, pass the slipped stitch over, knit 14-15-17-20 stitches, knit 3 together, knit 6-6-8-8, slip 1 stitch as if to knit, knit 2 together, pass the slipped stitch over, knit until there are 6 stitches left on the round, knit 3 together and finish with knit 3 (= 8 stitches decreased 44-46-52-58 stitches on the needle). ROUND 2: Purl. ROUND 3: Knit 2, slip 1 stitch as if to knit, knit 2 together, pass the slipped stitch over, knit 12-13-15-18 stitches, knit 3 together, knit 4-4-6-6, slip 1 stitch as if to knit, knit 2 together, pass the slipped stitch over, knit until there are 5 stitches left on the round, knit 3 together and finish with knit 2 (= 8 stitches decreased and 36-38-44-50 stitches on the round). ROUND 4: Purl. ROUND 5: Knit 1, slip 1 stitch as if to knit, knit 2 together, pass the slipped stitch over, knit 10-11-13-16 stitches, knit 3 together, knit 2-2-4-4, slip 1 stitch as if to knit, knit 2 together, pass the slipped stitch over, knit until there are 4 stitches left on the round, knit 3 together and finish with knit 1 (= 8 stitches decreased and 28-30-36-42 stitches on the round). ROUND 6: Purl. Stop here for Sizes 15/17 + 18/19. SIZES 20/21 + 22/23: ROUND 7: Slip 1 stitch as if to knit, knit 2 together, pass the slipped stitch over, knit 11-14 stitches, knit 3 together, knit 2-2, slip 1 stitch as if to knit, knit 2 together, pass the slipped stitch over, knit until there are 3 stitches left on the round, knit 3 together (= 8 stitches decreased and 28-34 stitches on the round). ROUND 8: Purl. ALL SIZES: Work 1 ridge over all stitches. ASSEMBLY: Divide the stitches onto 2 needles with the same number on each needle (= mid under the foot). Lay the piece double and sew together lengthwise with grafting stitches – sew one stitch in each stitch. Work another sock in the same way. PICOT EDGE: Work a picot edge around the top of one of the socks. Start mid back and crochet with hook size 3 mm as follows: 1 double crochet in the first stitch, * 3 chain stitches, 1 treble crochet in the first chain stitch worked, skip 2 stitches on the sock, 1 double crochet in the next stitch*, repeat from *-* the whole round but finish with 1 slip stitch in the double crochet at the beginning of the round (instead of 1 double crochet in next stitch). Cut and fasten the strands. Work a similar edge around the other sock. SILK RIBBON: Cut the silk ribbon into two equal lengths. Start mid front on one of the socks and thread the ribbon up and down through the row of holes. Tie a bow mid front. Do the same on the other sock. |
||||||||||||||||
Diagram explanations |
||||||||||||||||
|
||||||||||||||||
 |
||||||||||||||||
Have you finished this pattern?Tag your pictures with #dropspattern #myfairybootiessocks or submit them to the #dropsfan gallery. Do you need help with this pattern?You'll find 27 tutorial videos, a Comments/Questions area and more by visiting the pattern on garnstudio.com. © 1982-2026 DROPS Design A/S. We reserve all rights. This document, including all its sub-sections, has copyrights. Read more about what you can do with our patterns at the bottom of each pattern on our site. |
||||||||||||||||


With over 40 years in knitting and crochet design, DROPS Design offers one of the most extensive collections of free patterns on the internet - translated to 17 languages. As of today we count 325 catalogues and 12298 patterns translated into English (UK/cm).
We work hard to bring you the best knitting and crochet have to offer, inspiration and advice as well as great quality yarns at incredible prices! Would you like to use our patterns for other than personal use? You can read what you are allowed to do in the Copyright text at the bottom of all our patterns. Happy crafting!
Post a comment to pattern DROPS Baby 29-2
We would love to hear what you have to say about this pattern!
If you want to leave a question, please make sure you select the correct category in the form below, to speed up the answering process. Required fields are marked *.