
Popular categories
Looking for a yarn?


Comments / Questions (85)
![]() Terri wrote:
Terri wrote:
Hello! This is beautiful, but I can't find a size chart stating the measurements for each size. EX: What chest sizes do S,M,L, XL, XXL and XXXL fit fit, or how big does each size measure when finished? Or is there a size chart on line that applies to all of your patterns? Thank you.
18.02.2017 - 23:39DROPS Design answered:
Dear Terri, you will find at the bottom of the page a measurement chart with all measurements in cm for each size, taken flat from side to side. Compare these to a similar garment you have and like the shape to find out the matching size. Read more here. Happy knitting!
20.02.2017 - 10:11
![]() Elena Crema wrote:
Elena Crema wrote:
Scusate, intendevo dire che dopo la diminuzione di 10 m per parte mi rimangono 202 maglie sul ferro.
05.12.2016 - 13:38DROPS Design answered:
Buongiorno Elena. Diminuisce 10 m per parte (quindi 20 m), ma nel corso degli ultimi due giri dei diagrammi A.1 – A.3 diminuisce in tutto altre 30 m (15 m sul davanti e 15 m sul dietro). Complessivamente, sul giro vengono diminuite 50 m. Quindi 222 m – 50 m = 172 m. Buon lavoro!
05.12.2016 - 14:21
![]() Elena Crema wrote:
Elena Crema wrote:
Buongiorno, ho un problema con le diminuzioni dopo gli 8 cm. Spiegazione: "Lavorare ora gli ultimi 2 giri dei diagrammi e allo stesso tempo diminuite 10 m sulle 30 lavorate a coste da ciascun lato", devo diminuire 20 maglie, è corretto? Ma sulle spieg. rimangono sui ferri 172 m. Io ho la tg S con 222 m, se diminuisco 10 m per parte, me ne rimangono 220. Potreste per cortesia spiegarmi, perchè sicuramente non ho capito bene questo passaggio. Grazie mille. Elena Crema
05.12.2016 - 13:36DROPS Design answered:
Buongiorno Elena. Deve diminuire le 20 m (10 m sulle coste da ciascun lato), ma ci sono delle diminuzioni anche nelle ultime due righe dei diagrammi. Con queste diminuzioni il numero delle m le risulta corretto. Buon lavoro!
05.12.2016 - 14:16
![]() Diane wrote:
Diane wrote:
Klopt de afkanting bij schouder? Voorpand 20 steken over, achterpand 22 over.
04.12.2016 - 13:30DROPS Design answered:
Hoi Diane. Nee, dat is een typefout in het patroon. Ik zal het aanpassen. Bedankt voor het opletten.
05.12.2016 - 14:40
![]() Cathy wrote:
Cathy wrote:
Bonsoir, Les modèles indiqués (notamment pour ce gros pull) taillent-ils plutôt grand (genre tailles Burda), plutôt petit (genre tailles vêtements asiatiques) ou moyen? J'hésite en effet entre la taille L ou XL pour une taille 42, sachant que ce n'est pas un vêtement près du corps. Merci pour vos réponses
25.11.2016 - 23:03DROPS Design answered:
Bonjour Cathy, vous trouverez en bas de chaque modèle un schéma avec toutes les mesures pour chaque taille - comparez ces mesures à un vêtement dont vous aimez la forme pour trouver la taille à suivre. Plus d'infos ici. Bon tricot!
28.11.2016 - 09:01
![]() Summer wrote:
Summer wrote:
Hallo, dit patroon is zeer onduidelijk. Waarom niet eerst een boordsteek breien en dan pas beginnen aan het telpatroon van de kabels. Verder is mij niet duidelijk wat men bedoelt bij het zwarte blokje: geen steek,sla dit vierkant over.
17.11.2016 - 20:17DROPS Design answered:
Hoi Summer. Wij hebben gekozen om de boordsteek in de telpatronen in te gaan (lees patroon en ook eerdere opmerkingen). En geen steek is dus geen steek. Je hebt 2 st samengebreid in de vorige nld en daarom komt er 1 steek minder - bijvoorbeeld A.1 heb je 10 st per herhaling, na de derde nld heb je 8 st over.
18.11.2016 - 12:22
![]() PEYRAN Hélène wrote:
PEYRAN Hélène wrote:
OK Je commence à comprendre ... pas facile quand même !!
17.11.2016 - 18:24
![]() PEYRAN Hélène wrote:
PEYRAN Hélène wrote:
Bonjour, Comme Mme Joly, je ne comprends pas le début du pull (dos/devant), vous ne parlez pas des côtes ... Vos explications ne correspondent pas à la photo si on doit démarrer directement avec les diagrammes.
17.11.2016 - 17:25DROPS Design answered:
Bonjour Mme Peyran, dès le début, on tricote en côtes (en commençant par 1 m env) 2/2 et en suivant les diagrammes en même temps sur les mailles indiquées, soit A.1, A.2 et A.3, on termine par des côtes (et par 1 m env). Bon tricot !
18.11.2016 - 12:55
![]() Sabrina wrote:
Sabrina wrote:
Ciao Drops, ti ringrazio ancora per le precedenti suggerimenti e soprattutto per l vostra disponibilità e tempestività. Avrei bisogno di un'altra delucidazione. Le diminuzioni di 1 m da ciascun lato delle sezioni lavorate a maglia rasata si intende la prima e l'ultima sezione ( il primo gruppo di 16 m e l'ultimo gruppo di un ferro)? Grazie
09.11.2016 - 10:49DROPS Design answered:
Buongiorno Sabrina. Se guarda tutto il giro, ai lati ha 32 m lavorate a m rasata (nella spiegazioni sono due gruppi di 16 m). Deve diminuire all’inizio e alla fine di queste 32 m. Quindi, seguendo le indicazioni: diminuisce alla fine delle prime 16 m a dir, all’inizio delle successive 16 m a dir, alla fine delle successive 16 m a dir, all’inizio delle ultime 16 m a dir (in tutto, su queste m a dir deve aver diminuito 4 m). Buon lavoro!
09.11.2016 - 11:17
![]() Annette Aagaard wrote:
Annette Aagaard wrote:
Når jeg kigger på billedet så er der strikket rib. Syntes ikke det fremgår af opskriften er der rib som jeg syntes at kunne se?
01.11.2016 - 09:05DROPS Design answered:
Hej Annette. Du starter med A.1 til A.3 og gentager de förste to pinde til 8 cm = rib.
01.11.2016 - 09:43
|
||||||||||||||||||||||||||||
Snow Tracks#snowtrackssweater |
||||||||||||||||||||||||||||
 |
 |
|||||||||||||||||||||||||||
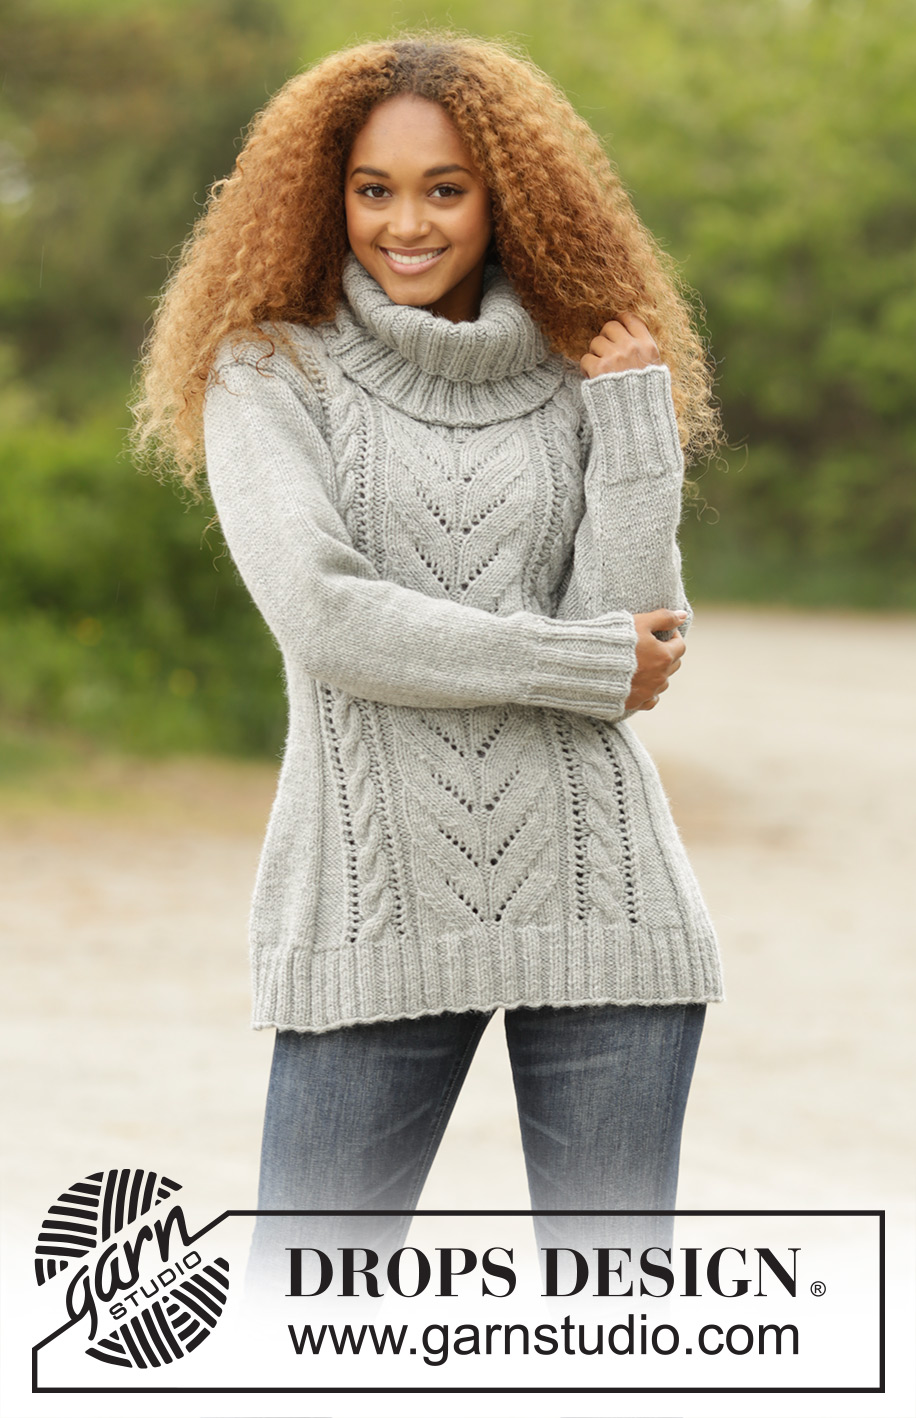
Knitted DROPS jumper with cables and detachable collar in ”Nepal”. Size: S - XXXL.
DROPS 171-20 |
||||||||||||||||||||||||||||
|
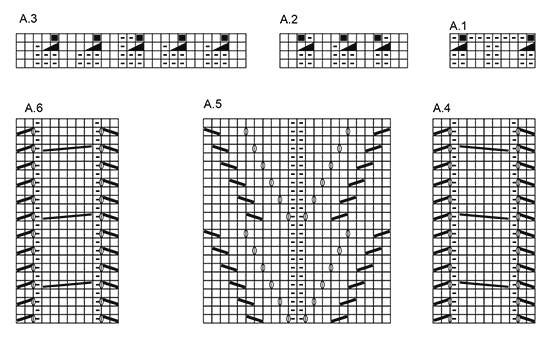
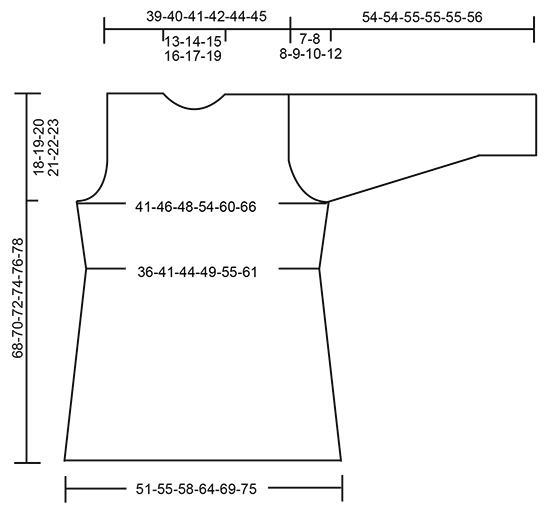
PATTERN: See diagrams A.1 to A.6. DECREASE TIP: Dec 1 st in each side of section in stocking st as follows: K 1, slip next st as if to K, K 1, psso, work until 3 sts remain, K 2 tog, K 1. INCREASE TIP: Inc with 1 YO inside first and last st in stocking st, work the inc sts twisted on next round to avoid holes. GARTER ST (worked in the round): 1 ridge = 2 rounds. * K 1 round and P 1 round *, repeat from *-*. ---------------------------------------------------------- JUMPER: Worked in the round on circular needle. BODY: Cast on 222-238-254-286-302-318 sts on circular needle size 4.5 mm with Nepal. K 1 round, then work as follows: * P 1, rib K 2/P 2 over the first 12-16-20-28-32-36 sts, K 2, A.1 (= 10 sts) A.2 (= 15 sts), P 2, A.3 (= 27 sts), P 2, A.2, A.1, K 2, rib P 2/K 2 over the next 12-16-20-28-32-36 sts, P 1 *, repeat from *-* 1 more time. REMEMBER THE KNITTING TENSION Repeat the first 2 rounds in A.1 - A.3 until piece measures 8 cm, then work the last 2 rounds in A.1 - A.3, AT THE SAME TIME dec 10-10-14-20-18-16 sts evenly over the 30-38-46-62-70-78 sts rib in each side = 172-188-196-216-236-256 sts. Switch to circular needle size 5 mm. Then work as follows: * K 10-14-16-21-26-31, P 8, A.4 (= 12 sts), P 2, A.5 (= 22 sts), P 2, A.6 (= 12 m), P 8, K 10-14-16-21-26-31 *, repeat from *-* 1 more time. When piece measures 10 cm, dec 1 st in every P section with P 8 and dec 1 st in each side of section in stocking st - READ DECREASE TIP (= 8 sts dec), dec the same way every 4 cm, 6 times in total, dec alternately on right and left side of P sections = 124-140-148-168-188-208 sts. When piece measures 34 cm, inc 1 st in every P section with a dec, and 1 st in every section in stocking st (= 8 sts inc) - READ INCREASE TIP, repeat inc when piece measures 46-47-48-49-50-51 cm = 140-156-164-184-204-224 sts. When piece measures 50-51-52-53-54-55 cm, work as follows from RS: Cast off the first 2-3-3-3-3-3 sts, work the next 66-72-76-86-96-106 sts as before, cast off the next 4-6-6-6-6-6 sts, work the next 66-72-76-86-96-106 sts as before and cast off the last 2-3-3-3-3-3 sts. Each part is worked separately back and forth on circular needle. BACK PIECE: = 66-72-76-86-96-106 sts. Continue pattern as before, AT THE SAME TIME continue to cast off in each side for armholes on every other row: Cast off 2 sts 0-1-1-2-3-4 times and 1 st 0-0-1-3-5-7 times = 66-68-70-72-74-76 sts. Continue the pattern as before. When piece measures 66-68-70-72-74-76 cm, cast off the middle 24-26-28-30-32-34 sts for neck and finish each shoulder separately. On next row cast off 1 st towards the neck = 20 sts remain on each shoulder. Cast off when piece measures 68-70-72-74-76-78 cm. FRONT PIECE: = 66-72-76-86-96-106 sts. Continue pattern as before and cast off for armholes as on back piece = 66-68-70-72-74-76 sts. Continue the pattern like this. When piece measures 60-62-64-66-68-70 cm, slip the middle 18-20-22-24-26-28 sts on a stitch holder for neck and finish each shoulder separately. Then cast off on every row towards neck, 2 sts 1 time, 1 st 2 times = 20 sts remain on shoulder. Work sts that do not fit the pattern in stocking st. Cast off when piece measures 68-70-72-74-76-78 cm. SLEEVE: Worked in the round on double pointed needles. Cast on 45-45-50-50-50-50 sts on double pointed needles size 4.5 mm with Nepal. K 1 round, then work rib = K 2/P 3. When rib measures 10 cm, K 1 round while dec 11-9-12-10-10-8 sts evenly = 34-36-38-40-40-42 sts. Switch to double pointed needles size 5 mm and continue in stocking st. Insert 1 marker at the beg of round. When piece measures 11 cm, inc 1 st on each side of marker, inc every 4-3½-3-2½-2-1½ cm a total of 9-10-11-13-15-17 times = 52-56-60-66-70-76 sts. When piece measures 47-47-47-46-45-44 cm (NOTE! Shorter measurements in the larger sizes because of broader shoulders), cast off 6 sts mid under sleeve (= 3 sts on each side of marker), now finish piece back and forth on needle. Cast off for sleeve cap at beg of every row in each side as follows: 2 sts 3 times and 1 st 0-1-1-2-3-5 times, cast off 2 sts in each side of piece until piece measures 53-53-54-54-54-55 cm, cast off 3 sts in each side and cast off the remaining sts. Piece measures 54-54-55-55-55-56 cm in total. NECK EDGE: Pick up approx. 64 to 86 sts around the neck (incl sts on stitch holder) on a short circular needle size 5 mm with Nepal. Work 2 ridges in GARTER ST – see explanation above, then cast off. DETACHABLE COLLAR: Cast on 108 sts on a short circular needle size 4.5 mm with grey. K 1 round, then work rib = K 2/P 2. Work rib for 25 cm, then cast off with K over K and P over P. ASSEMBLY: Sew shoulder seams and sew in sleeves. |
||||||||||||||||||||||||||||
Diagram explanations |
||||||||||||||||||||||||||||
|
||||||||||||||||||||||||||||
 |
||||||||||||||||||||||||||||
 |
||||||||||||||||||||||||||||
Have you finished this pattern?Tag your pictures with #dropspattern #snowtrackssweater or submit them to the #dropsfan gallery. Do you need help with this pattern?You'll find 27 tutorial videos, a Comments/Questions area and more by visiting the pattern on garnstudio.com. © 1982-2026 DROPS Design A/S. We reserve all rights. This document, including all its sub-sections, has copyrights. Read more about what you can do with our patterns at the bottom of each pattern on our site. |
||||||||||||||||||||||||||||


With over 40 years in knitting and crochet design, DROPS Design offers one of the most extensive collections of free patterns on the internet - translated to 17 languages. As of today we count 324 catalogues and 12290 patterns translated into English (UK/cm).
We work hard to bring you the best knitting and crochet have to offer, inspiration and advice as well as great quality yarns at incredible prices! Would you like to use our patterns for other than personal use? You can read what you are allowed to do in the Copyright text at the bottom of all our patterns. Happy crafting!
Post a comment to pattern DROPS 171-20
We would love to hear what you have to say about this pattern!
If you want to leave a question, please make sure you select the correct category in the form below, to speed up the answering process. Required fields are marked *.