
Popular categories
Looking for a yarn?


Comments / Questions (183)
![]() Pinceau à Bille wrote:
Pinceau à Bille wrote:
Une fois le short terminé, les augmentations de côté ne donnent pas le même dessin, marqueur après le 7ème, 8ème et 9ème dessin d'un côté et 21ème, 24ème et 27ème dessin !!! Le tombé du short est meilleur du côté où les augmentations sont faites après le 21ème, 24ème et 27ème dessin.
05.08.2018 - 15:06DROPS Design answered:
Bonjour Pinceau à Bille, on augmente 4 brides seulement à chaque tour d'augmentations: 1 bride avant et 1 bride après chacun des 2 marqueurs (1ère taille: les marqueurs sont dans la 3ème bride après le 7ème A.1 et dans la 3ème bride après le 21ème A.1). Vous augmentez à chaque fois de chaque côté de la bride avec le marqueur pour que les augmentations soient les mêmes. Bon crochet!
06.08.2018 - 10:00
![]() Reix Françoise wrote:
Reix Françoise wrote:
Bonjour, je n\'arrive pas à comprendre le rang pour faire une ré hausse. Puis je être aiguillée. Merci Françoise
03.07.2018 - 13:16DROPS Design answered:
Bonjour Mme Reix, commencez au milieu dos et crochetez en allers et retours le nbe de m. indiqué à chaque rang en comm. chaque rang par 1 mc en début de rg dès le 2ème rg.: Rg1: 11-12-13 ms après le marqueur, Rg2: 1 mc, 21-23-25 ms (= 10-11-12 ms, marqueur, 11-12-13 ms). Rg3: 1 mc, 32-35-38 ms (= 10-11-12 ms, marqueur, 22-24-26 ms). Rg4: 1 mc, 43-47-51 ms (=21-23-25 ms, marqueur, 22-24-26 ms) et ainsi de suite, commencez chaque rang par 1 mc et crochetez 11-12-13 ms en plus à la fin de chaque rang jusqu'à ce que vous ayez crocheté 154-192-208 m, tournez et crochetez jusqu'au milieu dos de nouveau. Bon crochet!
04.07.2018 - 07:40
![]() Solange wrote:
Solange wrote:
Bonjour, j'ai commencé ce short que je trouve magnifique. j'ai dû tout défaire alors que j'avais presque fini car il est vraiment trop grand ! j'ai fait la taille S/M pourtant, dommage.
07.06.2018 - 09:28DROPS Design answered:
Bonjour Solange, pensez à bien vérifier votre échantillon (changez la taille du crochet si besoin) et à bien conserver ensuite la même tension lorsque vous crochetez le short. Vous trouverez toutes les mesures pour chaque taille dans le schéma en bas de page, comparez un vêtement similaire dont vous aimez la forme pour trouver la bonne taille (+ d'infos sur les tailles ici). Bon crochet!
07.06.2018 - 09:47
![]() Jenn wrote:
Jenn wrote:
I would love a complete video tutorial as yarnspirations does. It takes the guesswork out of it all😀 and you can still make it a video to purchase.
19.05.2018 - 19:15
![]() Guwanda Tatum wrote:
Guwanda Tatum wrote:
I'm confused in how to start. So I start with 26 dc or chain to get the waist size I need or do I start with 3 dc and increase???????
13.01.2018 - 12:33DROPS Design answered:
Dear Guwanda, to make this short you start with 224-274-326 chain stitch, and work downwards from there. Then work with double crochets according to the pattern. Happy Crochet!
13.01.2018 - 21:27Carola Winter wrote:
I’m sorry i’m Whitin 15 cm, my question is where to ad stitches if I have the A1 pattern in between. I have A1, 2 dc , marker in dc, 2 dc , A1.... If it says 4 stitches to marker ... do you add them in the 5 dc groups?
01.12.2017 - 17:15DROPS Design answered:
Dear Mrs Winter, marker should be between sts and not in a st. Dec then as explained under INCREASE TIP 1, ie beginning 2 dc before marker mid back, work 2 dc in first of these both dc, 1 dc in each of the next 2 dc (marker is between these 2 dc) and 2 dc in next dc (= 2 dc increased). Inc 4 dc: beginning 4 dc before marker mid back,work 2 dc in first of the 4 dc, 1 dc in next dc, 2 dc in next dc, 1 dc each of the next 2 dc (marker is between these) and 2 dc in next dc, 1 dc in next dc, 2 dc in next dc (= 4 dc increased). Happy crocheting!
04.12.2017 - 09:02Carola wrote:
Beautiful pattern thank you I’m confused in the mid back section, Do yo have to do the increase N 1 and the 4 dc increases simultaneously? Or first the 10 N 1 .
01.12.2017 - 06:30DROPS Design answered:
Dear Carola, you increase in the sides, then when piece measures 15-17-19 cm (see size) inc on mid back continuing the inc on the sides until they are done. Happy crocheting!
01.12.2017 - 09:47
![]() Rossana Comin wrote:
Rossana Comin wrote:
Buongiorno. sto eseguendo questo modello che mi piace moltissimo. non capisco però gli aumenti con i segni: leggo di mettere un segno dopo 8 motivi del diagramma A1 e un altro dopo 24. Macosì facendo mi trovo con un segno appena dietro il fianco e il secondo circa a metà del davanti. Ho sbagliato qualcosa? Grazie
01.08.2017 - 11:55DROPS Design answered:
Buongiorno Rossana. I segni si devono trovare ai lati dei pantaloncini e si aggiungono al segno che ha già al centro sul dietro. Le 8 e le 24 ripetizioni vanno contate dall'inizio del giro; dopo il secondo segno rimangono 7 ripetizioni alla fine del giro (segno al centro sul dietro). Buon lavoro!
01.08.2017 - 13:11
![]() Lellettta wrote:
Lellettta wrote:
Ah ok, ma la spiegazione non è molto chiara! grazie comunque|||
26.07.2017 - 15:24
![]() Lelletta wrote:
Lelletta wrote:
Buonasera! ho lavorato i pantaloncini fin dove si deve ripetere il diagramma 1 fino a che non rimangono 2 maglie basse e 2 alte. Vorrei capire se è giusto lavorare quelle 2 m.b.Esse vengono dopo le 5m.a.Troverei più esatto lavorare il diagramma 1.Grazie in anticipo e buon lavoro!
26.07.2017 - 00:04DROPS Design answered:
Buongiorno Lelletta. Nelle 2 m.b deve lavorare le 2 m.alte (1 m.a in ogni m.b). Buon lavoro!
26.07.2017 - 06:44
|
||||||||||||||||||||||||||||
Elly May#ellymayshorts |
||||||||||||||||||||||||||||
 |
 |
|||||||||||||||||||||||||||
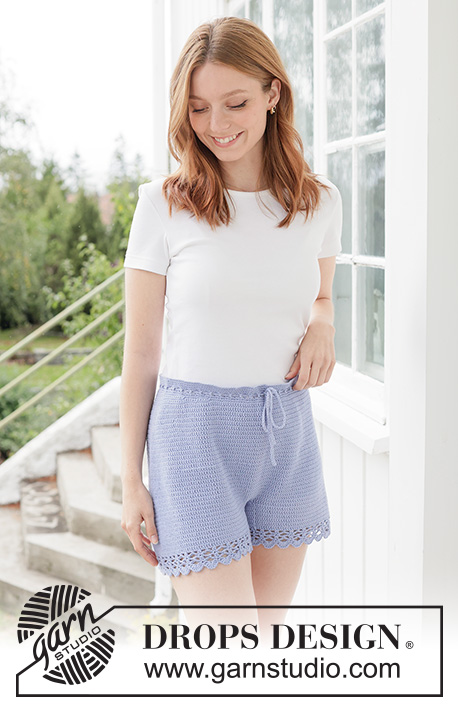
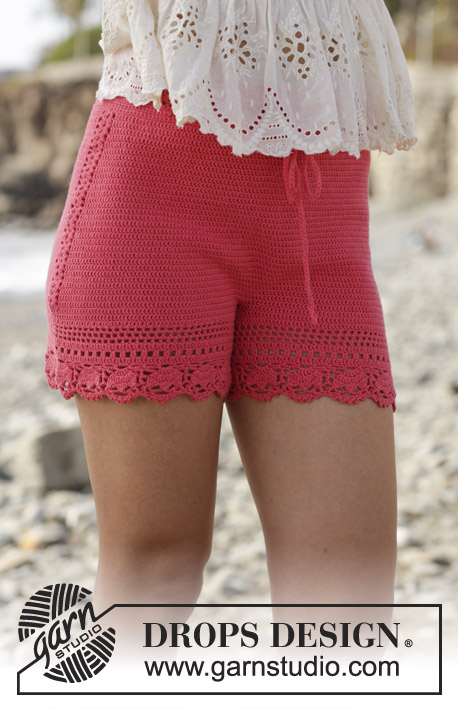
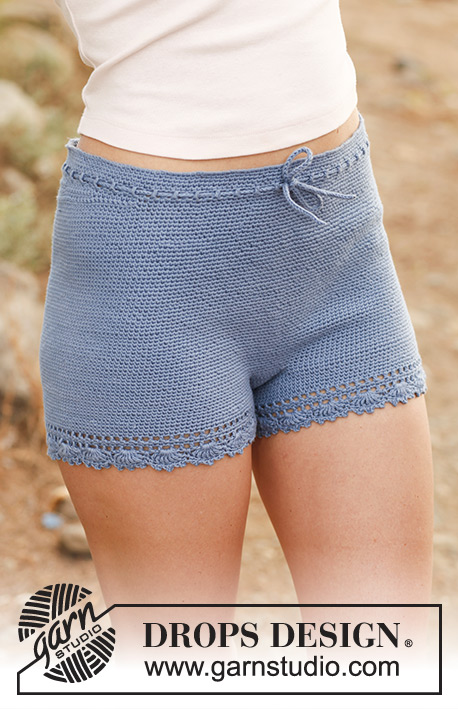
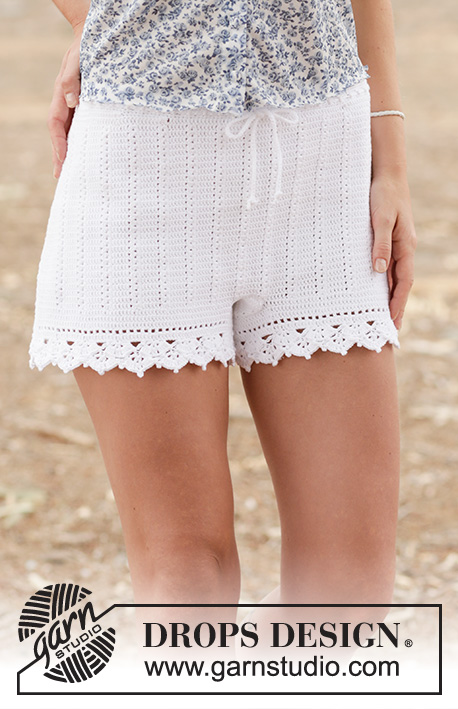
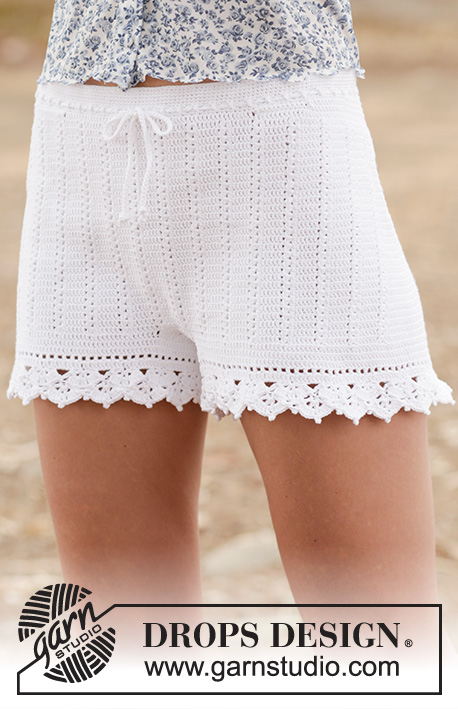
Crochet DROPS shorts with trebles and lace pattern in ”Safran”. Size: S - XXL.
DROPS 162-19 |
||||||||||||||||||||||||||||
|
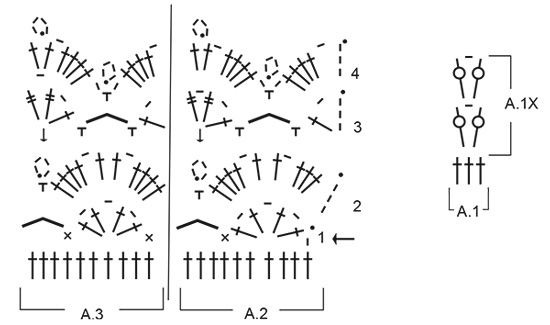
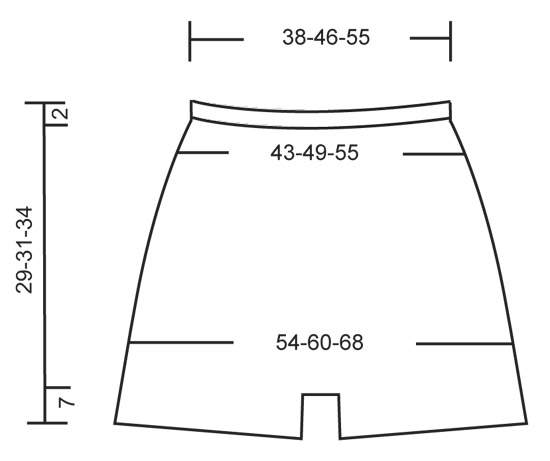
CROCHET INFO: Replace first dc at beg of every dc round with 1 ch. Finish round with 1 sl st in 1st ch at beg of round. Replace first tr at beg of every tr round with 3 ch. Finish round with 1 sl st in 3rd ch at beg of round. PATTERN: See diagrams A.1 to A.3. INCREASE TIP 1: Inc 2 tr mid back as follows: Work until 2 tr remain before marker mid back, work 2 tr in first tr, 1 tr in each of the next 2 tr (marker is between these) and 2 tr in next tr (= 2 tr inc). Inc 4 tr mid back as follows: Work until 4 tr remain before marker mid back, work 2 tr in first tr, 1 tr in next tr, 2 tr in next tr, 1 tr each of the next 2 tr (marker is between these) and 2 tr in next tr, 1 tr in next tr, 2 tr in next tr (= 4 tr inc). INCREASE TIP 2: Work until 1 tr remains before marker in the side, work 2 tr in first tr, 1 tr in next tr (marker is in this tr) and 2 tr in next tr (= 2 tr inc). Repeat the same inc in the other side = 4 sts inc on round. ---------------------------------------------------------- SHORTS: The piece is worked top down. Work 224-274-326 ch on hook size 2,5 mm with Safran and form a ring with 1 sl st in first ch. Insert 1 marker at beg of round = mid back. Work first round as follows: 1 ch, * skip 1 ch, 1 dc in each of the next 7 ch *, repeat from *-* until 0-2-6 ch remain, work 1 dc in each of these ch = 196-240-286 dc. READ CROCHET TIP! Continue working 1 dc in every dc until piece measures 2 cm. REMEMBER THE CROCHET TENSION! Now work an eyelet row as follows: 4 ch, skip 1 dc, * 1 tr in next dc, 1 ch, skip 1 dc *, repeat from *-* the entire round, finish with 1 sl st in 3rd ch from beg of round. On next round work 1 dc in every tr and every ch. Then work the shorts higher in the back as follows: Work 11-12-13 dc past the marker mid back, turn and work 1 sl st in first st, then 1 dc in each of the next 21-23-25 dc, turn and work 1 sl st in first st, then 1 dc in each of the next 32-35-38 sts (sl sts are also worked). Continue like this by working 11-12-13 sts more on every turn until a total of 154-192-208 sts have been worked. Turn again and work until marker mid back. Continue to work 1 round with dc while AT THE SAME TIME inc 28-16-2 dc evenly = 224-256-288 dc. Then work pattern (and insert markers) as follows from mid back: 3 tr, A.1 (= 3 tr), * 5 tr, A.1*, repeat from *-* until 2 tr remain, 2 tr, AT THE SAME TIME insert a marker in each side as follows: Insert a marker in the 3rd tr after 7th-8th-9th repetition A.1, and insert a marker in 3rd tr after 21th-24th-27th repetition with A.1 (i.e. 1 marker in each side). When A.1 has been worked 1 time vertically, continue pattern A.1X - AT THE SAME TIME inc mid back and in the sides as follows: SIDES: Inc on each side of tr with marker, in each side as follows - READ INCREASE TIP 2. Repeat inc every 4th round 7-7-8 times in total = 28-28-32 tr inc. MID BACK: AT THE SAME TIME when piece measures 15-17-19 cm (measured mid front), inc mid back as follows – Read INCREASE TIP-1. Repeat inc with 2 tr mid back every round 10 times in total, and repeat inc with 4 tr every round 2-2-3 times = 28-28-32 tr inc. There are now 280-312-352 tr on round. Now piece measures approx. 22-24-27 cm mid front and 27-29-32 cm mid back. Now divide for legs as follows: Work 1 sl st in each of the first 5-6-6 tr on round, turn and work 1 tr in each of the first 10-12-12 tr (i.e. 5-6-6 sts on each side of marker mid back). These 10-12-12 tr = gusset. Work tr back and forth over these tr. When piece measures 4-5-6 cm, dec 1 tr in each side, repeat dec when piece measures 8-9-10 cm = 6-8-8 tr. Continue with 1 tr in every tr until gusset measures 11-12-13 cm, cut the yarn. Fasten gusset edge to edge to the middle 6-8-8 sts towards mid front. Then work the legs. LEG: Work 1 tr in each of the 132-146-166 tr around one leg (i.e. work 1 tr in every tr in A.1X and 1 tr in ch-space = 3 tr), in addition work 28-31-34 tr along the gusset = 160-177-200 tr. Work 2 rounds with tr AT THE SAME TIME on last round inc 0-3-0 tr evenly by working 2 tr in 1 tr = 160-180-200 tr. Continue to work as follows: ROUND 1: 3 ch (= 1 tr), * 1 ch, skip 1 tr, 1 tr in next tr * , repeat from *-* until 1 tr remains, 1 ch, skip 1 tr, 1 sl st in 3rd ch at beg of round. ROUND 2: 3 ch (= 1 tr), * 1 tr in ch-space, 1 tr in next tr *, repeat from *-* the entire round until 1 ch-space remains, 1 tr in ch-space, finish with 1 sl st in 3rd ch on round. ROUND 3: Now work pattern as follows: Work pattern according to diagram A.2 over the first 10 tr, continue with A.3 the entire round. Finish every round with 1 sl st at beg of round. REMEMBER CROCHET INFO! Continue like this until pattern A.2-A.3 have been worked vertically. Fasten off. Work the other leg the same way. TIES: Work 130-140-150 cm with LOOSE ch, turn and work 1 sl st in every ch. Thread the tie in the row with eyelet holes at the top of shorts – start mid front |
||||||||||||||||||||||||||||
Diagram explanations |
||||||||||||||||||||||||||||
|
||||||||||||||||||||||||||||
 |
||||||||||||||||||||||||||||
 |
||||||||||||||||||||||||||||
Have you finished this pattern?Tag your pictures with #dropspattern #ellymayshorts or submit them to the #dropsfan gallery. Do you need help with this pattern?You'll find 13 tutorial videos, a Comments/Questions area and more by visiting the pattern on garnstudio.com. © 1982-2026 DROPS Design A/S. We reserve all rights. This document, including all its sub-sections, has copyrights. Read more about what you can do with our patterns at the bottom of each pattern on our site. |
||||||||||||||||||||||||||||


With over 40 years in knitting and crochet design, DROPS Design offers one of the most extensive collections of free patterns on the internet - translated to 17 languages. As of today we count 324 catalogues and 12290 patterns translated into English (UK/cm).
We work hard to bring you the best knitting and crochet have to offer, inspiration and advice as well as great quality yarns at incredible prices! Would you like to use our patterns for other than personal use? You can read what you are allowed to do in the Copyright text at the bottom of all our patterns. Happy crafting!
Post a comment to pattern DROPS 162-19
We would love to hear what you have to say about this pattern!
If you want to leave a question, please make sure you select the correct category in the form below, to speed up the answering process. Required fields are marked *.