
Popular categories
Looking for a yarn?


Comments / Questions (183)
![]() Michelle wrote:
Michelle wrote:
Hi im new to these kind of patterns and finding reading them difficult I have tried watching the video for A1 but still not sure what im doing it says tr but it looks like she is doing dc and also is she going in every stitch or missing some out. Many thanks Michelle
27.05.2019 - 20:45DROPS Design answered:
Dear Michelle, make first sure to choose the correct language scrolling down the menu under the picture and choosing UK- or US-English terminology. Happy crocheting!
28.05.2019 - 09:12
![]() Karin wrote:
Karin wrote:
Jag har en fråga, efter nedanstående, ska jag göra ett varv med stolpar innan? Det blir liksom så konstigt att göra nedanstående i fasta maskor!? “Sedan virkas det mönster (och sätts markörer) så här från mitt bak: 3 st, A.1 (= motsvarar 3 st), * 5 st, A.1*, upprepa *“ Vänligen Karin
07.05.2019 - 06:49DROPS Design answered:
Hei Karin. Første gang du hekler A.1 skal du hekle hele digrammet, altså inkludert den første raden med staver som ikke er innenfor klammene. Vi skal få rettet dette i oppskriften. Takk for beskjed og god fornøyelse.
07.05.2019 - 10:20
![]() Tine Ploug wrote:
Tine Ploug wrote:
Hej jeg forstår ikke hvorfor målet på 1 til 3 r er 71 cm langt når jeg følger opskriften med samme garn og nål 2, 50 str L de bliver jo alt for store så.
25.03.2019 - 19:50DROPS Design answered:
Hei Tine. Jeg er usikker på om jeg skjønner hvilke mål du referer til? Du sier du hekler med samme garn og heklenål som i oppskriften, men har du kontrollert at heklefastheten din stemmer overens? du skal ha 26 masker i bredden på 10 cm, om du har en annen heklefasthet kan dette påvirke målene på plagget. Du finner lengden og bredden på shortsen nederst i oppskriften, og disse målene stemmer overens med heklefastheten, det har vi nå kontrollert. God fornøyelse
02.04.2019 - 10:10
![]() Vanessa wrote:
Vanessa wrote:
Hello. please could you help again. with the increase mid back i'm not sure where to put the 2trb increase and the 4trb increase. the pattern states EVERY ROW for both increases. so am increasing 6 stitches in the first two rows? the increases for the 4trb fall into the A1 pattern so am i to make 2 trebles instead of the 2trbl together? and if i'm doing both increases (the 2trb and the 4trb) on each row i would have 4 stitches in the stitch after the marker - please clarify. thank you
15.02.2019 - 11:29DROPS Design answered:
Dear Vanessa, you need to increase first 2 trebles on mid back then 4 trebles, if your increases fall into the A.1 pattern, crochet the increases without A.1, just with trebles. If you skip the increases, the piece will not get the correct width. Happy crocheting!
15.02.2019 - 15:48
![]() Vanessa wrote:
Vanessa wrote:
Hi - I want to make sure i am following the pattern correctly. The 5 treble A1 pattern is causing the rows to be wavy (as if there are too many stitches for the row) whereas looking at the picture and the video it is flat (against the body) . i've started with 3 trb, A1 and then repeating 5 treble and A1. about to start row 4 which is an increase row, and the rows are going to become even more wavy with the extra stitches. should it be wavy or sit flat? Thanks
12.02.2019 - 20:27DROPS Design answered:
Dear Vanessa, when you work first row in A.1 *skip next st, then work 2 tr tog, 1 ch, 2 tr tog in the same st, skip next st*, so that there are 3 sts over the 3 sts from previous row. On next row in A.1 work the 2 tr tog, 1 ch, 2 tr tog around the chain from previous row. Happy crocheting!
13.02.2019 - 09:07
![]() Monico wrote:
Monico wrote:
Mais si je fais comme vous venez de me le dire diagramme A1 entre chaque A1 je n'aurais plus mes 5 brides car, si je saute 1 bride avant et après les 2 brides coulées et la ml, il ne me restera plus que 4 brides même si je crée 3 mailles avec les 2X2 brides coulées et la ml cela ne me recrée pas de bride pour remplacer la bride sautée……. Explications !!!!!!
03.12.2018 - 14:50DROPS Design answered:
Bonjour Mme Monico, le diagramme A.1 se crochète sur 3 mailles comme le montre le diagramme: au 1er rang, on saute une maille, dans la maille suivante, on a 2 b écoulées, ens, 1 ml, 2 b écoulées ensemble, on saute la m suivante et on passe aux instructions suivantes (par ex: 1 bride dans chacune des 5 brides suivantes). Au rang suivant, on crochète les 2 b écoulées ens, 1 ml 2 b écoulées ens autour de la ml et on continue 1 bride dans chacune des 5 b suivantes dans cet exemple. Bon crochet!
03.12.2018 - 16:11
![]() Monico wrote:
Monico wrote:
Je viens de visionner votre vidéo du 3/3/2016 concernant le diagramme A1 et ainsi j'ai pu obtenir la réponse à ma question. Merci Bcq
02.12.2018 - 14:43
![]() Monico wrote:
Monico wrote:
En ce qui concerne le diagramme A1 faut-il sauter une bride avant et après les 2B, MS,2B ? Car si je continue ainsi, entre 2 motifs du diagramme A1 il y a, non plus 5 B mais 7 B…… Pourriez vous m'expliquer. Merci
02.12.2018 - 13:22DROPS Design answered:
Bonjour Mme Monico, au 1er rang de A.1 vous crochetez ainsi: sautez 1 bride, dans la bride suivante crochetez: 2 brides écoulées ensemble (= 1 maille), 1 ml, 2 brides écoulées ensemble, sautez 1 bride (= 3 mailles au total au-dessus de 3 mailles). Au rang suivant de A.1, crochetez autour de la ml du 1er rang: 2 brides écoulées ensemble, 1 ml, 2 brides écoulées ensemble. Bon crochet!
03.12.2018 - 09:41
![]() Pinceau à Bille wrote:
Pinceau à Bille wrote:
Désolée, mes commentaires n'étaient pas pour ce modèle :(
06.08.2018 - 19:20
![]() Pinceau à Bille wrote:
Pinceau à Bille wrote:
Pour le lien, lire 230 mailles au lieu de 130 ;)
05.08.2018 - 15:42DROPS Design answered:
Bonjour Pinceau à Bille, pour le lien, on crochète une chaînette de 130 cm (pas de 130m) :) Bon crochet!
06.08.2018 - 09:56
|
||||||||||||||||||||||||||||
Elly May#ellymayshorts |
||||||||||||||||||||||||||||
 |
 |
|||||||||||||||||||||||||||
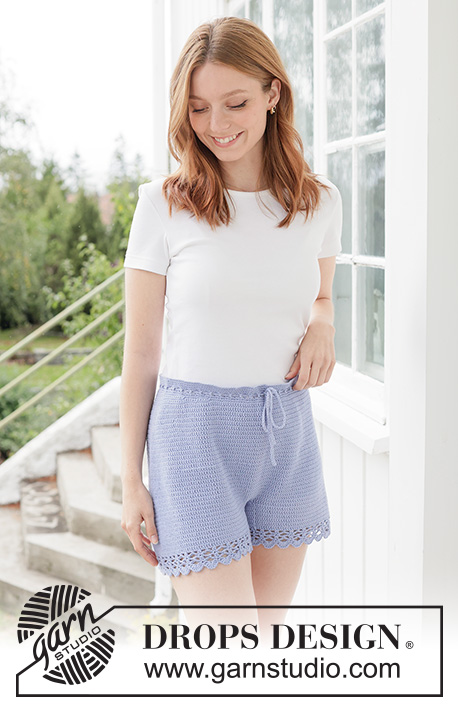
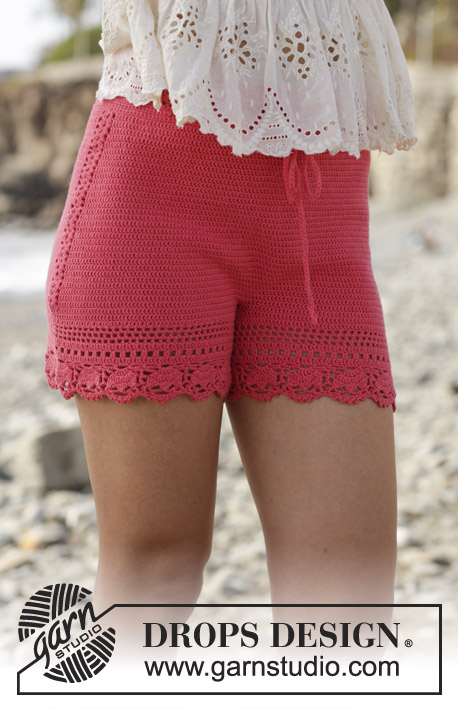
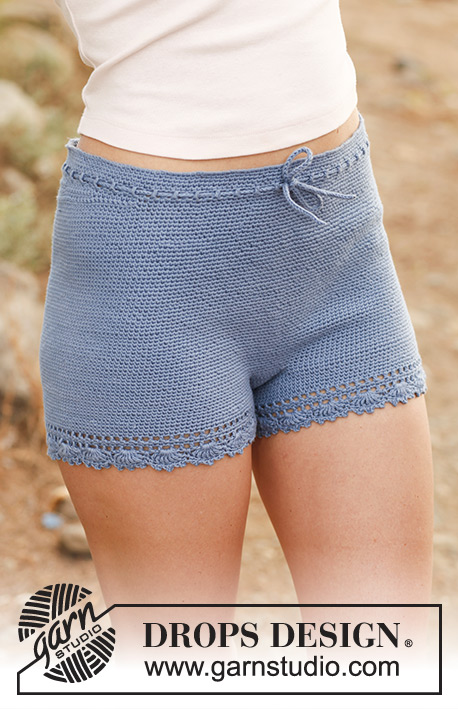
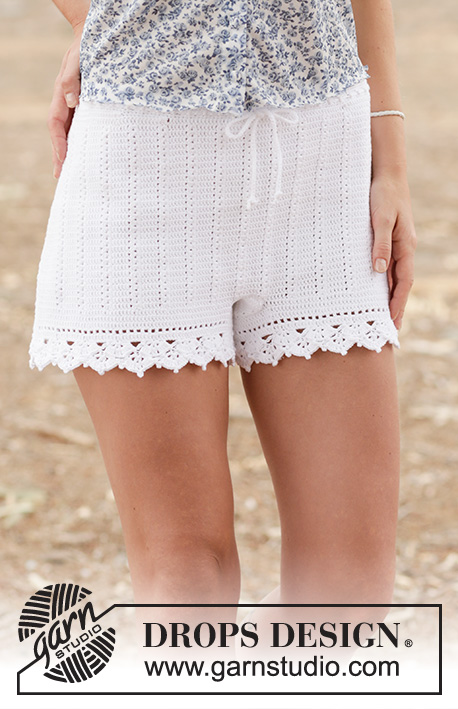
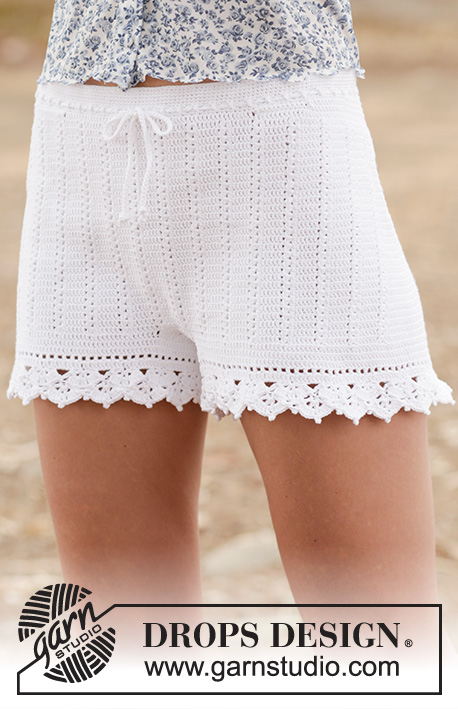
Crochet DROPS shorts with trebles and lace pattern in ”Safran”. Size: S - XXL.
DROPS 162-19 |
||||||||||||||||||||||||||||
|
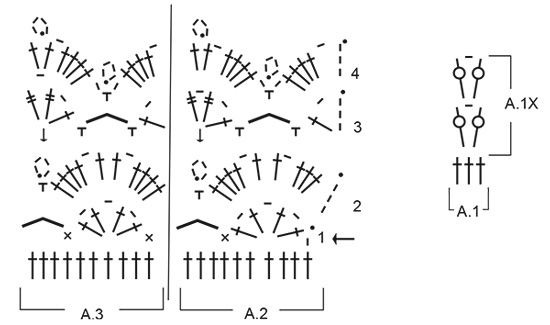
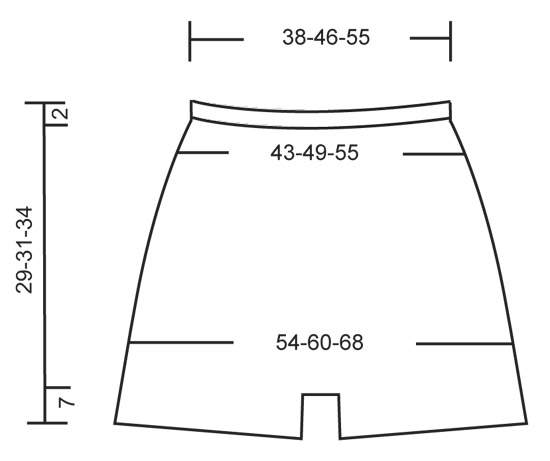
CROCHET INFO: Replace first dc at beg of every dc round with 1 ch. Finish round with 1 sl st in 1st ch at beg of round. Replace first tr at beg of every tr round with 3 ch. Finish round with 1 sl st in 3rd ch at beg of round. PATTERN: See diagrams A.1 to A.3. INCREASE TIP 1: Inc 2 tr mid back as follows: Work until 2 tr remain before marker mid back, work 2 tr in first tr, 1 tr in each of the next 2 tr (marker is between these) and 2 tr in next tr (= 2 tr inc). Inc 4 tr mid back as follows: Work until 4 tr remain before marker mid back, work 2 tr in first tr, 1 tr in next tr, 2 tr in next tr, 1 tr each of the next 2 tr (marker is between these) and 2 tr in next tr, 1 tr in next tr, 2 tr in next tr (= 4 tr inc). INCREASE TIP 2: Work until 1 tr remains before marker in the side, work 2 tr in first tr, 1 tr in next tr (marker is in this tr) and 2 tr in next tr (= 2 tr inc). Repeat the same inc in the other side = 4 sts inc on round. ---------------------------------------------------------- SHORTS: The piece is worked top down. Work 224-274-326 ch on hook size 2,5 mm with Safran and form a ring with 1 sl st in first ch. Insert 1 marker at beg of round = mid back. Work first round as follows: 1 ch, * skip 1 ch, 1 dc in each of the next 7 ch *, repeat from *-* until 0-2-6 ch remain, work 1 dc in each of these ch = 196-240-286 dc. READ CROCHET TIP! Continue working 1 dc in every dc until piece measures 2 cm. REMEMBER THE CROCHET TENSION! Now work an eyelet row as follows: 4 ch, skip 1 dc, * 1 tr in next dc, 1 ch, skip 1 dc *, repeat from *-* the entire round, finish with 1 sl st in 3rd ch from beg of round. On next round work 1 dc in every tr and every ch. Then work the shorts higher in the back as follows: Work 11-12-13 dc past the marker mid back, turn and work 1 sl st in first st, then 1 dc in each of the next 21-23-25 dc, turn and work 1 sl st in first st, then 1 dc in each of the next 32-35-38 sts (sl sts are also worked). Continue like this by working 11-12-13 sts more on every turn until a total of 154-192-208 sts have been worked. Turn again and work until marker mid back. Continue to work 1 round with dc while AT THE SAME TIME inc 28-16-2 dc evenly = 224-256-288 dc. Then work pattern (and insert markers) as follows from mid back: 3 tr, A.1 (= 3 tr), * 5 tr, A.1*, repeat from *-* until 2 tr remain, 2 tr, AT THE SAME TIME insert a marker in each side as follows: Insert a marker in the 3rd tr after 7th-8th-9th repetition A.1, and insert a marker in 3rd tr after 21th-24th-27th repetition with A.1 (i.e. 1 marker in each side). When A.1 has been worked 1 time vertically, continue pattern A.1X - AT THE SAME TIME inc mid back and in the sides as follows: SIDES: Inc on each side of tr with marker, in each side as follows - READ INCREASE TIP 2. Repeat inc every 4th round 7-7-8 times in total = 28-28-32 tr inc. MID BACK: AT THE SAME TIME when piece measures 15-17-19 cm (measured mid front), inc mid back as follows – Read INCREASE TIP-1. Repeat inc with 2 tr mid back every round 10 times in total, and repeat inc with 4 tr every round 2-2-3 times = 28-28-32 tr inc. There are now 280-312-352 tr on round. Now piece measures approx. 22-24-27 cm mid front and 27-29-32 cm mid back. Now divide for legs as follows: Work 1 sl st in each of the first 5-6-6 tr on round, turn and work 1 tr in each of the first 10-12-12 tr (i.e. 5-6-6 sts on each side of marker mid back). These 10-12-12 tr = gusset. Work tr back and forth over these tr. When piece measures 4-5-6 cm, dec 1 tr in each side, repeat dec when piece measures 8-9-10 cm = 6-8-8 tr. Continue with 1 tr in every tr until gusset measures 11-12-13 cm, cut the yarn. Fasten gusset edge to edge to the middle 6-8-8 sts towards mid front. Then work the legs. LEG: Work 1 tr in each of the 132-146-166 tr around one leg (i.e. work 1 tr in every tr in A.1X and 1 tr in ch-space = 3 tr), in addition work 28-31-34 tr along the gusset = 160-177-200 tr. Work 2 rounds with tr AT THE SAME TIME on last round inc 0-3-0 tr evenly by working 2 tr in 1 tr = 160-180-200 tr. Continue to work as follows: ROUND 1: 3 ch (= 1 tr), * 1 ch, skip 1 tr, 1 tr in next tr * , repeat from *-* until 1 tr remains, 1 ch, skip 1 tr, 1 sl st in 3rd ch at beg of round. ROUND 2: 3 ch (= 1 tr), * 1 tr in ch-space, 1 tr in next tr *, repeat from *-* the entire round until 1 ch-space remains, 1 tr in ch-space, finish with 1 sl st in 3rd ch on round. ROUND 3: Now work pattern as follows: Work pattern according to diagram A.2 over the first 10 tr, continue with A.3 the entire round. Finish every round with 1 sl st at beg of round. REMEMBER CROCHET INFO! Continue like this until pattern A.2-A.3 have been worked vertically. Fasten off. Work the other leg the same way. TIES: Work 130-140-150 cm with LOOSE ch, turn and work 1 sl st in every ch. Thread the tie in the row with eyelet holes at the top of shorts – start mid front |
||||||||||||||||||||||||||||
Diagram explanations |
||||||||||||||||||||||||||||
|
||||||||||||||||||||||||||||
 |
||||||||||||||||||||||||||||
 |
||||||||||||||||||||||||||||
Have you finished this pattern?Tag your pictures with #dropspattern #ellymayshorts or submit them to the #dropsfan gallery. Do you need help with this pattern?You'll find 13 tutorial videos, a Comments/Questions area and more by visiting the pattern on garnstudio.com. © 1982-2026 DROPS Design A/S. We reserve all rights. This document, including all its sub-sections, has copyrights. Read more about what you can do with our patterns at the bottom of each pattern on our site. |
||||||||||||||||||||||||||||


With over 40 years in knitting and crochet design, DROPS Design offers one of the most extensive collections of free patterns on the internet - translated to 17 languages. As of today we count 324 catalogues and 12290 patterns translated into English (UK/cm).
We work hard to bring you the best knitting and crochet have to offer, inspiration and advice as well as great quality yarns at incredible prices! Would you like to use our patterns for other than personal use? You can read what you are allowed to do in the Copyright text at the bottom of all our patterns. Happy crafting!
Post a comment to pattern DROPS 162-19
We would love to hear what you have to say about this pattern!
If you want to leave a question, please make sure you select the correct category in the form below, to speed up the answering process. Required fields are marked *.