
Popular categories
Looking for a yarn?


Comments / Questions (266)
![]() Ibtissam wrote:
Ibtissam wrote:
Ik ben momenteel bezig met de mouw. In het patroon staat dat je moet meerderen als het werk 6 cm hoog is. Is dit inclusief de boord of moet je na de boord 6cm breien en dan pas (eerste keer) meerderen?
21.12.2020 - 12:29DROPS Design answered:
Dag Ibtissam,
Als er afmetingen opgegeven worden, is het inderdaad altijd vanaf het opzetten, tenzij anders aangegeven. In dit geval dus ook vanaf het opzetten.
22.12.2020 - 12:17
![]() Elizabeth Hayes wrote:
Elizabeth Hayes wrote:
Love this sweater. I am almost finished and now working on the collar. I don't understand this direction -- "Now inc 1 st in each of the middle 14-14-14-16-16-16 P-sections seen from RS (= back of neck) = 158-162-170-180-188-196 sts." What are the P-sections? I don't know where to increase. Are the 14 extra stitches all on one row? Thanks for whatever clarification you can give.
20.12.2020 - 15:42DROPS Design answered:
Dear Mrs Hayes, the P-sections are the sections worked purled in the rib K2/P2, ie you will increase in the P2 seen from RS (= there will be P3 a total of 14 times - instead of P2 - but still P2 over all remaining P-sections from the rib) to make the collar wider. Happy knitting!
21.12.2020 - 08:10
![]() Deb wrote:
Deb wrote:
I am planning this sweater for my husband (XXXL) but he insists on having pockets. Do you have any suggestions/instructions on the best way to do this? Thank you.
15.12.2020 - 14:21DROPS Design answered:
Dear Deb, we are unfortunately not able to adjust every pattern to every single request, thanks for your comprehension - however, the Finnley Jacket does have pockets and might inspire you to add some to this one. Hope this will help. Happy knitting!
15.12.2020 - 14:57
![]() Marion wrote:
Marion wrote:
Goedeavond, zijn de 24 naalden van het patroon alleen de naalden van de goede kant? Of ook van de verkeerde kant? Alvast bedankt voor het antwoord. Groetjes Marion
07.11.2020 - 18:33DROPS Design answered:
Dag Marion,
In het telpatroon worden alle steken weergegeven, dus zowel de steken aan de goede kant als de steken aan de verkeerde kant.
18.11.2020 - 13:20
![]() Franca wrote:
Franca wrote:
Ciao vorrei fare questo modello ma con un filato più grosso , invece di Lima usare Andes o Eskimo . Mi potete aiutare con il convertitore è fattibile? Grazie
28.09.2020 - 17:12DROPS Design answered:
Buonasera Franca, questo modello è molto lavorato e usando un filato come Andes o Eskimo risulterebbe troppo pesante e inoltre andrebbe ridisegnato tutto perchè il campione non corrisponderebbe a quello indicato. Provi a rivolgersi al suo rivenditore DROPS di fiducia per un'assistenza più personalizzata. Buon lavoro!
28.09.2020 - 21:13
![]() Shirley Donnelly wrote:
Shirley Donnelly wrote:
Can this cardigan be knitted in cotton rich aran, which i think but not sure, is the equivalent of double knitting yarn? (Incidentally Ihave just knitted a long cardigan for my granddaughter for university from a Drops design and it turned out well.) Thank you for your help. Shirley Donnelly
27.09.2020 - 17:45DROPS Design answered:
Dear Mrs Donnelly, this jacket is worked with DROPS Lima which is a DK/worsted yarn (see shadecard - click on our yarn converter to find other alternatives with our cotton yarns. Happy knitting!
28.09.2020 - 10:26
![]() R Andersson wrote:
R Andersson wrote:
Hej, jeg strikker denne i str L og har regnet ud at når jeg har lukket alle maskerne i ærmegabet ( 26 i hver side) vil jeg have lukket maske i den første snoning! kan det være rigtigt? MVH Bare glem det- jeg har fundet ud af det så det passer. MVH
05.09.2020 - 21:40DROPS Design answered:
Hei R. Så fint at du fant ut av det. God Fornøyeløse!
07.09.2020 - 13:58
![]() Grace wrote:
Grace wrote:
How many yards of yarn is needed for this sweater?
27.04.2020 - 22:34DROPS Design answered:
Hi Grace, 50 g gives you approx. 109 yards (100m). Happy knitting!
28.04.2020 - 07:32
![]() Charlotte wrote:
Charlotte wrote:
Graag hoor ik hoe ik verder moet bij de sjaalkraag nadat ik 14 steken heb gemeerderd. Brri je dat stuk dan 2 rechts 3 averecht?
09.04.2020 - 22:41DROPS Design answered:
Dag Charlotte,
In de averecht delen waar je steken hebt gemeerderd heb je nu 3 averecht in plaats van 2, dus in dat gedeelte brei je inderdaad 2 recht, 3 averecht.
13.04.2020 - 10:39
![]() Amanda wrote:
Amanda wrote:
I really like this sweater and would like to make a similar one for myself. I thought about making the size small and putting the buttons on the opposite side to change it into a woman's cardigan. But I am a smaller woman and even the small men's size would be much too large for me. Does DROPS have a similar woman's pattern to this? Any suggestions? Thanks.
08.04.2020 - 13:15DROPS Design answered:
Dear Amanda, measure a similar jacket you have and like the shape to the measurements in chart so that you can adjust - you will find all our jackets with cables for women here to inspire you. Happy knitting!
09.04.2020 - 16:43
|
||||||||||||||||
Rambling Man#ramblingmancardigan |
||||||||||||||||
 |
 |
|||||||||||||||
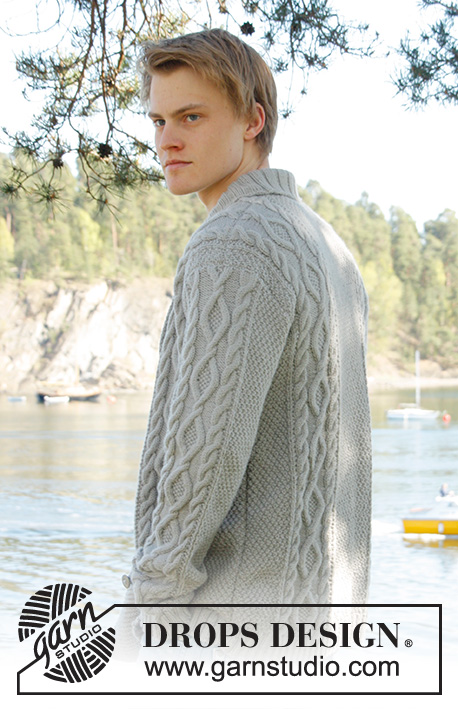
Men's knitted jacket in DROPS Lima, with cable pattern and shawl collar. Size: S - XXXL.
DROPS Extra 0-850 |
||||||||||||||||
|
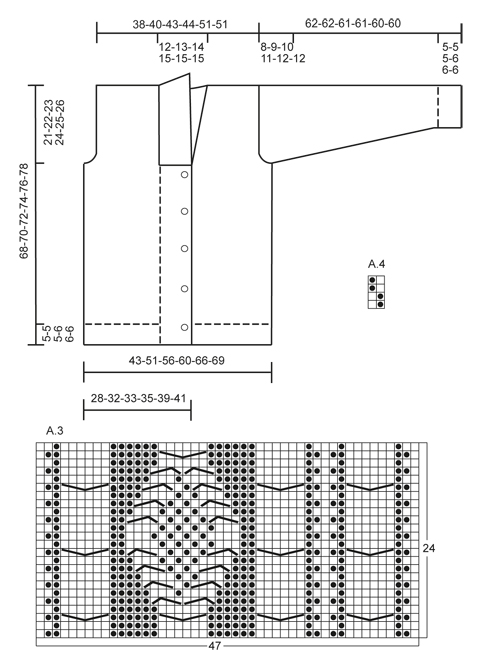
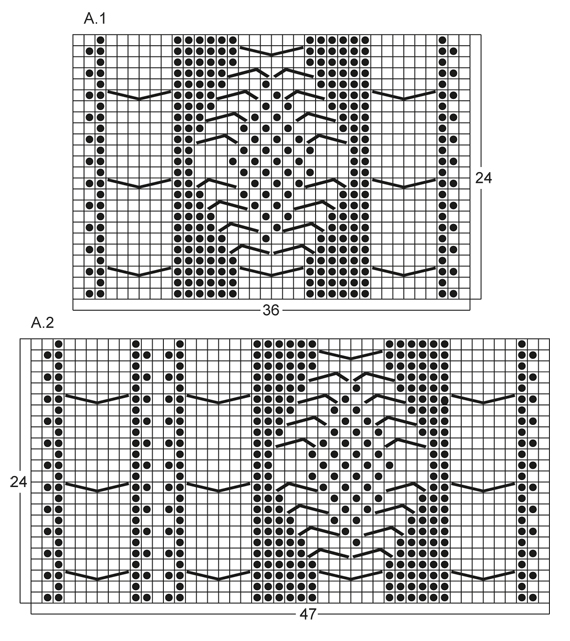
KNITTING TIPS: This design is written with button holes on right front edge, if you wish standard button holes for men, you can make the button holes on left front edge. GARTER ST (back and forth on needle): K all rows. NOTE: All edge sts are worked in garter st. PATTERN: See diagram A.1 to A.4, diagrams show all rows in 1 pattern repetition from RS. SHORT ROWS: RIGHT FRONT PIECE: Work 1 short row on row 3 of every pattern repetition vertically until finished measurements as follows: On 3rd row in pattern (= RS), work 26-26-26-26-30-30 band sts, turn and K back. Then work over all sts on row as before. LEFT FRONT PIECE: Work 1 short row on row 2 of every pattern repetition vertically until finished measurements as follows: On 2nd row in pattern (= WS), work 26-26-26-26-30-30 band sts, turn and K back. Then work over all sts on row as before. BUTTON HOLES: Cast off for 5 button holes from RS on right band. 1 BUTTON HOLE = cast off 7th and 8th st from mid front and cast on 2 new sts on next row over these sts. Cast off for button holes when piece measures: SIZE S: 14, 22, 30, 38 and 46 cm SIZE M: 15, 23, 31, 39 and 47 cm SIZE L: 16, 24, 32, 40 and 48 cm SIZE XL: 17, 25, 33, 41 and 49 cm SIZE XXL: 18, 26, 34, 42 and 50 cm SIZE XXXL: 19, 27, 35, 43 and 51 cm INCREASE TIP: Inc 1 st by making 1 YO, on next row work YO twisted (i.e. work in back loop of st instead front) to avoid holes. ---------------------------------------------------------- BACK PIECE: Worked back and forth on needle. Cast on 136-156-168-180-196-204 sts (incl 1 edge st in each side) on circular needle size 3.5 mm with Lima. Work rib as follows (1st row = RS): 1 edge st in GARTER ST - see explanation above, * K 2, P 2 *, repeat from *-*, finish with K 2 and 1 edge st in garter st. Continue to work like this until rib measures 5-5-5-6-6-6 cm. On last row from WS, P while AT THE SAME TIME dec 20-22-24-26-26-26 sts evenly = 116-134-144-154-170-178 sts. Then switch to needle size 4 mm and work next row from RS as follows: 1 edge st in garter st, 8-16-20-24-20-24 sts in A.4, work A.1 one time in size S - XL, work A.2 one time in size XXL and XXXL, 26-28-30-32-34-34 sts in A.4, then work A.1 one time in size S - XL, work A.3 one time in size XXL and XXXL, finish with 8-16-20-24-20-24 sts in A.4 and 1 edge st in garter st. REMEMBER THE KNITTING TENSION! Continue to work like this until piece measures 47-48-49-50-51-52 cm. Then cast off for armholes at the beg of every row in each side as follows: Cast off 3 sts 0-1-1-2-2-2 times, 2 sts 1-1-1-2-2-2 times, 1 st 4-7-9-8-4-8 times = 104-110-116-118-142-142 sts. Continue with pattern as before until piece measures 66-68-70-72-74-76 cm. Now cast off the middle 20-22-24-26-28-28 sts for neck and finish each part separately. Cast off 2 sts on next row from neck = 40-42-44-44-55-55 sts remain on shoulder. Continue with pattern as before. When piece measures 68-70-72-74-76-78 cm, loosely cast off sts with K over K and P over P. RIGHT FRONT PIECE: Worked back and forth on needle. Cast on 83-91-95-99-111-115 sts (incl 1 edge st in the side) on circular needle size 3.5 mm with Lima. Work rib as follows (1st row = RS): 26-26-26-26-30-30 sts in garter st (= band sts), * K 2, P 2 *, repeat from *-*, finish with 1 edge st in garter st. Continue with rib and band sts in garter st until rib measures 5-5-5-6-6-6 cm. On last row from WS, P over all sts in rib while AT THE SAME TIME dec 12-12-12-12-13-13 sts evenly (do not dec over band sts) = 71-79-83-87-98-102 sts. Then switch to needle size 4 mm and work next row from RS as follows: 26-26-26-26-30-30 band sts, work A.1 one time in size S - XL, work A.3 one time in size XXL and XXXL, 8-16-20-24-20-24 sts in A.4 and 1 edge in garter st. On next row from RS (= 3rd row in pattern) work SHORT ROWS - read explanation above. Continue with pattern and band sts at the front - while AT THE SAME TIME work 1 short row on 3rd row in every pattern repetition vertically until finished measurement. When piece measures 14-15-16-17-18-19 cm, cast off for BUTTON HOLES on right band - see explanation above! Continue to work until piece measures 47-48-49-50-51-52 cm. Then cast off at beg of next row from RS as follows: Cast off the first 25-25-25-25-29-29 sts, insert a marker (this marks where to beg the knit up for collar), work the rest of row. Then cast off for armhole on every row from WS as follows: 3 sts 0-1-1-2-2-2 times, 2 sts 1-1-1-2-2-2 times, 1 st 4-7-9-8-4-8 times = 40-42-44-44-55-55 sts remain on shoulder. Continue with pattern as before. When piece measures 68-70-72-74-76-78 cm, loosely cast off sts with K over K and P over P. LEFT FRONT PIECE: Cast on and work rib as on right front piece but reversed (i.e. * P 2, K 2 *, repeat from *-*) with 26-26-26-26-30-30 band sts in garter st. Continue to work until rib measures 5-5-5-6-6-6 cm. On last row from WS, P over all sts in rib while AT THE SAME TIME dec 12-12-12-12-13-13 sts evenly (do not dec over band sts) = 71-79-83-87-98-102 sts. Then switch to needle size 4 mm and work next row from RS as follows: 1 edge st in garter st, 8-16-20-24-20-24 sts in A.4, work A.1 one time in size S - XL, work A.2 one time in size XXL and XXXL, 26-26-26-26-30-30 band sts in garter st. On next row from WS (= 2nd row in pattern) work SHORT ROWS - read explanation above. Continue to work the same way as on right front piece but without button holes. SLEEVE: Worked back and forth on needle. Cast on 74-78-82-86-90-90 sts (incl 1 edge st in each side) on circular needle size 3.5 mm with Lima. Work rib as follows (1st row = RS): 1 edge st in garter st, * K 2, P 2 *, repeat from *-* and finish with 1 edge st in garter st. Continue to work like this until rib measures 5-5-5-6-6-6 cm. On last row from WS, P while AT THE SAME TIME dec 12-14-16-18-18-18 sts evenly = 62-64-66-68-72-72 sts. Then switch to needle size 4 mm and work next row from RS as follows: 1 edge st in garter st, 12-13-14-15-17-17 sts in A.4, work A.1 one time, 12-13-14-15-17-17 sts in A.4, finish with 1 edge st in garter st. AT THE SAME TIME when piece measures 6 cm, inc 1 st inside 1 edge st in each side - Read INCREASE TIP above. NOTE: Work the inc sts in A.4. Repeat inc every 3½-3-2½-2½-2½-2½ cm a total of 14-15-16-17-16-17 times = 90-94-98-102-104-106 sts. Continue until piece measures 54-53-51-50-48-48 cm (shorter measurements in the larger sizes because of longer sleeve cap and broader shoulder width), cast off at beg of every row in each side: 3 sts 1-1-1-2-2-2 times, 2 sts 1-1-2-2-2-2 times and 1 st 2-2-3-3-4-4 times. Then cast off 2 sts in each side until piece measures 61-61-60-60-59-59 cm, then cast off 3 sts 2 times in each side. When piece measures approx. 62-62-61-61-60-60 cm, loosely cast off sts with K over K and P over P. ASSEMBLY: Sew shoulder seams and sew in sleeves inside 1 edge st. Sew sleeve and side seams in one inside 1 edge st. Sew buttons on to left front piece, approx. 2½ cm from last K st in pattern. SHAWL COLLAR: Knit up sts from RS inside 1 edge st on circular needle size 3.5 mm. Start mid front at marker on right front piece as follows: Knit up approx. 60-70 sts up to shoulder, then 30-40 sts along the neck and 60-70 sts down along left front piece until marker = 150-180 sts. K 1 row from WS while AT THE SAME TIME adjusting no of sts to 144-148-156-164-172-180. Then work rib on next row from RS as follows: 1 sts in garter st, * K 2, P 2 *, repeat from *-* and finish with K 2 and 1 st in garter st. Continue like this until collar measures approx. 5-5-5-6-6-6 cm. Now inc 1 st in each of the middle 14-14-14-16-16-16 P-sections seen from RS (= back of neck) = 158-162-170-180-188-196 sts. Continue until collar measures approx. 12-12-12-12-14-14 cm, then loosely cast off with K over K and P over P. Fasten collar with stitches at the bottom in each side towards band from WS (so that the seam is not visible from RS) – sew edge to edge to avoid a chunky seam. |
||||||||||||||||
Diagram explanations |
||||||||||||||||
|
||||||||||||||||
 |
||||||||||||||||
 |
||||||||||||||||
Have you finished this pattern?Tag your pictures with #dropspattern #ramblingmancardigan or submit them to the #dropsfan gallery. Do you need help with this pattern?You'll find 23 tutorial videos, a Comments/Questions area and more by visiting the pattern on garnstudio.com. © 1982-2026 DROPS Design A/S. We reserve all rights. This document, including all its sub-sections, has copyrights. Read more about what you can do with our patterns at the bottom of each pattern on our site. |
||||||||||||||||


With over 40 years in knitting and crochet design, DROPS Design offers one of the most extensive collections of free patterns on the internet - translated to 17 languages. As of today we count 324 catalogues and 12291 patterns translated into English (UK/cm).
We work hard to bring you the best knitting and crochet have to offer, inspiration and advice as well as great quality yarns at incredible prices! Would you like to use our patterns for other than personal use? You can read what you are allowed to do in the Copyright text at the bottom of all our patterns. Happy crafting!
Post a comment to pattern DROPS Extra 0-850
We would love to hear what you have to say about this pattern!
If you want to leave a question, please make sure you select the correct category in the form below, to speed up the answering process. Required fields are marked *.