
Popular categories
Looking for a yarn?


Comments / Questions (266)
![]() Graz wrote:
Graz wrote:
Bonjour, Merci! peut-être serait-il mieux de faire la bordure séparément car elle n'est pas totalement rectiligne, pas seulement par rapport au reste du tricot mais également parce qu'elle tire vers le haut.. En tout cas, c'est ce que je vais faire.
12.01.2015 - 12:45
![]() Cheryl wrote:
Cheryl wrote:
I am on the sleeves. I have reached 2 3/8" and have purled the last WS row, decreasing 18. I am ready to use size 6 needles and begin working the pattern on the RS. However, it says when piece measures 2 3/8", inc 1 st inside 1 edge stitch in each side. (I am making a size large). This seems like an awful lot going on when the piece measures 2 3/8". I'm confused.
10.01.2015 - 21:11DROPS Design answered:
Dear Cheryl, in the 3 largest size, you will start the inc on the first row in pattern (= when piece measures 2 3/8"). Happy knitting!
12.01.2015 - 09:41Karen King wrote:
I made 180 for stiches for xl but i am confused as to weather i was suposed to do 180 or 182. I did the ribbing at 180 for length indecated. Then decreased 26 stiches. Then I am doing patern A4 and patern A1 for cables. My knitting is not looking right what am I doing wrong? PLEASE HELP. I have knit rows in the center of my larg dimond. I can not make out the cables on the sids of the dimond. I am doing the cables just like the patern tells you. Please help.
10.01.2015 - 18:29DROPS Design answered:
Dear Mrs King, in size XL you have 154 sts after the 26 dec, then work these 154 sts as follows: 1 edge st in garter st, 24 sts in A.4, A.1 (=36 sts), 32 sts in A.4, A.1 (=36 sts) and finish with 24 sts in A.4 and 1 edge st in garter st. Happy knitting!
12.01.2015 - 09:29
![]() Nadia wrote:
Nadia wrote:
Ho un dubbio riguardante il paragrafo "collo a scialle". Dopo 5 cm di lavoro, gli aumenti devono essere fatti solo sulla parte dietro del collo? Se sì, non ritrovo più due diritti e due rovesci. E' corretto? Grazie.
01.01.2015 - 11:39DROPS Design answered:
Buonasera Nadia. Deve aumentare 1 m rov nei 14 gruppi di m lavorate a rov, sul dietro del collo. Per questi gruppi, lavorerà a coste 2 m dir, 3 m rov sul dir del lavoro (2 m rov, 3 m dir sul rovescio del lavoro), mentre negli altri gruppi, continuerà a lavorare a coste 2 m dir, 2 m rov. Buon lavoro!
01.01.2015 - 18:33
![]() Cheryl wrote:
Cheryl wrote:
When beginning the left front piece, do I begin with the band in garter or do I begin with ribbing (P2 K2)?
06.12.2014 - 22:08DROPS Design answered:
Dear Cheryl, left front piece will start with ribbing and end with garter st (= front band sts are worked at the end of row from RS). You start with 1 edge st, then repeat *P2/K2* and finish with front band sts in garter st. Happy knitting!
07.12.2014 - 12:52
![]() Sonia wrote:
Sonia wrote:
After the first button hole bind off for the Right Front piece, it says "Continue to work until piece measures..." does this include short rows, or just working the pattern as usual without the short rows for the rest of the band?
04.12.2014 - 00:17DROPS Design answered:
Dear Sonia, after you have make the first buttonhole continue as before with pattern, short rows and next buttonholes as stated until piece measures 47-52 cm. Happy knitting!
04.12.2014 - 11:08
![]() Claudia wrote:
Claudia wrote:
Guten Tag, ich möchte diese Jacke gerne stricken, aber mit leicht dickerer Wolle, Nadelstärke 4 1/2. Welches Garn könnten Sie mir empfehlen, welches könnte ich doppelt nehmen? Außerdem soll das Rückenteil mit großem Perlmuster gestrickt werden, kein Zopfmuster. Brauche ich dann weniger oder mehr Wolle? Vielen Dank für Ihre Hilfe
29.11.2014 - 19:38DROPS Design answered:
Leider können wir Ihnen an dieser Stelle keine Variante zu der Jacke anbieten. Sie müssen die Jacke mit der angegebenen Maschenprobe stricken, da sich mit einer anderen Maschenprobe der Schnitt der Jacke verändern würde. Als Garnalternativen können Sie Garne der Gruppe B wählen. Es empfiehlt sich nicht, das Zopfmuster gegen das Perlmuster zu tauschen, da das Zopfmuster eine andere M-Zahl pro 10 cm benötigt als das Perlmuster, das Rückenteil würde mit Perlmuster breiter.
01.12.2014 - 13:26
![]() Philippe wrote:
Philippe wrote:
Bonjour Après avoir lu les réponses données plus bas au sujet des rangs raccourcis, encore 1 question pour m'assurer d'avoir définitivement compris: Pour le devant droit, on tricote le rang raccourci au rang 3 du motif A1 Si il y a disons 10 motifs torsade A1 qui se succèdent verticalement sur toute la hauteur du devant droit jusqu'aux épaules, cela signifie qu'on aura sur toute cette hauteur 10 rangs raccourcis à tricoter au total, c'est bien ça? Merci beaucoup!
29.11.2014 - 12:51DROPS Design answered:
Bonjour Philippe, les rangs raccourcis ne se tricote que sur les mailles de bordure des devants. Pour le devant droit, vous tricotez les 2 premiers rangs du diagramme, puis au rang suivant commençant par les mailles de la bordure devant, tricotez 2 rangs sur les 26-30 m de bordure seulement puis tricotez le rang suivant comme avant (bordure et rang 3 du point fantaisie). À chaque fois que vous répétez le diagramme en hauteur répétez ces rangs raccourcis au rang 3 du diagramme (= uniquement sur les mailles de bordure). Bon tricot!
01.12.2014 - 10:01
![]() Jennielubies wrote:
Jennielubies wrote:
Bonjour je me lance dans la confection de ce gilet en XL. j'attaque les manches. J'ai un souci sur les diagrammes. la 1er ligne du diagramme commence en bas à droite. jusque la tout va bien. mais la 2eme ligne du diagramme se lit elle de droite à gauche? les rangs envers sont ils représentés sur le diagramme ou faut il les tricoter comme ils se présentent? merci pour vos réponses jennielubies
25.11.2014 - 10:01DROPS Design answered:
Bonjour Jennielubies, on lit effectivement les diagrammes en commençant en bas à droite, de droite à gauche sur l'endroit et de gauche à droite sur l'envers (tous les rangs sont représentés dans les diagrammes). Bon tricot!
25.11.2014 - 10:42
![]() Margrethe Risnes wrote:
Margrethe Risnes wrote:
Kan jeg strikke alle delene i ett - på denne modellen - ikke for-bakstykke hver for seg. Synes det er bedre å strikke alle samlet til under armene dersom det går an. Venleg hilsen Margrethe Risnes
13.11.2014 - 12:31DROPS Design answered:
Hej Margrethe, Ja du må gerne strikke alle dele i ett - God fornøjelse! :)
25.11.2014 - 12:03
|
||||||||||||||||
Rambling Man#ramblingmancardigan |
||||||||||||||||
 |
 |
|||||||||||||||
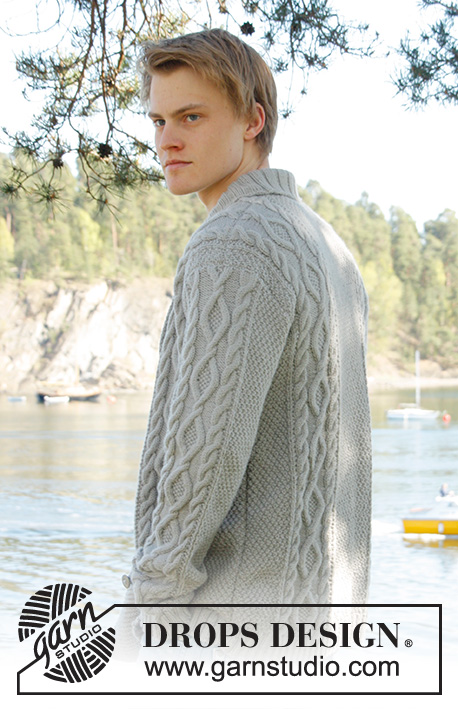
Men's knitted jacket in DROPS Lima, with cable pattern and shawl collar. Size: S - XXXL.
DROPS Extra 0-850 |
||||||||||||||||
|
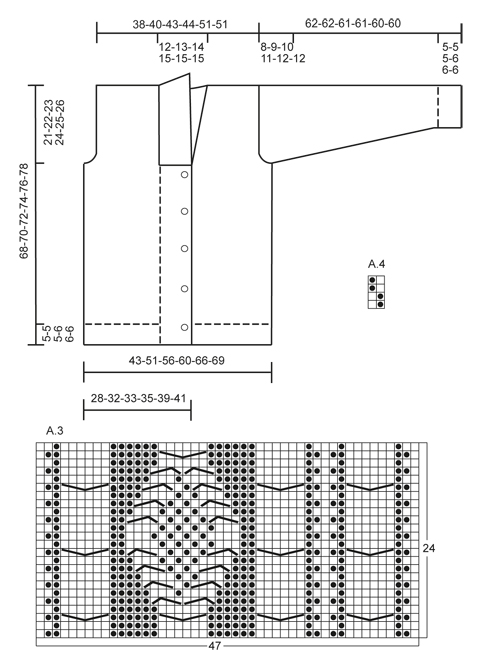
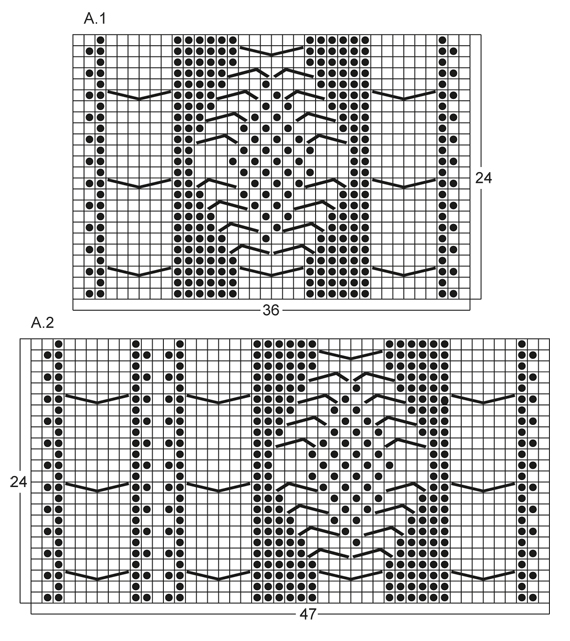
KNITTING TIPS: This design is written with button holes on right front edge, if you wish standard button holes for men, you can make the button holes on left front edge. GARTER ST (back and forth on needle): K all rows. NOTE: All edge sts are worked in garter st. PATTERN: See diagram A.1 to A.4, diagrams show all rows in 1 pattern repetition from RS. SHORT ROWS: RIGHT FRONT PIECE: Work 1 short row on row 3 of every pattern repetition vertically until finished measurements as follows: On 3rd row in pattern (= RS), work 26-26-26-26-30-30 band sts, turn and K back. Then work over all sts on row as before. LEFT FRONT PIECE: Work 1 short row on row 2 of every pattern repetition vertically until finished measurements as follows: On 2nd row in pattern (= WS), work 26-26-26-26-30-30 band sts, turn and K back. Then work over all sts on row as before. BUTTON HOLES: Cast off for 5 button holes from RS on right band. 1 BUTTON HOLE = cast off 7th and 8th st from mid front and cast on 2 new sts on next row over these sts. Cast off for button holes when piece measures: SIZE S: 14, 22, 30, 38 and 46 cm SIZE M: 15, 23, 31, 39 and 47 cm SIZE L: 16, 24, 32, 40 and 48 cm SIZE XL: 17, 25, 33, 41 and 49 cm SIZE XXL: 18, 26, 34, 42 and 50 cm SIZE XXXL: 19, 27, 35, 43 and 51 cm INCREASE TIP: Inc 1 st by making 1 YO, on next row work YO twisted (i.e. work in back loop of st instead front) to avoid holes. ---------------------------------------------------------- BACK PIECE: Worked back and forth on needle. Cast on 136-156-168-180-196-204 sts (incl 1 edge st in each side) on circular needle size 3.5 mm with Lima. Work rib as follows (1st row = RS): 1 edge st in GARTER ST - see explanation above, * K 2, P 2 *, repeat from *-*, finish with K 2 and 1 edge st in garter st. Continue to work like this until rib measures 5-5-5-6-6-6 cm. On last row from WS, P while AT THE SAME TIME dec 20-22-24-26-26-26 sts evenly = 116-134-144-154-170-178 sts. Then switch to needle size 4 mm and work next row from RS as follows: 1 edge st in garter st, 8-16-20-24-20-24 sts in A.4, work A.1 one time in size S - XL, work A.2 one time in size XXL and XXXL, 26-28-30-32-34-34 sts in A.4, then work A.1 one time in size S - XL, work A.3 one time in size XXL and XXXL, finish with 8-16-20-24-20-24 sts in A.4 and 1 edge st in garter st. REMEMBER THE KNITTING TENSION! Continue to work like this until piece measures 47-48-49-50-51-52 cm. Then cast off for armholes at the beg of every row in each side as follows: Cast off 3 sts 0-1-1-2-2-2 times, 2 sts 1-1-1-2-2-2 times, 1 st 4-7-9-8-4-8 times = 104-110-116-118-142-142 sts. Continue with pattern as before until piece measures 66-68-70-72-74-76 cm. Now cast off the middle 20-22-24-26-28-28 sts for neck and finish each part separately. Cast off 2 sts on next row from neck = 40-42-44-44-55-55 sts remain on shoulder. Continue with pattern as before. When piece measures 68-70-72-74-76-78 cm, loosely cast off sts with K over K and P over P. RIGHT FRONT PIECE: Worked back and forth on needle. Cast on 83-91-95-99-111-115 sts (incl 1 edge st in the side) on circular needle size 3.5 mm with Lima. Work rib as follows (1st row = RS): 26-26-26-26-30-30 sts in garter st (= band sts), * K 2, P 2 *, repeat from *-*, finish with 1 edge st in garter st. Continue with rib and band sts in garter st until rib measures 5-5-5-6-6-6 cm. On last row from WS, P over all sts in rib while AT THE SAME TIME dec 12-12-12-12-13-13 sts evenly (do not dec over band sts) = 71-79-83-87-98-102 sts. Then switch to needle size 4 mm and work next row from RS as follows: 26-26-26-26-30-30 band sts, work A.1 one time in size S - XL, work A.3 one time in size XXL and XXXL, 8-16-20-24-20-24 sts in A.4 and 1 edge in garter st. On next row from RS (= 3rd row in pattern) work SHORT ROWS - read explanation above. Continue with pattern and band sts at the front - while AT THE SAME TIME work 1 short row on 3rd row in every pattern repetition vertically until finished measurement. When piece measures 14-15-16-17-18-19 cm, cast off for BUTTON HOLES on right band - see explanation above! Continue to work until piece measures 47-48-49-50-51-52 cm. Then cast off at beg of next row from RS as follows: Cast off the first 25-25-25-25-29-29 sts, insert a marker (this marks where to beg the knit up for collar), work the rest of row. Then cast off for armhole on every row from WS as follows: 3 sts 0-1-1-2-2-2 times, 2 sts 1-1-1-2-2-2 times, 1 st 4-7-9-8-4-8 times = 40-42-44-44-55-55 sts remain on shoulder. Continue with pattern as before. When piece measures 68-70-72-74-76-78 cm, loosely cast off sts with K over K and P over P. LEFT FRONT PIECE: Cast on and work rib as on right front piece but reversed (i.e. * P 2, K 2 *, repeat from *-*) with 26-26-26-26-30-30 band sts in garter st. Continue to work until rib measures 5-5-5-6-6-6 cm. On last row from WS, P over all sts in rib while AT THE SAME TIME dec 12-12-12-12-13-13 sts evenly (do not dec over band sts) = 71-79-83-87-98-102 sts. Then switch to needle size 4 mm and work next row from RS as follows: 1 edge st in garter st, 8-16-20-24-20-24 sts in A.4, work A.1 one time in size S - XL, work A.2 one time in size XXL and XXXL, 26-26-26-26-30-30 band sts in garter st. On next row from WS (= 2nd row in pattern) work SHORT ROWS - read explanation above. Continue to work the same way as on right front piece but without button holes. SLEEVE: Worked back and forth on needle. Cast on 74-78-82-86-90-90 sts (incl 1 edge st in each side) on circular needle size 3.5 mm with Lima. Work rib as follows (1st row = RS): 1 edge st in garter st, * K 2, P 2 *, repeat from *-* and finish with 1 edge st in garter st. Continue to work like this until rib measures 5-5-5-6-6-6 cm. On last row from WS, P while AT THE SAME TIME dec 12-14-16-18-18-18 sts evenly = 62-64-66-68-72-72 sts. Then switch to needle size 4 mm and work next row from RS as follows: 1 edge st in garter st, 12-13-14-15-17-17 sts in A.4, work A.1 one time, 12-13-14-15-17-17 sts in A.4, finish with 1 edge st in garter st. AT THE SAME TIME when piece measures 6 cm, inc 1 st inside 1 edge st in each side - Read INCREASE TIP above. NOTE: Work the inc sts in A.4. Repeat inc every 3½-3-2½-2½-2½-2½ cm a total of 14-15-16-17-16-17 times = 90-94-98-102-104-106 sts. Continue until piece measures 54-53-51-50-48-48 cm (shorter measurements in the larger sizes because of longer sleeve cap and broader shoulder width), cast off at beg of every row in each side: 3 sts 1-1-1-2-2-2 times, 2 sts 1-1-2-2-2-2 times and 1 st 2-2-3-3-4-4 times. Then cast off 2 sts in each side until piece measures 61-61-60-60-59-59 cm, then cast off 3 sts 2 times in each side. When piece measures approx. 62-62-61-61-60-60 cm, loosely cast off sts with K over K and P over P. ASSEMBLY: Sew shoulder seams and sew in sleeves inside 1 edge st. Sew sleeve and side seams in one inside 1 edge st. Sew buttons on to left front piece, approx. 2½ cm from last K st in pattern. SHAWL COLLAR: Knit up sts from RS inside 1 edge st on circular needle size 3.5 mm. Start mid front at marker on right front piece as follows: Knit up approx. 60-70 sts up to shoulder, then 30-40 sts along the neck and 60-70 sts down along left front piece until marker = 150-180 sts. K 1 row from WS while AT THE SAME TIME adjusting no of sts to 144-148-156-164-172-180. Then work rib on next row from RS as follows: 1 sts in garter st, * K 2, P 2 *, repeat from *-* and finish with K 2 and 1 st in garter st. Continue like this until collar measures approx. 5-5-5-6-6-6 cm. Now inc 1 st in each of the middle 14-14-14-16-16-16 P-sections seen from RS (= back of neck) = 158-162-170-180-188-196 sts. Continue until collar measures approx. 12-12-12-12-14-14 cm, then loosely cast off with K over K and P over P. Fasten collar with stitches at the bottom in each side towards band from WS (so that the seam is not visible from RS) – sew edge to edge to avoid a chunky seam. |
||||||||||||||||
Diagram explanations |
||||||||||||||||
|
||||||||||||||||
 |
||||||||||||||||
 |
||||||||||||||||
Have you finished this pattern?Tag your pictures with #dropspattern #ramblingmancardigan or submit them to the #dropsfan gallery. Do you need help with this pattern?You'll find 23 tutorial videos, a Comments/Questions area and more by visiting the pattern on garnstudio.com. © 1982-2026 DROPS Design A/S. We reserve all rights. This document, including all its sub-sections, has copyrights. Read more about what you can do with our patterns at the bottom of each pattern on our site. |
||||||||||||||||


With over 40 years in knitting and crochet design, DROPS Design offers one of the most extensive collections of free patterns on the internet - translated to 17 languages. As of today we count 324 catalogues and 12291 patterns translated into English (UK/cm).
We work hard to bring you the best knitting and crochet have to offer, inspiration and advice as well as great quality yarns at incredible prices! Would you like to use our patterns for other than personal use? You can read what you are allowed to do in the Copyright text at the bottom of all our patterns. Happy crafting!
Post a comment to pattern DROPS Extra 0-850
We would love to hear what you have to say about this pattern!
If you want to leave a question, please make sure you select the correct category in the form below, to speed up the answering process. Required fields are marked *.