
Popular categories
Looking for a yarn?


Comments / Questions (266)
![]() Linda Contino wrote:
Linda Contino wrote:
Hi, I am beginning the buttonholes and firstly I am confused after looking at the diagram showing the placement of the buttonholes, that the buttonholes began at the band but this was not indicated in the pattern. Secondly, it is not clear after the first buttonhole, how many rows worked before second buttonhole? Thank you.
28.01.2019 - 23:01DROPS Design answered:
Dear Mrs Contino, the buttons are drawn on the chart just to show them (we usually don't show them) - they are placed depending on the size how explained under BUTTONHOLES, ie measure from the bottom edge (cast on row) to place them. You can count the number of rows you need between each buttonholes. Happy knitting!
29.01.2019 - 09:11
![]() Linda wrote:
Linda wrote:
Hi, I am starting to work the Right Front. Is it normal this is not even if you were to look at the bottom? The 26 garter stitches give the Right Front a somewhat uneven look. Thanks.
15.01.2019 - 19:48DROPS Design answered:
Dear Linda, sorry not sure what you mean with somewhat uneven - you are welcome to show your work to your store (even sending them a picture in a email) so that they can have a better overview and check with you. You will work short rows over the front band sts to avoid them to contract piece in height - see SHORT ROWS at the beg of written pattern. Happy knitting!
16.01.2019 - 08:12
![]() Annelies Staal wrote:
Annelies Staal wrote:
Ik heb een vraag over de verkorte toeren. Ik brei de verkorte toeren in patroon A 3 iedere 3e naald. Het valt me op dat het werk toch wel behoorlijk scheef wordt en ik heb pas 2 maal het patroon herhaald. Ik begin te twijfelen of het wel goed komt. Heeft u antwoord voor mij? Dank u.
05.01.2019 - 16:41DROPS Design answered:
Dag Annelies,
Het is de bedoeling dat je alleen over de voorbiessteken verkorte toeren breit en niet in het patroon zelf. Je breit deze verkorte toeren ter hoogte van iedere derde naald in iedere patroonherhaling, dus om de 24 naalden. Als de voorbies dan nog te royaal wordt, zou je wat minder verkorte toeren kunnen breien.
05.01.2019 - 20:26Flavio wrote:
"Dear Flavio, you bind off for sleeve at the beginning of every row (both from RS and from WS): 3 sts 1 time, 2 sts 1 time, 1 stitch 2 times, then continue binding off 2 sts at the beginning of every row (both from RS and from WS) until sleeve measures 61 cm" ------- But first do I have to reach the 53 cm as stated on the pattern and THEn start that, or before the 53 cm? :(
04.01.2019 - 18:49DROPS Design answered:
Dear Flavio, first work in pattern as explained before until work measures 53 cm from cast on row, then start to bind off for sleeve cap as described. Happy knitting!
09.01.2019 - 08:55Flavio wrote:
Hello! I am knitting size M. Confused about the end of the sleeve. Must I: 1) start the first binding off (3 sts x 1, 2 sts x 1 and 1 st x 2) WHILE I reach 53 cm, right after the last increase, or 2) Do I first reach 53cm, THEN start the binding off as above, and then 2 sts each side until 61cm? The second option would mean that aprox 5cm will be "straight", no inc and no binding off. First option would mean the sleeve is romboid and decreases right after increasing. help!
03.01.2019 - 22:37DROPS Design answered:
Dear Flavio, you bind off for sleeve at the beginning of every row (both from RS and from WS): 3 sts 1 time, 2 sts 1 time, 1 stitch 2 times, then continue binding off 2 sts at the beginning of every row (both from RS and from WS) until sleeve measures 61 cm from cast on edge. Now bind off 3 sts at the beg of next 4 rows (= 3 sts at the beg of each row a total of 2 times). The sleeve should now measure 62 cm. Happy knitting!
04.01.2019 - 12:29
![]() Noora wrote:
Noora wrote:
Minua mietityttää villatakin leveys. Olen tekemässä kokoa L. Tulkitsen ohjeesta, että napituslistan olisi oltava 12cm, koska kauluksen lyhyimmän reunan pitää olla 12cm. Näin ollen etukappaleet (yhden etukappaleen leveys 33cm-puolet napituslistasta 6cm=27cm) yhteensä (27cm x 2 = 54cm) ovat kapeampi kuin takakappale (56cm). Kuuluuko näin ollakin?
13.12.2018 - 10:13
![]() Linda wrote:
Linda wrote:
Hi its Linda again. regarding the binding off for the neck in the back, and I need to bind off the middle 26 sts for neck. I am not clear how I do this. The neck sts are the middle part of the neck which consist of 32 sts. To get to this part of the back so i can bind off 26 of the 32 sts, do I work the pattern to get there? Thank you. Linda
12.12.2018 - 06:37DROPS Design answered:
Dear Linda, work the 118 sts on back piece as follows: work the first 46 sts on row and slip them on to a stitch holder for first shoulder, then cast off the next 26 sts for neck, work the remaining 46 sts. On next row from neck towards armhole, bind off 2 sts = 44 sts. Continue until piece measures 74 cm and bind off the 44 sts, cut the yarn. Work the stitches from first shoulder back on needle and bind off the first 2 sts from neck towards shoulder, continue as before and bind off when piece measures 74 cm. Both shoulders are done and there are 26 sts + 2 sts on each side bound off for neck. Happy knitting!
12.12.2018 - 10:10
![]() Janne wrote:
Janne wrote:
Jeg finner ikke mønster A4. Jeg ser bare A1-2-3
11.12.2018 - 11:35DROPS Design answered:
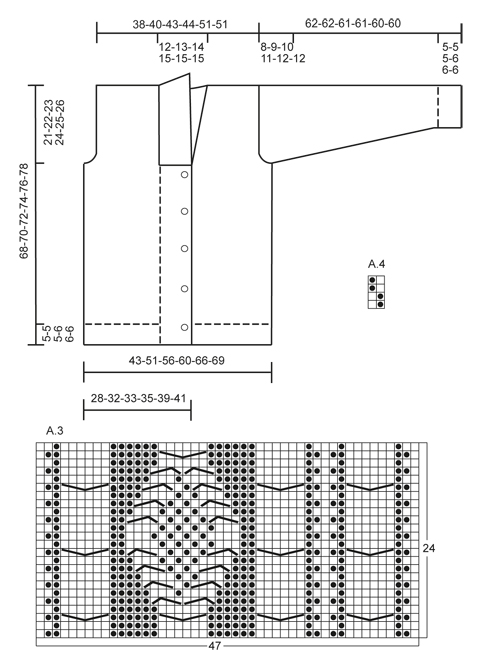
Hei Janne. A.4 ligger rett ved siden av målskissen, over de andre diagrammen. Det er ganske lite: 2 masker x 4 rader. God fornøyelse
11.12.2018 - 12:07
![]() Janne wrote:
Janne wrote:
Hei Jeg finner ikke mønster A4 🤷🏼♀️
11.12.2018 - 11:34
![]() Michele wrote:
Michele wrote:
Beautiful pattern! I am having troble with the sleeve cap. In the picture there appears to be a band at the top of the sleeve, however I do no see how or where to knit this. Is it done by picking up stitches or should it have been done before binding off the sleeve top (which i have already done) Help please?
06.12.2018 - 13:07DROPS Design answered:
Dear Michele, the band in double moss stitch you can see on the top of sleeve is the pattern (= diagram A.4) worked towards armhole on right and front piece - sleeve just finished with pattern (cables from diagram A.1). Happy knitting!
06.12.2018 - 13:43
|
||||||||||||||||
Rambling Man#ramblingmancardigan |
||||||||||||||||
 |
 |
|||||||||||||||
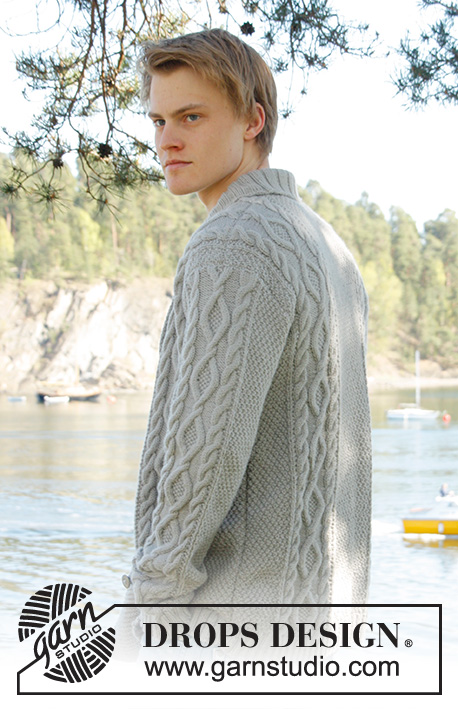
Men's knitted jacket in DROPS Lima, with cable pattern and shawl collar. Size: S - XXXL.
DROPS Extra 0-850 |
||||||||||||||||
|
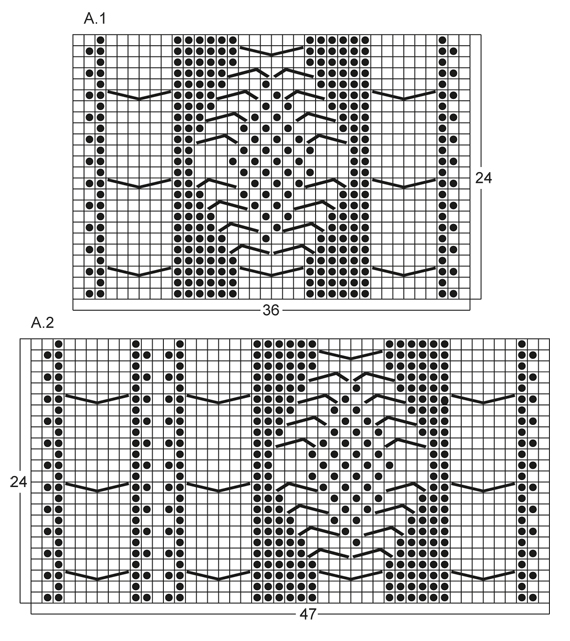
KNITTING TIPS: This design is written with button holes on right front edge, if you wish standard button holes for men, you can make the button holes on left front edge. GARTER ST (back and forth on needle): K all rows. NOTE: All edge sts are worked in garter st. PATTERN: See diagram A.1 to A.4, diagrams show all rows in 1 pattern repetition from RS. SHORT ROWS: RIGHT FRONT PIECE: Work 1 short row on row 3 of every pattern repetition vertically until finished measurements as follows: On 3rd row in pattern (= RS), work 26-26-26-26-30-30 band sts, turn and K back. Then work over all sts on row as before. LEFT FRONT PIECE: Work 1 short row on row 2 of every pattern repetition vertically until finished measurements as follows: On 2nd row in pattern (= WS), work 26-26-26-26-30-30 band sts, turn and K back. Then work over all sts on row as before. BUTTON HOLES: Cast off for 5 button holes from RS on right band. 1 BUTTON HOLE = cast off 7th and 8th st from mid front and cast on 2 new sts on next row over these sts. Cast off for button holes when piece measures: SIZE S: 14, 22, 30, 38 and 46 cm SIZE M: 15, 23, 31, 39 and 47 cm SIZE L: 16, 24, 32, 40 and 48 cm SIZE XL: 17, 25, 33, 41 and 49 cm SIZE XXL: 18, 26, 34, 42 and 50 cm SIZE XXXL: 19, 27, 35, 43 and 51 cm INCREASE TIP: Inc 1 st by making 1 YO, on next row work YO twisted (i.e. work in back loop of st instead front) to avoid holes. ---------------------------------------------------------- BACK PIECE: Worked back and forth on needle. Cast on 136-156-168-180-196-204 sts (incl 1 edge st in each side) on circular needle size 3.5 mm with Lima. Work rib as follows (1st row = RS): 1 edge st in GARTER ST - see explanation above, * K 2, P 2 *, repeat from *-*, finish with K 2 and 1 edge st in garter st. Continue to work like this until rib measures 5-5-5-6-6-6 cm. On last row from WS, P while AT THE SAME TIME dec 20-22-24-26-26-26 sts evenly = 116-134-144-154-170-178 sts. Then switch to needle size 4 mm and work next row from RS as follows: 1 edge st in garter st, 8-16-20-24-20-24 sts in A.4, work A.1 one time in size S - XL, work A.2 one time in size XXL and XXXL, 26-28-30-32-34-34 sts in A.4, then work A.1 one time in size S - XL, work A.3 one time in size XXL and XXXL, finish with 8-16-20-24-20-24 sts in A.4 and 1 edge st in garter st. REMEMBER THE KNITTING TENSION! Continue to work like this until piece measures 47-48-49-50-51-52 cm. Then cast off for armholes at the beg of every row in each side as follows: Cast off 3 sts 0-1-1-2-2-2 times, 2 sts 1-1-1-2-2-2 times, 1 st 4-7-9-8-4-8 times = 104-110-116-118-142-142 sts. Continue with pattern as before until piece measures 66-68-70-72-74-76 cm. Now cast off the middle 20-22-24-26-28-28 sts for neck and finish each part separately. Cast off 2 sts on next row from neck = 40-42-44-44-55-55 sts remain on shoulder. Continue with pattern as before. When piece measures 68-70-72-74-76-78 cm, loosely cast off sts with K over K and P over P. RIGHT FRONT PIECE: Worked back and forth on needle. Cast on 83-91-95-99-111-115 sts (incl 1 edge st in the side) on circular needle size 3.5 mm with Lima. Work rib as follows (1st row = RS): 26-26-26-26-30-30 sts in garter st (= band sts), * K 2, P 2 *, repeat from *-*, finish with 1 edge st in garter st. Continue with rib and band sts in garter st until rib measures 5-5-5-6-6-6 cm. On last row from WS, P over all sts in rib while AT THE SAME TIME dec 12-12-12-12-13-13 sts evenly (do not dec over band sts) = 71-79-83-87-98-102 sts. Then switch to needle size 4 mm and work next row from RS as follows: 26-26-26-26-30-30 band sts, work A.1 one time in size S - XL, work A.3 one time in size XXL and XXXL, 8-16-20-24-20-24 sts in A.4 and 1 edge in garter st. On next row from RS (= 3rd row in pattern) work SHORT ROWS - read explanation above. Continue with pattern and band sts at the front - while AT THE SAME TIME work 1 short row on 3rd row in every pattern repetition vertically until finished measurement. When piece measures 14-15-16-17-18-19 cm, cast off for BUTTON HOLES on right band - see explanation above! Continue to work until piece measures 47-48-49-50-51-52 cm. Then cast off at beg of next row from RS as follows: Cast off the first 25-25-25-25-29-29 sts, insert a marker (this marks where to beg the knit up for collar), work the rest of row. Then cast off for armhole on every row from WS as follows: 3 sts 0-1-1-2-2-2 times, 2 sts 1-1-1-2-2-2 times, 1 st 4-7-9-8-4-8 times = 40-42-44-44-55-55 sts remain on shoulder. Continue with pattern as before. When piece measures 68-70-72-74-76-78 cm, loosely cast off sts with K over K and P over P. LEFT FRONT PIECE: Cast on and work rib as on right front piece but reversed (i.e. * P 2, K 2 *, repeat from *-*) with 26-26-26-26-30-30 band sts in garter st. Continue to work until rib measures 5-5-5-6-6-6 cm. On last row from WS, P over all sts in rib while AT THE SAME TIME dec 12-12-12-12-13-13 sts evenly (do not dec over band sts) = 71-79-83-87-98-102 sts. Then switch to needle size 4 mm and work next row from RS as follows: 1 edge st in garter st, 8-16-20-24-20-24 sts in A.4, work A.1 one time in size S - XL, work A.2 one time in size XXL and XXXL, 26-26-26-26-30-30 band sts in garter st. On next row from WS (= 2nd row in pattern) work SHORT ROWS - read explanation above. Continue to work the same way as on right front piece but without button holes. SLEEVE: Worked back and forth on needle. Cast on 74-78-82-86-90-90 sts (incl 1 edge st in each side) on circular needle size 3.5 mm with Lima. Work rib as follows (1st row = RS): 1 edge st in garter st, * K 2, P 2 *, repeat from *-* and finish with 1 edge st in garter st. Continue to work like this until rib measures 5-5-5-6-6-6 cm. On last row from WS, P while AT THE SAME TIME dec 12-14-16-18-18-18 sts evenly = 62-64-66-68-72-72 sts. Then switch to needle size 4 mm and work next row from RS as follows: 1 edge st in garter st, 12-13-14-15-17-17 sts in A.4, work A.1 one time, 12-13-14-15-17-17 sts in A.4, finish with 1 edge st in garter st. AT THE SAME TIME when piece measures 6 cm, inc 1 st inside 1 edge st in each side - Read INCREASE TIP above. NOTE: Work the inc sts in A.4. Repeat inc every 3½-3-2½-2½-2½-2½ cm a total of 14-15-16-17-16-17 times = 90-94-98-102-104-106 sts. Continue until piece measures 54-53-51-50-48-48 cm (shorter measurements in the larger sizes because of longer sleeve cap and broader shoulder width), cast off at beg of every row in each side: 3 sts 1-1-1-2-2-2 times, 2 sts 1-1-2-2-2-2 times and 1 st 2-2-3-3-4-4 times. Then cast off 2 sts in each side until piece measures 61-61-60-60-59-59 cm, then cast off 3 sts 2 times in each side. When piece measures approx. 62-62-61-61-60-60 cm, loosely cast off sts with K over K and P over P. ASSEMBLY: Sew shoulder seams and sew in sleeves inside 1 edge st. Sew sleeve and side seams in one inside 1 edge st. Sew buttons on to left front piece, approx. 2½ cm from last K st in pattern. SHAWL COLLAR: Knit up sts from RS inside 1 edge st on circular needle size 3.5 mm. Start mid front at marker on right front piece as follows: Knit up approx. 60-70 sts up to shoulder, then 30-40 sts along the neck and 60-70 sts down along left front piece until marker = 150-180 sts. K 1 row from WS while AT THE SAME TIME adjusting no of sts to 144-148-156-164-172-180. Then work rib on next row from RS as follows: 1 sts in garter st, * K 2, P 2 *, repeat from *-* and finish with K 2 and 1 st in garter st. Continue like this until collar measures approx. 5-5-5-6-6-6 cm. Now inc 1 st in each of the middle 14-14-14-16-16-16 P-sections seen from RS (= back of neck) = 158-162-170-180-188-196 sts. Continue until collar measures approx. 12-12-12-12-14-14 cm, then loosely cast off with K over K and P over P. Fasten collar with stitches at the bottom in each side towards band from WS (so that the seam is not visible from RS) – sew edge to edge to avoid a chunky seam. |
||||||||||||||||
Diagram explanations |
||||||||||||||||
|
||||||||||||||||
 |
||||||||||||||||
 |
||||||||||||||||
Have you finished this pattern?Tag your pictures with #dropspattern #ramblingmancardigan or submit them to the #dropsfan gallery. Do you need help with this pattern?You'll find 23 tutorial videos, a Comments/Questions area and more by visiting the pattern on garnstudio.com. © 1982-2026 DROPS Design A/S. We reserve all rights. This document, including all its sub-sections, has copyrights. Read more about what you can do with our patterns at the bottom of each pattern on our site. |
||||||||||||||||


With over 40 years in knitting and crochet design, DROPS Design offers one of the most extensive collections of free patterns on the internet - translated to 17 languages. As of today we count 324 catalogues and 12291 patterns translated into English (UK/cm).
We work hard to bring you the best knitting and crochet have to offer, inspiration and advice as well as great quality yarns at incredible prices! Would you like to use our patterns for other than personal use? You can read what you are allowed to do in the Copyright text at the bottom of all our patterns. Happy crafting!
Post a comment to pattern DROPS Extra 0-850
We would love to hear what you have to say about this pattern!
If you want to leave a question, please make sure you select the correct category in the form below, to speed up the answering process. Required fields are marked *.