
Popular categories
Looking for a yarn?


Comments / Questions (154)
Jana wrote:
Thanks for answer, I understand
07.09.2015 - 14:03Jana wrote:
I am knitting jacket, and don`t understand how to make "6 sts tog 2 by 2"?
06.09.2015 - 09:28DROPS Design answered:
Dear Jana, you need to dec number of sts in M.3 worked over 6 sts, work K2 tog a total of 3 times (6 sts dec to 3 sts).
07.09.2015 - 11:12
![]() Tiziana wrote:
Tiziana wrote:
Buongiorno, sto lavorando la copertina di questo modello, sono quasi alla fine. Non le vedo io o mancano le istruzioni per il bordo all'uncinetto da fare tutto intorno alla copertina dopo aver cucito tutti i quadrati insieme? Grazie mille, buona giornata! Tiziana
04.06.2015 - 10:53DROPS Design answered:
Buongiorno Tiziana. Abbiamo aggiunto il testo mancante. La ringraziamo per la segnalazione. Buon lavoro!
04.06.2015 - 11:10
![]() Tiziana wrote:
Tiziana wrote:
Buongiorno, vorrei eseguire la copertina, volevo chiedere se posso lavorare tutti i quadrati insieme e non solamente una fila di 4 alla volta, in modo da evitare di dover unire le file alla fine e cercare di fare un lavoro più pulito possibile. Grazie mille per l'aiuto, a presto
04.05.2015 - 17:12DROPS Design answered:
Buonasera Tiziana, può lavorare la coperta in un pezzo unico. In questo caso si lavora a quadrati o a file per comodità: la coperta risulta pesante da lavorare tutta insieme e si ricordi che il filato potrebbe smollare un pò a causa del peso del lavoro, trattandosi di Merino. Buon lavoro!
04.05.2015 - 20:25
![]() Gitte wrote:
Gitte wrote:
Er det muligt at strikke denne i Baby Alpaca Silk?
03.05.2015 - 15:38DROPS Design answered:
Hej Gitte. Saa skal du nok bruge dobbelt traad. Men strik en pröve först og tjek din strikkefasthed.
04.05.2015 - 11:47
![]() Dominique Bruley wrote:
Dominique Bruley wrote:
Bonjour, je tricote le gilet en 6/9 mois. pour le dos, à 18 cm de hauteur je dois commencer les diminutions et passer des 80 mailles de départ à 56. soit 12 mailles de chaque côté du gilet en procédant ainsi :1 fois 3m., 1 fois 2m., 3 fois 1m, soit 8 mailles et non 12. Merci de me dire où je fais erreur. Merci infiniment
22.03.2015 - 21:53DROPS Design answered:
Bonjour Mme Bruley, en taille 6/9 mois, on a 72 m (8 diminutions après les côtes), on rabat ensuite bien 8 m de chaque côté au total, soit 72 - 16 = 56 m. Bon tricot!
23.03.2015 - 10:33
![]() Maybritt wrote:
Maybritt wrote:
Hej. Jeg har sat mig for at lave denne smukke jakke. Har dog et spørgsmål til rygstykket. Når man er på vrang siden, skal man så først læse M2 diagrammet og skal stadig lave vr hvis der står det på vrang siden fx 8vr masker, m3, 2vr, m3, 8 vr masker? På forhånd tak
16.03.2015 - 21:43DROPS Design answered:
Hej Maybritt. Du læser mønsteret fra retsiden, dvs at når der står 8 m vr (fra retsiden) så strikkes disse 8 m ret fra vrangen. God fornøjelse!
21.05.2015 - 09:43
![]() Severine Carrere wrote:
Severine Carrere wrote:
Bonjour je suis entrain de faire la veste et j'ai une question concernant le diagramme M 3 quand on l'a terminer de tricoter tout les rangs et vue qu'il est plus petit comme diagramme que le M1 et M2 dois je recommencer au debut du diagramme pour continuer le point fantaisie ou dois je faire 4 rang et au cinquieme faire mon point fantaisie ? j'espere que vous me comprenez merci par avance de votre aide. bonne journée.
19.02.2015 - 11:50DROPS Design answered:
Bonjour Mme Carrere, les diagrammes n'ont effectivement pas tous le même nombre de rangs à répéter en hauteur, quand M.3 est terminé, reprenez au 1er rang, mais continuez bien M.1 et M.2 comme avant. Bon tricot!
19.02.2015 - 14:23
![]() Ranvoisé wrote:
Ranvoisé wrote:
Bonjour pour le dos de la veste, à 32 cm de hauteur totale tricoter ens à l'end 2 par 2 les 6 m de M3. je ne comprend pas, car je ne tricote pas le point du modèle. pouvez vous me renseigner sur les 6 mailles à rabattre. merci
18.02.2015 - 12:04DROPS Design answered:
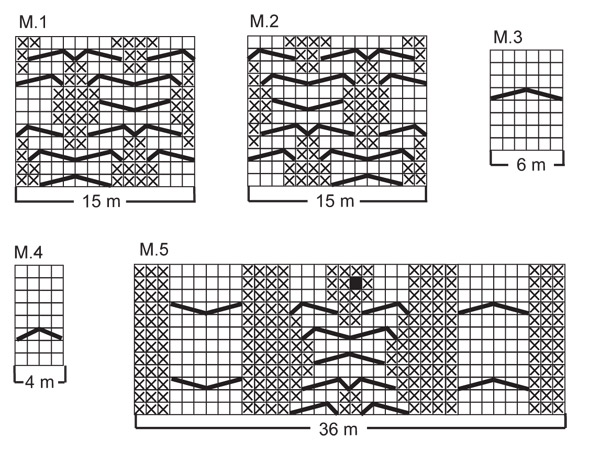
Bonjour Mme Ranvoisé, dans ce modèle M3 correspond à une torsade et pour éviter que les mailles ne soient trop larges quand on les mets en attente pour l'encolure, on doit diminuer 3 m (3 fois 2 m ens à l'end dans M3). Si vous tricotez un point différent, vous pouvez ajuster en fonction. Bon tricot!
18.02.2015 - 14:56
![]() Lynne Dufort wrote:
Lynne Dufort wrote:
Bonjour. Pour la couverture, la torsade du centre se dessine à l'envers du travail contrairement aux torsades gauches et droites qui sont sur l'endroit. Est-ce qu'il y a une erreur dans l'explication?
31.01.2015 - 23:58DROPS Design answered:
Bonjour Mme Dufort, le 1er rang de M5 se fait sur l'endroit, et tous les rangs figurent dans le diagramme, les croisements (torsades) se font tous sur l'endroit aux rangs 1, 3, 5, 7, et 9, les torsades de chaque côté se font aux rangs 3 et 9. Bon tricot!
02.02.2015 - 12:38
|
|||||||||||||||||||||||||
Matheo#matheojacket |
|||||||||||||||||||||||||
 |
 |
||||||||||||||||||||||||
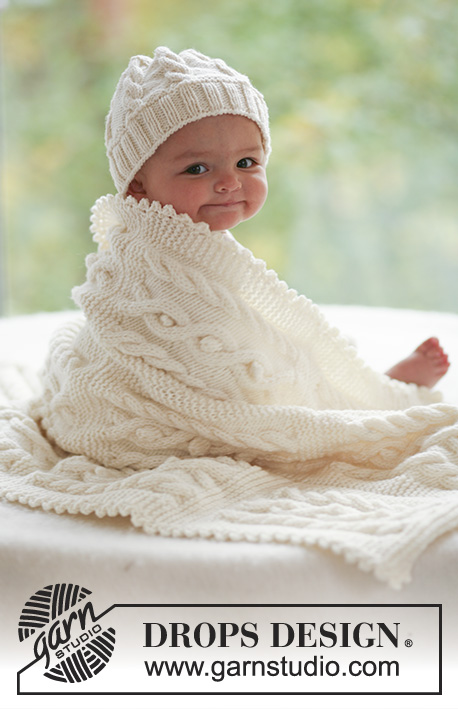
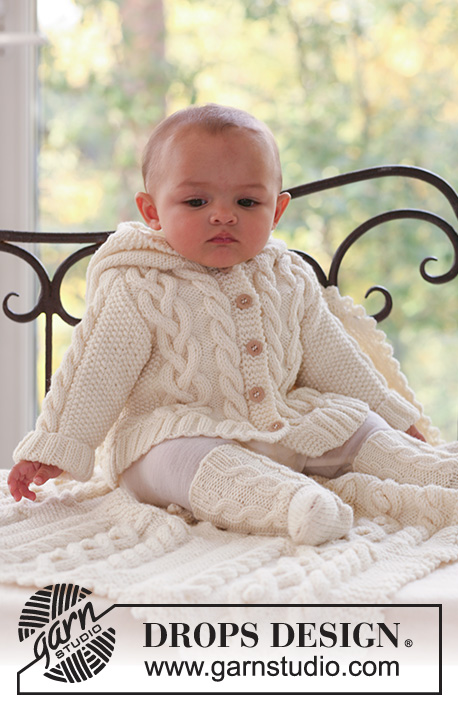
Set of knitted jacket with hood, socks and blanket with cables for baby and children in DROPS Merino Extra Fine. Theme: Baby blanket
DROPS Baby 17-2 |
|||||||||||||||||||||||||
|
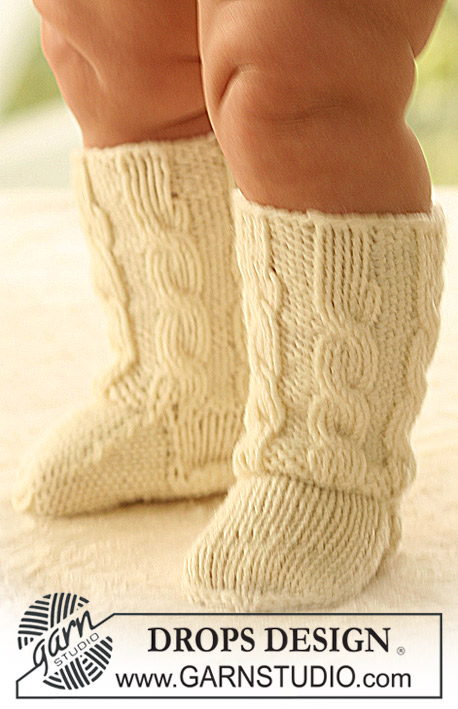
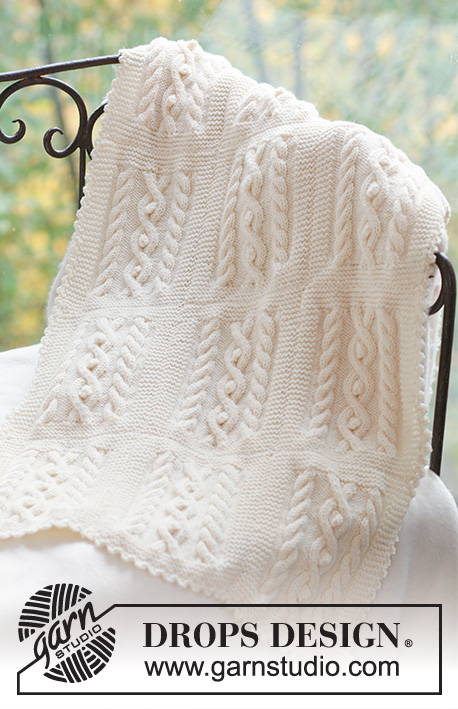
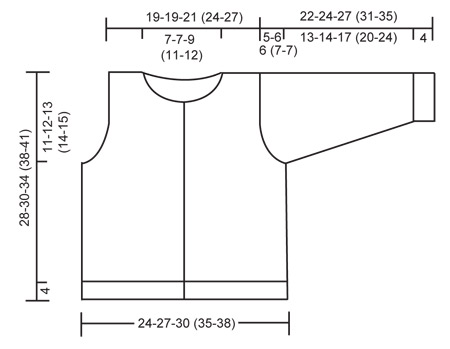
JACKET: MOSS ST: Row 1: * K1, P1 *, repeat from *-*. Row 2: K over P and P over K. Repeat row 2. PATTERN: See diagram M.1, M.2 and M.3. The diagrams show the pattern from the RS. BUTTONHOLES: Make buttonholes on right front band by K tog 2nd and 3rd st from edge and make 1 YO. Make buttonholes when piece measures: SIZE 1/3 months: 3, 8, 13, 18 and 23 cm SIZE 6/9 months: 5, 10, 15, 20 and 25 cm SIZE 12/18 months: 5, 11, 17, 23 and 29 cm SIZE 2 years: 5, 11, 16, 21, 27 and 32 cm SIZE 3/4 years: 5, 11, 17, 23, 29 and 35 cm ---------------------------------------------------------- BACK PIECE: Worked back and forth on needle. Cast on 72-80-84 (96-104) sts (includes 1 edge st each side) on needle size 3.5 mm with Merino Extra Fine. Work rib as follows (first row = RS): 1 edge st, * K2, P2 *, repeat from *-*, and finish with K2 and 1 edge st. When rib measures 4 cm change to needle size 4.5 mm and K 1 row from RS, AT THE SAME TIME dec 6-8-6 (8-10) sts evenly = 66-72-78 (88-94) sts. K 1 row from WS and continue as follows from RS: 1 edge st, 4-7-8 (11-11) moss sts – SEE ABOVE – P 2, M.1 (= 15 sts), P 4-4-6 (8-11), M.3 (= 6 sts), P 2, M.3 (= 6 sts), P 4-4-6 (8-11), M.2 (= 15 sts), P 2, 4-7-8 (11-11) moss sts and 1 edge st. Continue in pattern like this. REMEMBER THE KNITTING TENSION! When piece measures 17-18-21 (24-26) cm cast off for armhole each side at the beg of every row from the side: 3 sts 1 time, 2 sts 0-1-2 (3-3) times and 1 st 2-3-2 (2-2) times = 56-56-60 (66-72) sts. When piece measures 26-28-32 (36-39) cm work the 6 sts on M.3 tog 2 by 2 = 50-50-54 (60-66) sts. On next row cast off the middle 12-12-16 (20-22) sts for neck and complete each side separately. Cast off 1 st on neckline on next row = 18-18-18 (19-21) sts left on shoulder. When piece measures 28-30-34 (38-41) cm dec 6 sts evenly on row = 12-12-12 (13-15) sts left on shoulder, cast off on next row. RIGHT FRONT PIECE: Worked back and forth on needle from mid front. Cast on 42-46-50 (54-58) sts (includes 1 edge st at side and 5 front band sts towards mid front) on needle size 3.5 mm with Merino Extra Fine. Work rib as follows from mid front (first row = RS): 5 garter sts (= front band), * K2, P2 *, repeat from *-* and finish with 1 edge st. Remember buttonholes on front band - SEE ABOVE. When piece measures 4 cm change to needle size 4.5 mm, K 1 row from RS, AT THE SAME TIME dec 4-5-6 (5-6) sts evenly (do not dec on front band) = 38-41-44 (49-52) sts. K 1 row from WS and work next row as follows from RS: 5 garter sts (= front band), P 1, M.3 (= 6 sts), P 4-4-6 (8-11), M.1 (= 15 sts), P 2, 4-7-8 (11-11) moss sts and 1 edge st. Continue in pattern like this. When piece measures 17-18-21 (24-26) cm cast off for armhole at the side as described for back piece = 33-33-35 (38-41) sts. When piece measures 24-26-30 (33-36) cm work the 6 sts on M.3 tog 2 by 2 = 30-30-32 (35-38) sts. Now slip the 8-8-10 (12-13) sts towards mid front on a stitch holder for neck. Cast off to shape the neckline at the beg of every row from mid front: 2 sts 1 time and 1 st 2 times = 18-18-18 (19-21) sts left on shoulder. When piece measures 28-30-34 (38-41) cm dec 6 sts evenly = 12-12-12 (13-15) sts left on shoulder, cast off LEFT FRONT PIECE: Cast on and work like right front piece, but mirrored, i.e. work first row as follows from the side: 1 edge st * P2, K2 *, repeat from *-*, and finish with 5 garter sts (= front band). When working pattern work row from RS as follows: 1 edge st, 4-7-8 (11-11) moss sts, P 2, M.2 (= 15 sts), P 4-4-6 (8-11), M.3 (= 6 sts), P 1 and 5 garter sts (= front band). Do not make buttonholes! SLEEVE: Worked back and forth on needle. Cast on 46-46-46 (50-50) sts (includes 1 edge st each side) on needle size 3.5 mm with Merino Extra Fine. Work 4 cm rib, K2/P2, with 1 edge st each side. Change to needle size 4.5 mm and K 1 row from RS, AT THE SAME TIME dec 10-8-8 (10-10) sts evenly = 36-38-38 (40-40) sts. K 1 row from WS and work next row as follows from RS: 1 edge st, 12-13-13 (14-14) moss sts, P 2, M.3 (= 6 sts), P 2, 12-13-13 (14-14) moss sts and 1 edge st. Continue in pattern like this. AT THE SAME TIME when piece measures 7 cm inc 1 st each side and repeat the inc on every 4th row a total of 6-7-9 (10-12) times = 48-52-56 (60-64) sts – work the inc sts in moss st. When piece measures 17-18-21 (24-28) cm cast off for sleeve cap each side at the beg of every row: 4 sts 1 time, and then 2 sts until piece measures 21-23-26 (30-34) cm, now cast off 3 sts each side 1 time, AT THE SAME TIME on the last row work the 6 sts on M.3 tog 2 by 2. Cast off remaining sts on next row. Piece measures approx 22-24-27 (31-35) cm. ASSEMBLY: Sew shoulder seams. HOOD: Pick up approx 46 to 68 sts (incl sts on stitch holders at front) round neckline on needle size 4.5 mm. K 2 rows, AT THE SAME TIME on second row inc evenly to 68-72-76 (80-84) sts. Continue in reverse stocking st with 5 garter sts each side until hood measures 21-23-25 (27-28) cm, cast off. Sew hood tog at the top, edge to edge to avoid a chunky seam. Set in sleeves. Sew sleeve and side seams inside 1 edge st. Sew on buttons. ---------------------------------------------------------- SOCK: PATTERN: See diagram M.4. The diagram shows the pattern from the RS. DECREASING TIP: Dec as follows before marker: K 2 tog. Dec as follows after marker: Slip 1 st as if to K, K1, psso. HEEL DECREASES: ROW 1 (= RS): Work row until 5-5-6 (6-6) sts remain, slip next st as if to K, K1, psso, turn piece, ROW 2 (= WS): Work row until 5-5-6 (6-6) sts remain, slip next st as if to P, P1, psso, turn piece, ROW 3 (= RS): Work row until 4-4-5 (5-5) sts remain, slip next st as if to K, K1, psso, turn piece, ROW 4 (= WS): Work row until 4-4-5 (5-5) sts remain, slip next st as if to P, P1, psso, turn piece. Continue dec like this with 1 less st between each dec until there are 9-9-12 (12-12) sts on row. ---------------------------------------------------------- SOCK: Worked in the round on double pointed needles. Cast on 36-36-42 (42-42) sts on double pointed needles size 3 mm with Merino Extra Fine and work 2 cm rib, K3/P3. Work 1 round rib, AT THE SAME TIME inc all K3 to K4 = 42-42-49 (49-49) sts. Work 1 round K4/P3. Now continue as follows: * M.4, P3 *, repeat from *-* a total of 6-6-7 (7-7) times. After 3 vertical repeats of M.4 work sts in M.4 tog 2 by 2 = 30-30-35 (35-35) sts. Now keep the first 17-17-22 (22-22) sts on needle for heel and slip remaining 13 sts on a stitch holder (= upper foot). Work 3-3.5-4 (4-4.5) cm stocking st back and forth on heel sts. Insert a marker in piece and now dec for heel – SEE ABOVE. After heel dec pick up 7-8-9 (9-10) sts on each side of heel and slip sts from stitch holder back on needle = 36-38-43 (43-45) sts. Continue in stocking st on all sts, AT THE SAME TIME dec as follows on each side of the 13 sts on upper foot: K tog the 2 sts before the 13 sts on upper foot into back of loop and K tog the 2 sts after the 13 sts. Dec on every other row a total of 5-6-7 (6-6) times = 26-26-29 (31-33) sts. When piece measures approx 8-9-9.5 (11.5-12.5) cm from marker on heel (approx 2-2-2.5 (2.5-3.5) cm remain) insert 1 marker each side with 13-13-15 (15-17) sts on upper foot and 13-13-14 (16-16) sts under foot. Dec on each side of both markers – SEE DECREASING TIP – on every other round 2-2-3 (3-5) times and then on every round 3-3-3 (3-2) times = 6-6-5 (7-5) sts. Cut the thread, pull through remaining sts and fasten. Sock measures approx 10-11-12 (14-16) cm. ---------------------------------------------------------- : BLANKET GARTER ST (back and forth on needle): K all rows. INCREASING TIP: Make all inc from RS. Inc 1 st by making 1 YO. Work YO into back of loop on return row to avoid a hole. PATTERN: See diagram M.5. The diagram shows the pattern from the RS. --------------------------------------------------------- BLANKET: Blanket is made up of 12 squares, sewn tog 3 by 4. 1 square measures approx: width 18 cm, length 22.5 cm 1 SQUARE: Cast on 36 sts on needle size 5 mm with Merino Extra Fine. Work 8 rows garter st – SEE ABOVE. K 1 row from RS, AT THE SAME TIME inc 10 sts evenly on the middle 26 sts = 46 sts. Work next row from WS as follows: 5 garter sts, K3, P6, K 4, P3, K4, P3, K4, P6, K3 and 5 garter sts. Continue as follows from RS: 5 garter sts, M.5 on the next 36 sts, 5 garter sts. Work 4 vertical repeats of M.5 like this, but on the last repeat finish when 2 rows of diagram remain. K 1 row from RS on all sts, AT THE SAME TIME dec 10 sts on the middle 36 sts = 36 sts. Work 8 rows garter st on all sts and cast of loosely. Note: You may work 4 squares in a row without casting off, i.e. beg a new square after the last 8 rows in garter st. ASSEMBLY: Sew the squares tog, 3 by 4. Sew in outer loops of sts to avoid a chunky seam. CROCHET BORDER: Crochet a border round the whole blanket with crochet hook size 5 mm as follows: * 1 dc in edge st, 3 ch, 1 dc in the first of these 3 ch, skip 1 cm *, repeat from *-*, and finish with 1 sl st in first dc from beg of round. |
|||||||||||||||||||||||||
Diagram explanations |
|||||||||||||||||||||||||
|
|||||||||||||||||||||||||
 |
|||||||||||||||||||||||||
 |
|||||||||||||||||||||||||
Have you finished this pattern?Tag your pictures with #dropspattern #matheojacket or submit them to the #dropsfan gallery. Do you need help with this pattern?You'll find 34 tutorial videos, a Comments/Questions area and more by visiting the pattern on garnstudio.com. © 1982-2026 DROPS Design A/S. We reserve all rights. This document, including all its sub-sections, has copyrights. Read more about what you can do with our patterns at the bottom of each pattern on our site. |
|||||||||||||||||||||||||


With over 40 years in knitting and crochet design, DROPS Design offers one of the most extensive collections of free patterns on the internet - translated to 17 languages. As of today we count 325 catalogues and 12298 patterns translated into English (UK/cm).
We work hard to bring you the best knitting and crochet have to offer, inspiration and advice as well as great quality yarns at incredible prices! Would you like to use our patterns for other than personal use? You can read what you are allowed to do in the Copyright text at the bottom of all our patterns. Happy crafting!
Post a comment to pattern DROPS Baby 17-2
We would love to hear what you have to say about this pattern!
If you want to leave a question, please make sure you select the correct category in the form below, to speed up the answering process. Required fields are marked *.