
Popular categories
Looking for a yarn?


Comments / Questions (62)
![]() Ulla wrote:
Ulla wrote:
Skall första varvet på m.5 stickas från avigsidan och sedan två varv slätstickning? känns lite märkligt.
29.10.2012 - 20:10DROPS Design answered:
Här skal du bara sticka 1 varv slätstickning!
15.11.2012 - 13:42
![]() DROPS Design NL wrote:
DROPS Design NL wrote:
U kunt de panden tot aan de pas gewoon heen en weer breien op een breinld. Maar de pas moet in de rondte worden gebreid voor het mooiste resultaat. Bekijk de video over rondbreien (ga naar de DROPS Video Index). Daar kunt u zien hoe u moet breien. Succes.
24.01.2012 - 12:34
![]() Loes wrote:
Loes wrote:
In de beschrijving staat dat er gebreid wordt met een rondbreinaald, maar kan ik hier ook gewone rechte breinld gebruiken?
24.01.2012 - 11:22
![]() Susanne Wenngren wrote:
Susanne Wenngren wrote:
Hej! Den här tittade jag på flera gånger o den blev bara finare o finare för varje gång, nu ska jag sticka den i härlig rosa fast ett annat garn än det som står här, längtar tills den blir klar. Hälsningar Susanne
06.04.2011 - 09:03Elnaz wrote:
Hi I found your site few days ago it's exellent I want to knitt this
27.11.2010 - 09:17
![]() Maria wrote:
Maria wrote:
Denna är bara så fin. Jag har ju en hög med vitt bomullsgarn, som bara ligger och väntar på att jag ska göra något fint med den. Denna modell blir perfekt!
26.02.2010 - 09:26
![]() Hege Kvalø wrote:
Hege Kvalø wrote:
Jeg sliter litt med denne opskriften, forstår ikke hvorfor det skal være så tungvint når du kommer på omgang 5 på m2a og m2b, får det ikke til og stemme selv om jeg låner en maske fra m2b.
26.07.2009 - 13:28
![]() Carinna Höglund wrote:
Carinna Höglund wrote:
Hej igen, har stickat i över 25 år och aldrig stött på något så underligt mönster som detta. På mönster M.2A varv 9 ( svart triangel) ska man helt plötsligt öka maskantal mitt i ett mönster, Varför? och dessutom ska man sticka 1 rät och 1 avig i samma maska på ett slätstickat område???
25.01.2009 - 12:19
![]() Syosticka.se wrote:
Syosticka.se wrote:
Hej Carina! Det är en ruta (= 1m) mellan symbolerna för omslag. Tänk dig att de sitter mellan maskorna så ska du nog få till det. Vad gäller varv 5 ser det ut som om det blir rätt om du "lånar" en m från nästa rapport fortsätter med 1 m mellan hoptagen och 3 mellan omslagen. /Lotta
24.01.2009 - 13:42
![]() Carina Höglund wrote:
Carina Höglund wrote:
På mönstret M.2A och M.2B blir jag inte klok. Enligt mönstret ska man göra två omslag efter varandra på varv tre, det går ju inte!Jag undrar också, man ska sticka M.2A nästan hela varvet, men hur blir det då när man kommer fram till varv 5.En "rapport" slutar ju med 2 maskor tills fast en ruta ligger över på M.2B
24.01.2009 - 13:23
|
||||||||||||||||||||||
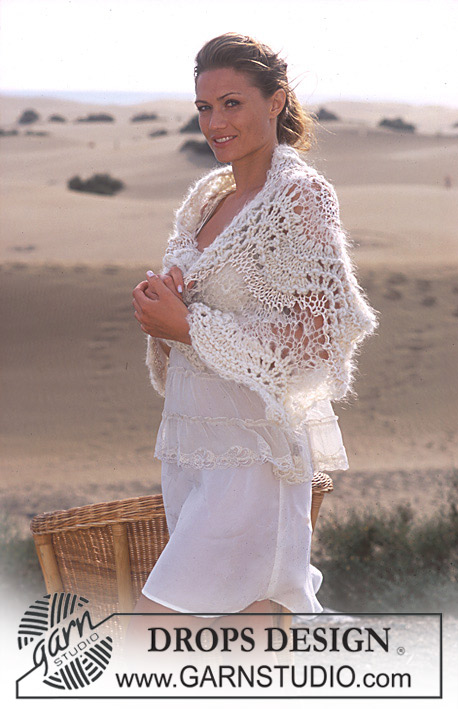
Lovely in Lace |
||||||||||||||||||||||
|
|
||||||||||||||||||||||
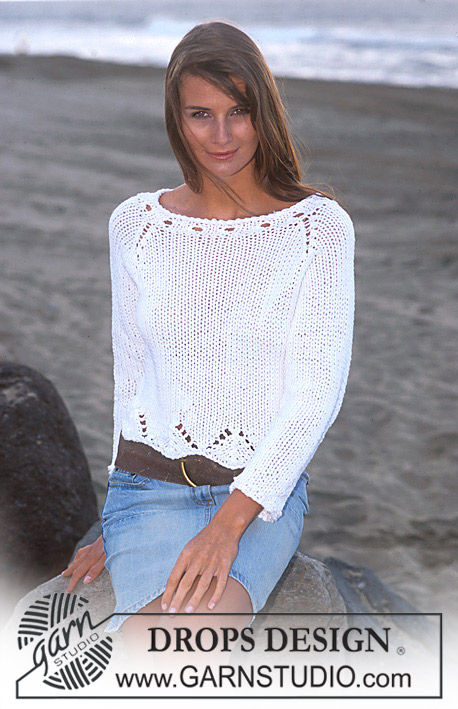
DROPS Long top with lace pattern knitted in Safran.
DROPS 94-24 |
||||||||||||||||||||||
|
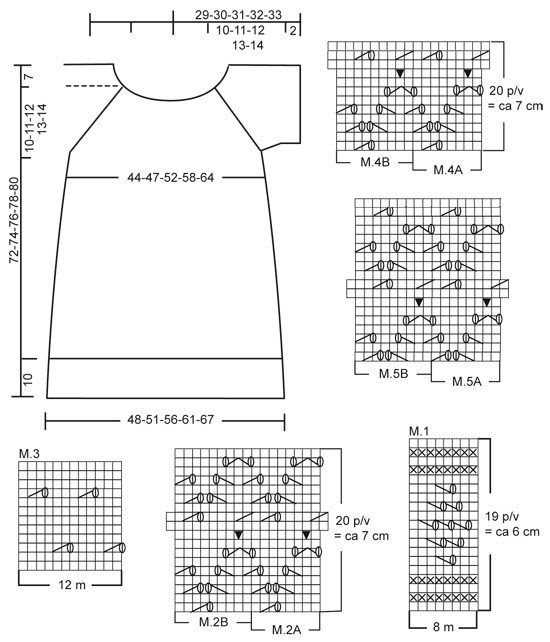
Knitting Gauge: 21 sts x 30 rows on needles size 3.5 mm in lace pattern with Safran = 10 x 10 cm, and 25 sts x 30 rows of rib-2 = 10 x 10 cm. Rib-1: *K2, P4*, repeat from *-* Rib-2: *K2, P3*, repeat from *-* Lace pattern: See diagrams M.1 to M.5. The diagrams are seen from the right side. Decreasing tips (for raglan): Bind off as follows at every transition between the sleeve and the front and back piece (begin 3 sts before the marking thread): K2 tog, K2 (marking thread is now in between these 2 sts), slip 1 st as if to knit, K1, psso. Front piece: Please read the entire pattern before starting – Work forward and backward on circular needle. Cast on 146-158-170-182-206 sts (inclusive of 1 seam st each side) on needles size 3.5 mm in Safran. P 1st row from the wrong side, and continue in Rib-1 and a seam st each side. After 2 rows dec. all P4’s to P3 = 122-132-142-152-172 sts, and continue the rib K2/P3 (seen from the right side). When the piece measures 10 cm K1 row from the right side, at the same time adjusting number of sts evenly on row to 102-110-120-130-142. Knit the next row from the wrong side as follows: 1 seam st, 2-2-3-0-2 stocking sts, M.1 over the next 96-104-112-128-136 sts, 2-2-3-0-2 sts of stocking sts and 1 seam st. Knit 1 repeat – NB: On the rows where the pattern says P from the right side, P over all sts including the 2-2-3-0-2 stocking sts at each side of M.1. At the same time, on the second but last row in M.1 adjust the number of sts to 99-107-123-131-139. Continue the next row from the right side as follows: 1 seam st, M.2A over the next 88-96-112-120-128 sts, M.2B (= 9 sts) and 1 seam st. Knit 1 repeat – at the same time on the last row in M.2 adjust the number of sts to 98-104-116-128-140. Continue in M.3 with a seam st at each side. At the same time when the piece measures 26 and 38 cm dec 1 st each side = 94-100-112-124-136 sts – knit the sts not fitting into pattern in stocking sts. When the piece measures approx. 46-47-48-49-50 cm – adjust M.3 so that you have knitted 2 rows of stocking sts after a row of lace holes and the next row is from the wrong side – continue as follows: 1 seam st, 2-1-3-1-3 sts of stocking sts, M.1 over the next 88-96-104-120-128 sts, 2-1-3-1-3 sts of stocking sts and 1 seam st. Knit 1 repeat (remember to P from the right side over all sts) – at the same time on the last row of M.1 adjust the number of sts to 95-101-111-123-137. After M.1 knit the next row as follows from the right side: 1 seam st, 2-1-2-0-3 sts of stocking sts, M.4A over the next 80-88-96-112-120 sts, M.4B (= 9 sts), 2-1-2-0-3 sts of stocking sts and 1 seam st. Knit 1 repeat of M.4 and continue in M.5 the same way until finished measurements. At the same time when the piece measures 55-56-57-58-59 cm bind off 7-7-7-9-9 sts each side = 81-87-97-105-119 sts left. Put the sts on a thread and knit the back piece. Back piece: Cast on and knit as front piece. Sleeve: Knit the sleeve forward and backward on circular needle. Cast on 72-77-82-87-92 sts (inclusive of a seam st each side) on circular needle size 3.5 mm in Safran. P 1st row from the wrong side, and continue in Rib-2 and a seam st each side. When the piece measures 2 cm – make sure the next row is from the right side – knit 4 rows of garter sts – at the same time dec 1-2-3-2-1 sts evenly distributed on on 1st row = 71-75-79-85-91 sts. Now bind off 7-7-7-9-9 sts each side and put the remaining sts on a thread. Knit 1 more sleeve. Assembly: Sew the front and back pieces tog inside the seam sts. Sew the sleeves tog inside the seam sts. Yoke: Insert the sleeves on the same circular needle as the front and back where you bound off for the armholes = 276-296-324-344-384 sts. Insert a marking thread at all transitions between front and back and sleeves = 4 marking threads. Knit 1-2-1-2-1 rounds before decreasing – NB: continue the pattern (M.5) on the front and back pieces as well as the sleeves (make sure to begin the pattern on the sleeves on the same pattern row as front and back pieces and knit 0-2-0-1-0 sts of stocking sts each side (M.5A are knitted over the first 48-48-56-56-64 sts and M.5B over the last 9 sts). Knit sts not fitting into pattern in stocking sts, and make sure to dec. as many sts as you make yo’s so that the number of sts outside the raglan decreases is constant. Raglan decreases: Dec 1 st each side of the marking threads (= 8 decreases per round) – see Decreasing tips above: Dec on every other row 15-16-18-19-21 times – NB: Knit sts not fitting into pattern in stocking sts. Neck: At the same time when the piece measures 63-65-67-68-70 cm put the centre front 39-43-47-51-57 sts on a thread for neck. Bind off on each neckline on every other row as follows: 2 sts 1-1-1-2-2 times and 1 st 2 times. After all dec for raglan and neck there are 109-117-125-129-147 sts left on row. Cast off. Neck edge: Pick up approx. 156-212 sts around the neck (including the sts from the thread at the centre front) on a small circular needle size 3.5 mm with Safran. P 1 round, K 1 round at the same time dec evenly on round to 120-130-130-140-140 sts. Continue in Rib-2 until the neck edge measures 2.5 cm. Bind off loosely in rib. Insert the silk ribbon in the top row of M.3 and tie a knot/loop. |
||||||||||||||||||||||
Diagram explanations |
||||||||||||||||||||||
|
||||||||||||||||||||||
 |
||||||||||||||||||||||
Have you finished this pattern?Tag your pictures with #dropspattern or submit them to the #dropsfan gallery. Do you need help with this pattern?You'll find 24 tutorial videos, a Comments/Questions area and more by visiting the pattern on garnstudio.com. © 1982-2026 DROPS Design A/S. We reserve all rights. This document, including all its sub-sections, has copyrights. Read more about what you can do with our patterns at the bottom of each pattern on our site. |
||||||||||||||||||||||


With over 40 years in knitting and crochet design, DROPS Design offers one of the most extensive collections of free patterns on the internet - translated to 17 languages. As of today we count 324 catalogues and 12290 patterns translated into English (UK/cm).
We work hard to bring you the best knitting and crochet have to offer, inspiration and advice as well as great quality yarns at incredible prices! Would you like to use our patterns for other than personal use? You can read what you are allowed to do in the Copyright text at the bottom of all our patterns. Happy crafting!
Post a comment to pattern DROPS 94-24
We would love to hear what you have to say about this pattern!
If you want to leave a question, please make sure you select the correct category in the form below, to speed up the answering process. Required fields are marked *.