
Popular categories
Looking for a yarn?


|
|||||||||||||||||||
DROPS 94-25 |
|||||||||||||||||||
|
|
|||||||||||||||||||
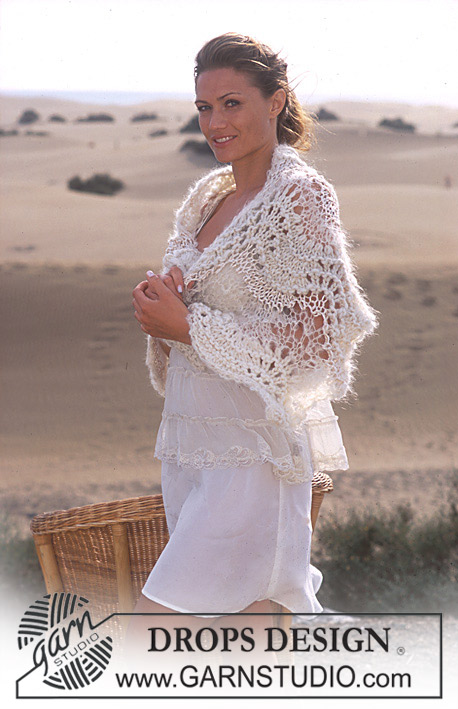
DROPS Long cardigan with lace pattern knitted in Muskat.
DROPS 94-25 |
|||||||||||||||||||
|
Knitting Gauge: 21 sts x 28 rows on needles size 4 mm stocking sts = 10 x 10 cm. Pattern: See diagrams M.1 to M.3 Diagrams are seen from the right side. NB: Make sure the patterns are in line vertically as shown in diagrams. Knit sts not fitting into pattern after dec for armhole, neck and sleeve cap in stocking sts. Back piece: Please read all of the section before you begin! Cast on 101-109-117-127-141 sts (inclusive of 1 seam st each side – all seam sts are knitted in garter sts throughout) on needles size 4 in Muskat and knit 2 rows of garter sts, continue in stocking sts. When the piece measures 10 cm continue from the right side as follows: 1 seam st, 9-8-7-7-9 sts of stocking sts, M.1A (= 6 sts), M.1B over the next 70-80-90-100-110 sts, M.1C (=5 sts), 9-8-7-7-9 sts of stocking sts and 1 seam st. NB: purl all sts on rows purled from the right side. After 1 vertical repeat of M.1, continue with 1 vercital repeat of M.2, and now knit M.3 until finished measurements. At the same time when the piece measures 12 cm dec 1 st each side on every 7-7-7-8-8 cm a total of 5 times = 91-99-107-117-131 sts. When the piece measures 49-50-51-52-53 cm bind off for armhole on each side on every other row: 4 sts 1 times, 3 sts 0-1-1-1-2 times, 2 sts 1-1-2-4-5 times and and 1 st 3 times = 73-75-79-81-85 sts. When the piece measures 66-68-70-72-74 cm bind off the centre 21 sts for neck and continue to bind off on each neckline on every other row: 1 st 2 times = 24-25-27-28-30 left on each shoulder. When the piece measures 68-70-72-74-76 cm bind off remaining sts (adjust to at least 2 rows of stocking sts after finishing the lace pattern). Left front: Please read all of the section before continuing. Cast on 56-60-64-69-76 sts (inclusive of 1 seam st at the side and 5 edge sts mid front, all knitted in garter sts throughout) on needles size 4 mm in Muskat and knit 2 rows garter sts with the 2 mid front sts knitted in double thread (use an extra ball and let the thread follow the piece as you go along). Continue in stocking sts (remember garter sts at side and mid front and double thread mid front). At the same time when the piece measures 10 cm, knit next row as follows from the right side: 1 seam st, 14-8-12-7-14 sts stocking sts, M.1A (= 6 sts), M.1B over the next 20-30-30-40-40 sts, M.1C (= 5 sts), 5 sts stocking sts and 5 edge sts at the centre front as before. Continue the pattern as described for back piece – remember to purl all sts on rows purled from the right side. Decreasing at side: At the same time when the piece measures 12 cm dec at side as done for the back piece = 51-55-59-64-71 sts. Collar: Please read all of the section before continuing. At the same time when the piece measures 46-47-48-49-50 cm inc number of sts knitted in garter st for collar mid front. Knit 1 extra st in garter sts on every 4th row a total of 13 times (i.e. do not inc sts but knit 1 st previously knitted in stocking sts in garter sts) = 18 sts of garter sts mid front. At the same time knit 1 more st with double thread on every 4th row a total of 3 times = 5 sts knitted in double thread mid front. Armhole: At the same time when the piece measures 49-50-51-52-53 cm bind off for armhole as on the back piece = 42-43-45-46-48 sts. When the piece measures 68-70-72-74-76 cm – adjust to the back piece – bind off the outermost 24-25-27-28-30 sts for the shoulder = 18 sts left on row for the collar. Collar: Continue knitting the collar and sew it to the back piece during assembly. Knit as follows: *2 rows of garter sts over all sts, 2 rows of garter sts over only the 13 sts towards mid front (remember to knit the 5 outermost sts with double thread)*, repeat from *-* until the collar measures 6 cm on the inside (it will measure approx 12 cm on the outer side). Put the sts on a thread. Right front: Cast on and knit as left front but reversed. I addition make buttonholes on front edge, 1 buttonhole = bind off the 3rd and 4th st on front edge and cast on 2 new sts over the bound off sts on next row. Bind off for buttonholes when the piece measures: Size S: 24, 31 and 38 cm Size M: 25, 32 and 39 cm. Size L: 26, 33 and 40 cm Size XL: 27, 34 and 41 cm Size XXL: 28, 35 and 42 cm Sleeve: Cast on 57-57-57-67-67 sts (inclusive of 1 seam st each side) on needles size 4 mm in Muskat and knit 2 rows of garter sts, at the same time dec 4 sts evenly on the 1st row = 53-53-53-63-63 sts. Continue in stocking sts. When the piece measures 6 cm knit the next row from the right side as follows: 1 seam st, M.2A (= 6 sts), M.2B over the next 40-40-40-50-50 sts, M.2C (= 5 sts) and 1 edge st. Knit 1 vertical repeat of M.2 and then knit M.3 until finished measurements– remember the pattern should be in line as shown in the pattern diagram. At the same time when the piece measures 13 cm inc. 1 st each side on every 3.5-3-2-2.5-2 cm a total of 10-12-15-12-15 times = 73-77-83-87-93 sts – new sts are knitted in stocking sts until they fit into the pattern. When the piece measures 49-48-47-46-44 cm bind off for sleeve cap each side on every other row: 3 sts 1 time, 2 sts 3 times and 1 st 3-5-6-8-10 times. Continue to bind off 2 sts each side until the piece measures 56 cm. Then bind off each side 3 sts 1 time. Bind off remaining sts when the piece measures approx 57 cm. Knit the other sleeve. Assembly: Sew shoulders seams. Sew the collar together mid back (sew sts together from threads). Sew the collar to the back piece with the seam at the right side. Sew in the sleeves inside the seam sts. Sew the sides and the sleeves together inside the seam sts. Sew in the buttons. |
|||||||||||||||||||
Diagram explanations |
|||||||||||||||||||
|
|||||||||||||||||||

|
|||||||||||||||||||
|
Have you made this or any other of our designs? Tag your pictures in social media with #dropsdesign so we can see them! Do you need help with this pattern?You'll find tutorial videos, a Comments/Questions area and more by visiting the pattern on garnstudio.com. © 1982-2024 DROPS Design A/S. We reserve all rights. This document, including all its sub-sections, has copyrights. Read more about what you can do with our patterns at the bottom of each pattern on our site. |
|||||||||||||||||||


With over 40 years in knitting and crochet design, DROPS Design offers one of the most extensive collections of free patterns on the internet - translated to 17 languages. As of today we count 304 catalogues and 11422 patterns - 11422 of which are translated into English (UK/cm).
We work hard to bring you the best knitting and crochet have to offer, inspiration and advice as well as great quality yarns at incredible prices! Would you like to use our patterns for other than personal use? You can read what you are allowed to do in the Copyright text at the bottom of all our patterns. Happy crafting!
Comments / Questions (29)
Bonjour je ne comprend pas sur le devant lorsqu'il faut tricoter avec 2 fils sur la bordure j, aimerais plus d,explication .merci beaucoup pou votre reponse bonne soirée
28.03.2021 - 22:59DROPS Design answered:
Bonjour Mme Pouril, on tricote les 2 m du bord avec 2 fils pour que le bord soit un peu plus ferme. Cette vidéo montre comment procéder. Bon tricot!
06.04.2021 - 08:35Kan ni vara snäll och skriv ut i text vilka maskor som skall göras i M.1A, M.2B, M.3C. det första rätvarvet. Den bild på hur mönstren skall stickas är oklar. Så vänligen skriv ut ex. vis. M.1a går över xx antal maskor och stickas så här...och så en beskrivning i ord hur de olika mönstren ska stickas. Jag väntar på svar så jag kan fortsätta stickningen igen.
17.04.2019 - 12:40DROPS Design answered:
Hej. Du stickar så här (storlek S) på det första varvet: 1 kantm, 9 m slätstickning, M.1A (= 2 rätm tills, 3 rm, 1 omslag, 1 rm), M.1B (= 1 omslag, 3 rm, lyft 1 m som om den skulle stickas rät, 2 rm tills, drag den lyfta m över, 3 rm, 1 omslag, 1 rm) över 70 m, dvs det inom sista parentesen stickas totalt 7 gånger, M.1C (= 1 omslag, 3 rm, lyft 1 m som om den skull stickas rät, 1 rm, drag den lyfta m över). Lycka till!
25.04.2019 - 11:19Claudine Piers wrote:
Zou ik aub uitleg kunnen krijgen over de steken bij M1B UIT HOEVEEL STEKEN BESTAAT HET TELPATROON IK HEB BIJ DE EERSTE NAALD STEKEN OVER GRT
22.07.2016 - 16:17DROPS Design answered:
Hoi Claudine. M.1B loopt over 10 st
25.07.2016 - 16:03J'aimerais savoir pour les diminutions des manches 1 fois 3 mailles , et combien de fois 2 mailles merci beaucoup modèle superbe!
09.03.2015 - 01:00DROPS Design answered:
Bonjour Danielle et merci, on rabat pour l'arrondi de la manche de chaque côté tous les 2 rangs: 1 fois 3 m, 3 fois 2 m (corrigé), 3-5-6-8-10 fois 1 m puis 2 m de chaque côté tous les 2 rangs jusqu'à ce que la manche mesure 56 cm de hauteur totale, puis 1 fois 3 m de chaque côté et les mailles restantes. Bon tricot!
09.03.2015 - 09:59Hej! Jag får absolut inte mönstret att gå ihop på bakstycket, M2 varvet där man tar ihop två och gör ett omslag. I slutet av varvet är det inte lika många maskor kvar som det är i början. Har tagit upp hur många gånger som helst, men det blir inte rätt i alla fall. Hur ska jag göra?
11.06.2012 - 15:41DROPS Design answered:
Hej, Första raden på M2 blir så här: 4 minskningar och 4 ökningar, så maskantalet skall vara konstant i rapporten. Lycka till!
12.06.2012 - 10:30Rita: ik zie nu dat je het over het aantal St. Tussen het ajour, maar je moet ook 5 St. Tussen breien. ( bij Herhaling van m3b), maar het patroon klopt.
22.05.2012 - 18:39En toch is de teltekening fout,mijn buurvrouw heeft het ook eens geprobeerd,na 2 samen breien,1 omslag,1 r.,1 omslag en 1 afn. en 1 breien en de afgenomene erover moet je 4 steken breien in plaats van 5 anders komt de tekening niet uit.Dat er geen steken minder op staan dat weet ik ook wel.
22.05.2012 - 15:24DROPS Design answered:
2 st samen, 1 omslag, 1 r, 1 omslag, 1 r afnemen, 1 r, overhalen maakt bij mij wel 5 st...
22.05.2012 - 16:43Mevrouw,bij de teltekening m 3 staat een fout in de derde rij,in plaat van 5 steken tussen de minderingen zijn het er maar 4 ,dan komt de tekening juist anders klopt het niet. groetjes Rita
21.05.2012 - 14:08DROPS Design answered:
Ik heb het patroon doorgenomen en kan geen fout vinden? Bij het breien van M.3 komen er geen minderingen? Het aantal st na het breien van de nld 3 moet gelijk blijven. Er zijn 6 r st tussen elk "ajourmotief". U moet ook ervoor zorgen dat de ajourmotieven netjes boven elkaar komen te liggen.
22.05.2012 - 14:34Lilla, you work what's called short rows to shape the collar. After working the 13 sts, you turn work and knit back. We also have a video for that in our video library.
22.04.2010 - 00:36Having problems with the last part of the collar: 2 rows garter over all 18, 2 rows garter over the first 13. What do I do with the 5 left over. Doesn't look right. Thanks a lot.
21.04.2010 - 21:27