
Popular categories
Looking for a yarn?


Comments / Questions (62)
![]() Carina Höglund wrote:
Carina Höglund wrote:
När man kommit upp på varvet där jag ska maska av för ärmen (på framstycket) , är det även där jag ska sätta övriga maskorna på en tråd
19.01.2020 - 12:21DROPS Design answered:
Hej. Ja det stämmer. Mvh DROPS Design
29.01.2020 - 08:37Griet De Reu wrote:
Ik snap het niet goed, M2 wordt dit van rechts naar links gelezen ? Als ik van links naar rechts A1 lees dan valt een stuk van het figuur uit mijn breiwerk. Of stel ik nu een heel domme vraag ?
22.05.2018 - 10:24DROPS Design answered:
Hallo Griet, Je begint de telpatronen altijd rechts onder en dan lees je naar links. Misschien is het handig om deze insctructie even te lezen, daarin staat uitgelegd hoe je telpatronen leest.
23.05.2018 - 11:13
![]() Rebekah R wrote:
Rebekah R wrote:
Thank you, that makes sense! Sorry was reading chart from incorrect side, your clarification really helped :)
19.04.2018 - 14:16
![]() Rebekah R wrote:
Rebekah R wrote:
Im confuses about M.2B row 5 and the overlap with M.2A. How does the row start? Is this correct? Seam st, *Yo, K3, Yo, slip 1 (k, k1, psso), k1, k2tog* (repeat *-*) until last 9 then k2tog, Yo, K3, Yo, slip 1 (k, k1, psso), k2, seam st.
18.04.2018 - 15:31DROPS Design answered:
Dear Rebekah, the last st in M.2A will be worked together with the first st in M.2B = the YO will now below to M.2A and the last st in M.2A will worked tog with the first st in M.2B. Same happens when repeating M.2B: the last st in M.2B will be worked together with the first st in next M.2B. Happy knitting!
18.04.2018 - 15:43Dorthe wrote:
Efter M.1 strikkes næste p således fra retsiden: 1 kantm, 2-1-2-0-3 m glatstrik, M.4A over de næste 80-88-96-112-120 m, M.4B (= 9 m), 2-1-2-0-3 m glatstrik og 1 kantm. Når M.4 er strikket 1 gang i højden strikkes M.5 på samme måde - M.5 gentags til færdig mål. Men hvad er færdigt mål??? Inden bærestykke?
10.12.2017 - 15:55DROPS Design answered:
Hej Dorthe, Bærestykket starter når du har lukket af til ærmegab "Samtidig når arb måler 55-56-57-58-59 cm lukkes der 7-7-7-9-9 m af i hver side til ærmegab = 81-87-97-105-119 m på p." Se også målene på tunikaen nederst i måleskitsen. God fornøjelse!
12.12.2017 - 11:50
![]() Rebekah R. wrote:
Rebekah R. wrote:
Silly question...when starting front piece, instructions read cast on 158 (inclusive of seam stitch at each end), does that mean cast on 160 total or are the seam stitches included already in 158. Thanks!
21.05.2017 - 02:54DROPS Design answered:
Hi Rebekah, It means as you first thought, that you cast on 158 stitches xx
21.05.2017 - 09:53
![]() Diane Peckham wrote:
Diane Peckham wrote:
I'm confused over how to read M2A and M2B because the knit two together occurs over M2A and M2B how can I knit two together follow the chart when one is from M2A and one is from M2B
21.04.2016 - 04:26DROPS Design answered:
Dear Mrs Peckham, on row 5 and 15 K tog the last st in M.2A with the first st in next M.2A /M.2B - inserting a marker after each repeat can be a good idea to follow diagram. Happy knitting!
21.04.2016 - 09:31
![]() Iris wrote:
Iris wrote:
Kann dieses wunderschöne Longtop auch in Runden gestrickt werden?
25.02.2016 - 05:08DROPS Design answered:
Liebe Iris, es spicht nichts dagegen, das Top in Runden zu stricken.
01.03.2016 - 14:29
![]() Nadine wrote:
Nadine wrote:
Sorry die randmasche lasse ich ja weg, aber dennoch habe ich dann mehr als die 107 maschen
19.11.2015 - 18:53DROPS Design answered:
Antwort siehe unten! :-)
24.11.2015 - 21:42
![]() Nadine wrote:
Nadine wrote:
Bei dem Muster m 2 a verläuft die "grenze" in der 5. Reihe genau durch die 2 re zusammen gestrickte Maschen. Wie soll das gehen? Stricke ich dann nur 1 Masche, weil ich dann mit einer randmasche und 2 Maschen rechts wieder anfangen muss habe ich am ende mehr als 107 Maschen. Stricke ich dennoch 2 Maschen zusammen stimmt es vom Muster her nicht mehr
19.11.2015 - 18:52DROPS Design answered:
Sie müssen an dieser Stelle das Muster als Ganzes betrachten, also einfach im angefangenen Rhythmus weiterstricken. M.2B zeigt, wie die R endet. Sie stricken also in der 5. R 2 M re, * 2 M re überzogen zusammen, 1 Umschlag, 3 M re, 1 Umschlag, 2 M re zusammen, 1 M re *, von *-* wdh, die R endet dann mit 2 M re überzogen zusammen, 1 Umschlag, 3 M re, 1 Umschlag und 2 M re zusammen.
24.11.2015 - 21:41
|
||||||||||||||||||||||
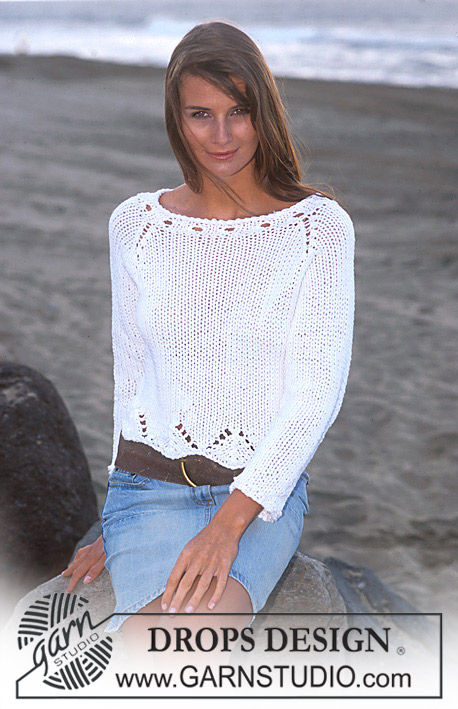
Lovely in Lace |
||||||||||||||||||||||
|
|
||||||||||||||||||||||
DROPS Long top with lace pattern knitted in Safran.
DROPS 94-24 |
||||||||||||||||||||||
|
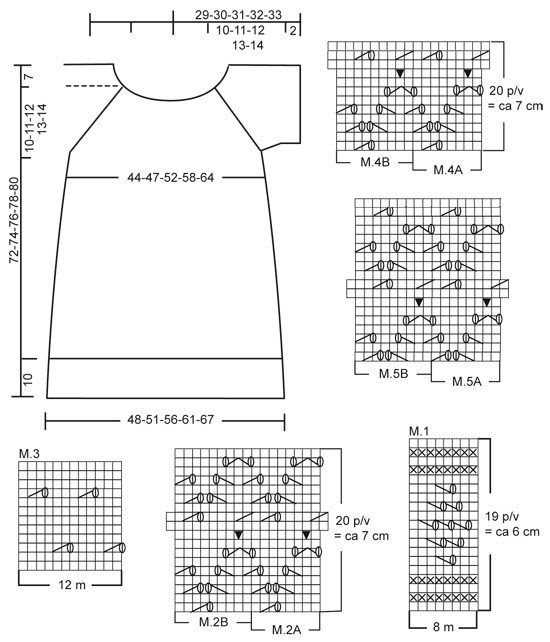
Knitting Gauge: 21 sts x 30 rows on needles size 3.5 mm in lace pattern with Safran = 10 x 10 cm, and 25 sts x 30 rows of rib-2 = 10 x 10 cm. Rib-1: *K2, P4*, repeat from *-* Rib-2: *K2, P3*, repeat from *-* Lace pattern: See diagrams M.1 to M.5. The diagrams are seen from the right side. Decreasing tips (for raglan): Bind off as follows at every transition between the sleeve and the front and back piece (begin 3 sts before the marking thread): K2 tog, K2 (marking thread is now in between these 2 sts), slip 1 st as if to knit, K1, psso. Front piece: Please read the entire pattern before starting – Work forward and backward on circular needle. Cast on 146-158-170-182-206 sts (inclusive of 1 seam st each side) on needles size 3.5 mm in Safran. P 1st row from the wrong side, and continue in Rib-1 and a seam st each side. After 2 rows dec. all P4’s to P3 = 122-132-142-152-172 sts, and continue the rib K2/P3 (seen from the right side). When the piece measures 10 cm K1 row from the right side, at the same time adjusting number of sts evenly on row to 102-110-120-130-142. Knit the next row from the wrong side as follows: 1 seam st, 2-2-3-0-2 stocking sts, M.1 over the next 96-104-112-128-136 sts, 2-2-3-0-2 sts of stocking sts and 1 seam st. Knit 1 repeat – NB: On the rows where the pattern says P from the right side, P over all sts including the 2-2-3-0-2 stocking sts at each side of M.1. At the same time, on the second but last row in M.1 adjust the number of sts to 99-107-123-131-139. Continue the next row from the right side as follows: 1 seam st, M.2A over the next 88-96-112-120-128 sts, M.2B (= 9 sts) and 1 seam st. Knit 1 repeat – at the same time on the last row in M.2 adjust the number of sts to 98-104-116-128-140. Continue in M.3 with a seam st at each side. At the same time when the piece measures 26 and 38 cm dec 1 st each side = 94-100-112-124-136 sts – knit the sts not fitting into pattern in stocking sts. When the piece measures approx. 46-47-48-49-50 cm – adjust M.3 so that you have knitted 2 rows of stocking sts after a row of lace holes and the next row is from the wrong side – continue as follows: 1 seam st, 2-1-3-1-3 sts of stocking sts, M.1 over the next 88-96-104-120-128 sts, 2-1-3-1-3 sts of stocking sts and 1 seam st. Knit 1 repeat (remember to P from the right side over all sts) – at the same time on the last row of M.1 adjust the number of sts to 95-101-111-123-137. After M.1 knit the next row as follows from the right side: 1 seam st, 2-1-2-0-3 sts of stocking sts, M.4A over the next 80-88-96-112-120 sts, M.4B (= 9 sts), 2-1-2-0-3 sts of stocking sts and 1 seam st. Knit 1 repeat of M.4 and continue in M.5 the same way until finished measurements. At the same time when the piece measures 55-56-57-58-59 cm bind off 7-7-7-9-9 sts each side = 81-87-97-105-119 sts left. Put the sts on a thread and knit the back piece. Back piece: Cast on and knit as front piece. Sleeve: Knit the sleeve forward and backward on circular needle. Cast on 72-77-82-87-92 sts (inclusive of a seam st each side) on circular needle size 3.5 mm in Safran. P 1st row from the wrong side, and continue in Rib-2 and a seam st each side. When the piece measures 2 cm – make sure the next row is from the right side – knit 4 rows of garter sts – at the same time dec 1-2-3-2-1 sts evenly distributed on on 1st row = 71-75-79-85-91 sts. Now bind off 7-7-7-9-9 sts each side and put the remaining sts on a thread. Knit 1 more sleeve. Assembly: Sew the front and back pieces tog inside the seam sts. Sew the sleeves tog inside the seam sts. Yoke: Insert the sleeves on the same circular needle as the front and back where you bound off for the armholes = 276-296-324-344-384 sts. Insert a marking thread at all transitions between front and back and sleeves = 4 marking threads. Knit 1-2-1-2-1 rounds before decreasing – NB: continue the pattern (M.5) on the front and back pieces as well as the sleeves (make sure to begin the pattern on the sleeves on the same pattern row as front and back pieces and knit 0-2-0-1-0 sts of stocking sts each side (M.5A are knitted over the first 48-48-56-56-64 sts and M.5B over the last 9 sts). Knit sts not fitting into pattern in stocking sts, and make sure to dec. as many sts as you make yo’s so that the number of sts outside the raglan decreases is constant. Raglan decreases: Dec 1 st each side of the marking threads (= 8 decreases per round) – see Decreasing tips above: Dec on every other row 15-16-18-19-21 times – NB: Knit sts not fitting into pattern in stocking sts. Neck: At the same time when the piece measures 63-65-67-68-70 cm put the centre front 39-43-47-51-57 sts on a thread for neck. Bind off on each neckline on every other row as follows: 2 sts 1-1-1-2-2 times and 1 st 2 times. After all dec for raglan and neck there are 109-117-125-129-147 sts left on row. Cast off. Neck edge: Pick up approx. 156-212 sts around the neck (including the sts from the thread at the centre front) on a small circular needle size 3.5 mm with Safran. P 1 round, K 1 round at the same time dec evenly on round to 120-130-130-140-140 sts. Continue in Rib-2 until the neck edge measures 2.5 cm. Bind off loosely in rib. Insert the silk ribbon in the top row of M.3 and tie a knot/loop. |
||||||||||||||||||||||
Diagram explanations |
||||||||||||||||||||||
|
||||||||||||||||||||||
 |
||||||||||||||||||||||
Have you finished this pattern?Tag your pictures with #dropspattern or submit them to the #dropsfan gallery. Do you need help with this pattern?You'll find 24 tutorial videos, a Comments/Questions area and more by visiting the pattern on garnstudio.com. © 1982-2026 DROPS Design A/S. We reserve all rights. This document, including all its sub-sections, has copyrights. Read more about what you can do with our patterns at the bottom of each pattern on our site. |
||||||||||||||||||||||


With over 40 years in knitting and crochet design, DROPS Design offers one of the most extensive collections of free patterns on the internet - translated to 17 languages. As of today we count 324 catalogues and 12290 patterns translated into English (UK/cm).
We work hard to bring you the best knitting and crochet have to offer, inspiration and advice as well as great quality yarns at incredible prices! Would you like to use our patterns for other than personal use? You can read what you are allowed to do in the Copyright text at the bottom of all our patterns. Happy crafting!
Post a comment to pattern DROPS 94-24
We would love to hear what you have to say about this pattern!
If you want to leave a question, please make sure you select the correct category in the form below, to speed up the answering process. Required fields are marked *.