
Popular categories
Looking for a yarn?


Comments / Questions (32)
![]() Anna wrote:
Anna wrote:
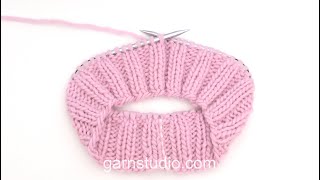
Hola! Al seguir el diagrama del elástico para la espalda, tejo: Vuelta 1 (derecho): orillo – PD retorcido – PR – … – PD retorcido – orillo. Vuelta 2 (revés): orillo – PD – PR retorcido – … – PD – orillo. De este modo, los puntos no quedan alineados verticalmente y el relieve no se forma como en el modelo. ¿Qué estoy haciendo mal?
23.01.2026 - 13:27DROPS Design answered:
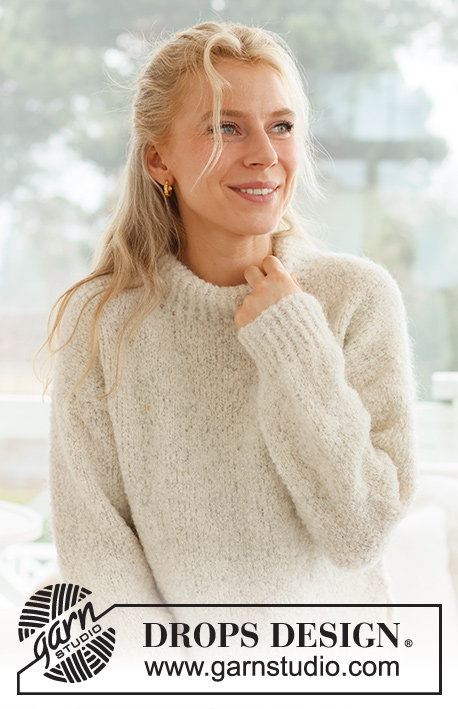
Hola Anna, tendrías que tener: Fila 1: 1 orillo, [1 derecho retorcido, 1 revés], repetir de [ a ] y terminar con 1 derecho retorcido (1º punto de A.1) y 1 orillo. Fila 2: 1 orillo, 1 revés retorcido (sobre el último derecho retorcido de la fila anterior), 1 derecho, [1 revés retorcido, 1 derecho], terminar con 1 revés retorcido (sobre el 1º punto del elástico de la fila anterior) y 1 orillo. Recuerda que tienes que empezar y acabar con el cuadrado en blanco del diagrama, para tener el patrón simétrico y que te quede alineado.
18.03.2026 - 12:00
![]() Mariela wrote:
Mariela wrote:
Jag stickar exakt som diagrammet visar: på rätsidan 1 vriden rätsticka och 1 vanlig avig, på avigsidan 1 vanlig rätsticka och 1 vriden avig. Däremot ser jag ingen resår som bildas överhuvudtaget. Jag trodde först att det berodde på bouclégarnet, men jag gjorde en provlapp i bomull för att se tydligare och ingen resår bildas där heller. Jag använder bouclé + kid silk, precis enligt instruktionen.
15.01.2026 - 21:28DROPS Design answered:
Hei Mariela. Ta en titt på denne videoen (den viser 2 vrang masker, men teknikken er den samme). Hur man stickar en resår med 1 vridet rät och en avig - fram och tillbaka her. mvh DROPS Design
29.01.2026 - 12:15
![]() Betti wrote:
Betti wrote:
Ich verzweifle gerade am Zusammennähen der Teile, hab‘s schon dreimal wieder aufgetrennt. Es ist eine Katastrophe, den rundgestrickten Ärmel an die glatte Kante von Vorder- und Rückenteil anzupassen. Würde ich nie wieder machen.
10.10.2025 - 15:37DROPS Design answered:
Liebe Betti, vielleicht schauen Sie mal im Kopf der Anleitung bei den Videos (ggf. dort unter den angezeigten Videos auf "Show more related videos" klicken), dort finden Sie auch Videos zum Zusammennähen. Hoffentlich hilft Ihnen das weiter. Gutes Gelingen!
22.10.2025 - 21:57
![]() Anne-Marie wrote:
Anne-Marie wrote:
Ich habe den Pullover nun schon zum 2. Mal gestrickt. Den 1. hat meine Tochter leider zu warm gewaschen 🤷🏻♀️. Nun kann sie sich auf das neue Stück freuen.
06.10.2025 - 23:01
![]() Inga wrote:
Inga wrote:
Knitting the back after taking 6cm of needles, the length of the knitting on the total lenght 33 is with or without the rib? Thank you for your help
16.09.2025 - 19:10DROPS Design answered:
Hi Inga, The piece is measured from the cast-on edge and includes the rib. Regards, Drops team.
17.09.2025 - 06:47
![]() Anna wrote:
Anna wrote:
Danke für die schnelle Hilfe. Ich habe leider noch eine weitere Frage. Ich habe das Diagramm jetzt wie beschrieben gestrickt. Nach 6cm des Bündchens kann ich allerdings immer noch keine Rippenoptik erkennen. Ich habe das empfohlene Garn (Boucle in 2020 und Kid-Silk in 12 beige) genommen. Mache ich etwas falsch?
01.03.2025 - 14:53DROPS Design answered:
Liebe Anna, könnte vielleicht dieses Video helfen? Wir stricken (am Anfang) so ein Rippenmuster, dh mit 1 M rechts verschränkt/1 M links, so sollen Sie stricken. Im Video nehmen wir dann zu 1 M rechts verschränkt, 2 M links, für dieses Modell sollen Sie aber nicht zunehmen. Viel Spaß beim Stricken!
03.03.2025 - 09:03
![]() Anna wrote:
Anna wrote:
Hallo, ich verstehe folgenden Teil der Anleitung leider nicht. Ich habe noch nie mit einem Diagramm gearbeitet und auch die Erklärung (wie man das liest) hat mir leider nicht weitergeholfen. „Dann wie folgt im Rippenmuster stricken: 1 Rand-Masche KRAUS RECHTS – siehe oben, A.1 bis noch 2 Maschen auf der Nadel sind, die erste Masche von A.1 (damit das Rippenmuster symmetrisch beginnt und endet), enden mit 1 Rand-Masche kraus rechts.“
28.02.2025 - 08:00DROPS Design answered:
Liebe Anna, A.1 stricken Sie so mit 1 Randmasche krausrechts beidseitig: 1. Reihe (Hin-Reihe): 1 M re (Randmasche), dann die 2 Maschen A.1 stricken (= 1 M re verschränkt, 1 M li) bis 2 Maschen übrig sind, dann 1 M re verschränkt (- die 1. M A.1), und 1 M re (Randmasche). Bei der Rückreihe stricken Sie: 1 M re (Randmasche), 1 M re (1. M A.1), dann stricken Sie A.1 (1 M re, 1 M links verschränkt) bis 1 M übrig ist, 1 M re (Randmasche). Diese 2 Maschen wiederholen Sie bis die Arbeit 10 cm misst. Viel Spaß beim Stricken!
28.02.2025 - 10:02
![]() Manuela wrote:
Manuela wrote:
Buonasera, nella sezione CAMPIONE non è indicato il numero di ferri da utilizzare ("NOTA! La misura dei ferri è solo indicativa! Se avete troppe maglie in 10 cm passate a una misura di ferri più grande. Se avete meno maglie in 10 cm passate a una misura di ferri più piccola"). Il lavoro deve essere avviato sempre con i ferri n°5? Grazie.
13.01.2025 - 22:33DROPS Design answered:
Buonasera Manuela, di solito per il campiome si utilizzano i ferri con cui si lavora gran parte del capo. Buon lavoro!
13.01.2025 - 22:48
![]() Birgitta wrote:
Birgitta wrote:
Hej! Kan jag inte sticka fram- och bakstycka med en rundsticka om jag vill att den ska vara i slätsticknng?
10.01.2025 - 21:43
![]() Gabriela Kleespies wrote:
Gabriela Kleespies wrote:
Guten Tag, ich möchte den Pullover gern mit Alpaca bouclé 602 braun stricken. Welche Farbe schlagen Sie vor für Kid Silk zur Kombination?
07.08.2024 - 11:41DROPS Design answered:
Liebe Kleespies, gerne wird Ihnen Ihr DROPS Händler damit (auch per Telefon oder per E-Mail) helfen, die besten passenden Farben zu empfehlen. Viel Spaß beim Stricken!
07.08.2024 - 13:24
|
|||||||
Edeltraut#edeltrautsweater |
|||||||
 |
 |
||||||
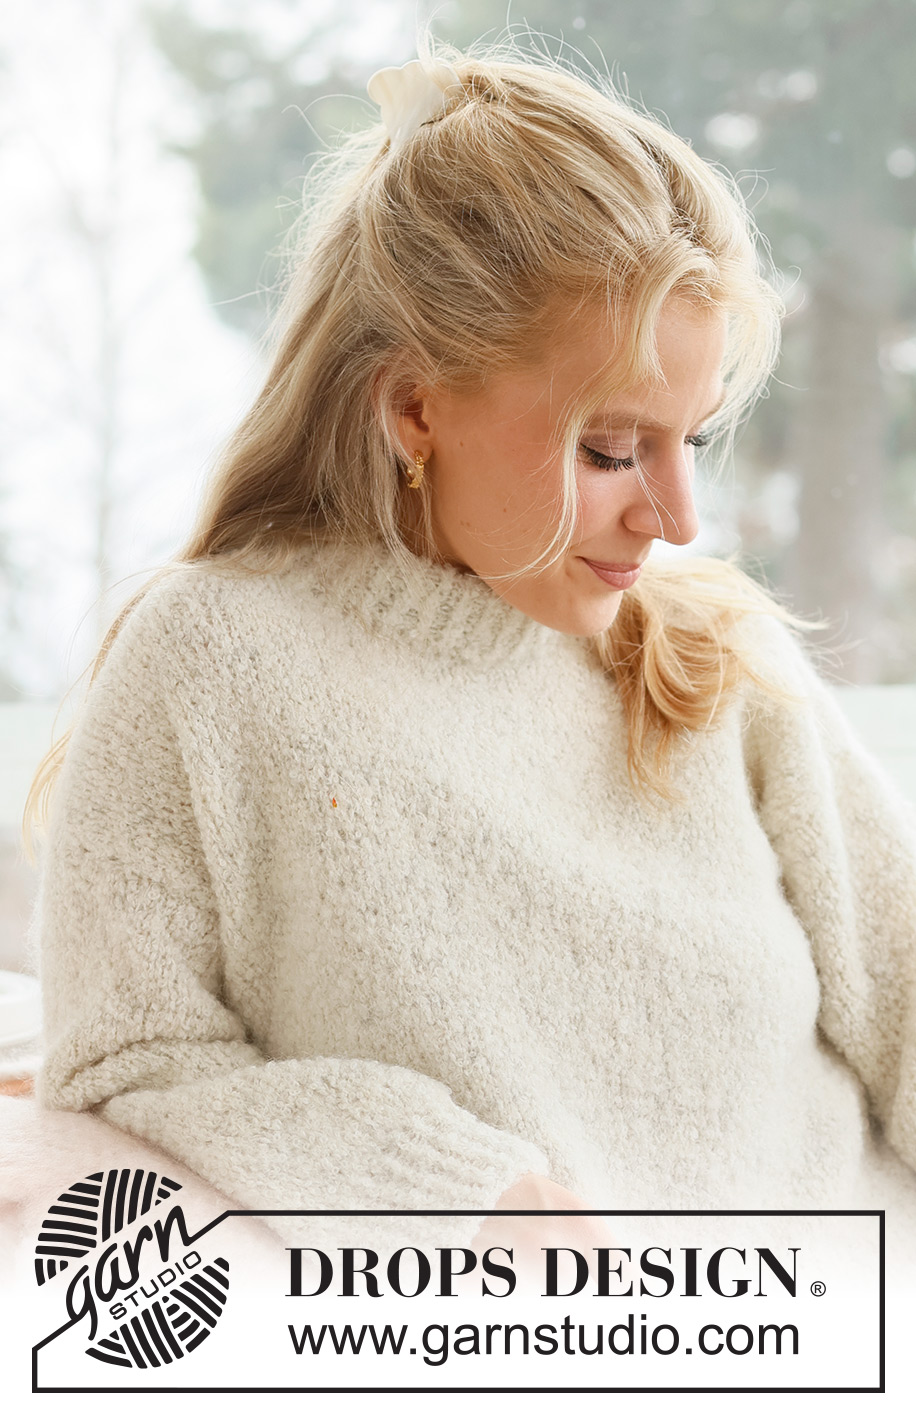
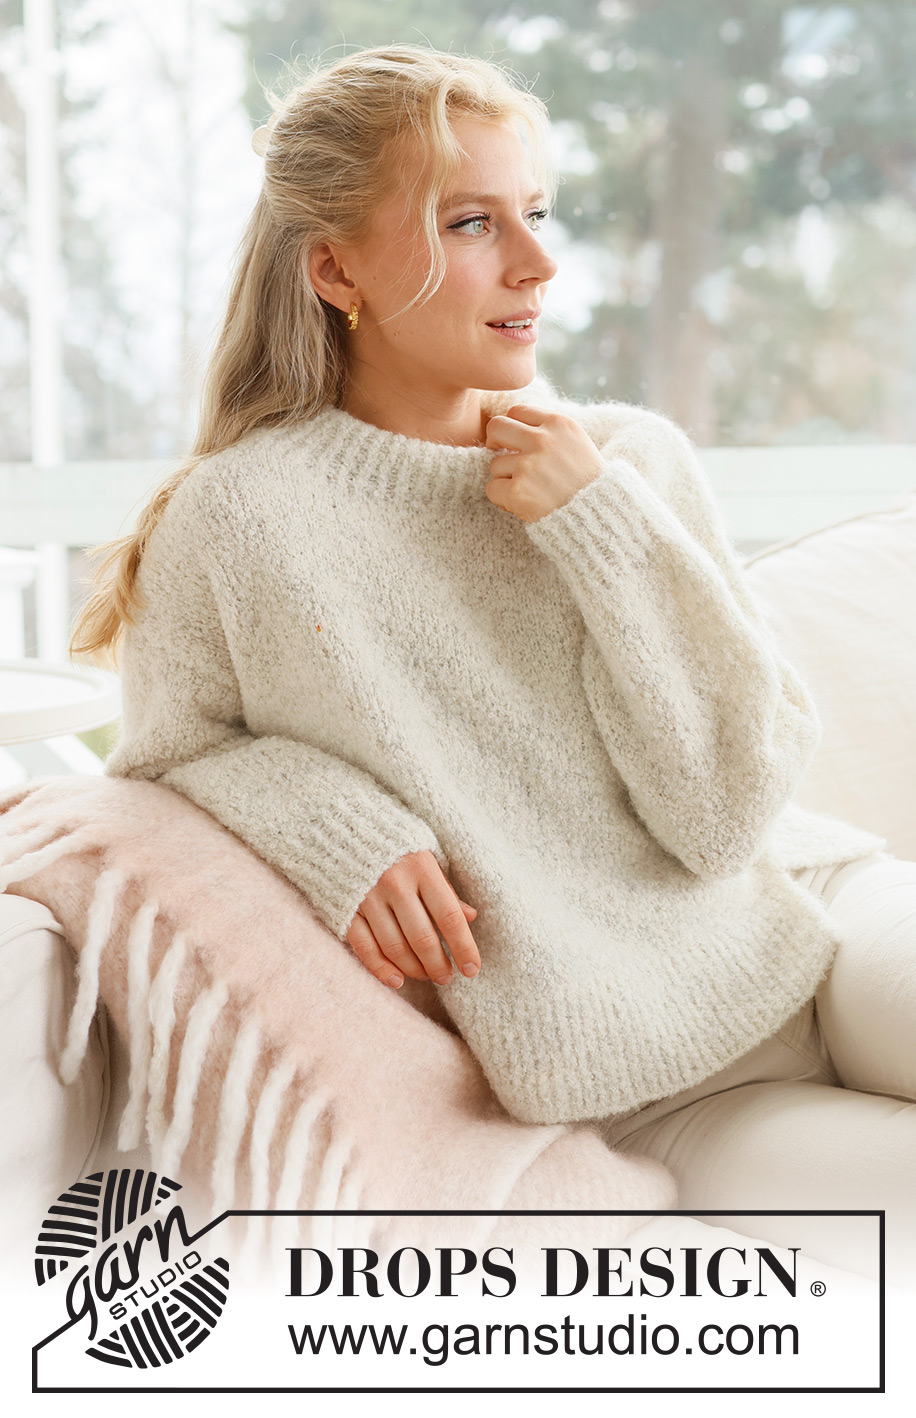
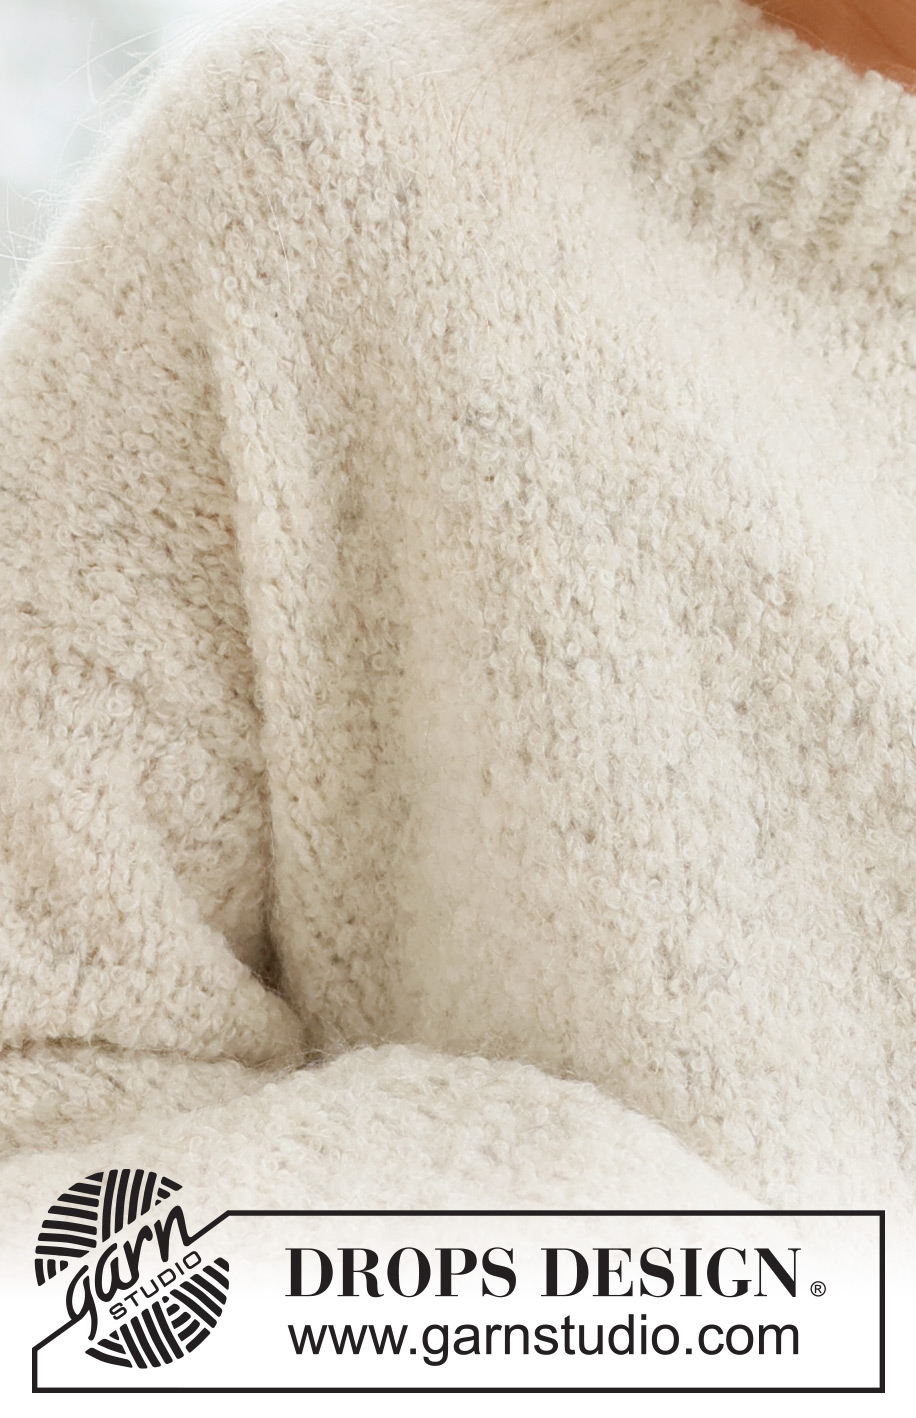
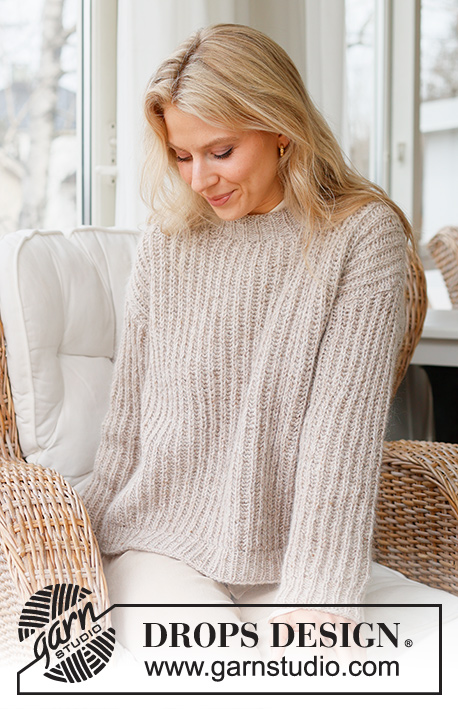
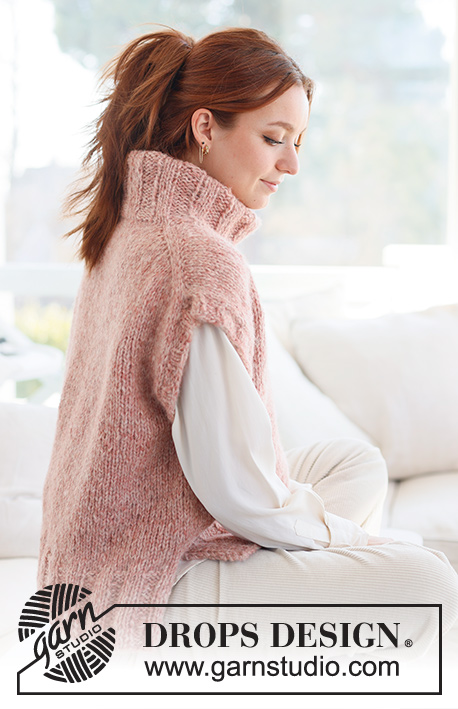
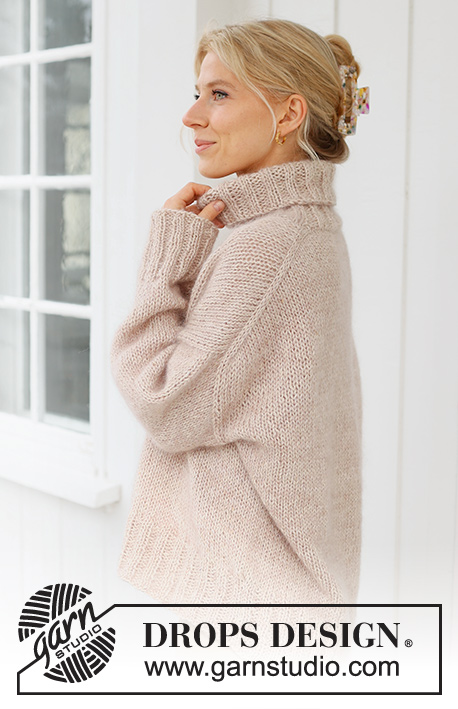
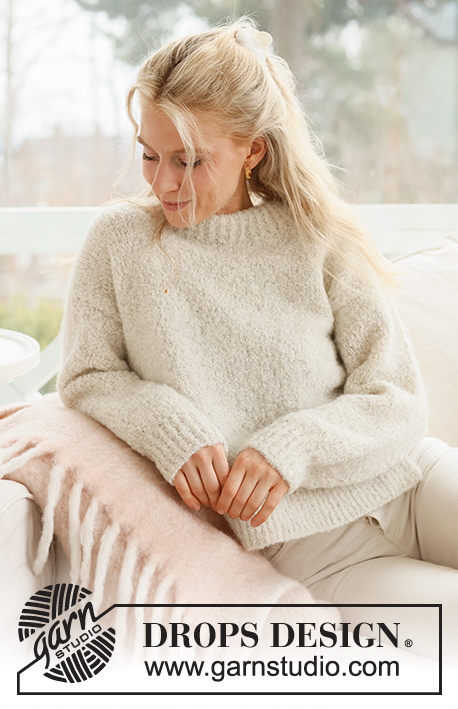
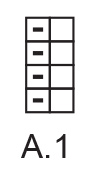
Knitted jumper in DROPS Alpaca Bouclé and DROPS Kid-Silk. Piece is knitted from bottom up in stocking stitch with vents in the sides, double neck edge and edges in rib. Size XS – XXL.
DROPS 237-27 |
|||||||
|
---------------------------------------------------------- EXPLANATION FOR THE PATTERN: ---------------------------------------------------------- GARTER STITCH (back and forth): Knit all rows. 1 ridge vertically = knit 2 rows. PATTERN: See diagram A.1. Diagrams show all rows in pattern seen from the right side. INCREASE TIP (applies to mid under sleeve): Work until 1 stitch remains before marker thread, make 1 yarn over, knit 2 (marker thread is between these 2 stitches), make 1 yarn over (= 2 stitches increased). On next round knit yarns over twisted to avoid holes. Then work the new stitches in stocking stitch. ---------------------------------------------------------- START THE PIECE HERE: ---------------------------------------------------------- JUMPER - SHORT OVERVIEW OF THE PIECE: Work front and back piece back and forth separately. Work sleeves in the round on double pointed needles/circular needle up to sleeve cap, then work the rest of sleeve back and forth. Pick up stitches for a double neck edge worked in the round, fold it double and fasten to wrong side of garment. BACK PIECE: Cast on 85-93-101-109-119-129 stitches on circular needle size 5 mm with 1 strand of each quality (= 2 strands). Purl 1 row from wrong side. Then work rib as follows: 1 band stitch in GARTER STITCH - read explanation above, work A.1 until 2 stitches remain on row, work the first stitch in A.1 so that pattern begins and ends the same, and finish with 1 edge stitch in garter stitch. Continue back and forth like this until rib measures 10 cm. Knit 1 row from right side while decreasing 22-24-27-29-32-34 stitches evenly = 63-69-74-80-87-95 stitches. Switch to circular needle size 6 mm. Work in stocking stitch and cast on 1 stitch at the end of the next 2 rows (= edge stitches for seam) = 65-71-76-82-89-97 stitches. Then work in stocking stitch with 1 edge stitch in garter stitch in each side. REMEMBER THE KNITTING TENSION! When piece measures 31-32-33-34-35-36 cm, cast on 1 new stitch in each side edge at the end of the next 2 rows - to use for assembly of sleeves = 67-73-78-84-91-99 stitches. Continue with stocking stitch and 1 edge stitch in garter stitch in each side. When piece measures 49-51-52-54-56-58 cm, cast off the middle 21-21-22-22-23-23 stitches for neck and finish each shoulder separately. Continue as before, and cast off stitches for neck at the beginning of every row from neck as follows: Cast off 1 stitch 0-1-1-1-1-0 times and 2 stitches 1-1-1-1-1-2 times = 21-23-25-28-31-34 stitches remain on shoulder. Work until piece measures 52-54-56-58-60-62 cm. Cast off knitting from right side. Work the other shoulder the same way. FRONT PIECE: Cast on and work the same way as back piece until piece measures 46-47-49-50-52-53 cm = 67-73-78-84-91-99 stitches on needle. Now slip the middle 11-13-14-14-15-17 stitches on a thread for neck and finish each shoulder separately. Then cast off stitches for neck on every row from neck as follows: Cast off 1 stitch 3 times and 2 stitches 2 times = 21-23-25-28-31-34 stitches remain on shoulder. Cast off when piece measures 52-54-56-58-60-62 cm. Work the other shoulder the same way. SLEEVES: Cast on 38-40-42-44-44-46 stitches on double pointed needles size 5 mm with 1 strand of each quality (= 2 strands). Work rib according to A.1 for 6 cm. Switch to double pointed needles size 6 mm, knit 1 round while decreasing 4 stitches evenly on round = 34-36-38-40-40-42 stitches. Insert a marker thread at beginning of round. Move marker thread upwards when working. Work in stocking stitch in the round. When piece measures 8-8-7-11-7-8 cm, increase 2 stitches mid under sleeve – read INCREASE TIP. Increase like this approx. on every 3-2½-2½-2-2-2 cm 12-13-13-14-15-15 times in total = 58-62-64-68-70-72 stitches. Continue to work until sleeve measures 43-43-42-41-40-38 cm. On next round cast off the middle 7 stitches mid under sleeve. Work piece back and forth on needle until finished measurements. Now decrease for sleeve cap as follows: Cast off 3 stitches at beginning of every row until piece measures approx. 47-47-46-45-44-42 cm. Cast off the remaining stitches. Work the other sleeve the same way. ASSEMBLY: Sew shoulder seams inside cast-off edge. Sew sleeves in body inside 1 edge stitch in garter stitch on body and inside cast-off edge on sleeves. Sew side seams from armhole and down to rib inside 1 edge stitch in garter(= 10 cm vent in each side). NECK: Pick up approx. 74 to 92 stitches (including stitches on thread) on a short circular needle size 5 mm with 1 strand of each quality. Number of stitches must be divisible by 2. Work A.1 in the round over all stitches. Continue rib until piece measures 10 cm, cast off with knit over twisted knit and purl over purl. Fold the rib down on inside of garment. Fasten rib to get a double neck edge. To avoid a tight neck edge that sticks out it is important to keep the seam elastic. |
|||||||
Diagram explanations |
|||||||
|
|||||||
 |
|||||||
 |
|||||||
Have you finished this pattern?Tag your pictures with #dropspattern #edeltrautsweater or submit them to the #dropsfan gallery. Do you need help with this pattern?You'll find 37 tutorial videos, a Comments/Questions area and more by visiting the pattern on garnstudio.com. © 1982-2026 DROPS Design A/S. We reserve all rights. This document, including all its sub-sections, has copyrights. Read more about what you can do with our patterns at the bottom of each pattern on our site. |
|||||||


With over 40 years in knitting and crochet design, DROPS Design offers one of the most extensive collections of free patterns on the internet - translated to 17 languages. As of today we count 324 catalogues and 12290 patterns translated into English (UK/cm).
We work hard to bring you the best knitting and crochet have to offer, inspiration and advice as well as great quality yarns at incredible prices! Would you like to use our patterns for other than personal use? You can read what you are allowed to do in the Copyright text at the bottom of all our patterns. Happy crafting!
Post a comment to pattern DROPS 237-27
We would love to hear what you have to say about this pattern!
If you want to leave a question, please make sure you select the correct category in the form below, to speed up the answering process. Required fields are marked *.