
Popular categories
Looking for a yarn?


Comments / Questions (47)
![]() Susanne wrote:
Susanne wrote:
Er det rigtigt at der skal strikkes 25 cm før der deles til ærmer, for og bag ? Synes det er langt.
21.02.2024 - 14:24DROPS Design answered:
Hej Susanne, du finder målene i måleskitsen nederst i opskriften (mål gerne en bluse som du synes om at have på og vælg den størrelse i måleskitsen med de mål som passer dig)
22.02.2024 - 11:47
![]() Tina Albertsen wrote:
Tina Albertsen wrote:
Jeg er igang med denne opskrift, men forstår ikke udtagningen til raglan helt. Hvorfor tages der kun ud på forkortede pinde FORAN på arbejdet, altså fra mærke 3 til mærke 2? Som jeg forstår opskriften bliver der en forskel på for og bag på arbejdet. Og så vil jeg høre om det skal forstås som at der begyndes 3 masker EFTER mærke 3 (altså mærkemaske plus 3 masker) eller 3. maske efter mærkemaske (altså mærkemaske plus 2 masker)?
01.02.2024 - 14:47DROPS Design answered:
Hei Tina. 1) Tråden er klippet og du starter fra 3 masker før masken med 3. merket i. Dvs i venstre side av halsen foran dersom du tenker at du har plagget på. Du starter 3 masker før masken med 3. merket, så strikker du over 3. merke, så over 4. merke, så over 1. merke og så 3 masker forbi 2. merke, snu arbeidet. Strikk tilbake fra vrangen, først over 2. merke, så 1. merke, så 4. merke og så 7 masker forbi 3. merke. Fortsett som forklart i oppskriften. 2) Du starter 3 masker etter masken med 3. merket i. mvh DROPS Design
12.02.2024 - 09:26
![]() Anita wrote:
Anita wrote:
Kan 237-39 candy harvest strikkes uden at man bruger vendepinde?
15.12.2023 - 16:14DROPS Design answered:
Hei Anita. Ved å strikke vendingene vil du få en bedre passform, men du kan kutte ut vendigene og strikke for -og bakstykket likt. Du vil da kanskje føle at halsen kommer litt for mye opp i front. mvh DROPS Design
18.12.2023 - 07:24
![]() Daria wrote:
Daria wrote:
A quanto ammontano le maglie aumentate per il raglan nella parte lavorata a ferri accorciati?
27.11.2023 - 18:15DROPS Design answered:
Buonasera Daria, deve aumentare per il raglan dove indicato, nei ferri accorciati. Buon lavoro!
30.11.2023 - 22:50
![]() Janne wrote:
Janne wrote:
Når 3. merke er "venstre side av halsen foran" og 2. merke er "høyre side av halsen foran" og man skal strikke forkortede rader fram og tilbake mellom disse to, blir ikke forhøyningen foran da?? Jeg er svært forvirret her og håper dere kan oppklare så jeg kommer videre.
20.10.2023 - 14:25DROPS Design answered:
Hei Janne, Forkortede pinner er mellom disse merkene, men du strikker fra retten og begynner på venstre siden av halsen (3 masker før merke 3), rundt bakstykke til venstre siden av halsen (3 masker forbi merke 2). God fornøyelse!
23.10.2023 - 07:38
![]() Janne wrote:
Janne wrote:
Er det riktig at de forkortede radene strikkes foran slik at forstykket blir høyere enn bakstykket? Virker merkelig for meg. Kan det være riktig eller har jeg misforstått totalt?
20.10.2023 - 13:05DROPS Design answered:
Hej Janne, hvis du følger opskriften får du de forkortede rader på bagstykket :)
24.10.2023 - 08:29
![]() Pia Majbrit Hjort wrote:
Pia Majbrit Hjort wrote:
Drops 237-37 Tak for jeres mange super skønne :-) Dog må jeg bare sige at det ikke altid er nemt af læse dem. Tror ikke helt jeg forstår hvorfor I indsætter henvisninger til "raglan", "halsudskæring" og lign. og udelader det i opskriften. Hele tiden skal vi op at læse og "sætte ind". Personligt vil jeg meget hellere at det står løbende i opskriften hvad jeg skal. I lægger så mange gode videoer ind. så hvis man er i tvivl er det nemt at finde Venlig hilsen Pia
13.05.2023 - 11:45
![]() Helle Pedersen wrote:
Helle Pedersen wrote:
Hej! Hvorfor skal der laves halsudskæring, når der er strikket dobbelt halskant? Hvordan skal man strikke halsudskæring? Hvordan kommer man videre fra den dobbelte halskant til halsudskæringen? Ny rundpind eller hvordan?
12.02.2023 - 22:13DROPS Design answered:
Hei Helle. 1) Det strikkes en halsringning slik at det blir en forhøyning bak / passformen blir bedre. Man kan strikke en halsringning uansett om det er en enkel eller dobbelt halskant. 2) Du strikker frem og tilbake over det maskeantallet det står i oppskriften under HALSUDSKÆRING. 3) Når du har strikket halskanten og satt 4 merker i arbeidet klipper du tråden. Du starter et nytt sted med ny tråd slik det er beskrevet i oppskriften (Start fra retten, 3 masker før 3.merke). Ta gjerne en titt på hjelpevideoen: Hvordan tages der ud til raglan og strikkes forkortede pinde samtidigt mvh DROPS Design
13.02.2023 - 14:10
![]() Gigi wrote:
Gigi wrote:
Bonjour, lorsque l'on doit continuer sans augmentations jusqu'à ce que l'empiècement mesure (pour ma part 25cm) au milieu du devant (mesurer après le col). Je ne comprends pas "mesurer après le col" si le tricot est bien avancé et que l'on regarde en arrière faut-il mesurer tout au début du col (tout en haut du tricot) ou après le col lorsqu'il est fait ? Merci
11.02.2023 - 16:43DROPS Design answered:
Bonjour Gigi, on mesure après le col, autrement dit après les côtes, à partir de la partie tricotée en jersey, pensez à bien mesurer au niveau du milieu du devant (l'ouvrage sera plus long au milieu du dos à cause des rangs raccourcis de l'encolure). Bon tricot!
13.02.2023 - 09:07
![]() Sylvie Lachance wrote:
Sylvie Lachance wrote:
J'aimerais savoir si la laine Fabel est assez douce pour un pull porté sur la peau. Merci!
29.11.2022 - 01:57DROPS Design answered:
Bonjour Mme Lachance, la sensibilité est une question très personnelle - si vous êtes plutôt sensible, DROPS Baby Merino peut être une bonne alternative. N'hésitez pas à contacter votre magasin DROPS pour toute assistance au choix d'une laine, même par mail ou téléphone. Bon tricot!
29.11.2022 - 10:16
|
|
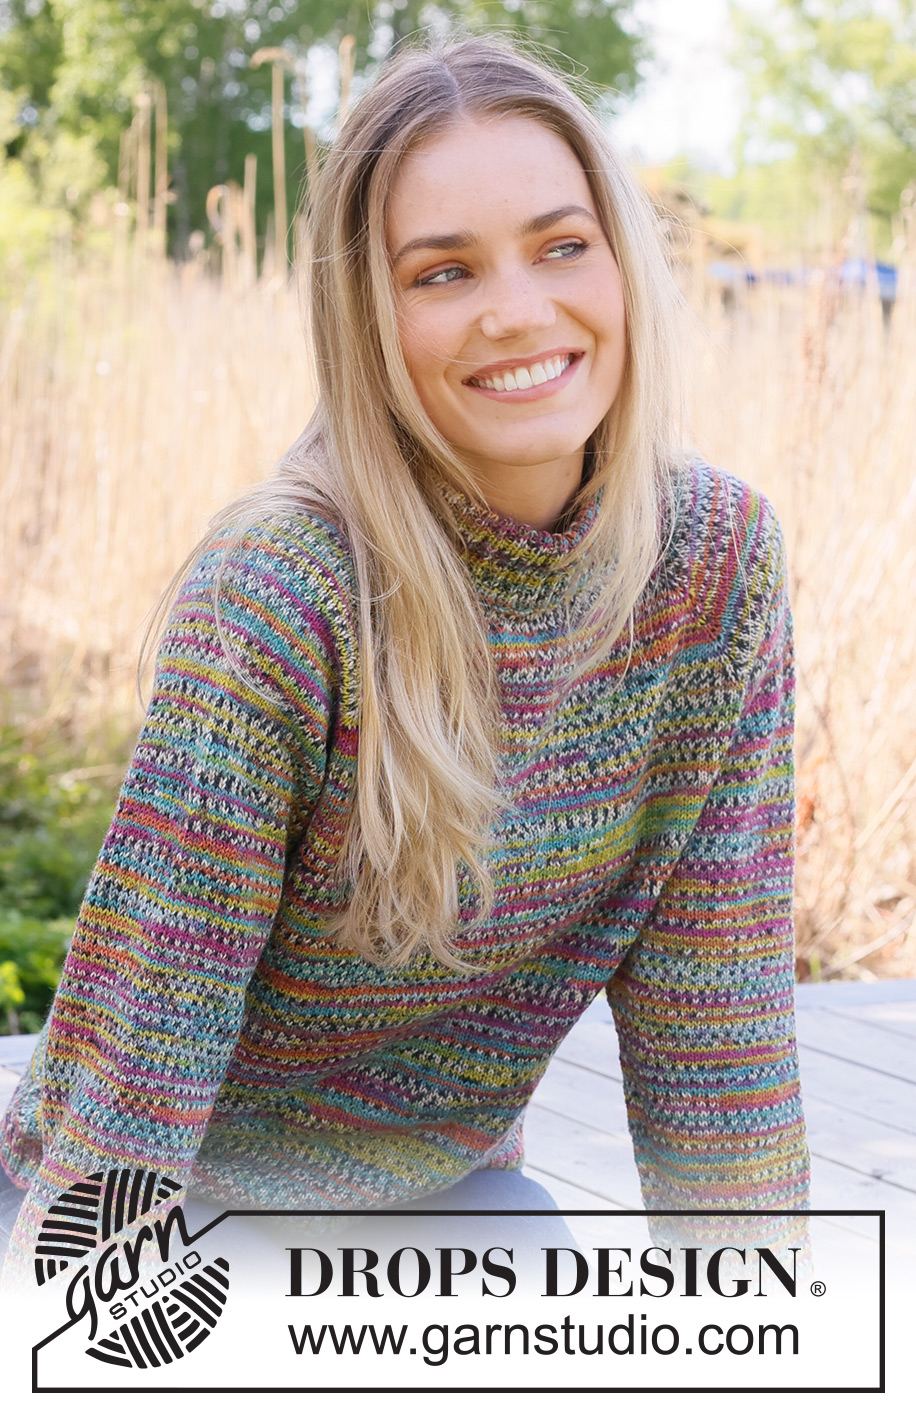
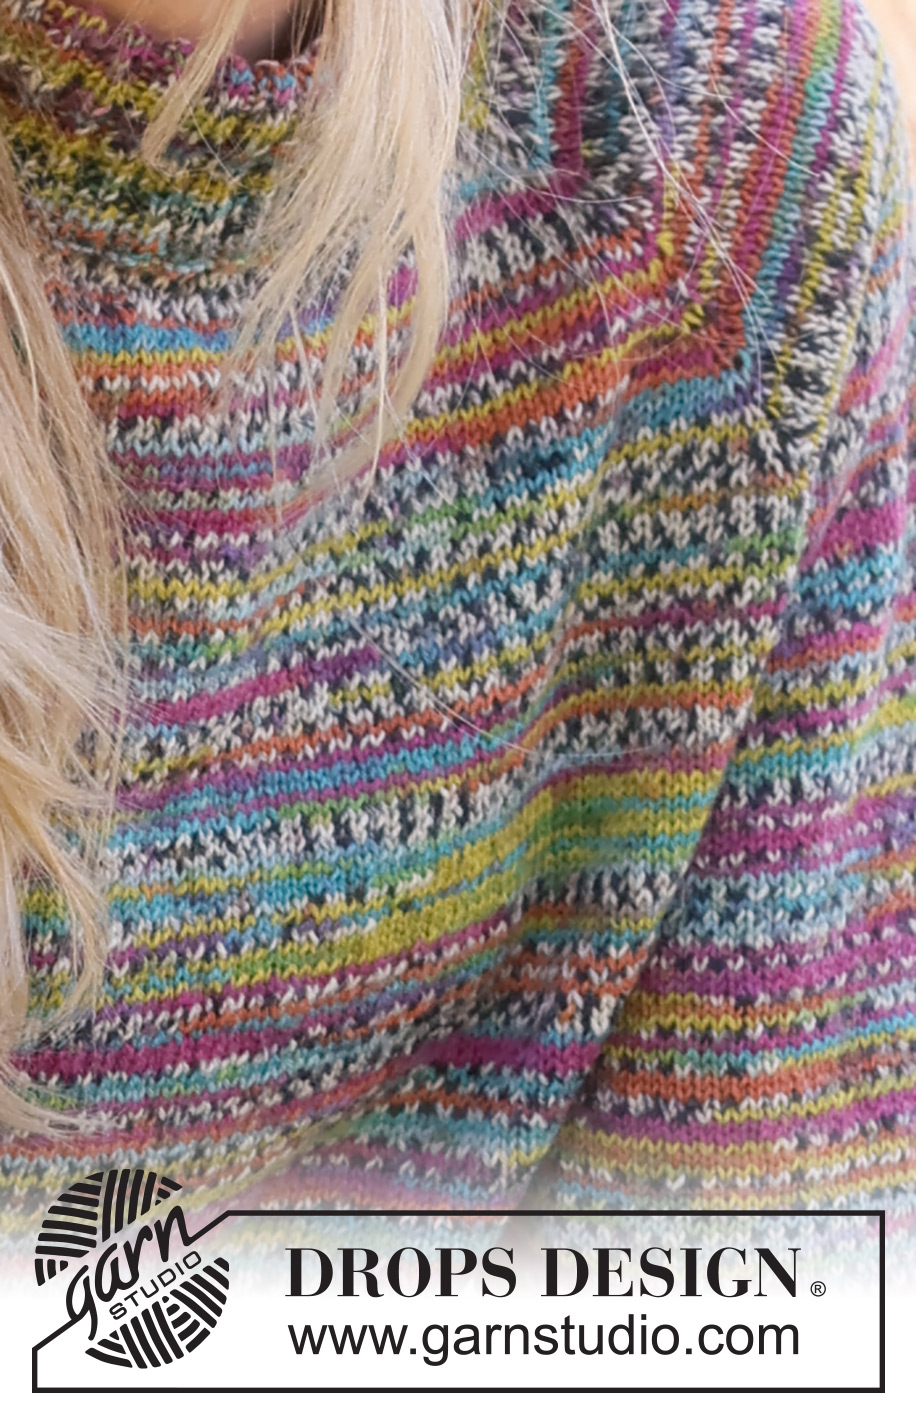
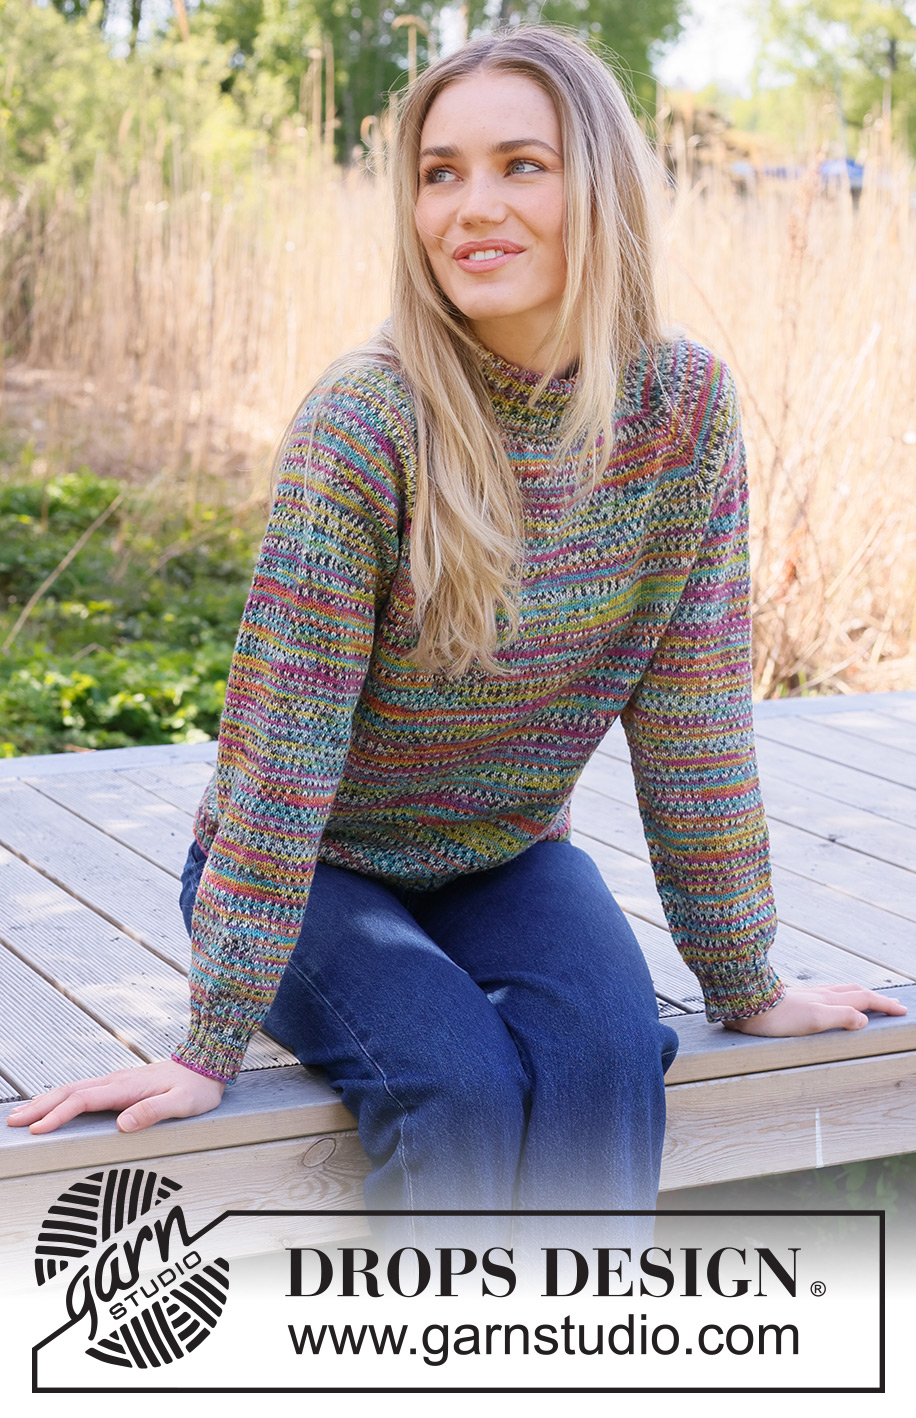
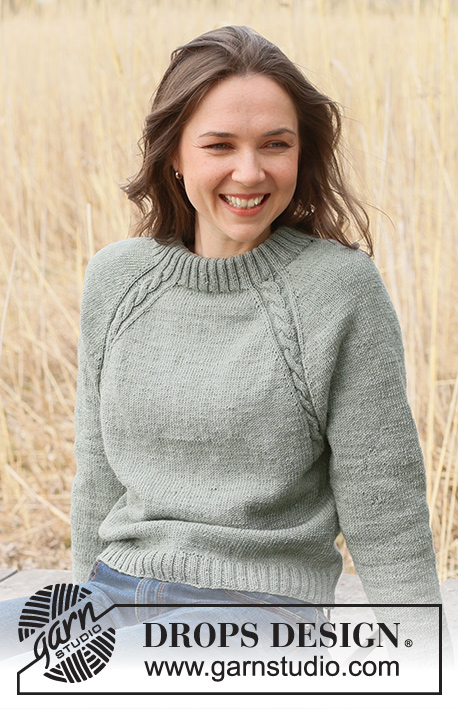
Candy Harvest#candyharvestsweater |
|
 |
 |
Knitted jumper in DROPS Fabel. The piece is worked top down with raglan and double neck. Sizes XS - XXL.
DROPS 237-39 |
|
|
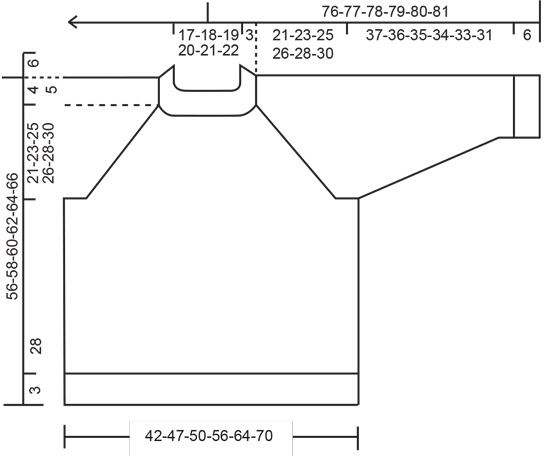
------------------------------------------------------- EXPLANATIONS FOR THE PATTERN: ------------------------------------------------------- RAGLAN: In each transition between body and sleeves, increase 1 stitch on each side of the marker-stitch. Increase 1 stitch by making 1 yarn over which is worked twisted on the next round to avoid holes. The new stitches are then worked in stocking stitch. DECREASE TIP (sleeves): Start 2 stitches before the marker-stitch, knit 2 twisted together, knit 1 (= marker-stitch), knit 2 together (= 2 stitches decreased). ------------------------------------------------------- START THE PIECE HERE: ------------------------------------------------------- JUMPER – SHORT OVERVIEW OF THE PIECE: The piece is worked in the round on circular needle, top down. The sleeves are worked in the round with short circular needle, changing to double pointed needles when necessary as you decrease stitches. DOUBLE NECK: Cast on 120-136-140-152-164-168 stitches with DROPS Fabel over 2 circular needles size 3 mm and 3.5 mm held together. Remove the needle size 3.5 mm keeping the stitches on the needle size 3 mm (this gives an elastic cast-on edge). Knit 1 round then work rib (knit 2, purl 2) for 12 cm. Fold the rib double to the inside and knit the next round, knitting every 2nd stitch together with its corresponding stitch on the cast-on edge, giving you a double neck. Change to circular needle size 3.5 mm. Knit 1 round and purl 1 round. Insert 4 markers without working the stitches; these are used when increasing for raglan: Count 20-24-24-27-30-31 stitches (half back piece), insert marker-1 in the next stitch, count 18-18-20-20-20-20 stitches (sleeve), insert marker-2 in the next stitch, count 40-48-48-54-60-62 stitches (front piece), insert marker-3 in the next stitch, count 18-18-20-20-20-20 stitches (sleeve), insert marker-4 in the next stitch, there are 20-24-24-27-30-31 stitches left after the last marker (half back piece). Cut the strand. NECK-LINE: Now work a neck-line with short rows: Start from the right side, 3 stitches before marker-3 (front left-hand side of the neck when garment is worn). Work stocking stitch and increase for RAGLAN – read description above, until you are 3 stitches past marker-2 (front right-hand side of neck). Turn, tighten the strand and work back to 7 stitches past marker-3. Turn, tighten the strand and work back to 7 stitches past marker-2 – remember to increase for raglan. Turn, tighten the strand and work back to 11 stitches past marker-3. Turn, tighten the strand and work back to 11 stitches past marker-2 - remember to increase for raglan. Turn, tighten the strand and work back to 3 stitches past marker-3. Cut the strand. YOKE: Start mid-back and continue to increase for raglan every 2nd round a total of 26-28-32-36-42-48 times (including the increases on the short rows) = 328-360-396-440-500-552 stitches. Continue working without further increases until the yoke measures 21-23-25-26-28-30 cm mid-front (measured after the neck). Divide the yoke for the body and sleeves as follows: Work the first 47-53-57-64-73-80 stitches (half back piece), place the next 70-74-84-92-104-116 stitches on a thread for the sleeve, cast on 7 stitches (in side under sleeve), work 94-106-114-128-146-160 stitches (front piece), place the next 70-74-84-92-104-116 stitches on a thread for the sleeve, cast on 7 stitches (in side under sleeve), work the remaining 47-53-57-64-73-80 stitches (half back piece). The body and sleeves are finished separately. Remove the markers. The piece is now measured from here! BODY: = 202-226-242-270-306-334 stitches. Continue with stocking stitch in the round for a further 28 cm. Change to circular needle size 3 mm. Knit 1 round and increase 18-22-22-26-30-34 stitches evenly spaced = 220-248-264-296-336-368 stitches. Work rib (knit 2, purl 2) for 3 cm. Cast off. The jumper measures approx. 56-58-60-62-64-66 cm from the shoulder down. SLEEVES: Place the 70-74-84-92-104-116 stitches from the thread on the one side of the piece on short circular needle size 3.5 mm and knit up 1 stitch in each of the 7 stitches cast on under the sleeve = 77-81-91-99-111-123 stitches. Insert a marker in the middle stitch of the 7 new stitches under the sleeve. Continue in the round with stocking stitch for 2 cm. Now decrease 1 stitch on each side of the marker – read DECREASE TIP. Decrease like this every 4-4-2½-2-1½-1 cm a total of 9-9-13-16-21-24 times = 59-63-65-67-69-75 stitches. Continue working until the sleeve measures 37-36-35-34-33-31 cm from the division. Change to double pointed needles size 3 mm, knit 1 round and increase 5-5-7-5-7-9 stitches evenly on this round = 64-68-72-72-76-84 stitches. Work rib (knit 2, purl 2) for 6 cm. Cast off. The sleeve measures approx. 43-42-41-40-39-37 cm. Work the other sleeve in the same way. |
|
 |
|
Have you finished this pattern?Tag your pictures with #dropspattern #candyharvestsweater or submit them to the #dropsfan gallery. Do you need help with this pattern?You'll find 34 tutorial videos, a Comments/Questions area and more by visiting the pattern on garnstudio.com. © 1982-2026 DROPS Design A/S. We reserve all rights. This document, including all its sub-sections, has copyrights. Read more about what you can do with our patterns at the bottom of each pattern on our site. |
|


With over 40 years in knitting and crochet design, DROPS Design offers one of the most extensive collections of free patterns on the internet - translated to 17 languages. As of today we count 324 catalogues and 12290 patterns translated into English (UK/cm).
We work hard to bring you the best knitting and crochet have to offer, inspiration and advice as well as great quality yarns at incredible prices! Would you like to use our patterns for other than personal use? You can read what you are allowed to do in the Copyright text at the bottom of all our patterns. Happy crafting!
Post a comment to pattern DROPS 237-39
We would love to hear what you have to say about this pattern!
If you want to leave a question, please make sure you select the correct category in the form below, to speed up the answering process. Required fields are marked *.