
Popular categories
Looking for a yarn?


Comments / Questions (47)
![]() Marja wrote:
Marja wrote:
Waarom moet er na het samenbreien van de kraag een naald rechts en dan een naald averechts worden gebreid voordat je aan de verkorte toeren begint?
21.04.2026 - 22:18DROPS Design answered:
Dag Marja,
Dit is denk ik bedoeld om een mooie overgang te krijgen.
22.04.2026 - 13:18
![]() Petra wrote:
Petra wrote:
Voor de hals heb ik voor maat XXL 168 steken. Als ik de steken voor de raglan verdeel kom ik toch uit op 164 steken? (31 + 20 + 62 + 20 + 31)
16.02.2026 - 14:58DROPS Design answered:
Dag Petra,
Heb je de markeerders voor de raglan in de steken geplaatst? En niet tussen 2 steken?
16.02.2026 - 20:30
![]() Ausra wrote:
Ausra wrote:
Nydelig
31.10.2025 - 20:43
![]() Wei-Lei Hubbard wrote:
Wei-Lei Hubbard wrote:
At the end of "Double Neck" section, you said to cut the strand and gStart from the right side, 3 stitches before marker-3. How do we get to the new starting (before marker 3) point? do you mean we have to shift the two needles one by one stitch to that point?
28.09.2025 - 22:36
![]() Michelle wrote:
Michelle wrote:
Een vraag over de markeerdraden, neemt je die in de steken mee bij het breien van de raglan? Kan ik ook een steekmarkeerder gebruiken die ik in de steek "hang"?
28.09.2025 - 07:46DROPS Design answered:
Hi Michelle, in this patterns the markers are inserted IN stitches, not between 2 stitches. Happy crocheting!
28.09.2025 - 09:10
![]() Margherita Scaraglino wrote:
Margherita Scaraglino wrote:
Buongiorno, ho realizzato tutti gli aumenti del raglan per la taglia che mi interessa e ora devo proseguire con la lavorazione per altri 6 cm prima di dividere il lavoro, vorrei sapere se in prossimità del raglan devo continuare a lavorare a dritto ritorto le maglie prima e dopo il punto che forma il raglan anche se non si fanno più aumenti? Grazie
30.08.2025 - 16:48DROPS Design answered:
Buonasera Margherita, non è necessario. Buon lavoro!
30.08.2025 - 20:03
![]() Vicki wrote:
Vicki wrote:
Can you tell me will I be able to find the yarn pattern repeat when I start the second ball of yarn?
21.08.2025 - 20:01DROPS Design answered:
Dear Vicki, DROPS Fabel has an uneven pattern, so it will be very difficult to exactly match the same pattern as you had in the previous ball of yarn. However it's this variability that gives it the multicolor effect on the garment so, as long as they are both from the same dyelot, it should hardly be noticeable that the pattern doesn't match. Happy knitting!
26.08.2025 - 23:06
![]() Jenny wrote:
Jenny wrote:
I stickfastheten anges inte vilket sticknummer som avses utgå ifrån. Ska jag anta att det är garnets rekommenderade nummer 3 ?
08.04.2025 - 20:20DROPS Design answered:
Hej Jenny. Det är den större av de 2 (den som ska användas vid slätstickning) som du ska använda när du mäter stickfastheten. Mvh DROPS Design
09.04.2025 - 10:37
![]() Tanja wrote:
Tanja wrote:
Werden die Raglanzunahmen während der verkürzten Reihen in jeder Reihe oder lediglich in jeder Hinreihe gestrickt? In der Beschreibung der Raglan-Zunahme steht "in jeder Reihe", während in der Beschreibung des Passes "in jeder 2." steht
12.01.2025 - 10:57DROPS Design answered:
Liebe Tanja, hier wird "bei jeder Zunahmen für Raglan" gemeint, aber die Raglanzunahmen entstehen in jeder 2. Reihe/Runde wie beschrieben. Viel Spaß b beim Stricken!
13.01.2025 - 09:05
![]() Tanja wrote:
Tanja wrote:
Die Maschenzahl für die Einteilung für die Raglanzunahmen stimmt nich. 2x24+2x18+48=132 und nicht 136 (wie für den Anschlag für Grösse S angegeben). Wie soll ich nun weitermachen?
12.01.2025 - 10:28DROPS Design answered:
Liebe Tanja, beachten Sie, daß dier Markierer in je einer Masche (und nicht zwischen Maschen) eingesetzt werden, so haben Sie 132 M + 4 M mit je 1 Markierer = 136 M. Viel Spaß beim Stricken!
13.01.2025 - 11:13
|
|
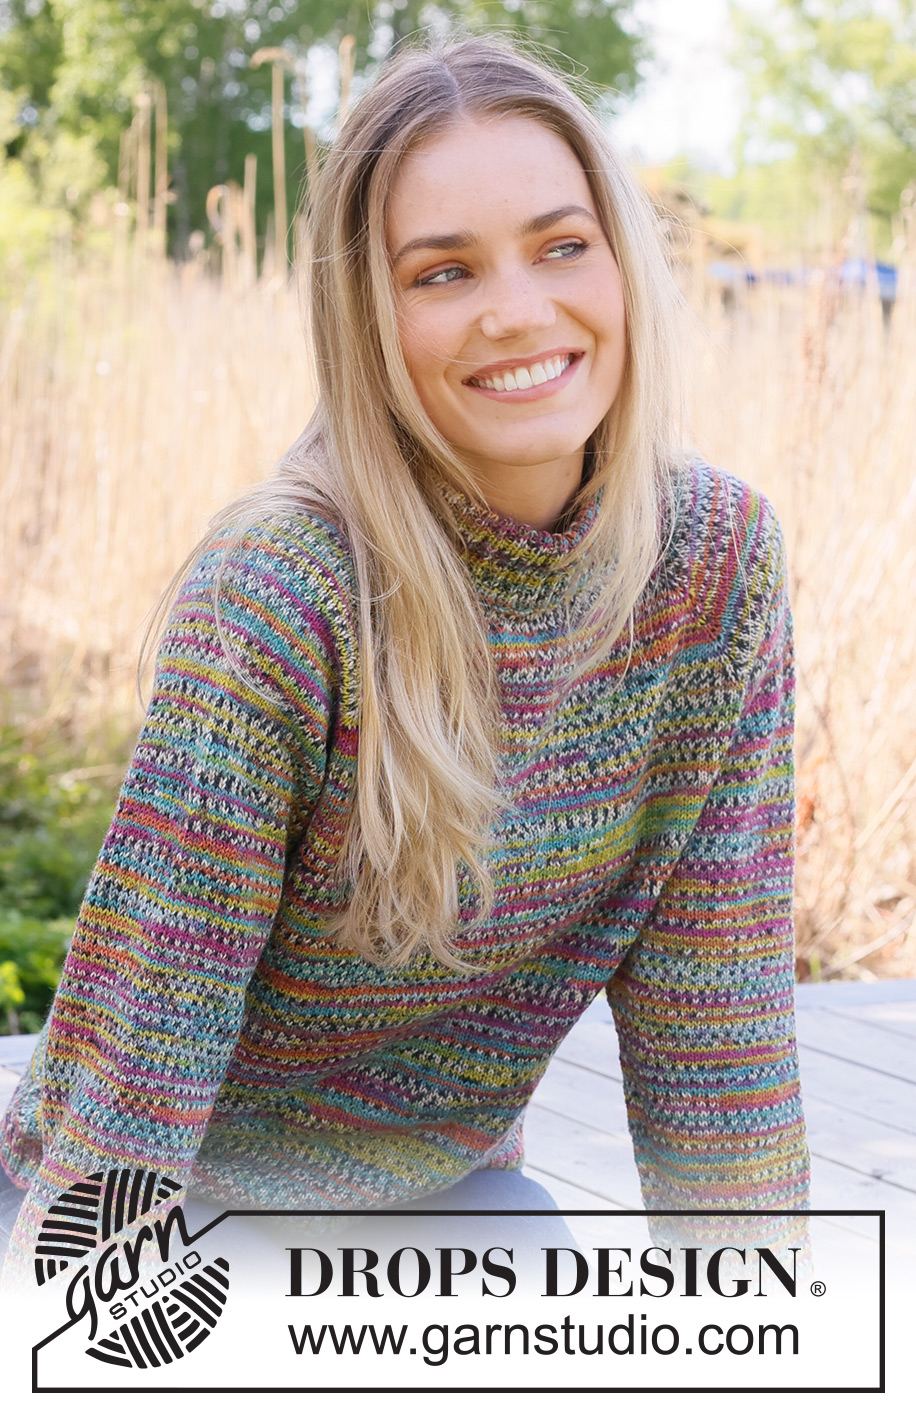
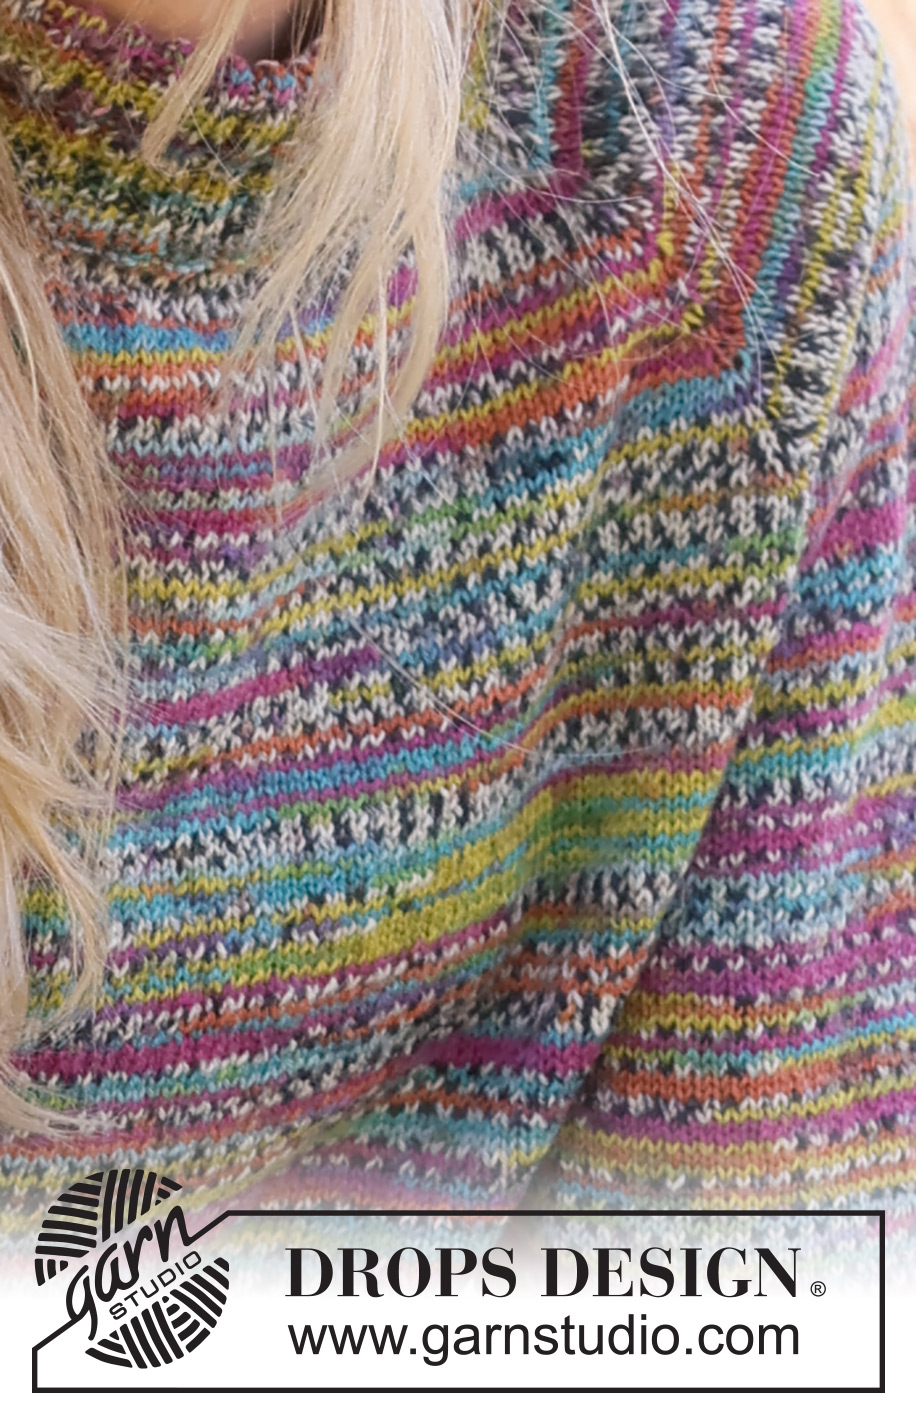
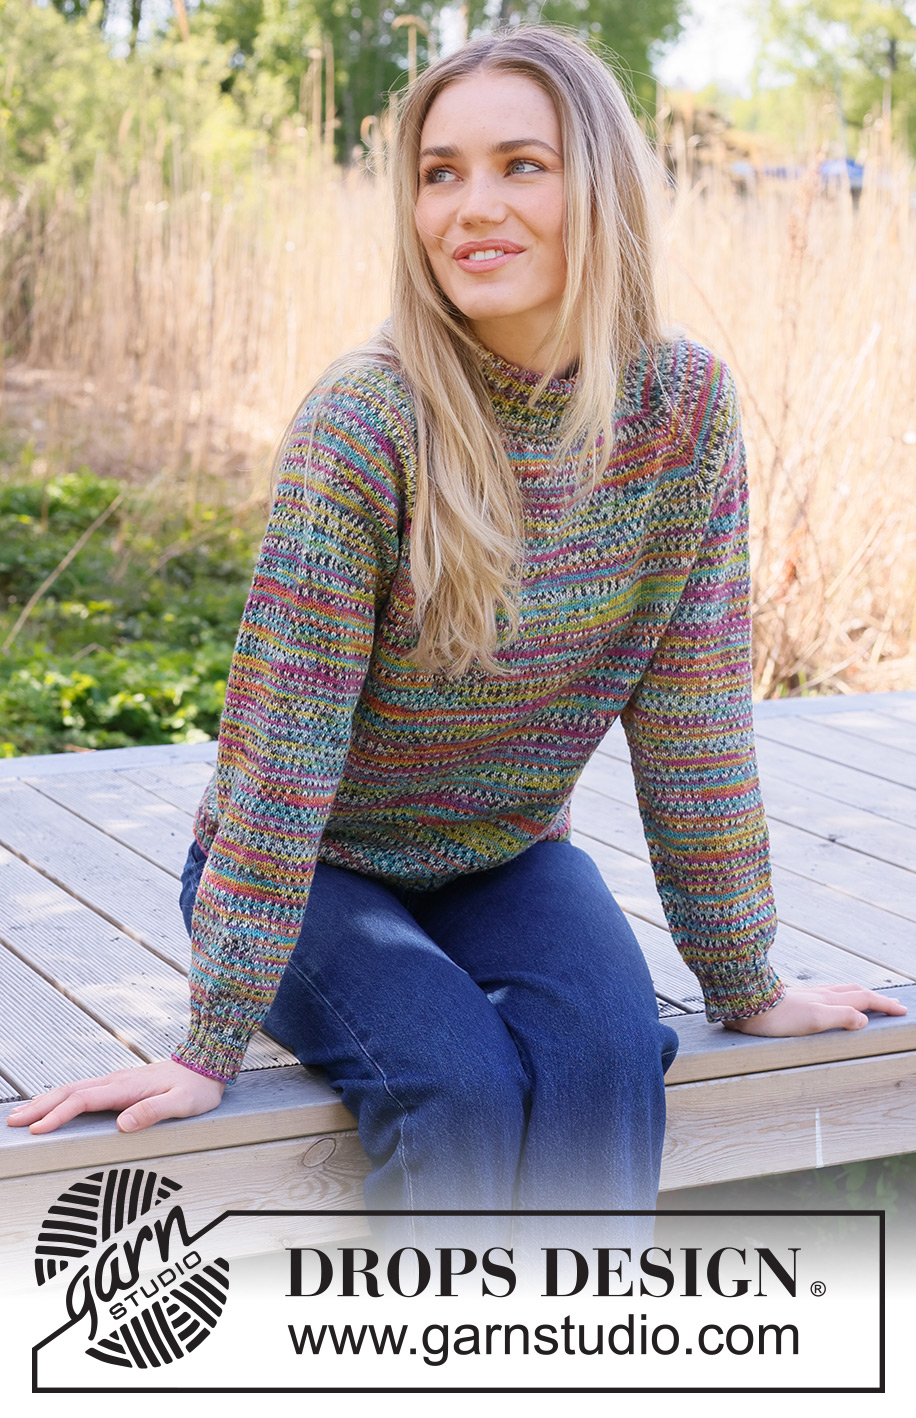
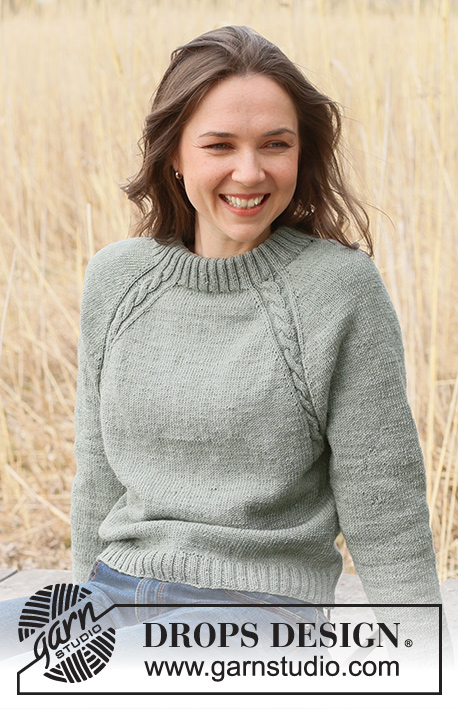
Candy Harvest#candyharvestsweater |
|
 |
 |
Knitted jumper in DROPS Fabel. The piece is worked top down with raglan and double neck. Sizes XS - XXL.
DROPS 237-39 |
|
|
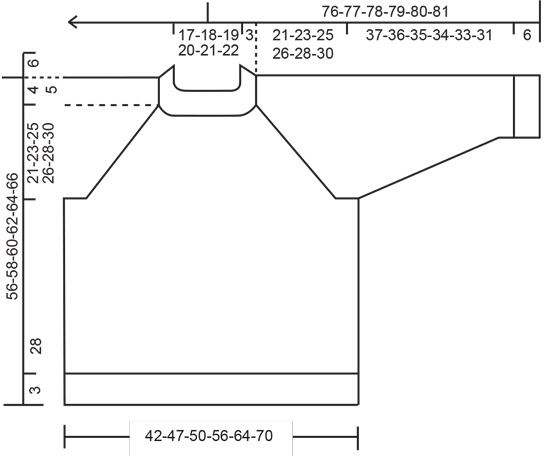
------------------------------------------------------- EXPLANATIONS FOR THE PATTERN: ------------------------------------------------------- RAGLAN: In each transition between body and sleeves, increase 1 stitch on each side of the marker-stitch. Increase 1 stitch by making 1 yarn over which is worked twisted on the next round to avoid holes. The new stitches are then worked in stocking stitch. DECREASE TIP (sleeves): Start 2 stitches before the marker-stitch, knit 2 twisted together, knit 1 (= marker-stitch), knit 2 together (= 2 stitches decreased). ------------------------------------------------------- START THE PIECE HERE: ------------------------------------------------------- JUMPER – SHORT OVERVIEW OF THE PIECE: The piece is worked in the round on circular needle, top down. The sleeves are worked in the round with short circular needle, changing to double pointed needles when necessary as you decrease stitches. DOUBLE NECK: Cast on 120-136-140-152-164-168 stitches with DROPS Fabel over 2 circular needles size 3 mm and 3.5 mm held together. Remove the needle size 3.5 mm keeping the stitches on the needle size 3 mm (this gives an elastic cast-on edge). Knit 1 round then work rib (knit 2, purl 2) for 12 cm. Fold the rib double to the inside and knit the next round, knitting every 2nd stitch together with its corresponding stitch on the cast-on edge, giving you a double neck. Change to circular needle size 3.5 mm. Knit 1 round and purl 1 round. Insert 4 markers without working the stitches; these are used when increasing for raglan: Count 20-24-24-27-30-31 stitches (half back piece), insert marker-1 in the next stitch, count 18-18-20-20-20-20 stitches (sleeve), insert marker-2 in the next stitch, count 40-48-48-54-60-62 stitches (front piece), insert marker-3 in the next stitch, count 18-18-20-20-20-20 stitches (sleeve), insert marker-4 in the next stitch, there are 20-24-24-27-30-31 stitches left after the last marker (half back piece). Cut the strand. NECK-LINE: Now work a neck-line with short rows: Start from the right side, 3 stitches before marker-3 (front left-hand side of the neck when garment is worn). Work stocking stitch and increase for RAGLAN – read description above, until you are 3 stitches past marker-2 (front right-hand side of neck). Turn, tighten the strand and work back to 7 stitches past marker-3. Turn, tighten the strand and work back to 7 stitches past marker-2 – remember to increase for raglan. Turn, tighten the strand and work back to 11 stitches past marker-3. Turn, tighten the strand and work back to 11 stitches past marker-2 - remember to increase for raglan. Turn, tighten the strand and work back to 3 stitches past marker-3. Cut the strand. YOKE: Start mid-back and continue to increase for raglan every 2nd round a total of 26-28-32-36-42-48 times (including the increases on the short rows) = 328-360-396-440-500-552 stitches. Continue working without further increases until the yoke measures 21-23-25-26-28-30 cm mid-front (measured after the neck). Divide the yoke for the body and sleeves as follows: Work the first 47-53-57-64-73-80 stitches (half back piece), place the next 70-74-84-92-104-116 stitches on a thread for the sleeve, cast on 7 stitches (in side under sleeve), work 94-106-114-128-146-160 stitches (front piece), place the next 70-74-84-92-104-116 stitches on a thread for the sleeve, cast on 7 stitches (in side under sleeve), work the remaining 47-53-57-64-73-80 stitches (half back piece). The body and sleeves are finished separately. Remove the markers. The piece is now measured from here! BODY: = 202-226-242-270-306-334 stitches. Continue with stocking stitch in the round for a further 28 cm. Change to circular needle size 3 mm. Knit 1 round and increase 18-22-22-26-30-34 stitches evenly spaced = 220-248-264-296-336-368 stitches. Work rib (knit 2, purl 2) for 3 cm. Cast off. The jumper measures approx. 56-58-60-62-64-66 cm from the shoulder down. SLEEVES: Place the 70-74-84-92-104-116 stitches from the thread on the one side of the piece on short circular needle size 3.5 mm and knit up 1 stitch in each of the 7 stitches cast on under the sleeve = 77-81-91-99-111-123 stitches. Insert a marker in the middle stitch of the 7 new stitches under the sleeve. Continue in the round with stocking stitch for 2 cm. Now decrease 1 stitch on each side of the marker – read DECREASE TIP. Decrease like this every 4-4-2½-2-1½-1 cm a total of 9-9-13-16-21-24 times = 59-63-65-67-69-75 stitches. Continue working until the sleeve measures 37-36-35-34-33-31 cm from the division. Change to double pointed needles size 3 mm, knit 1 round and increase 5-5-7-5-7-9 stitches evenly on this round = 64-68-72-72-76-84 stitches. Work rib (knit 2, purl 2) for 6 cm. Cast off. The sleeve measures approx. 43-42-41-40-39-37 cm. Work the other sleeve in the same way. |
|
 |
|
Have you finished this pattern?Tag your pictures with #dropspattern #candyharvestsweater or submit them to the #dropsfan gallery. Do you need help with this pattern?You'll find 34 tutorial videos, a Comments/Questions area and more by visiting the pattern on garnstudio.com. © 1982-2026 DROPS Design A/S. We reserve all rights. This document, including all its sub-sections, has copyrights. Read more about what you can do with our patterns at the bottom of each pattern on our site. |
|


With over 40 years in knitting and crochet design, DROPS Design offers one of the most extensive collections of free patterns on the internet - translated to 17 languages. As of today we count 324 catalogues and 12290 patterns translated into English (UK/cm).
We work hard to bring you the best knitting and crochet have to offer, inspiration and advice as well as great quality yarns at incredible prices! Would you like to use our patterns for other than personal use? You can read what you are allowed to do in the Copyright text at the bottom of all our patterns. Happy crafting!
Post a comment to pattern DROPS 237-39
We would love to hear what you have to say about this pattern!
If you want to leave a question, please make sure you select the correct category in the form below, to speed up the answering process. Required fields are marked *.