
Popular categories
Looking for a yarn?


Comments / Questions (45)
![]() Anna wrote:
Anna wrote:
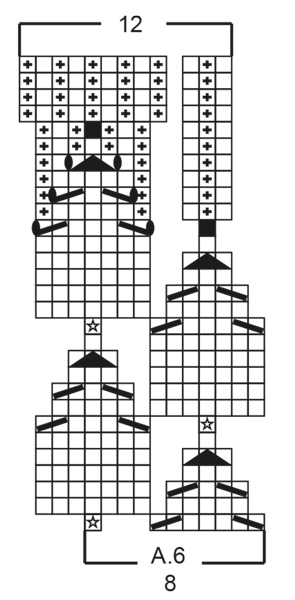
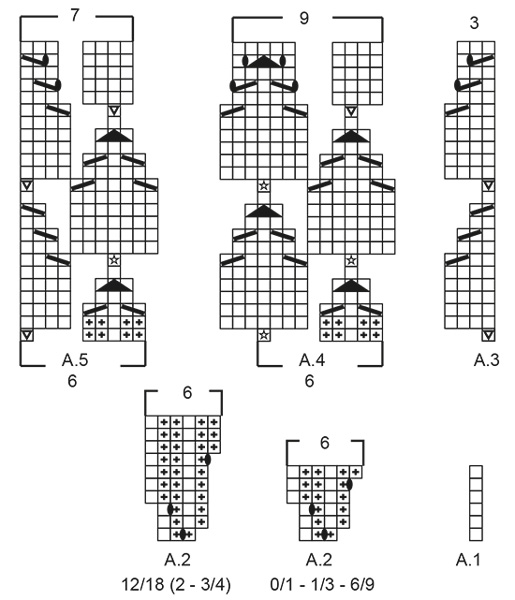
Hvad gør jeg når antal masker jeg har slået op ikke passer med antal i mønster. For eksempel slutter A3 med slå om før de 5 retmasker . Og mit arbejde måler efter A3 ca. 9 cm. Inden jeg begynder på A4og A5 og arbejdet først efter A4ogA5 skal måle ca 10 cm. Jeg strikker størrelse 1-3 måneder og min strikkeprøve passede .
26.02.2024 - 23:58DROPS Design answered:
Hei Anna. Du må ha riktig maskeantall for at oppskriften skal stemme. Når A.1 og A.2 er strikket 1 gang i høyden skal du ha 143 masker. Så strikkes det 5 kantmasker + A.3 (1 maske) + A.4 (x 21) + A.5 (6 masker) + 5 kantmasker =143 masker. A.1 + A.2 = 3 cm, A.3, A.4 + A.5 = cm 7 cm, så når A.3, A.4 + A.5 er strikket 1 gang i høyden, måler arbeidet ca. 10 cm (om strikkefastheten er overholdt). Usikker på hva du mener med «For eksempel slutter A3 med slå om før de 5 retmasker». Du starter med de 5 retmaskene og deretter strikkes A.3. På slutten av pinnen, slutter du med A.5 og deretter 5 retmasker. Mvh DROPS Design
04.03.2024 - 11:00
![]() Christina wrote:
Christina wrote:
Hej! Stickar Belllflower Dress storlek 1/3. Stickar på oket och förstår inte hur jag ska läsa A3 och A4. Sticka A3 står det ( hela stapeln?) Därefter A4. Har svårt att se vad som är A4. Förstår att det inte är hela diagramfiguren. Tacksam för svar.
13.02.2024 - 18:28DROPS Design answered:
Hej Christina. Ja du stickar enligt beskrivningen först 5 m rätstickning, maskorna på första raden i A.1, A.2 totalt 22 gånger, 5 m rätstickning. När du stickat på detta sätt så hela A.1 och A.2 stickats på höjden så fortsätter du enligt beskrivningen såhär: 5 m rätstickning, A.3, A.4 totalt 21 gånger, A.5 och 5 m rätstickning. Sticka till hela diagrammen är stickade på höjden. A.3 är delen längst till höger under måttskissen, A.4 är delen i mitten under måttskissen och A.5 är delen längst till vänster under måttskissen. Mvh DROPS Design
15.02.2024 - 14:09
![]() Anna wrote:
Anna wrote:
Buona sera Com'è si fa quattro aumenti in una maglia? Ho visto il video ma è di 5 magmie Grazie mille
12.10.2023 - 20:19DROPS Design answered:
Buonasera Anna, a quale parte del modello sta facendo riferimento? Buon lavoro!
19.10.2023 - 23:34
![]() Anna Maria wrote:
Anna Maria wrote:
Buongiorno Sto lavorando la misura di due anni.Non ho capito il diadramma 3 4 5 Dopo le 5 mag a legaccio debbo fare 4 mg in una poi faccio il diagramma 4 ma quante sono 6? Non ho capito Grazie
07.10.2023 - 12:12DROPS Design answered:
Buonasera Anna Maria, si esatto, dopo A.3 lavora A.4. Buon lavoro!
09.10.2023 - 23:18
![]() Anna Maria wrote:
Anna Maria wrote:
Buongiorno. Sto lavorando la misura 2 anni: nel diagramma 1 debbo fare x 6 giri? Poi fare il diagramma a2 x 26 volte?Grazie mille
05.10.2023 - 11:31DROPS Design answered:
Buonasera Anna Maria, no, deve lavorare 5 maglie a maglia legaccio, A.1 (1 maglia) e ripetere il diagramma A.2 per 26 volte. Buon lavoro!
05.10.2023 - 21:46
![]() Leena Haapakoski wrote:
Leena Haapakoski wrote:
Ruutupiirroksessa A2, " Oikea silmukka oikealta puolelta, nurja silmukka nurjalta puolelta" . Neulotaanko nämä tuohon samaan silmukkaan, eli että lisääntyy yksi silmukka?
24.03.2023 - 09:27DROPS Design answered:
Tämä silmukka neulotaan joko oikein oikealta puolelta tai nurin nurjalta puolelta, eli työhön ei tehdä lisäystä.
27.03.2023 - 18:32
![]() Meike Bauer wrote:
Meike Bauer wrote:
Wie stricke ich den Umschlag in A2 in der Rückreihe, rechts oder links? Und sehe ich das richtig, dass auch auf der Rückreihe ein Umschlag gearbeitet wird? Wie stricke ich den dann in der Hinreihe?
14.03.2023 - 08:52DROPS Design answered:
Liebe Frau Bauer, stricken Sie den Umschlag wie im Diagram bei der nächsten Reihe gezeigt, dh den 1. stricken Sie links verschränkt und die 2 nächsten Umschläge stricke Sie rechts verschränkt (so haben Sie Bündchen 2 M li, 1 M re).. Viel spaß beim stricken!
14.03.2023 - 10:13
![]() Mona Irene Olsen wrote:
Mona Irene Olsen wrote:
Jeg har startet på Bell dress baby 43-11. I A3 vises det i 1. Rekke at jeg skal strikke 4 masker i en. Skal jeg gjøre det i hver maske på hele raden, eller har jeg misforstått noe?
01.12.2022 - 22:30DROPS Design answered:
Hei Mona Irene. Når du skal strikke etter A.3, strikker du bare A.3 1 gang før (altså 1 maske) du strikker A.4 x antall ganger, og så av avsluttes det med A.5.. mvh DROPS Design
05.12.2022 - 11:54
![]() Laura wrote:
Laura wrote:
Buonasera nella gonna gli aumenti sono prima del segnapunti o anche dopo?
08.09.2022 - 16:24DROPS Design answered:
Buonasera Laura, gli aumenti sono prima del segnapunti. Buon lavoro!
08.09.2022 - 21:01
![]() Laura wrote:
Laura wrote:
Salve volevo sapere se nel vestito gli aumenti della gonna, vengono fatti solo prima del segnapunti. Grazie
07.09.2022 - 00:59DROPS Design answered:
Buonasera Laura, gli aumenti sono prima del segnapunti. Buon lavoro!
08.09.2022 - 21:06
|
||||||||||||||||||||||||||||
Bellflower Dress#bellflowerdress |
||||||||||||||||||||||||||||
 |
 |
|||||||||||||||||||||||||||
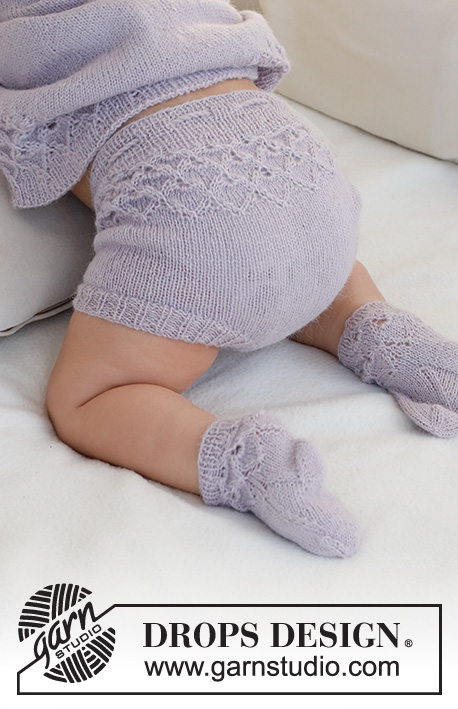
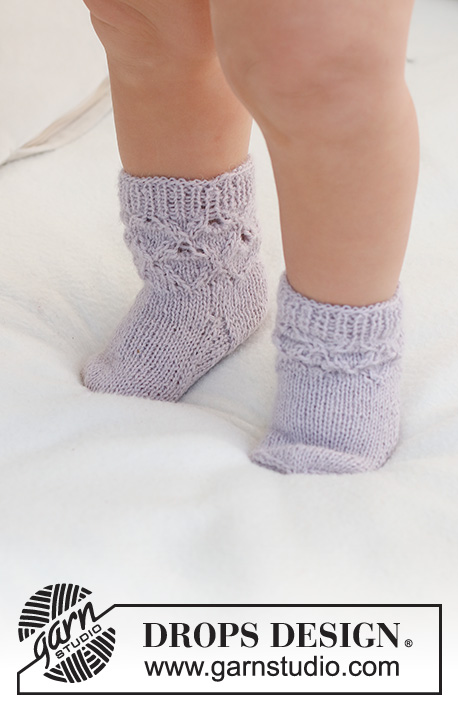
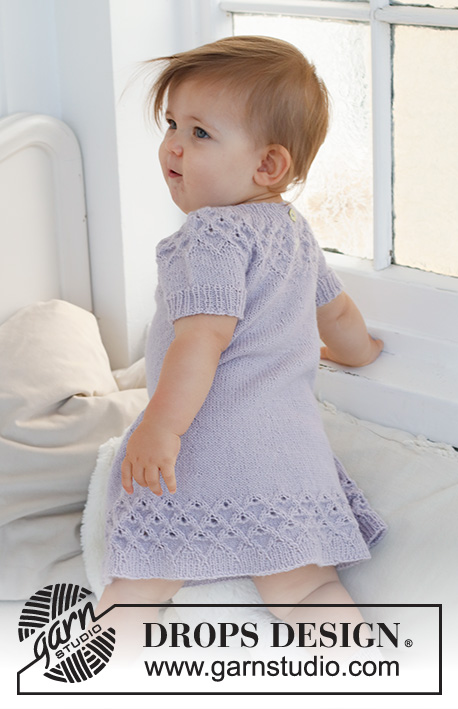
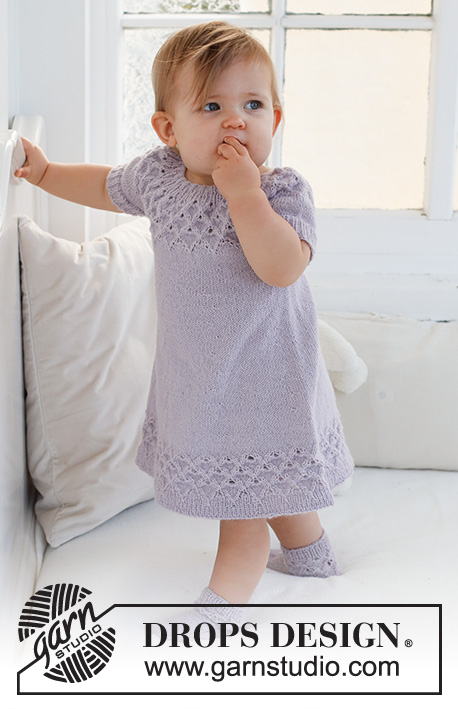
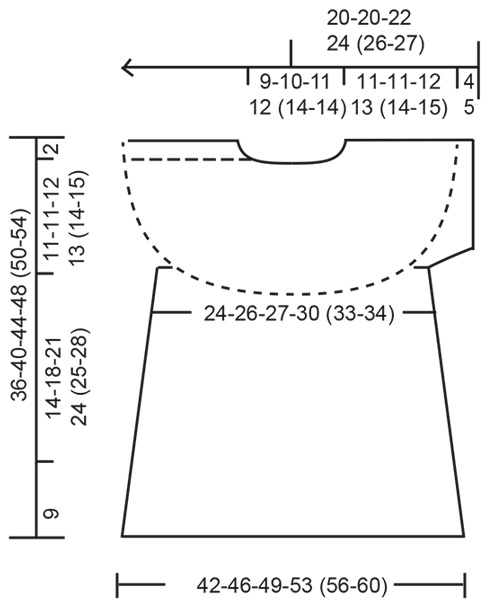
Knitted dress for babies and children in DROPS Alpaca. The piece is worked top down, with round yoke and lace pattern. Sizes 0 - 4 years.
DROPS Baby 43-11 |
||||||||||||||||||||||||||||
|
------------------------------------------------------- EXPLANATIONS FOR THE PATTERN: ------------------------------------------------------- RIDGE/GARTER STITCH (worked back and forth): Knit all rows. 1 ridge = knit 2 rows. PATTERN: See diagrams A.1 to A.6. Choose diagram for your size. The diagrams show all rows in the pattern from the right side. INCREASE TIP (for skirt): Increase alternately before and after each marker (i.e. the first increase is before each marker, the second after each marker, etc.). INCREASE 1 STITCH BEFORE EACH MARKER: Work until there is 1 stitch left before the marker, make 1 yarn over. INCREASE 1 STITCH AFTER EACH MARKER: Work to the marker, make 1 yarn over. On the next round knit the yarn overs twisted to avoid holes. Then work the new stitches in stocking stitch. BUTTONHOLES: Work the buttonholes on the left band (when the garment is worn). Work from the right side inside 1 stitch as follows: Knit 1, knit 2 together, make 1 yarn over. On the next row (wrong side), knit the yarn over to leave a hole. The first buttonhole is worked when the piece measures 1½-2 cm. The second buttonhole when the piece measures 5-6 cm. ------------------------------------------------------- START THE PIECE HERE: ------------------------------------------------------- DRESS – SHORT OVERVIEW OF THE PIECE: The piece is worked top down, back and forth until the split is finished mid-back. Then you continue in the round. The yoke is divided for the skirt and sleeve-edges and the skirt is continued in the round. The sleeve edges are worked in the round with double pointed needles. NECK: Cast on 71-77-83-89 (95-95) stitches with circular needle size 2.5 mm and DROPS Alpaca. Work 5 stitches in GARTER STITCH – read description above, * knit 1, purl 2 *, work from *-* until there are 6 stitches left, knit 1 and 5 stitches in garter stitch. Work this rib back and forth for 1 cm. Change to circular needle size 3 mm. YOKE: Work the next row from the right side as follows: 5 stitches in garter stitch, A.1, work A.2 20-22-24-26 (28-28) times and 5 stitches in garter stitch. Work the BUTTONHOLES – read description above. When A.1 and A.2 have been worked in height there are 131-143-155-167 (179-179) stitches. The piece measures approx. 3-3-3-4-4-4 cm. Continue with pattern as follows: 5 stitches in garter stitch, A.3, work A.4 19-21-23-25 (27-27) times, A.5 and 5 stitches in garter stitch. REMEMBER THE KNITTING TENSION! On the last row in A.3 to A.5 increase 0-0-0-0 (0-10) stitches evenly spaced. When A.3 to A.5 have been worked in height there are 191-209-227-245 (263-273) stitches. The piece measures approx. 10-10-10-12-12-12 cm. On the next row from the right side, cast off the first 5 stitches and knit to the end of the row = 186-204-222-240 (258-268) stitches. Continue with stocking stitch in the round. Move the start of the round 3 stitches so it is mid-back. When the piece measures 11-11-12-13 (14-15) cm, divide for the skirt and sleeves as follows: Knit 26-29-30-34 (37-39), place the next 40-44-50-52 (54-56) stitches on a thread for the sleeve, cast on 4 stitches under the sleeve, knit 53-58-61-68 (75-78), place the next 40-44-50-52 (54-56) stitches on a thread for the sleeve, cast on 4 stitches under the sleeve, knit the last 27-29-31-34 (38-39) stitches. SKIRT: = 114-124-130-144 (158-164) stitches. Continue with stocking stitch in the round for a further 3 cm. Insert 8 markers as follows: Knit 7-7-8-9 (10-10), insert 1 marker, * knit 14-15-16-18 (19-20), insert 1 marker, knit 14-16-16-18 (20-21), insert 1 marker *, work from *-* 2 more times, knit 15-16-17-18 (20-20), insert 1 marker and knit 8-8-9-9 (11-11). Allow the markers to follow your work onwards. On the next round increase 1 stitch before each marker – read INCREASE TIP! Increase like this every 4th-4th-5th-5th (6th-6th) round a total of 9-10-11-12 (12-13) times = 186-204-218-240 (254-268) stitches. When the skirt measures 14-18-21-24 (25-28) cm from the division, knit 1 round where you increase 6-4-6-0 (2-4) stitches evenly spaced = 192-208-224-240 (256-272) stitches. Then work A.6 on the round. When A.6 is finished there are 288-312-336-360 (384-408) stitches. Cast off with knit. The dress measures approx. 36-40-44-48 (50-54) cm from the shoulder down. SLEEVE-EDGES: Place the 40-44-50-52 (54-56) stitches from the thread on one side of the piece on double pointed needles size 3 mm and knit up 1 stitch in each of the 4 stitches cast on under the sleeve = 44-48-54-56 (58-60) stitches. Work stocking stitch in the round for 1-1-1-2-2-2 cm. Knit 1 round where you increase 4-3-3-4 (5-6) stitches evenly spaced = 48-51-57-60 (63-66) stitches. Change to double pointed needles size 2.5 mm. Work rib (knit 1, purl 2). Cast off with knit when the sleeve-edge measures 4-4-4-5-5-5 cm. Work the other sleeve-edge in the same way. ASSEMBLY: Lay the right band (the cast-off band) under the left band and sew down. Sew the buttons onto the right band. |
||||||||||||||||||||||||||||
Diagram explanations |
||||||||||||||||||||||||||||
|
||||||||||||||||||||||||||||
 |
||||||||||||||||||||||||||||
 |
||||||||||||||||||||||||||||
 |
||||||||||||||||||||||||||||
Have you finished this pattern?Tag your pictures with #dropspattern #bellflowerdress or submit them to the #dropsfan gallery. Do you need help with this pattern?You'll find 30 tutorial videos, a Comments/Questions area and more by visiting the pattern on garnstudio.com. © 1982-2026 DROPS Design A/S. We reserve all rights. This document, including all its sub-sections, has copyrights. Read more about what you can do with our patterns at the bottom of each pattern on our site. |
||||||||||||||||||||||||||||


With over 40 years in knitting and crochet design, DROPS Design offers one of the most extensive collections of free patterns on the internet - translated to 17 languages. As of today we count 324 catalogues and 12290 patterns translated into English (UK/cm).
We work hard to bring you the best knitting and crochet have to offer, inspiration and advice as well as great quality yarns at incredible prices! Would you like to use our patterns for other than personal use? You can read what you are allowed to do in the Copyright text at the bottom of all our patterns. Happy crafting!
Post a comment to pattern DROPS Baby 43-11
We would love to hear what you have to say about this pattern!
If you want to leave a question, please make sure you select the correct category in the form below, to speed up the answering process. Required fields are marked *.