Comments / Questions (42)
![]() Naila wrote:
Naila wrote:
Altså jeg strikker som vanlig men setter inn merke etter de tre første maskene rett etter de jeg har felt på stolpen?
10.04.2025 - 09:29DROPS Design answered:
Hei Naila, Ja, det er riktig, omgangen begynner 3 masker etter de felte maskene og du strikker rundt. God fornøyelse!
10.04.2025 - 10:03
![]() Naila wrote:
Naila wrote:
Hei. Hvordan forskyver jeg omgangen med 3 masker?
09.04.2025 - 18:06DROPS Design answered:
Hej Naila, du flytter bare mærket, så du tæller fra midt bagpå når du skal dele arbejdet :)
10.04.2025 - 08:56
![]() Erla Erlingsdottir wrote:
Erla Erlingsdottir wrote:
Hi, in A when you work 3 stitches in the same stitch, it does not specify if the yarn over is knitted twisted or not on next round?
14.12.2024 - 03:54DROPS Design answered:
Dear Erla, the yarn over is not knitted twisted, there should be a hole left. Here is a video explanation on how to work these stitches: https://www.garnstudio.com/video.php?id=1639&lang=en. Happy knitting!
15.12.2024 - 22:50
![]() Katarina wrote:
Katarina wrote:
Lagt upp halskantens 95 m (st 2 år). Är det första varvet man stickar från rätsidan?
03.12.2024 - 15:46DROPS Design answered:
Hej Katarina, du bestemmer selv hvilken side du vil have som retside (tror de fleste lader den første pind være fra vrangen) :)
06.12.2024 - 14:11
![]() Erla Erlingsdottir wrote:
Erla Erlingsdottir wrote:
I'm so confused on the start using A1 and A2. On the wrong side am I also doing A1 then AT after the 5 garter stitches?
27.11.2024 - 05:26DROPS Design answered:
Hi Erla, When working back from the wrong side, the pattern is worked in reverse, reading the diagrams from left to right: 5 garter stitches, then repeat row 2 in A.2 (from left to right) the correct number of times for your size, work row 2 in A.1 (from left to right) and 5 garter stitches. Hope this helps and happy knitting!
27.11.2024 - 06:48
![]() Marisa Blanc wrote:
Marisa Blanc wrote:
Pour l’empiècementbde la robe : Je dois tricoter 5 mailles au point mousse, À.1, répéter 24 fois À.2 et terminer par 5 mailles au point mousse. Je ne comprends pas ce que cela veut dire. Merci pour votre réponse. Marisa Blanc
01.11.2024 - 18:39DROPS Design answered:
Bonjour Mme Blanc, tricotez (sur l'endroit): 5 m. point mousse (- à l'endroit), tricotez ensuite la maille du diagramme A.1 (- 1 m jersey), répétez ensuite 24 fois les 4 mailles du diagramme A.2 (on augmente 1 maille au 1er rang) et terminez par 5 m point mousse; sur l'envers, tricotez 5 m point mousse (à l'endroit), répétez les diagramme A.2 en lisant de gauche à droite et terminez par A.1 (1 m envers) et 5 m point mousse. Bon tricot!
04.11.2024 - 07:39
![]() Paula wrote:
Paula wrote:
Voiko alpacka langan vaihtaa Merino extra fine lankaan (50g = 105g) Bellflower dress-ohjeeseen
31.10.2024 - 11:49DROPS Design answered:
Hei, DROPS Merino Extra Fine -lanka on Alpaca-lankaa paksumpi lanka, joten et voi vaihtaa kyseiseen lankaan. Voit kuitenkin käyttää vaihtoehtona jonkun muun lankaryhmään A kuuluvan langan, esim. DROPS Baby Merino.
31.10.2024 - 16:35
![]() Ellen Pedersen wrote:
Ellen Pedersen wrote:
Kan opskrifter udskrives endnu ?
17.06.2024 - 00:18DROPS Design answered:
Hei Ellen. Klikk på "Skriv ut" ikonet og du får skrevet ut oppskriften. mvh DROPS Design
24.06.2024 - 13:31
![]() Ann Cathrin Mora wrote:
Ann Cathrin Mora wrote:
Fant svaret på mitt spørsmål selv. Den som leter, finner ;)
28.04.2024 - 12:09
![]() Ann Cathrin Mora wrote:
Ann Cathrin Mora wrote:
Kan ikke finne diagram A.6 - er diagram A.6 det samme som A.3+A.4+A.5? Strikker i str 2 år.
27.04.2024 - 16:13DROPS Design answered:
Hei Ann Cathrin, Diagram A.6 finner du ovenfor målskissen, på bunnen av oppskriften. God fornøyelse!
29.04.2024 - 06:51
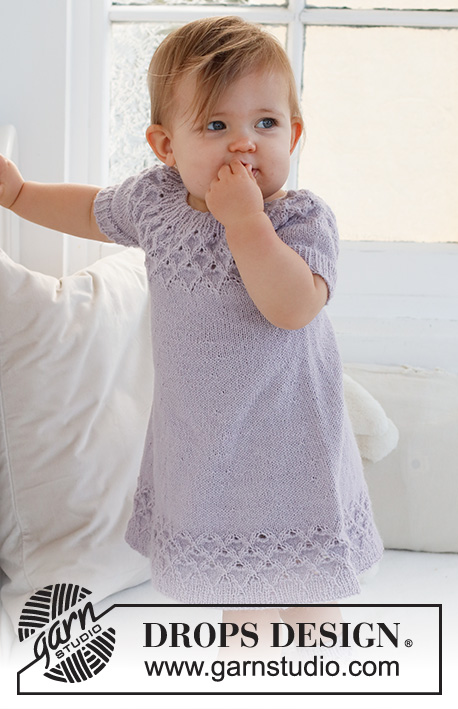
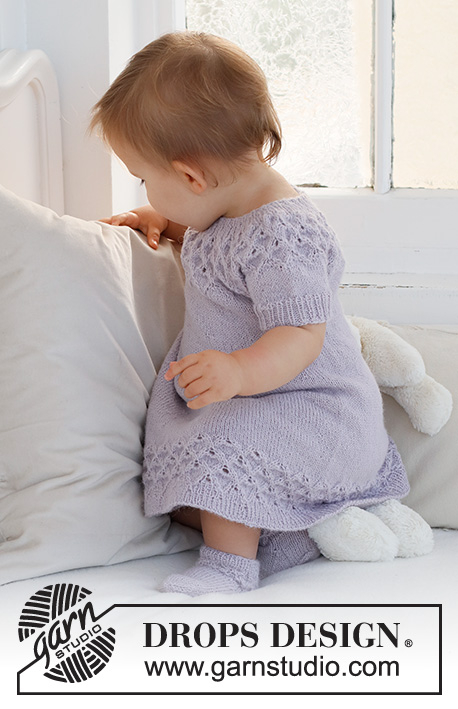
Bellflower Dress#bellflowerdress |
||||||||||||||||||||||||||||
 |
 |
|||||||||||||||||||||||||||
Knitted dress for babies and children in DROPS Alpaca. The piece is worked top down, with round yoke and lace pattern. Sizes 0 - 4 years.
DROPS Baby 43-11 |
||||||||||||||||||||||||||||
|
------------------------------------------------------- EXPLANATIONS FOR THE PATTERN: ------------------------------------------------------- RIDGE/GARTER STITCH (worked back and forth): Knit all rows. 1 ridge = knit 2 rows. PATTERN: See diagrams A.1 to A.6. Choose diagram for your size. The diagrams show all rows in the pattern from the right side. INCREASE TIP (for skirt): Increase alternately before and after each marker (i.e. the first increase is before each marker, the second after each marker, etc.). INCREASE 1 STITCH BEFORE EACH MARKER: Work until there is 1 stitch left before the marker, make 1 yarn over. INCREASE 1 STITCH AFTER EACH MARKER: Work to the marker, make 1 yarn over. On the next round knit the yarn overs twisted to avoid holes. Then work the new stitches in stocking stitch. BUTTONHOLES: Work the buttonholes on the left band (when the garment is worn). Work from the right side inside 1 stitch as follows: Knit 1, knit 2 together, make 1 yarn over. On the next row (wrong side), knit the yarn over to leave a hole. The first buttonhole is worked when the piece measures 1½-2 cm. The second buttonhole when the piece measures 5-6 cm. ------------------------------------------------------- START THE PIECE HERE: ------------------------------------------------------- DRESS – SHORT OVERVIEW OF THE PIECE: The piece is worked top down, back and forth until the split is finished mid-back. Then you continue in the round. The yoke is divided for the skirt and sleeve-edges and the skirt is continued in the round. The sleeve edges are worked in the round with double pointed needles. NECK: Cast on 71-77-83-89 (95-95) stitches with circular needle size 2.5 mm and DROPS Alpaca. Work 5 stitches in GARTER STITCH – read description above, * knit 1, purl 2 *, work from *-* until there are 6 stitches left, knit 1 and 5 stitches in garter stitch. Work this rib back and forth for 1 cm. Change to circular needle size 3 mm. YOKE: Work the next row from the right side as follows: 5 stitches in garter stitch, A.1, work A.2 20-22-24-26 (28-28) times and 5 stitches in garter stitch. Work the BUTTONHOLES – read description above. When A.1 and A.2 have been worked in height there are 131-143-155-167 (179-179) stitches. The piece measures approx. 3-3-3-4-4-4 cm. Continue with pattern as follows: 5 stitches in garter stitch, A.3, work A.4 19-21-23-25 (27-27) times, A.5 and 5 stitches in garter stitch. REMEMBER THE KNITTING TENSION! On the last row in A.3 to A.5 increase 0-0-0-0 (0-10) stitches evenly spaced. When A.3 to A.5 have been worked in height there are 191-209-227-245 (263-273) stitches. The piece measures approx. 10-10-10-12-12-12 cm. On the next row from the right side, cast off the first 5 stitches and knit to the end of the row = 186-204-222-240 (258-268) stitches. Continue with stocking stitch in the round. Move the start of the round 3 stitches so it is mid-back. When the piece measures 11-11-12-13 (14-15) cm, divide for the skirt and sleeves as follows: Knit 26-29-30-34 (37-39), place the next 40-44-50-52 (54-56) stitches on a thread for the sleeve, cast on 4 stitches under the sleeve, knit 53-58-61-68 (75-78), place the next 40-44-50-52 (54-56) stitches on a thread for the sleeve, cast on 4 stitches under the sleeve, knit the last 27-29-31-34 (38-39) stitches. SKIRT: = 114-124-130-144 (158-164) stitches. Continue with stocking stitch in the round for a further 3 cm. Insert 8 markers as follows: Knit 7-7-8-9 (10-10), insert 1 marker, * knit 14-15-16-18 (19-20), insert 1 marker, knit 14-16-16-18 (20-21), insert 1 marker *, work from *-* 2 more times, knit 15-16-17-18 (20-20), insert 1 marker and knit 8-8-9-9 (11-11). Allow the markers to follow your work onwards. On the next round increase 1 stitch before each marker – read INCREASE TIP! Increase like this every 4th-4th-5th-5th (6th-6th) round a total of 9-10-11-12 (12-13) times = 186-204-218-240 (254-268) stitches. When the skirt measures 14-18-21-24 (25-28) cm from the division, knit 1 round where you increase 6-4-6-0 (2-4) stitches evenly spaced = 192-208-224-240 (256-272) stitches. Then work A.6 on the round. When A.6 is finished there are 288-312-336-360 (384-408) stitches. Cast off with knit. The dress measures approx. 36-40-44-48 (50-54) cm from the shoulder down. SLEEVE-EDGES: Place the 40-44-50-52 (54-56) stitches from the thread on one side of the piece on double pointed needles size 3 mm and knit up 1 stitch in each of the 4 stitches cast on under the sleeve = 44-48-54-56 (58-60) stitches. Work stocking stitch in the round for 1-1-1-2-2-2 cm. Knit 1 round where you increase 4-3-3-4 (5-6) stitches evenly spaced = 48-51-57-60 (63-66) stitches. Change to double pointed needles size 2.5 mm. Work rib (knit 1, purl 2). Cast off with knit when the sleeve-edge measures 4-4-4-5-5-5 cm. Work the other sleeve-edge in the same way. ASSEMBLY: Lay the right band (the cast-off band) under the left band and sew down. Sew the buttons onto the right band. |
||||||||||||||||||||||||||||
Diagram explanations |
||||||||||||||||||||||||||||
|
||||||||||||||||||||||||||||
 |
||||||||||||||||||||||||||||
 |
||||||||||||||||||||||||||||
 |
||||||||||||||||||||||||||||
Have you finished this pattern?Tag your pictures with #dropspattern #bellflowerdress or submit them to the #dropsfan gallery. Do you need help with this pattern?You'll find 29 tutorial videos, a Comments/Questions area and more by visiting the pattern on garnstudio.com. © 1982-2026 DROPS Design A/S. We reserve all rights. This document, including all its sub-sections, has copyrights. Read more about what you can do with our patterns at the bottom of each pattern on our site. |
||||||||||||||||||||||||||||


Post a comment to pattern DROPS Baby 43-11
We would love to hear what you have to say about this pattern!
If you want to leave a question, please make sure you select the correct category in the form below, to speed up the answering process. Required fields are marked *.