
Popular categories
Looking for a yarn?


Comments / Questions (13)
![]() Marie wrote:
Marie wrote:
Hallo. Ich würde gerne den Rumpf ohne Naht und vor allen Dingen auch die rechte und linke Blende in einem stricken um die hintere Naht zu vermeiden. Spricht da was dagegen? Außer natürlich, dass man sehr viel Maschen auf der Nadel hat ;-). Viele Grüße
18.07.2024 - 08:35DROPS Design answered:
Liebe Marie, Sie können das Rumpfteil auch in einem Stück stricken. Die Seitennähte können noch zu etwas mehr Formstabilität von Kleidungsstücken führen, aber grundsätzlich spricht nichts - außer den vielen Maschen auf der Nadel und dem damit auch einhergehenden Gewicht - dagegen, die Jacke ohne die Nähte zu stricken. Die Blende können Sie ebenfalls in einem Stück stricken, wenn Sie die vielen Maschen auf der Nadel nicht stören. Auch hier gilt aber: Die Naht kann etwas mehr Stabilität bieten. Viel Spaß beim Stricken!
23.07.2024 - 09:35
![]() Mary wrote:
Mary wrote:
This pattern of drops design could be explained more clearly without mentioning the garter stitch every line. Also explain that you are working the V neck and cast off for sleeve at same time. Not an easy pattern to follow. Sorry but that is my opinion . Have been knitting over 50 years.
04.04.2024 - 04:59
![]() Anna wrote:
Anna wrote:
Die Zunahmen der Blenden soll man beide Male ab Beginn des V-Ausschnittes stricken. Dann würden sie aber bei der linken Blende oberhalb und bei der rechten unterhalb des Beginns zu liegen kommen, da man die 1. Reihe der linken Blende von unten nach oben und der rechten von oben nach unten strickt.
11.01.2024 - 12:56DROPS Design answered:
Liebe Anna, die Zunahmen werden bei der 1. Reihe für jede Blende genau bei der 1. Reihe von dem V-Halsauschnitt gestrickt, da die Jacke von unten nach oben gestrickt ward, werden die Zunahmen für die beiden Blenden bei der 1. Abnahmen gestrickt. Viel Spaß beim stricken!
11.01.2024 - 15:43
![]() Chritine wrote:
Chritine wrote:
Je ne trouve pas le diagramme A1 pouvez-vous me l'expliquer. Merci
17.11.2023 - 13:04
![]() Anna wrote:
Anna wrote:
Wäre es möglich diese Jacke mit einer doppelten Blende zu stricken oder wäre das zu d ick?
29.07.2023 - 16:44DROPS Design answered:
Liebe Anna, es wäre wahrscheinlich möglich, und natürlich anders aussehen - beachten Sie, daß die Blende hier 6 cm misst. Viel Spaß beim stricken!
31.07.2023 - 10:19
![]() Tina wrote:
Tina wrote:
Hello where can I find the A.1 diagram for this pattern? It’s not appearing on my end
21.06.2023 - 01:53DROPS Design answered:
Dear Tina, you will find diagram A.1 on the right side of the body next to measurement chart, under the sleeve, it's a small diagram worked over 2 sts and 4 rows. Happy knitting!
21.06.2023 - 08:10
![]() Moreau Nathalie wrote:
Moreau Nathalie wrote:
Pourquoi augmenter des mailles a partir du v en tricotant la bande de boutonnage je ne comprends pas
04.01.2023 - 11:20DROPS Design answered:
Bonjour Mme Moreau, on augmente au niveau de l'encolure V pour que la bordure devant soit plus jolie - ces augmentations ne se font qu'au tout premier rang, ainsi la bordure reste bien plate, en suivant l'encolure V. Bon tricot!
04.01.2023 - 14:04
![]() Lisa Engman wrote:
Lisa Engman wrote:
Vid stickning av framkant, ökar man 4 maskor varje varv i fortsättningen?
03.11.2022 - 14:08DROPS Design answered:
Hej Lisa, du öker bara på första varvet. Vi har gjort ett förtydligande i mönstret. Tack för info :)
04.11.2022 - 13:27
![]() Rebecca wrote:
Rebecca wrote:
Hallo, ich kann kein Diagramm A.1 finden. Wurde es vielleicht vergessen? In den Fotos sieht es nach Rippenmuster (1 rechts, 1 links) aus. Wie sollte ich hier stricken? Vielen Dank Rebecca
30.05.2022 - 23:19DROPS Design answered:
Liebe Rebecca, das Diagram A.1 finden Sie neben der Maßskizze, unter der Ärmel, es wird über 2 Maschen und 4 Reihen gestrickt, es handelt sich um Bündchen (1 Masche rechts verschränkt, 1 Masche links) - von der Vorderseite gesehen. Viel Spaß beim stricken!
31.05.2022 - 08:36
![]() Rebecca wrote:
Rebecca wrote:
Thanks for your reply. Do you think it’s possible to adapt this particular pattern to straight needles, I read somewhere that some patterns are more difficult? Thanks Rebecca
26.04.2022 - 09:39DROPS Design answered:
Dear Rebecca, back and front pieces are worked here back and forth on circular needles to have enough room for all stitches; front bands are also worked back and forth on needle - only sleeves are worked here in the round and this lesson will help you to adapt them on to straight needles. Happy knitting!
26.04.2022 - 10:08
|
|||||||||||||
Shy Daisy Cardigan#shydaisycardigan |
|||||||||||||
 |
 |
||||||||||||
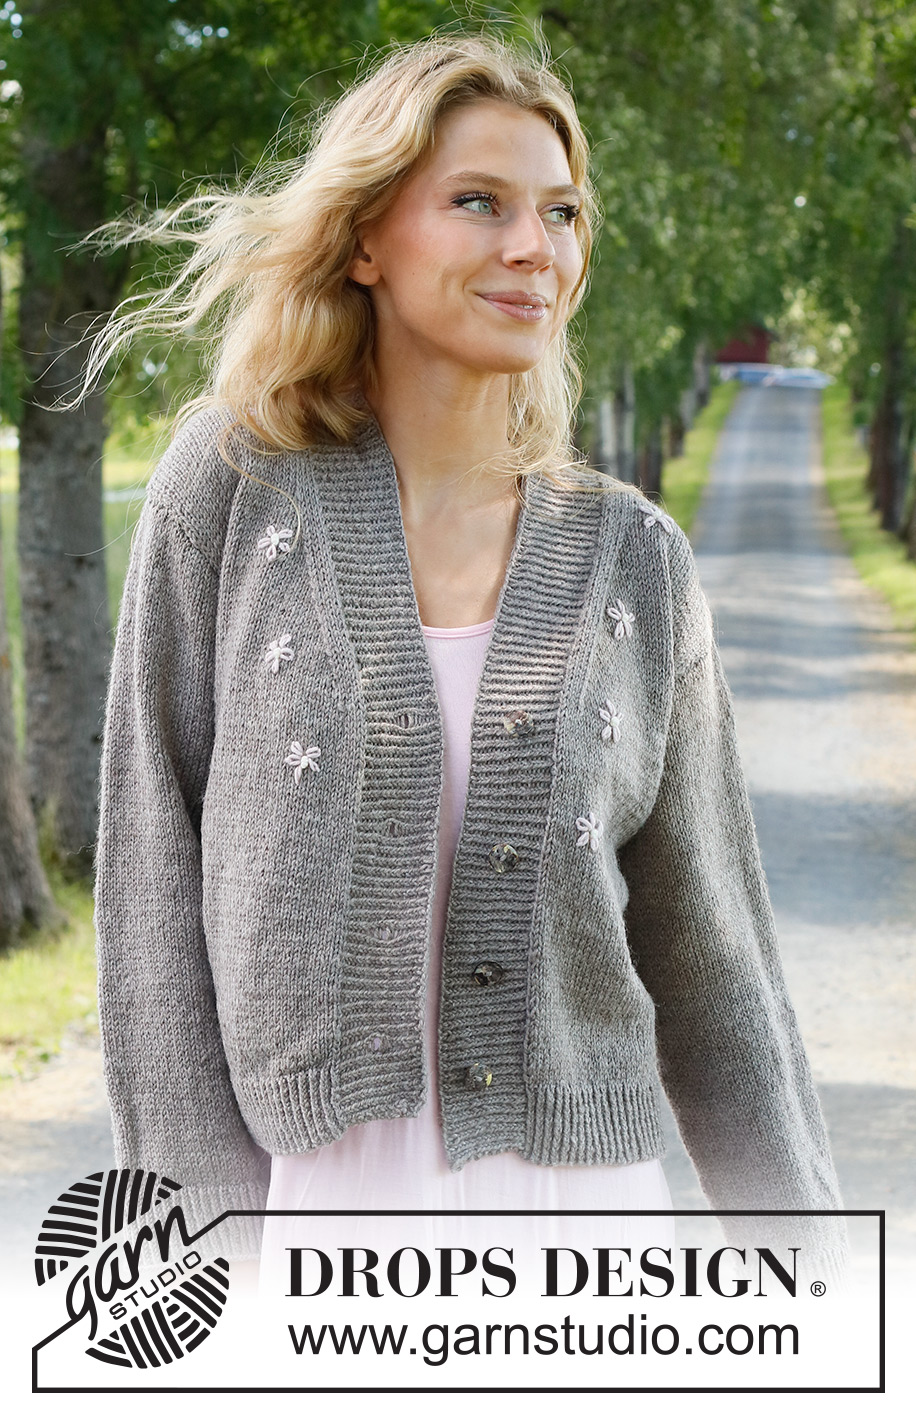
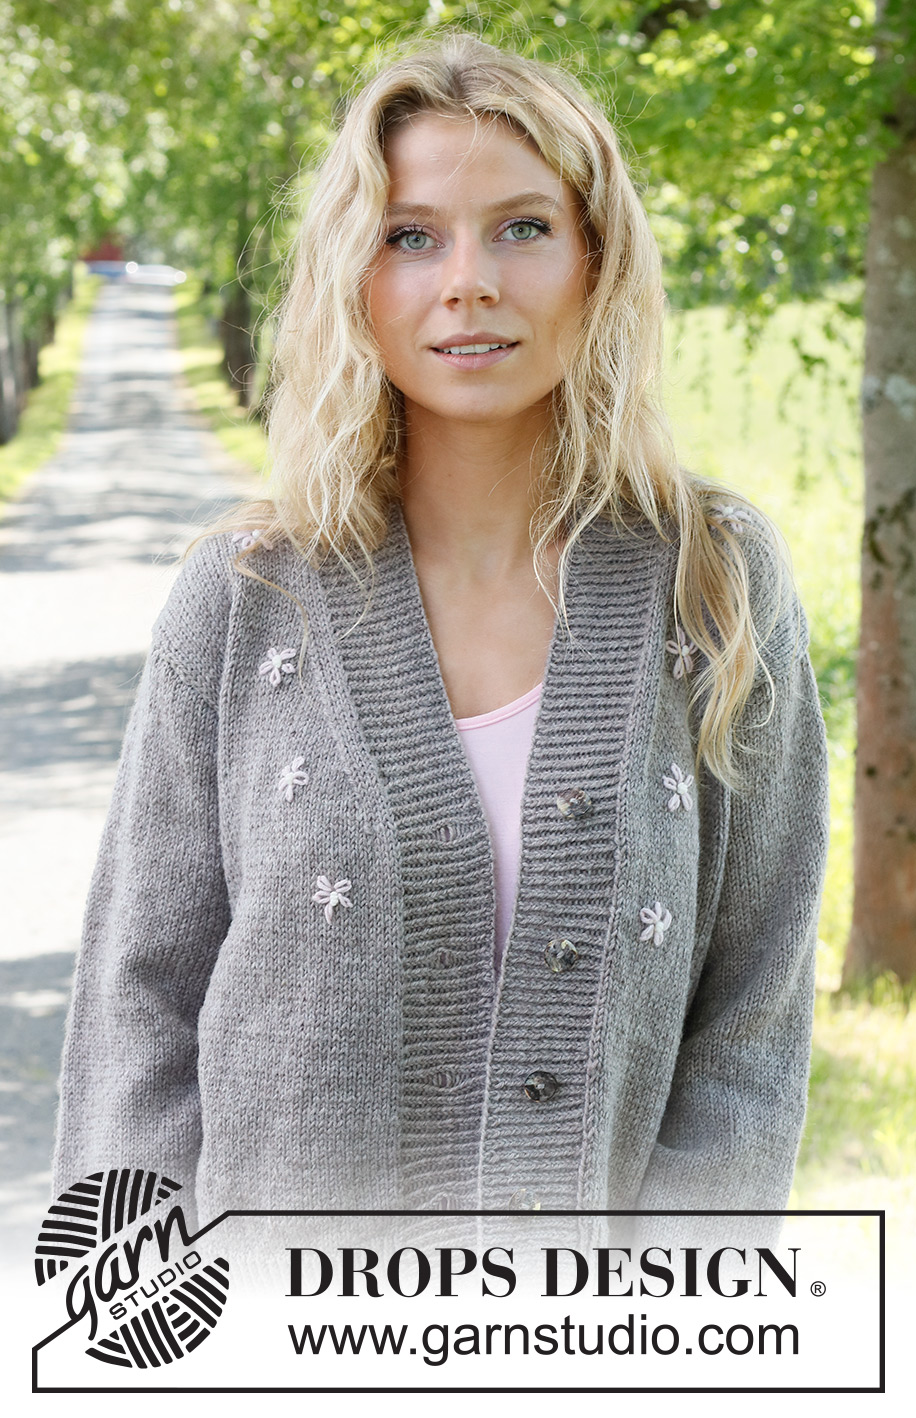
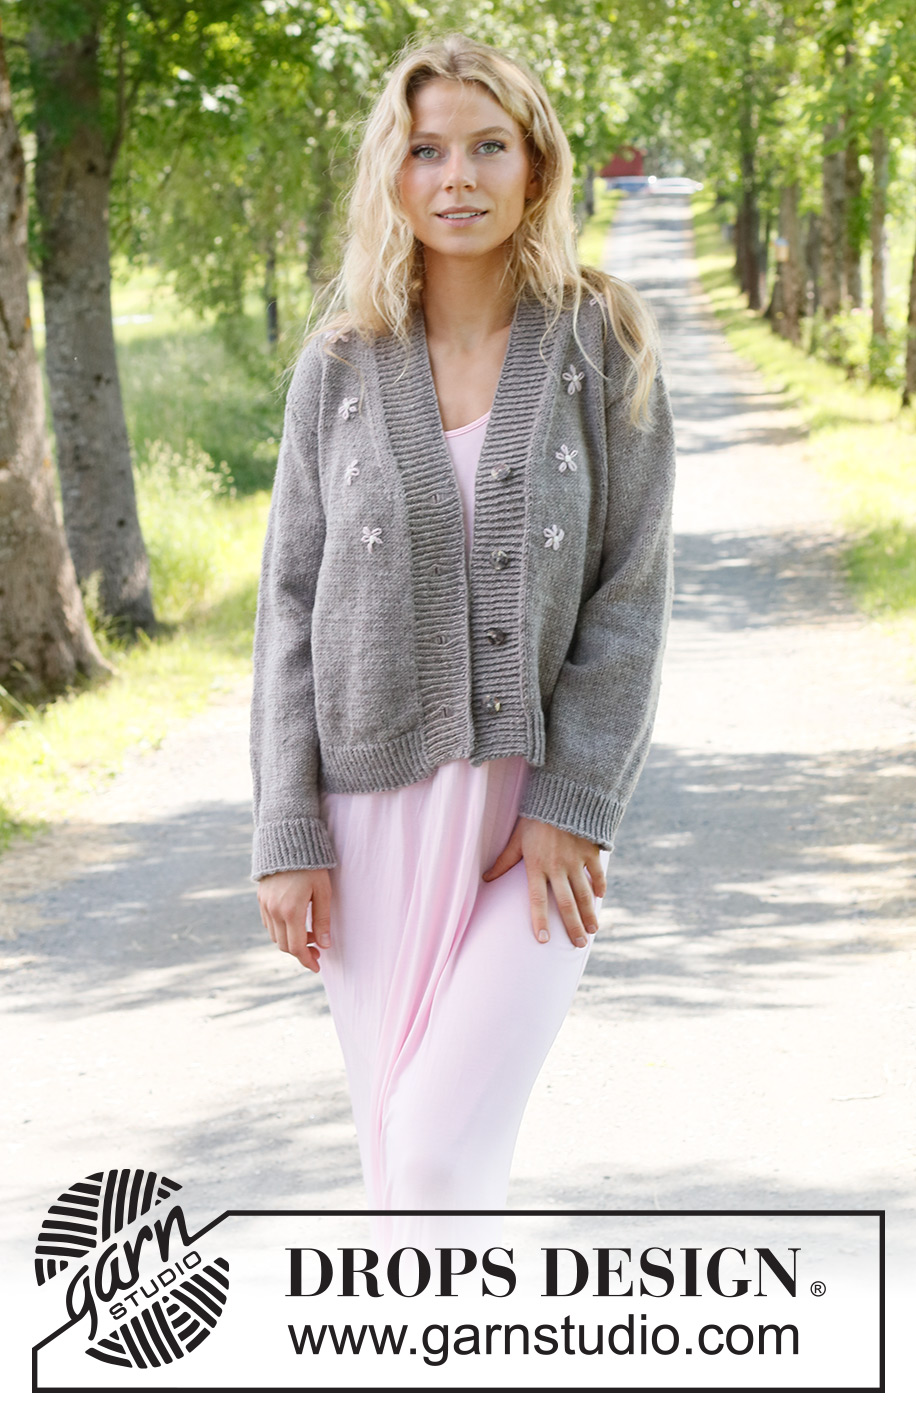
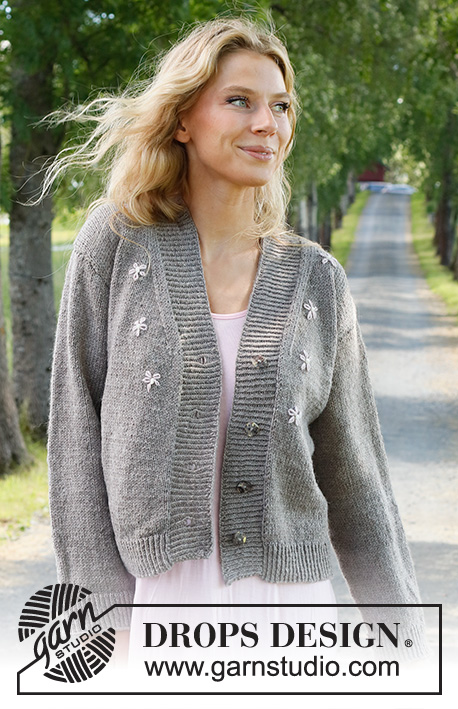
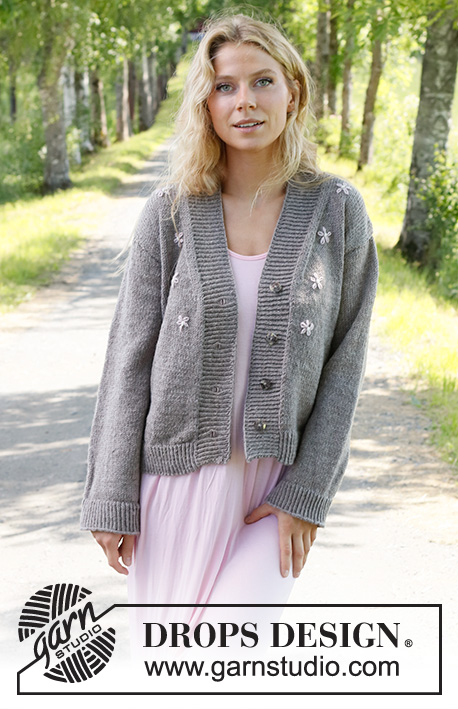
Knitted jacket in DROPS Merino Extra Fine. Piece is knitted bottom up in stocking stitch and embroidered flowers. Size: S - XXXL
DROPS 231-33 |
|||||||||||||
|
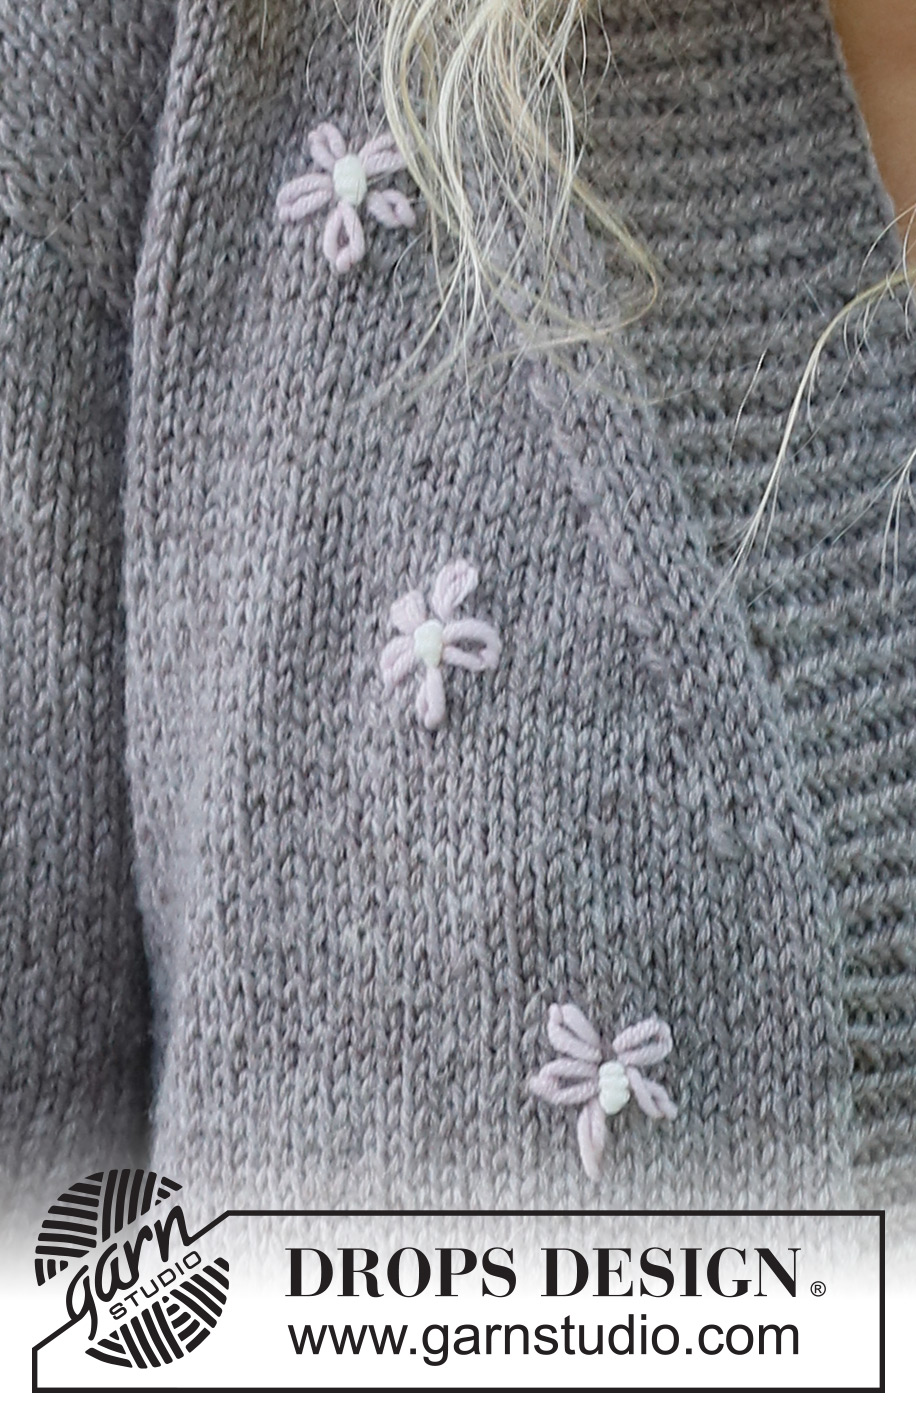
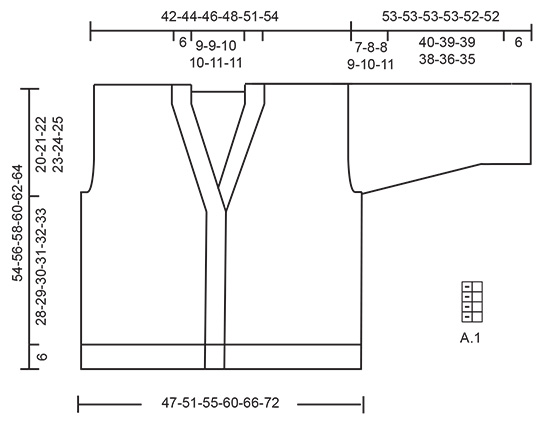
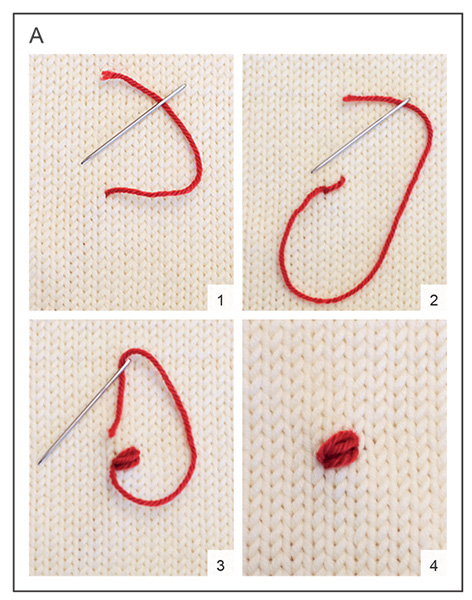
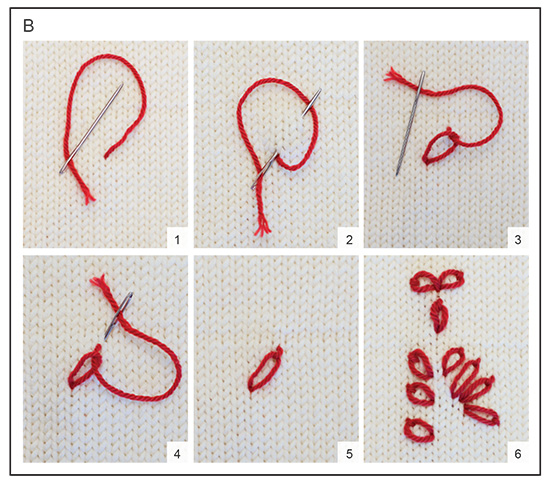
---------------------------------------------------------- EXPLANATION FOR THE PATTERN: ---------------------------------------------------------- GARTER STITCH (back and forth): Knit all rows. 1 ridge vertically = knit 2 rows. PATTERN: See diagram A.1. Diagrams show all rows in pattern seen from the right side. DECREASE TIP (evenly): To calculate how to decrease evenly, use the total number of stitches on row (e.g. 129 stitches), minus edge stitches (2 stitches), and divide the remaining 127 stitches by number of decreases to be done (e.g. 33) = 3.8. In this example decrease by knitting approx. every 3rd and 4th stitch together and do not decrease over edge stitches. INCREASE TIP (applies to sleeves): Work until 1 stitch remains before marker thread, make 1 yarn over, knit 2 (marker is between these stitches), make 1 yarn over. On next round knit yarns over twisted to avoid holes. Then work the new stitches in stocking stitch. CAST-OFF TIP: To avoid a tight cast-off edge when casting off, you may use a larger needle. If this still is too tight make 1 yarn over after approx. every 4th stitch while casting off (cast off yarn overs as stitches). ---------------------------------------------------------- START THE PIECE HERE: ---------------------------------------------------------- JACKET - SHORT OVERVIEW OF THE PIECE: Work back piece and front pieces back and forth in parts. Work sleeves in the round on double pointed needles/short circular needle up to sleeve cap, then work back and forth on circular needle. Assemble piece as explained in pattern. Pick up stitches for bands mid front. Then embroider flowers on the front pieces. BACK PIECE: Cast on 129-139-149-163-179-195 stitches (including 1 edge stitch in each side) on circular needle size 3.5 mm with colour light brown in DROPS Merino Extra Fine. Work rib as follows: 1 edge stitch in GARTER STITCH – read explanation above, A.1 until 2 stitches remain, work first stitch in A.1 so that the rib is the same in each side, finish with 1 edge stitch in garter stitch. Continue rib back and forth like this for 6 cm. Now knit 1 row from right side while decreasing 33-35-37-41-45-49 stitches evenly - read DECREASE TIP = 96-104-112-122-134-146 stitches. Switch to circular needle size 4.5 mm. Purl 1 row with 1 edge stitch in garter stitch in each side. Now work in stocking stitch with 1 edge stitch in garter stitch in each side. REMEMBER THE KNITTING TENSION! When piece measures 34-35-36-37-38-39 cm, cast off 3-3-4-5-6-7 stitches at the beginning of the next 2 rows for armholes = 90-98-104-112-122-132 stitches. On next row from right side, continue decrease for armholes in each side as follows: Work 1 edge stitch in garter stitch, knit 3-3-3-4-4-4 stitches, slip 1 stitch knitwise, knit 1, pass slipped stitch over stitch worked (= 1 stitch decreased), work until 6-6-6-7-7-7 stitches remain, knit 2 together (= 1 stitch decreased), work 3-3-3-4-4-4 stitches, 1 edge stitch in garter stitch. Purl 1 row with 1 edge stitch in garter stitch in each side. Decrease like this on every other row (= every row from right side) 3-5-6-8-10-12 times in total = 84-88-92-96-102-108 stitches. Continue with stocking stitch and 1 edge stitch in garter stitch. When piece measures 50-52-54-56-58-60 cm, cast off the middle 40-40-42-42-44-44 stitches for neck and finish each shoulder separately. Then cast off 1 stitch on next row from neck = 21-23-24-26-28-31 stitches for shoulder. Continue to work until piece measures 54-56-58-60-62-64 cm. Cast off. Work the other shoulder the same way. RIGHT FRONT PIECE: Cast on 65-69-75-81-89-97 stitches (including 1 edge stitch in each side) on circular needle size 3.5 mm with colour light brown in DROPS Merino Extra Fine. Work rib as follows: 1 edge stitch in garter stitch, A.1 until 2 stitches remain, work first stitch in A.1 so that the rib is the same in each side, finish with 1 edge stitch in garter stitch. Continue rib back and forth like this for 6 cm. Now knit 1 row from right side while decreasing 16-16-18-19-21-23 stitches evenly - remember DECREASE TIP = 49-53-57-62-68-74 stitches. Switch to circular needle size 4.5 mm. Purl 1 row with 1 edge stitch in garter stitch in each side. OVERVIEW OF NEXT SECTION: Now continue in stocking stitch with 1 edge stitch in garter stitch in each side, at the same time decrease for V-neck and armholes - read all of the following section before continuing. V-NECK: When piece measures 30-31-32-33-34-35 cm, decrease for V- neck on next row from right side as follows: Work 1 edge stitch in garter stitch, knit 3-3-3-4-4-4 stitches, slip 1 stitch knitwise, knit 1, pass slipped stitch over stitch worked (= 1 stitch decreased), knit the rest of row as before. Decrease like this every 4th row 1 time, then every other row 19-18-18-17-17-16 times in total and every 4th row 2-3-4-5-6-7 times in total. ARMHOLE: When piece measures 34-35-36-37-38-39 cm, cast off 3-3-4-5-6-7 stitches at the beginning of next row from wrong side. On next row from right side decrease for armhole in the side as follows: Work until 6-6-6-7-7-7 stitches remain, knit 2 together (= 1 stitch decreased) and knit 3-3-3-4-4-4 stitches, 1 edge stitch in garter stitch. Purl 1 row with 1 edge stitch in garter stitch in each side. Decrease like this every other row (= every row from right side) 3-5-6-8-10-12 times in total. When all decreases for V-neck and armholes are done 21-23-24-26-28-31 stitches remain for shoulder. Continue to work until piece measures 54-56-58-60-62-64 cm. Cast off. LEFT FRONT PIECE: Cast on 65-69-75-81-89-97 stitches (including 1 edge stitch in each side) on circular needle size 3.5 mm with colour light brown in DROPS Merino Extra Fine. Work rib as follows: 1 edge stitch in garter stitch, A.1 until 2 stitches remain, work first stitch in A.1 so that the rib is the same in each side, finish with 1 edge stitch in garter stitch. Continue rib back and forth like this for 6 cm. Now knit 1 row from right side while decreasing 16-16-18-19-21-23 stitches evenly - remember DECREASE TIP = 49-53-57-62-68-74 stitches. Switch to circular needle size 4.5 mm. Purl 1 row with 1 edge stitch in garter stitch in each side. OVERVIEW OF NEXT SECTION: Now continue in stocking stitch with 1 edge stitch in garter stitch in each side, at the same time decrease for V-neck and armholes - read all of the following section before continuing. V-NECK: When piece measures 30-31-32-33-34-35 cm, decrease for V- neck on next row from right side as follows: Work 1 edge stitch in garter stitch, work until 6-6-6-7-7-7 stitches remain, knit 2 together (= 1 stitch decreased) and knit 3-3-3-4-4-4 stitches, 1 edge stitch in garter stitch. Decrease like this every 4th row 1 time, then every other row 19-18-18-17-17-16 times in total and every 4th row 2-3-4-5-6-7 times in total. ARMHOLE: When piece measures 34-35-36-37-38-39 cm, cast off 3-3-4-5-6-7 stitches at the beginning of next row from right side. Then decrease for armhole as follows: Work 1 edge stitch in garter stitch, knit 3-3-3-4-4-4, slip 1 stitch knitwise, knit 1, pass slipped stitch over stitch worked (= 1 stitch decreased), work the rest of row. Purl 1 row with 1 edge stitch in garter stitch in each side. Decrease like this every other row (= every row from right side) 3-5-6-8-10-12 times in total. When all decreases for V-neck and armholes are done 21-23-24-26-28-31 stitches remain for shoulder. Continue to work until piece measures 54-56-58-60-62-64 cm. Cast off. SLEEVES: Cast on 70-72-74-76-80-82 stitches on double pointed needles size 3.5 mm with colour light brown DROPS Merino Extra Fine. Work A.1 in the round for 6 cm. Knit 1 round while decreasing 18-18-18-18-20-20 stitches evenly = 52-54-56-58-60-62 stitches. Switch to double pointed needles size 4.5 mm. Insert a marker thread at beginning of round. Work in stocking stitch in the round. When sleeve measures 10-10-10-9-9-7 cm from cast-on edge, increase 1 stitch on each side of marker thread - read INCREASE TIP. Increase like this approx. every 3½-3-2½-2½-2-2 cm 10-11-13-14-16-17 times in total = 72-76-82-86-92-96 stitches. Continue to work until sleeve measures 46-45-45-44-42-41 cm. On next round cast off 6-6-8-10-12-14 stitches mid under sleeve (i.e. 3-3-4-5-6-7 stitches on each side of marker thread) = 66-70-74-76-80-82 stitches. Then work armholes in stocking stitch back and forth, at the same time cast off stitches at beginning of every row in each side as follows: Cast off 2 stitches 6-5-4-8-8-9 times, 1 stitch 0-1-1-2-3-4 times and 3 stitches 3-4-5-2-2-1 time = 24-24-26-28-30-32 stitches remain. Cast off the remaining stitches. Sleeve measures 53-53-53-53-52-52 cm in total. Work the other sleeve the same way. ASSEMBLY: Sew shoulder seams inside cast-off edges. Sew sleeve cap to body inside cast-off edge on sleeves and inside 1 edge stitch in garter stitch on body. Sew side seams from armhole and down - if desired leave a vent of 6 cm (the same length as rib at the bottom). RIGHT BAND: Insert a marker thread mid back of neck. Begin from right side with DROPS Merino Extra Fine and circular needle size 3.5 mm and pick up approx. 173 to 203 stitches inside 1 edge stitch in garter stitch from bottom of body and up to marker thread in the neck. Number of stitches must be divisible by 2 + 1. Turn and work rib back and forth as follows: 1 edge stitch in garter stitch, work the last stitch in A.1, repeat A.1 until 1 stitch remains, 1 edge stitch in garter stitch, at the same time increase where V-neck begins by working as follows: * make 1 yarn over, knit 1 *, work from *-* 4 times in total (= 4 stitches increased). Continue back and forth like this. When band measures 3 cm, decrease for 4 buttonholes on right band. Place top buttonhole approx. 1 cm below where decrease for V-neck began, and bottom buttonhole approx. 6 cm from bottom edge (the increases are just worked on first row). 1 BUTTONHOLE = cast off 1 purl stitch in a purl section seen from right side (cast off a bit tight), and cast on 1 new stitch over the stitch cast off on next row. Work rib until rib measures 6 cm in total. Cast off with knit over twisted knit and purl over purl – read CAST-OFF TIP! LEFT BAND: Begin from right side with DROPS Merino Extra Fine and circular needle size 3.5 mm and pick up the same number of stitches as on right band inside 1 edge stitch in garter stitch from marker thread in the back of neck and down to bottom of body. Turn and work rib back and forth as follows: 1 edge stitch in garter stitch, work the last stitch in A.1, repeat A.1 until 1 stitch remains, 1 edge stitch in garter stitch, at the same time increase where V-neck begins by working as follows: * make 1 yarn over, knit 1 *, work from *-* 4 times in total (= 4 stitches increased). Continue back and forth like this until band measures 6 cm (the increases are just worked on first row). Cast off with knit over twisted knit and purl over purl – remember CAST-OFF TIP. Sew together bands inside 1 edge stitch in garter stitch in the back of neck. Sew the buttons on to left band. EMBROIDERING: Now embroider 4 flowers on each front piece. Embroider flowers on a line approx. 4 to 5 cm from transition between front piece and band. FLOWER: Begin by embroidering a backstitch with colour off white - see diagram A and diagram explanation - embroider the knot so that it is 0.5 to 1 cm in diameter. This is the centre of flower. Then embroider with chain stitches around the flower’s centre with colour light pink - see diagram B and diagram explanation, embroider 5 stitches around the centre and every stitch is approx. 1-1.5 cm long. Fasten off. |
|||||||||||||
Diagram explanations |
|||||||||||||
|
|||||||||||||
 |
|||||||||||||
 |
|||||||||||||
 |
|||||||||||||
Have you finished this pattern?Tag your pictures with #dropspattern #shydaisycardigan or submit them to the #dropsfan gallery. Do you need help with this pattern?You'll find 38 tutorial videos, a Comments/Questions area and more by visiting the pattern on garnstudio.com. © 1982-2026 DROPS Design A/S. We reserve all rights. This document, including all its sub-sections, has copyrights. Read more about what you can do with our patterns at the bottom of each pattern on our site. |
|||||||||||||


With over 40 years in knitting and crochet design, DROPS Design offers one of the most extensive collections of free patterns on the internet - translated to 17 languages. As of today we count 325 catalogues and 12298 patterns translated into English (UK/cm).
We work hard to bring you the best knitting and crochet have to offer, inspiration and advice as well as great quality yarns at incredible prices! Would you like to use our patterns for other than personal use? You can read what you are allowed to do in the Copyright text at the bottom of all our patterns. Happy crafting!
Post a comment to pattern DROPS 231-33
We would love to hear what you have to say about this pattern!
If you want to leave a question, please make sure you select the correct category in the form below, to speed up the answering process. Required fields are marked *.