
Popular categories
Looking for a yarn?


Comments / Questions (22)
![]() Angelica Alebjer wrote:
Angelica Alebjer wrote:
Hej igen. Hur jag än gör blir det fel på v hals höger sida. Jag stickar spetsen, sen 1 m rät, lyfter över en maska som om den skulle stickas rät, stickar 1 m rät, lyfter över den lyfta maska över den senaste stickade rät askan och sen fortsätter jag räta varvet ut. Men kanten vid minskningen blir inte som två raka streck utmed spetsen som det blir på vänster sida, utan det blir som hackade förskjutningar istället? På avigsidan stickar jag avig fram till spetsen.
31.10.2024 - 11:43DROPS Design answered:
Hej Angelica, vet inte riktigt vad som blir fel här.... har du 1 maska slätstickning mellan spetskanten och minskningen, det är den som blir "rak" hela vägen upp med kanten...
01.11.2024 - 11:34
![]() Angelica Alebjer wrote:
Angelica Alebjer wrote:
Hej. Jag undrar vad ni menar med slätstickning i höger framstycke. " spetskant höger sida över de första 7 maskorna, sticka 1 maska slätstickning" innebär det 1 maska rät? Vad är det för skillnad på slätstickning 1 m och 1 rät i detta?
27.10.2024 - 09:48DROPS Design answered:
Hej Angelica, spetskanten stickas enligt beskrivningen för varje varv. Slätstickning är rätmaska från rätsidan, avigmaska från avigsidan :)
29.10.2024 - 08:09
![]() Sharon wrote:
Sharon wrote:
Do you include the lace trim when you are sewing the shoulders together?
28.04.2024 - 20:36DROPS Design answered:
Dear Sharon, yes, the lace trim is part of the shoulders so should be sewn as well. Happy knitting!
29.04.2024 - 00:09
![]() Elena wrote:
Elena wrote:
Hi! When I start binding off for the armholes, the piece should measure 27 cm for size M in total with the rib plank? It seems to me it will be too short in that case...
27.04.2024 - 00:39DROPS Design answered:
Dear Elena, unless a pattern specifically says at a point that you should measure the piece from there, your knitting should be measured from the cast on to the direczon of the knitting. Also if you check the schematic drawing, and take out the length of the armhole from the full length, you can see how long the sweater should be. This is designed to be a short, light summer piece, if you find it to short for your body (and/or style) you can always lengthen it. Happy Knitting!
27.04.2024 - 07:47
![]() Isabella wrote:
Isabella wrote:
Sto lavorando la taglia M. iPer il dietro dovrei iniziare l’incavo per le maniche a 27 cm. Non capisco dallo schema se sono 27 dalla maglia rasata o includendo il bordo inferiore.
22.02.2023 - 21:15DROPS Design answered:
Buongiorno Isabella, se non diversamente indicato, le misure si intendono dall'inizio del lavoro. Buon lavoro!
25.02.2023 - 13:59
![]() Laura wrote:
Laura wrote:
Buongiorno, ho delle difficoltà con le spiegazioni del collo a V: - non riesco a capire dove devo contare le 8 maglie in cui inserire il segnapunti, cosa si intende per "centro davanti"? Devo contare otto maglie da quello che sarà il bordo traforato oppure sono le otto maglie dentro le 42 ? - le diminuzioni sul diritto del lavoro sono due? Una prima del bordo e una nel centro davanti? Grazie mille Laura
14.10.2022 - 17:18DROPS Design answered:
Buonasera Laura, deve contare 8 maglie da quello che sarà il bordo traforato. Buon lavoro!
01.11.2022 - 17:00
![]() George wrote:
George wrote:
The sleeves just don't work. I've tried to follow the pattern and your help from the comments. Are you sure you have the measurements right? The sleeve opening - with the cap - is not big enough to fit onto the body. Perhaps patterns needs adjusting.
02.10.2022 - 17:13DROPS Design answered:
Dear George, the sleeve cap should fit the armhole starting from the cast off stitches on sleeve (the 6 sts cast off on sleeve should be sewn to the sts cast off on front/back piece (= 2 x 4 sts cast off - 2 edge sts = 6 sts); then sew the whole cast off edge on sleeve along the armhole. You can weave in and out before starting seam if neede, this can help to place the sleeve properly. Happy assembly!
03.10.2022 - 10:09
![]() Lynne wrote:
Lynne wrote:
"V-neck - decrease 1 stitch before the laced edge stitches + 1 stockinette stitch mid-front" Does this mean on RS, decrease 1 stitch before laced edge and decrease 1 stitch at V-neck edge? So decrease 2 stitches on each RS row until there are 2 stitches left before marker? Row3: Do you bind off 2 stitches together? So K3 and slip first 2 stitches together over third?
29.09.2022 - 18:56DROPS Design answered:
Dear Lynne, you have to decrease 1 stitch for V-neck inside the lace edge + 1 st in stocking stitch (inside 7 sts) as follows: work until there are 2 sts left before the marker, K2 tog, then knit 1 + lace edge - on the left front piece you will work the first 7 sts as before then slip 1, k1, psso. Happy knitting!
30.09.2022 - 08:01
![]() Myriam wrote:
Myriam wrote:
Bonjour, je ne comprends pas comment faire le col à partir de 53cm. Je fais la taille xxxl. Je dois séparer en 2 les 40m central? Et ensuite rabattre 34m. Soit 2x 17m ? Merci de votre aide.
12.09.2022 - 09:22DROPS Design answered:
Bonjour Myriam, vous parlez du haut du dos? Vous tricotez les 40 mailles centrales au point mousse et les autres mailles comme avant pendant 4 rangs, autrement dit ainsi: 21 m comme avant, 40 m point mousse, 21 m comme avant. Vous rabattez ensuite les 34 m centrales, il vous reste pour chaque épaule (que vous terminez séparément): 21 m comme avant + 3 m point mousse côté encolure. Au début du rang suivant à partir de l'encolure rabattez 1 m = il reste 21 m comme avant + 2 m point mousse côté encolure. Bon tricot!
12.09.2022 - 12:08
![]() Lynn wrote:
Lynn wrote:
Back side, following armhole cast offs: "work 2 ridges over the middle32 stitches". Would this be garter stitch worked in this section between stockinette stitches on both sides? Would this be 4 complete rows to make 2 ridges? Thank you.
11.09.2022 - 19:45DROPS Design answered:
Dear Lynn, to cast off for the armholes you will cast off at the beginning of each row on each side (size M): 4 sts 1 time, 2 sts 1 time and 1 stitch 2 times = 68 sts remain. Then when piece measures 45 cm work the middle 32 sts in garter stitch (= 18 sts as before, 32 sts garter stitch, 18 sts as before (=18+32+18=68 sts), then cast off the middle 26 sts for neck and finish each shoulder separately. Happy knitting!
12.09.2022 - 11:26
|
|
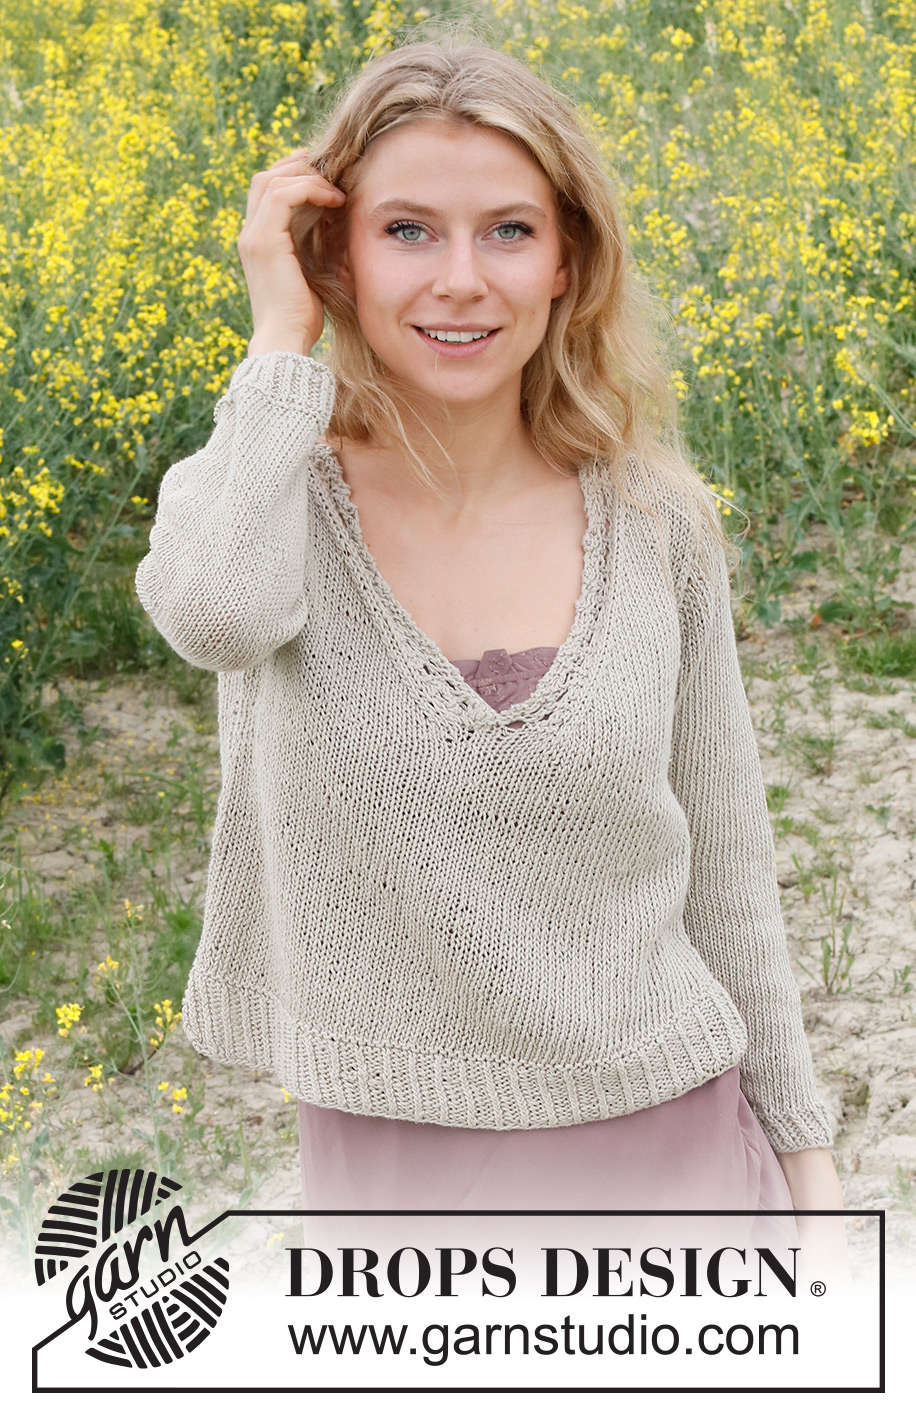
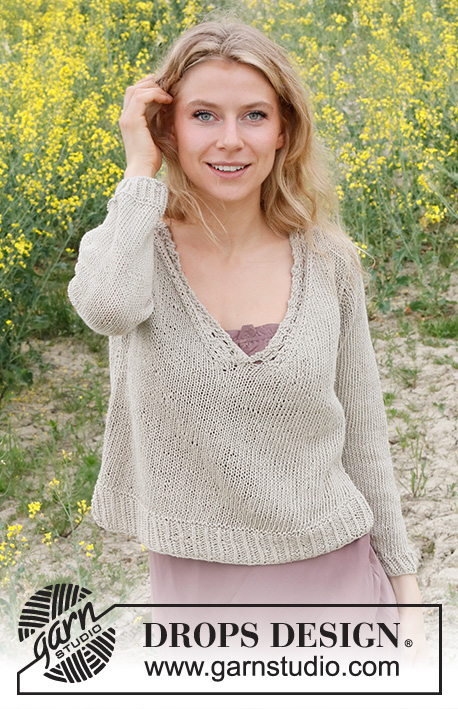
Wild and Free#wildandfreesweater |
|
 |
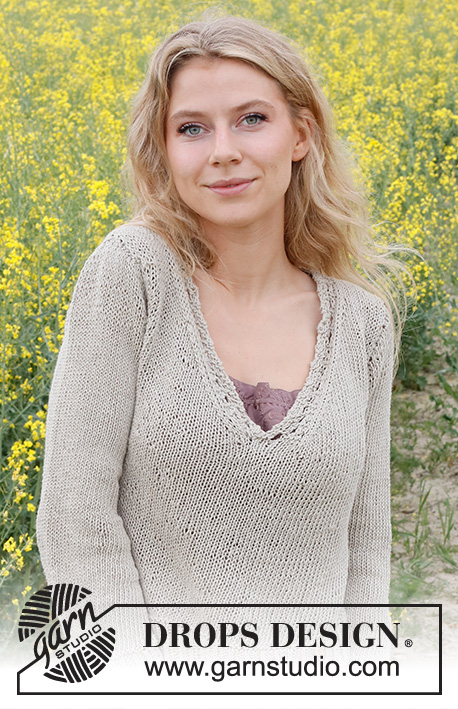 |
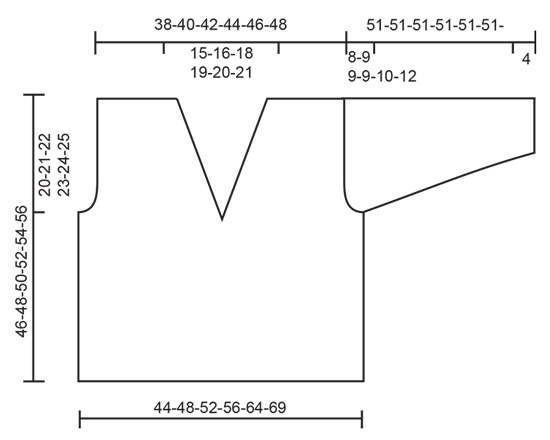
Knitted jumper in DROPS Bomull-Lin or DROPS Paris. The piece is worked bottom up, in stocking stitch with laced-edges and V-neck. Sizes S - XXXL.
DROPS 231-35 |
|
|
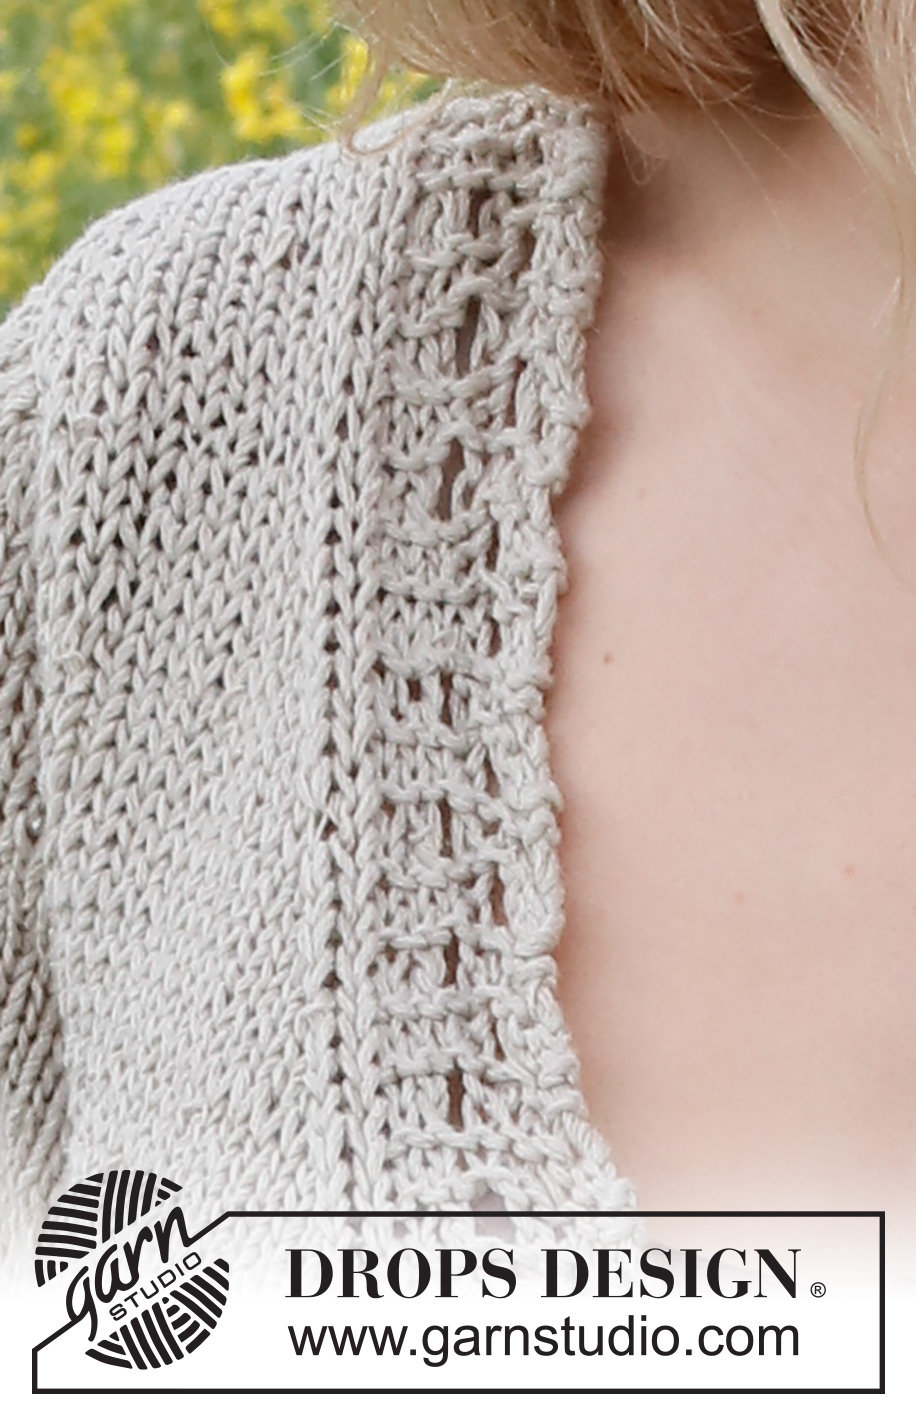
------------------------------------------------------- EXPLANATIONS FOR THE PATTERN: ------------------------------------------------------- RIDGE/GARTER STITCH (worked back and forth): Knit all rows. 1 ridge = knit 2 rows. LACED EDGE RIGHT SIDE: Row 1 (right side): Knit 3, 1 double yarn over, purl 1, knit 3. Row 2 (wrong side): Knit 5, knit 1 twisted (work in the back loop instead of the front), knit 3. Row 3: Cast off 2 stitches (= 1 stitch left on right needle), knit 2, purl 1, 1 double yarn over, knit 2 twisted together, knit 1 twisted. Row 4: Knit 2, knit 1 in double yarn over, drop the second yarn over, knit 4. LACED EDGE LEFT SIDE: Row 1 (wrong side) = Knit 3, 1 double yarn over, knit 4. Row 2 (right side): Knit 3, purl 1, knit 1, knit 1 twisted, knit 3. Row 3: Cast off 2 stitches (= 1 stitch left on needle), knit 3, 1 double yarn over, knit 2 twisted together, knit 1 twisted. Row 4: Knit 3 (drop the second yarn over), purl 1, knit 3. INCREASE TIP: Work until there are 2 stitches left before the marker, 1 yarn over, knit 4 (marker sits between these 4 stitches), 1 yarn over. On the next round knit the yarn overs twisted to avoid holes. Then work the new stitches in stocking stitch. ------------------------------------------------------- START THE PIECE HERE: ------------------------------------------------------- JUMPER – SHORT OVERVIEW OF THE PIECE: The front and back pieces are worked separately back and forth, bottom up. The sleeves are worked in the round with double pointed needles/short circular needle bottom up as far as the sleeve cap and finished back and forth. BACK PIECE: Cast on 83-92-98-107-119-131 stitches with circular needle size 4 mm and DROPS Bomull-Lin or DROPS Paris. Purl 1 row from the wrong side, then work rib as follows (first row from the right side): 2 stitches in GARTER STITCH – read description above, * knit 1 twisted, purl 2 *, work from *-* until there are 3 stitches left, knit 1 twisted and 2 stitches in garter stitch. When the rib measures 6 cm, change to circular needle size 5 mm. Continue with stocking stitch and 1 edge stitch in garter stitch on each side, AT THE SAME TIME on row 1 decrease 7-8-8-9-9-11 stitches evenly spaced = 76-84-90-98-110-120 stitches. REMEMBER THE KNITTING TENSION! When the piece measures 26-27-28-29-30-31 cm, cast off for the armholes at the beginning of each row as follows: 4 stitches 1 time on each side, 2 stitches 1-1-1-2-3-4 times and 1 stitch 0-2-3-4-6-7 times on each side = 64-68-72-74-78-82 stitches. When the piece measures 43-45-47-49-51-53 cm, work 2 ridges over the middle 30-32-34-36-38-40 stitches. Then cast off the middle 24-26-28-30-32-34 stitches for the neck and finish each shoulder separately. Cast off 1 stitch on the next row from the neck = 19-20-21-21-22-23 stitches on the shoulder. Continue with stocking stitch and 2 stitches in garter stitch by the neck until the piece measures 46-48-50-52-54-56 cm. Cast off. Work the other shoulder in the same way. FRONT PIECE: Cast on and work in the same way as the back until the front piece measures 25-26-27-28-29-30 cm. There are 76-84-90-98-110-120 stitches on the needle. The front piece is now divided for the V-neck, the lace edge worked and you cast off for the armholes. Read V-NECK and ARMHOLES before continuing. V-NECK: Place the last 34-38-41-45-51-56 stitches (seen from the right side) on a thread and work the first 42-46-49-53-59-64 stitches. Insert 1 marker inside 8 stitches mid-front and work the first row as follows from the wrong side: Work LACED EDGE LEFT SIDE over the first 7 stitches and stocking stitch over the other stitches. On the next row from the right side begin to decrease for the V-neck - decrease 1 stitch before the laced edge stitches + 1 stocking stitch mid-front (work until there are 2 stitches left before the marker, knit 2 together, 1 stocking stitch and laced edge). Repeat this decrease every row from the right side a total of 17-18-19-20-21-22 times. ARMHOLE: At the same time, when the piece measures 26-27-28-29-30-31 cm, cast off at the beginning of each row from the side as follows: 4 stitches 1 time, 2 stitches 1-1-1-2-3-4 times and 1 stitch 0-2-3-4-6-7 times. After all the decreases there are 19-20-21-21-22-23 stitches (counted after row 4 in the laced pattern). Cast off when the piece measures 46-48-50-52-54-56 cm. RIGHT FRONT PIECE: Place the 34-38-41-45-51-56 stitches from the thread back on the needle. Work 1 row from the right side. On the next row (wrong side) cast on 8 stitches at the end of the row by the neck = 42-46-49-53-59-64 stitches. Insert 1 marker inside the 8 new stitches mid-front and work the first row as follows from the right side: Work LACED EDGE RIGHT SIDE over the first 7 stitches, work 1 stocking stitch, slip 1 stitch as if to knit, knit 1 and pass the slipped stitch over the knitted stitch, work to the end of the row. The first decrease for the V-neck is now finished. Repeat this decrease (work the laced edge, 1 stocking stitch, slip 1 as if to knit, knit next stitch and pass the slipped stitch over the knitted stitch) on each row from the right side a total of 17-18-19-20-21-22 times. ARMHOLE: At the same time, when the piece measures 26-27-28-29-30-31 cm, cast off at the beginning of each row from the side as follows: 4 stitches 1 time, 2 stitches 1-1-1-2-3-4 times and 1 stitch 0-2-3-4-6-7 times. After all the decreases there are 19-20-21-21-22-23 stitches (counted after row 4 in the laced pattern). Cast off when the piece measures 46-48-50-52-54-56 cm. SLEEVES: Cast on 48-51-54-54-57-60 stitches with double pointed needles size 4 mm and DROPS Bomull-Lin or DROPS Paris. Knit 1 round, then work rib (knit 1 twisted, purl 2) for 4 cm. Change to double pointed needles size 5 mm. Knit 1 round where you decrease 0-1-2-0-1-2 stitches evenly spaced = 48-50-52-54-56-58 stitches. Purl 1 round then continue with stocking stitch. Insert 1 marker at the beginning of the round = mid-under sleeve. When the sleeve measures 8 cm, increase 1 stitch on each side of the marker – read INCREASE TIP. Increase like this every 10-8-6-4-3½-2½ cm a total of 4-5-6-8-9-11 times = 56-60-64-70-74-80 stitches. When the piece measures 43-42-42-42-41-39 cm, cast off 3 stitches on each side of the marker (= 6 stitches cast off) and finish the sleeve cap back and forth. Cast off at the beginning of each row as follows: 2 stitches 3-3-3-3-3-4 times and 1 stitch 1-2-2-2-3-3 times on each side. Then cast off 2 stitches on each side until the sleeve measures 50 cm in all sizes, cast off 3 stitches 1 time on each side then cast off the remaining stitches. The sleeve measures approx. 51 cm. Work the other sleeve in the same way. ASSEMBLY: Sew the shoulder seams. Sew in the sleeves. Sew the side seams inside the 1 edge stitch, leaving the bottom 6 cm open (= split). Lay the 8 cast-on stitches on the right front piece under the laced edge on the left piece and sew down. |
|
|
|
Have you finished this pattern?Tag your pictures with #dropspattern #wildandfreesweater or submit them to the #dropsfan gallery. Do you need help with this pattern?You'll find 29 tutorial videos, a Comments/Questions area and more by visiting the pattern on garnstudio.com. © 1982-2025 DROPS Design A/S. We reserve all rights. This document, including all its sub-sections, has copyrights. Read more about what you can do with our patterns at the bottom of each pattern on our site. |
|


With over 40 years in knitting and crochet design, DROPS Design offers one of the most extensive collections of free patterns on the internet - translated to 17 languages. As of today we count 314 catalogues and 11821 patterns translated into English (UK/cm).
We work hard to bring you the best knitting and crochet have to offer, inspiration and advice as well as great quality yarns at incredible prices! Would you like to use our patterns for other than personal use? You can read what you are allowed to do in the Copyright text at the bottom of all our patterns. Happy crafting!
Post a comment to pattern DROPS 231-35
We would love to hear what you have to say about this pattern!
If you want to leave a question, please make sure you select the correct category in the form below, to speed up the answering process. Required fields are marked *.