
Popular categories
Looking for a yarn?


Comments / Questions (22)
![]() Fosse wrote:
Fosse wrote:
Bonjour, Je tricote le modèle en taille M avec la laine DROPS SKY EN 2 BRINS avec des aiguilles 6, J’arrive à la fin des augmentations et je n’ai que 26 cm depuis l’encolure au lieu des 33 indiqués dans cette taille et pourtant je suis quasiment à la Fin du 2ème diagramme et je n’ai pas encore divisé l’ouvrage. J’ai respecté à la lettre toutes les indications et les mesures que j’obtiens ne correspondent pas. Pouvez-vous m’aider s’il vous plaît?
10.12.2025 - 22:50DROPS Design answered:
Bonjour Mme Fosse, notez que la hauteur doit être mesurée dans le sens du tricot = le long des mailles et pas au milieu du devant; vous avez tricotez 52 tours (26 augmentations tous les 2 tours) à raison de 16 rangs pour 10 cm, vous devez avoir environ 33 cm après la dernière augmentation, le long de mailles tricotées à partir du marqueur. Bon tricot!
11.12.2025 - 09:24
![]() Cath wrote:
Cath wrote:
Bonjour, j'ai besoin de vos lumières pour savoir quand diviser l'ouvrage en taille M Je vous remercie par avance de votre réponse. Cordialement Cath
20.02.2025 - 11:23
![]() Cath wrote:
Cath wrote:
Bonjour, j'ai besoin de vos lumières pour savoir quand diviser l'ouvrage en taille M Je vous remercie par avance de votre réponse. Cordialement Cath
20.02.2025 - 11:22
![]() Cath wrote:
Cath wrote:
Bonjour, j'ai besoin de vos lumières pour savoir quand diviser l'ouvrage en taille M Je vous remercie par avance de votre réponse. Cordialement Cath
20.02.2025 - 11:20DROPS Design answered:
Bonjour Cath, vous pouvez d'ores et déjà visionner la vidéo ou bien regarder les photos de la leçon qui montrent toutes les deux comment tricoter un pull de haut en bas et comment le diviser à la fin de l'empiècement. Dans les 2 cas, on tricote un raglan, mais la partie qui vous concerne pour la division se fera de la même façon. Bon tricot!
20.02.2025 - 14:40
![]() Sara wrote:
Sara wrote:
Hi, can you share what size the model is wearing in the pictures? Thx!
08.11.2023 - 19:29DROPS Design answered:
Dear Sara, most of the time our models wear either a size S or a size M, but as we all are different, the best way to find the matching size is to measure a similar garment you have and like the shape and compare these measurements to the ones in the chart. Read more here. Happy knitting!
09.11.2023 - 08:20
![]() Lynn wrote:
Lynn wrote:
Hello Please can you help me with a written pattern of this sweater instead of a diagram pattern. I have difficulty to focus on diagram pattern with my eyes. Much appreciated ☺️
03.09.2023 - 20:11DROPS Design answered:
Dear Lynn, we don't make custom patterns; this is the only format of this pattern available. You can print the charts and enlarge them so that you may see them more easily. You can also ask for any questions regarding the charts here. Happy knitting!
03.09.2023 - 23:55
![]() Soledad wrote:
Soledad wrote:
No entiendo bien como debo hacer la parte de abajo de este jersey , ruego me lo aclaren. Gracias
18.11.2022 - 14:29DROPS Design answered:
Hola Soledad, puedes ver en el siguiente video cómo recoger puntos para la orilla inferior: https://www.garnstudio.com/video.php?id=59&lang=es
20.11.2022 - 23:25
![]() Huguette St-Germain wrote:
Huguette St-Germain wrote:
Merci pour votre prompte réponse. J'avais bien compris alors. Le fait est que 38 cm de longueur totale avant de diviser est beaucoup trop long pour moi et la phrase "qu'on doit diviser l'ouvrage avant la fin des diagrammes" m'a induite en erreur. On doit faire les diagrammes au complet en fin de compte (d'augmentations) ! J'ai l'idée de continuer avec le nombre de mailles en grandeur Petit, en ajustant les longueurs, le cas échéant. Je vous en donne des nouvelles !
19.01.2022 - 15:34
![]() Huguette St-Germain wrote:
Huguette St-Germain wrote:
Je tricote le modèle en grandeur XL. C'est écrit qu'on doit diviser l'ouvrage avant la fin des diagrammes. À combien de mailles? présentement, j'ai arrêté à l'endroit où chaque section comporte également 67 mailles. Combien de mailles dois-je glisser en attente pour les manches? et combien dois-je en garder pour les dos/devant? merci !
18.01.2022 - 19:55DROPS Design answered:
Bonjour Mme St-Germain, en XL, vous devez augmenter 31 fois tous les 2 tours, vous avez 336 mailles sur l'aiguille, et votre ouvrage doit mesurer 38 cm, vous coupez le fil pour diviser les mailles pour le dos/le devant et les manches. Continuez le point fantaisie en même temps, jusqu'à ce qu'il soit terminé, puis vous continuerez en jersey. Bon tricot!
19.01.2022 - 08:36
![]() Kosa Timea wrote:
Kosa Timea wrote:
A fél eleje/háta résznél a lelancolást nem értem. Minden sor elején ( akkor is ha a fonáján kötök?) leláncolunk 2 szemet? A 2 szem leláncolása azt jelenti, hogy 2 szemmel kevesebb lesz ? Köszönöm a választ!
14.01.2022 - 17:59
|
|||||||||||||||||||||||||||||||
Northern Spring#northernspringsweater |
|||||||||||||||||||||||||||||||
 |
 |
||||||||||||||||||||||||||||||
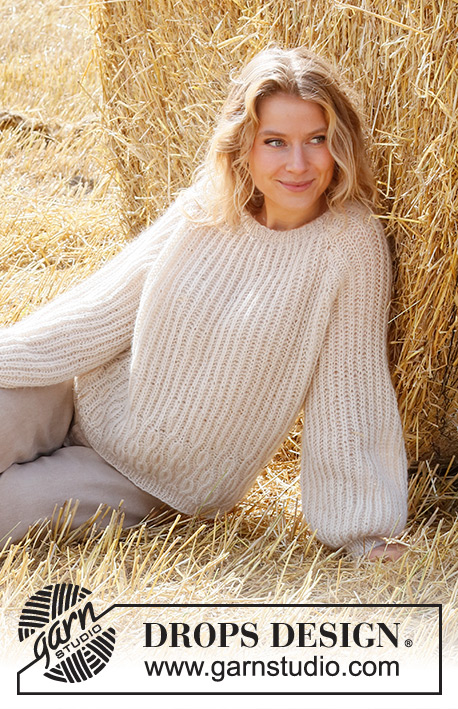
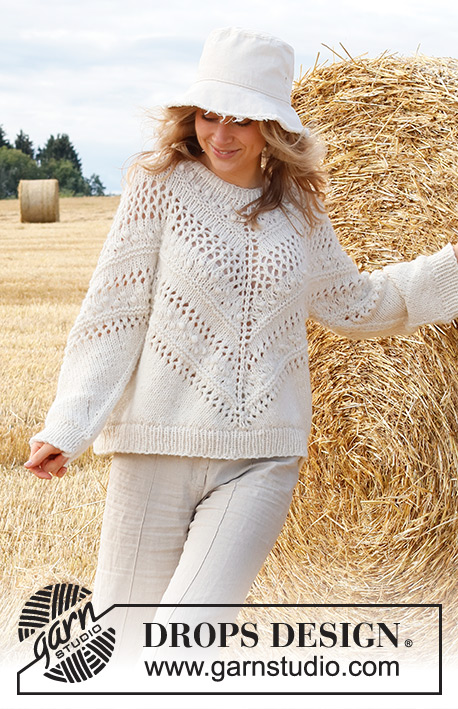
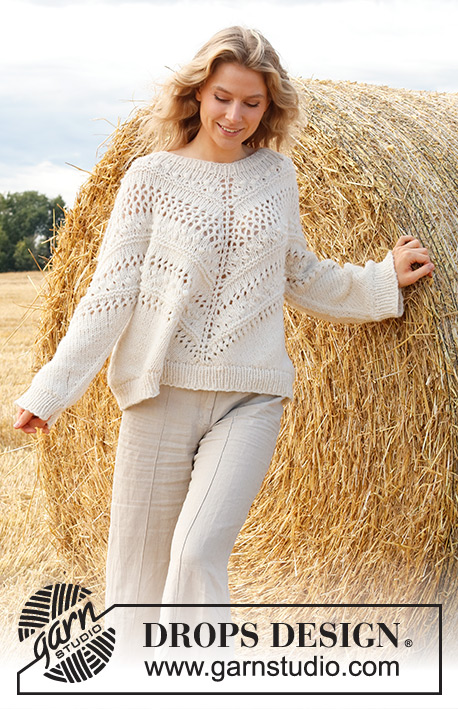
Knitted jumper in 2 strands DROPS Sky. Piece is knitted top down diagonally with lace pattern and knots. Size XS–XXL.
DROPS 223-8 |
|||||||||||||||||||||||||||||||
|
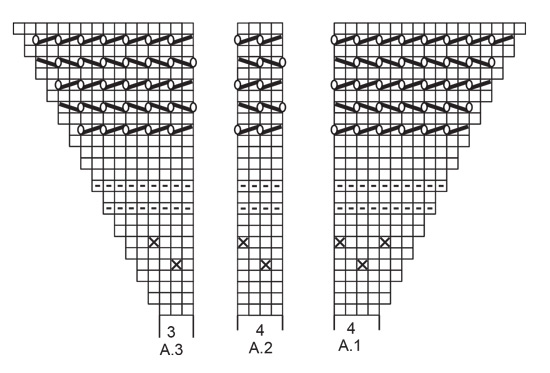
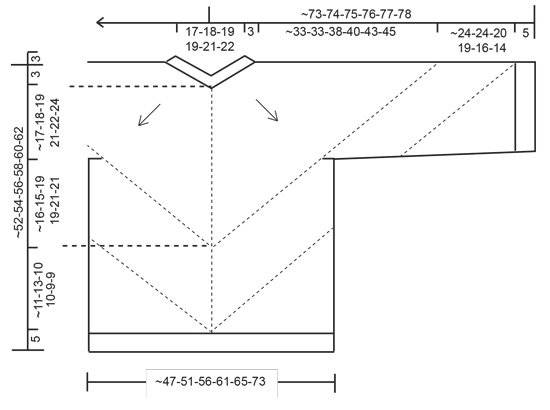
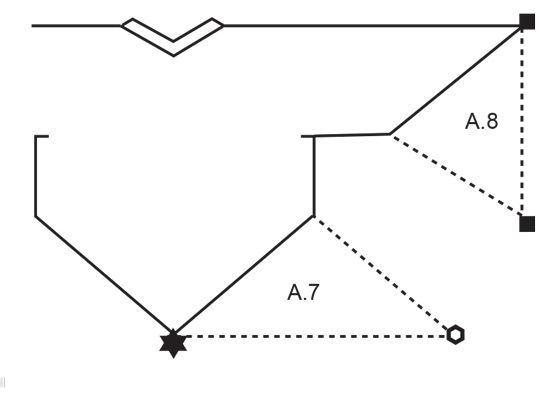
------------------------------------------------------- EXPLANATION FOR THE PATTERN: ------------------------------------------------------- PATTERN: See diagram A.1 to A.8 (A.7 and A.8 applies to illustration). INCREASE TIP (evenly): To calculate how to increase evenly, use the total number of stitches on row (e.g. 66 stitches) and divide stitches by number of increases to be done (e.g. 14) = 4.7. In this example increase by making 1 yarn over after alternately approx. every 4th and 5th stitch. On next round work yarn overs twisted to avoid holes. INCREASE TIP-2 (applies to mid front/back + shoulders): Work until stitch with marker, make 1 yarn over, knit 1 (marker is in this stitch), make 1 yarn over. Repeat at each of the remaining 3 stitches with markers (= 8 stitches increased on round). Work the new stitches in pattern as shown in diagram (they should make holes). DECREASE TIP (applies to sides on body and sleeves): Work until 2 stitches remain before stitch with marker, knit 2 together, knit 1 (marker is in this stitch), slip 1 stitch knitwise, knit 1, pass slipped stitch over stitch worked. CAST-OFF TIP: To avoid a tight cast-off edge you may use a larger needle size. If this also is too tight, work a 1 yarn over after approx. every 4th stitch while casting off (cast off yarn overs as regular stitches). ------------------------------------------------------- START THE PIECE HERE: ------------------------------------------------------- JUMPER - SHORT OVERVIEW OF THE PIECE: Neck edge and yoke are worked in the round on circular needle, top down. Now divide yoke for body and sleeves. Work body in the round, top down. Then divide the piece mid front/mid back and work back and forth in 2 parts (= sides) - this is done to get a straight edge at the bottom. Work rib in round at the end. Work sleeves in the round on double pointed needles/a short circular needle, top down. Then divide the piece and work back and forth, as at the bottom of the body. Work rib in round at the end. NECK EDGE: Cast on 64-66-68-70-74-78 stitches on short circular needle size 5 mm with 2 strands Sky. Knit 1 round. Then work rib (= knit 1/purl 1) for 3 cm. Switch to circular needle size 6 mm. Knit 1 round while increasing 0-14-12-26-22-34 stitches = 64-80-80-96-96-112 stitches. Insert a marker thread here. NOW MEASURE THE PIECE FROM HERE! YOKE: Now insert 4 markers in the piece without working as follows: Insert a marker in first stitch (= mid on top of shoulder), then insert 3 markers more 15-19-19-23-23-27 stitches apart between each stitch with marker. Then increase in each side of stitches with markers and work pattern as follows: Knit 1 (= stitch with marker on left shoulder), make 1 yarn over, work A.1 over the next 4 stitches, A.2 over the next 8-12-12-16-16-20 stitches, A.3 over the next 3 stitches, make 1 yarn over, knit 1 (= stitch with marker), make 1 yarn over, work A.1 over the next 4 stitches, A.2 over the next 8-12-12-16-16-20 stitches, A.3 over the next 3 stitches, make 1 yarn over, knit 1 (= stitch with marker on right shoulder), make 1 yarn over, work A.1 over the next 4 stitches, A.2 over the next 8-12-12-16-16-20 stitches, A.3 over the next 3 stitches, make 1 yarn over, knit 1 (= stitch with marker mid front), make 1 yarn over, work A.1 over the next 4 stitches, A.2 over the next 8-12-12-16-16-20 stitches, A.3 over the next 3 stitches, make 1 yarn over. 1 stitch has been increased on each side of every stitch with marker - read INCREASE TIP-2. REMEMBER THE KNITTING TENSION! Continue pattern and increase like this every other round until 23-23-26-28-30-31 increases have been done in total on each side of stitches with marker (= 248-264-288-320-336-360 stitches on round) - on every round with purl in diagrams purl the 4 stitches with markers. AT THE SAME TIME when A.1 to A.3 have been worked vertically, work as pattern as follows: * Knit 1 (stitch with marker), A.4 over the first 3 stitches, A.5 until 2 stitches remain before next marker, work A.6 over the last 2 stitches before next marker *, work from *-* on round, and continue increase as before every other round. In size XS, S, M, L and XL divide piece before diagrams have been worked vertically. In size XXL continue with stocking stitch when diagram has been worked vertically. When all increases are done, the piece measures approx. 29-29-33-35-38-39 cm in knitting direction from after neck edge. Cut the yarn. Work next round as follows: Slip the first 26-27-30-33-34-35 stitches on 1 stitch holder for half a sleeve, cast on 3-3-3-3-4-4 new stitches on row (= in the side under sleeve), work the next 73-79-85-95-101-111 stitches (= back piece), slip the next 51-53-59-65-67-69 stitches on 1 stitch holder for sleeve, cast on 5-5-5-5-7-7 new stitches on needle (= in the side under sleeve), work the next 73-79-85-95-101-111 stitches (= front piece), slip the remaining 25-26-29-32-33-34 stitches on first stitch holder for sleeve, and cast on 2-2-2-2-3-3 new stitches on row (= in the side under sleeve). Insert 1 marker in the middle stitch on each shoulder, and insert 1 marker in the middle stitches mid back. Leave marker there - MEASURE PIECE FROM HERE! BODY: = 156-168-180-200-216-236 stitches. Insert 1 marker in first stitch on round, and insert 1 marker in the 3rd-3rd-3rd-3rd-4th-4th stitch of the 5-5-5-5-7-7 stitches cast on in the side under the second sleeve, move the markers upwards when working (= the sides). In XS, S, M and L continue in the round with pattern as before until diagrams have been worked, then work in stocking stitch. In size XL and XXL pattern has been worked and work in stocking stitch. Work as follows: Continue in the round with pattern/stocking stitch, and increase mid back and mid front as before, AT THE SAME TIME decrease 2 stitches at the 2 new markers in the side – read DECREASE TIP-1 (this is done to keep number of stitches constant). Decrease like this every other round until finished measurements. On each side of decrease in each side work as many stitches of pattern that will fit towards the sides. Work the remaining stitches in stocking stitch. When piece measures approx. 11-13-10-10-9-9 cm from marker inserted mid back (piece measures approx. 47-49-51-53-55-57 cm from shoulder and down and approx. 5 cm remain before total length, cut the yarn. Slip stitch with marker mid back + stitches until before stitch with marker mid front on 1 stitch holder (= half back piece + half front piece), work over these stitches later. There is now half a front piece and half a back piece on needle. HALF FRONT/BACK PIECE: Now work back and forth at the same time as casting off stitches in each side, so that bottom edge is straight. See illustration A.7 for this part. Begin from right side and cast off stitch with marker mid front/mid back. Work in stocking stitch back and forth on row - AT THE SAME TIME cast off 2 stitches at the beginning of every row and decrease on each side of stitch with marker (i.e. in the side) continue on every other row as before until finished measurements. Continue like this until 3 stitches remain on row, cut the yarn and pull it through the remaining stitches and fasten. HALF FRONT/BACK PIECE: Slip stitches from stitch holder on circular needle size 6 mm and work the same way as other half front/back piece. BOTTOM EDGE: Begin in one side and pick up approx. 132-142-156-170-182-204 stitches along entire bottom edge on circular needle size 6 mm with 2 strands (number of stitches should be divisible by 2) - pick up inside decrease, to get an invisible decrease. Work rib (knit 1/purl 1) for 5 cm. Cast off with knit over knit and purl over purl - read CAST-OFF TIP. SLEEVE: Slip the 51-53-59-65-67-69 stitches from stitch holder in one side of piece double pointed needles or a short circular needle size 6 mm and pick in addition up 1 stitch in each of the 5-5-5-5-7-7 new stitches cast on in the side under sleeve = 56-58-64-70-74-76 stitches. Insert 1 marker in the 3rd-3rd-3rd-3rd-4th-4th stitch of the 5-5-5-5-7-7 stitches under sleeve and move the markers upwards when working. Continue pattern/stocking stitch the same way as on body, and increase mid on top of sleeve as before, AT THE SAME TIME decrease at the marker under sleeve - remember DECREASE TIP. Decrease like this every other round until finished measurements. Continue like this until sleeve measures approx. 24-24-20-19-16-14 cm from marker in mid stitch on shoulder (approx. 5 cm remain until finished length. Try the jumper and work to desired length). Now work back and forth at the same time as casting off stitches in each side, so that bottom edge is straight - see illustration A.8 for this part. Begin from right side and cast off stitch with marker mid on top of sleeve. Continue with stocking stitch and decrease at the marker mid under sleeve as before - AT THE SAME TIME cast off 2 stitches at the beginning of every row. Continue like this until 3 stitches remain on row, cut the yarn and pull it through the remaining stitches. Work the other sleeve the same way. SLEEVE EDGE: Begin mid under sleeve and pick up approx. 48-48-56-58-64-68 stitches along entire bottom edge on double pointed needles size 5 mm with 2 strands (number of stitches should be divisible by 2) - pick up inside decrease, to get an invisible decrease. Work rib = knit 1/purl 1 for 5 cm, then cast off with knit over knit and purl over purl. Work the other sleeve edge the same way. |
|||||||||||||||||||||||||||||||
Diagram explanations |
|||||||||||||||||||||||||||||||
|
|||||||||||||||||||||||||||||||
 |
|||||||||||||||||||||||||||||||
 |
|||||||||||||||||||||||||||||||
 |
|||||||||||||||||||||||||||||||
 |
|||||||||||||||||||||||||||||||
Have you finished this pattern?Tag your pictures with #dropspattern #northernspringsweater or submit them to the #dropsfan gallery. Do you need help with this pattern?You'll find 27 tutorial videos, a Comments/Questions area and more by visiting the pattern on garnstudio.com. © 1982-2026 DROPS Design A/S. We reserve all rights. This document, including all its sub-sections, has copyrights. Read more about what you can do with our patterns at the bottom of each pattern on our site. |
|||||||||||||||||||||||||||||||


With over 40 years in knitting and crochet design, DROPS Design offers one of the most extensive collections of free patterns on the internet - translated to 17 languages. As of today we count 324 catalogues and 12290 patterns translated into English (UK/cm).
We work hard to bring you the best knitting and crochet have to offer, inspiration and advice as well as great quality yarns at incredible prices! Would you like to use our patterns for other than personal use? You can read what you are allowed to do in the Copyright text at the bottom of all our patterns. Happy crafting!
Post a comment to pattern DROPS 223-8
We would love to hear what you have to say about this pattern!
If you want to leave a question, please make sure you select the correct category in the form below, to speed up the answering process. Required fields are marked *.