
Popular categories
Looking for a yarn?


Comments / Questions (91)
![]() Wanda wrote:
Wanda wrote:
Ok. Jetzt habe ich es nach mehrmaligem nachrechnen verstanden - Verzeihung und dankeschön :)
06.05.2021 - 13:19
![]() Wanda wrote:
Wanda wrote:
Ich meine nicht die Raglanzunahmen sondern die Zunahmen beim Einsetzen der Marker. Dort steht: "... 7 Maschen rechts stricken und dabei 2-4-2 (2-2-2-2) Maschen gleichmäßig verteilt zunehmen..." Und am Ende der Runde steht: "...1 Masche rechts und enden mit 1 Rand-Masche kraus rechts = 64-72-68 (74-78-80-82) Maschen." Für Größe 2 werden mehr Maschen zugenommen als für Grösse 3?
06.05.2021 - 13:11DROPS Design answered:
Liebe Wanda, ja genau haben Sie die gewünschte 72 M für die 2. Grösse, deshalb werden 4 M hier zugenomen. Aber dann werden mehr Maschen für die 3. Grösse beim Raglan zugenomen. Viel Spaß beim stricken!
06.05.2021 - 13:59
![]() Wanda wrote:
Wanda wrote:
Guten Tag ich studiere gerade die Anleitung und bin in der Passe gestolpert: beim Anbringen der Marker nimmt man in den Ärmeln für Grösse 2 jeweils 4 Maschen zu für Grösse 3 jedoch nur 2 Maschen? Auch in der Gesamtzahl der Maschen nach Anbringen der Markierer sind in Grösse 2 mehr Maschen auf der Nadel angegeben als in Grösse 3 (=64-72-68). Ist das richtig so oder wurden die Grössen hier vertauscht?
06.05.2021 - 10:25DROPS Design answered:
Liebe Wanda, es ist so richtig, es wird 13-14-15 Mal für den Raglan zugonommen und wenn alle Zunahmen für Raglan fertig sind, haben Sie dann 168-184-188 Maschen. Viel Spaß beim stricken!
06.05.2021 - 11:05
![]() Christa wrote:
Christa wrote:
Danke für die Antwort! Ich habe noch eine Frage: Wie kann ich die passenden Knöpfe bestellen? Mit freundlichen Grüßen Christa
29.04.2021 - 17:39DROPS Design answered:
Liebe Christa, bei der Liste von den DROPS Händlern finden Sie die jenigen, wo Sie die passende Knöpfe bestellen können. Viel Spaß beim stricken!
30.04.2021 - 07:10
![]() Christa wrote:
Christa wrote:
Für den Little-Fox-Pullover werden die Farben Haselnuss, hellbeige und schwarz empfohlen. Entspricht die Farbe "heller Nebel" der Farbe hellbeige? Sieht in der Abbildung nicht so aus. Mit freundlichen Grüßen C
29.04.2021 - 15:02DROPS Design answered:
Liebe Christa, ja genau, Sky 03 wurde umbenannt, aber Farbe ist dieselbe. Viel Spaß beim stricken!
29.04.2021 - 16:16
![]() Noortje Van Veller wrote:
Noortje Van Veller wrote:
Hi there, First of all: This sweater is really adorable! I just wonder: The pattern/ instruction says to embroider the ears, but that's not what I see in the pictures. Or am I wrong about that? Is there a way to knit the ears instead? Or is there a good reason not to? Many thanks in advance!
17.02.2021 - 18:57DROPS Design answered:
Dear Noortje, There is no particular reason not to knit the ears as intarsia, except that it is a relatively small piece and many find it easier to embroider it. But if you prefer knitted it with intarsia, then go ahead. Happy Knitting!
18.02.2021 - 00:09
![]() Susanne Juhl Simonsen wrote:
Susanne Juhl Simonsen wrote:
Hvorfor er det så svært at finde strikkeopskrifter der er strikkede nedefra og op.
17.01.2021 - 14:48DROPS Design answered:
Hei Susanne. Mange av våre nye oppskrifter er strikket ovenifra og ned, men om du ser på modeller fra DROPS Baby katalog nr 21 og nedover og DROPS Children nr. 30 og nedover finner du mange oppskrifter der det er skrevet nedenifra og opp. mvh DROPS design
18.01.2021 - 15:16
![]() Susanne Juhl Simonsen wrote:
Susanne Juhl Simonsen wrote:
Syntes det er rigtig svært at finde strikkeopskrifter til børn der er strikket nedefra. 😢😢
17.01.2021 - 14:45
![]() Jacqueline wrote:
Jacqueline wrote:
Bonjour à tous, je ne comprends pas pourquoi il faut monter des mailles ( 4 à 6 ) en fin de rang lorsque l’on rassemble les du corps ( dos et devant ) étant donné que nous avons déjà monté des mailles sous la manche. Merci beaucoup
12.01.2021 - 08:55DROPS Design answered:
Bonjour Jacqueline, ces 4-4-4 (4-4-4-5) mailles sont celles qui vont se trouver sous la bordure d'ouverture du raglan - pour le dessous des manches, on monte 4-4-6 (6-6-6-6) mailles. Bon tricot!
12.01.2021 - 09:33
![]() Anna wrote:
Anna wrote:
Hello Anna here. When do you start the raglan band that you mention at the end of your instructions? I am assuming it is before you knit the sleeves but getting a little confused here :)
29.12.2020 - 09:21DROPS Design answered:
Dear Anna! Raglan bands are knitted after sleeves. Happy knitting!
03.01.2021 - 02:58
|
|||||||||||||
Little Fox#littlefoxsweater |
|||||||||||||
 |
 |
||||||||||||
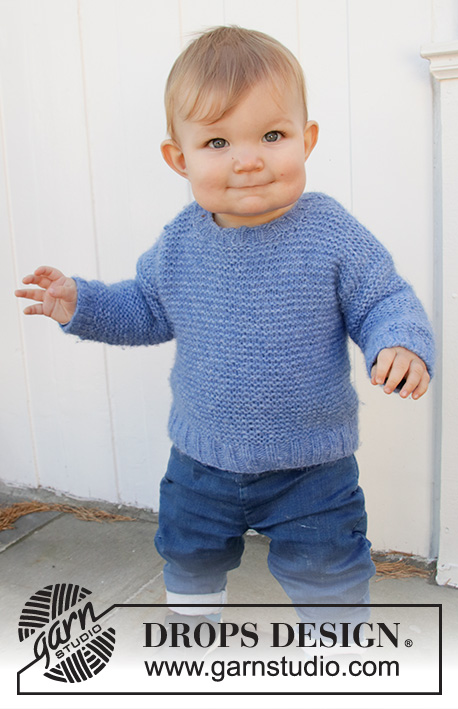
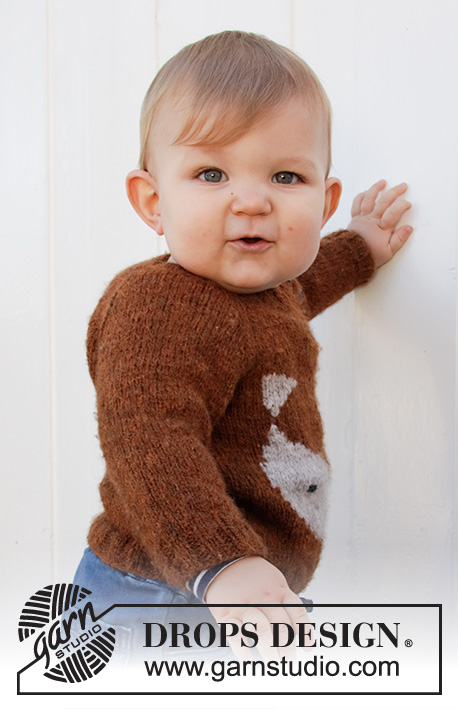
Knitted jumper with raglan for babies and kids in DROPS Sky. The piece is worked top down with fox-pattern. Sizes 1 month – 8 years.
DROPS Baby 36-14 |
|||||||||||||
|
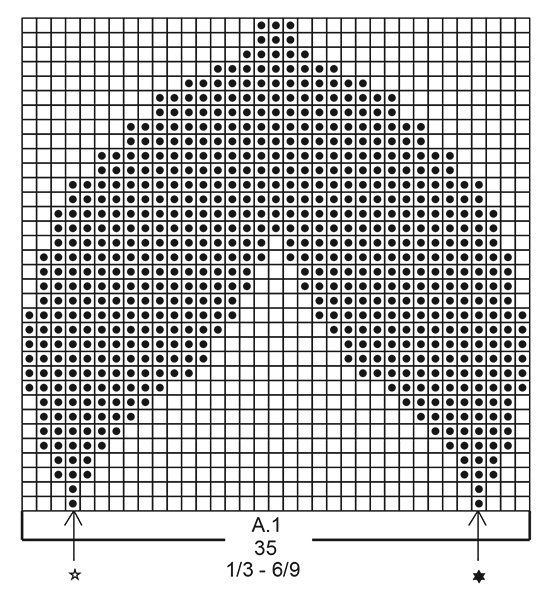
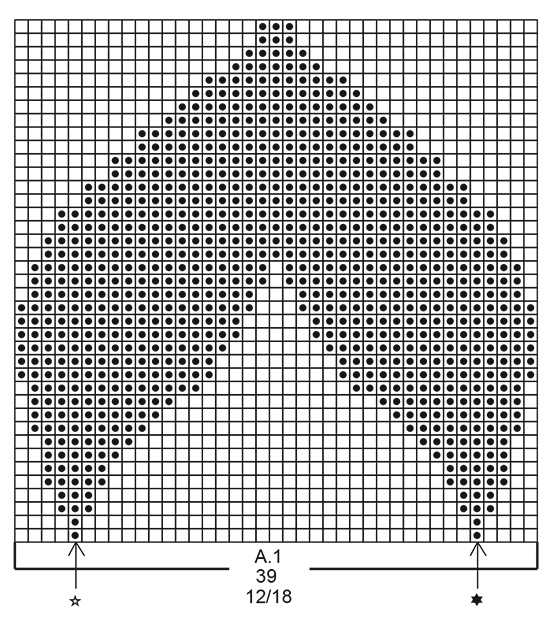
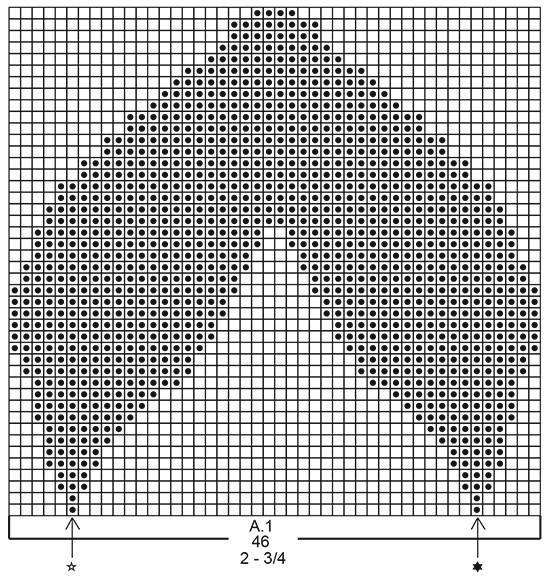
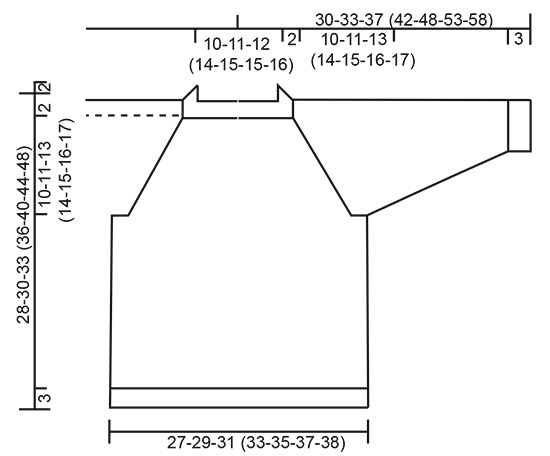
------------------------------------------------------- EXPLANATIONS FOR THE PATTERN: ------------------------------------------------------- RIDGE/GARTER STITCH (worked back and forth): Knit all rows. 1 ridge in height = Knit 2 rows. PATTERN: Diagrams A.1 to A.3 – choose diagram for your size. The whole of diagram A.1 is worked in stocking stitch. The diagrams show all rows in the pattern from the right side. When working with 2 colours, work with more than 1 strand of each colour to avoid long strands on the wrong side. You can use the strand from both the inside and outside of the ball. I.e. the first part of A.1 is knitted with 5 threads (1 thread hazelnut, 1 thread light beige, 1 thread hazelnut, 1 thread light beige, 1 thread hazelnut), the rest of A.1 is knitted with 3 threads ( 1 thread hazelnut, 1 thread light beige, 1 thread hazelnut) NOTE: To avoid holes when changing colour, twist the 2 strands together. Diagrams A.2 and A.3 show how the ears are sewn with duplicate stitches. INCREASE TIP: All increases are worked from the right side! Increase 1 stitch after marker 1, work until there is 1 stitch left before markers 2, 3 and 4, 1 yarn over, work 2 stitches (markers sit between these 2 stitches), 1 yarn over and increase 1 stitch before marker 5 (= 8 stitches increased). Increase by making 1 yarn over, which is worked twisted on the next row to avoid holes. DECREASE TIP (for sleeves): Decrease 1 stitch on each side of the marker as follows: Work until there are 3 stitches left before the marker, knit 2 together, knit 2 (marker sits between these 2 stitches), slip 1 stitch as if to knit, knit 1 and pass the slipped stitch over the knitted stitch (= 2 stitches decreased). CASTING-OFF TIP: To avoid the cast-off edge being tight you can cast off with a larger size needle. If the edge is still tight, make 1 yarn over after approx. each 4th stitch at the same time as casting off and the yarn overs are cast off as normal stitches. ------------------------------------------------------- START THE PIECE HERE: ------------------------------------------------------- JUMPER – SHORT OVERVIEW OF THE PIECE: The piece is worked top down. The yoke is worked back and forth with circular needle, before it is divided for sleeves and body. The body is continued back and forth with circular needle. The sleeves are worked in the round with double pointed needles. YOKE: Cast on 56-60-60 (68-72-72-76) stitches (including 1 edge stitch on each side) with circular needle size 3.5 mm and hazelnut. Purl 1 row from the wrong side. Then work rib as follows: Work 1 edge stitch in GARTER STITCH – read description above, * knit 2, purl 2 *, work from *-* until there are 3 stitches left, knit 2 and 1 edge stitch in garter stitch. When the rib measures 1½ to 2 cm, change to circular needle size 4.5 mm. Insert 5 markers in the piece and increase evenly from the right side as follows: Work 1 edge stitch in garter stitch, knit 1, insert marker 1, knit 7 and increase 2-4-2 (2-2-2-2) stitches evenly, insert marker 2 (= left sleeve), knit 21-23-23 (27-29-29-31) and increase 2-2-2 (1-1-2-1) stitches evenly, insert marker 3 (= back piece), knit 8 and increase 2-4-2 (2-2-2-2) stitches evenly, insert marker 4 (= right sleeve), knit 16-18-18 (22-24-24-26) and increase 2-2-2 (1-1-2-1) stitches evenly, insert marker 5, knit 1 and finish with 1 edge stitch in garter stitch = 64-72-68 (74-78-80-82) stitches. Continue with stocking stitch and 1 edge stitch in garter stitch on each side and increase to raglan on each row from the right side as follows: Increase at each marker – read INCREASE TIP, a total of 13-14-15 (16-17-18-19) times = 168-184-188 (202-214-224-234) stitches. REMEMBER THE KNITTING TENSION! Work until the piece measures 12-13-15 (16-17-18-19) cm from the cast-on edge. Now divide the piece for body and sleeves on the next row from the right side as follows: Work 1 stitch in garter stitch, place the next 36-40-40 (42-44-46-48) stitches on 1 thread for the sleeve and cast on 4-4-6 (6-6-6-6) stitches under the sleeve, knit 49-53-55 (60-64-67-70) stitches (= back piece), place the next 36-40-40 (42-44-46-48) stitches on 1 thread for the sleeve and cast on 4-4-6 (6-6-6-6) stitches under the sleeve, knit 45-49-51 (56-60-63-66) stitches, 1 stitch in garter stitch and cast on 4-4-4 (4-4-4-5) stitches at the end of the row = 108-116-124 (134-142-148-155) stitches. BODY: Continue back and forth with stocking stitch and 1 edge stitch in garter stitch on each side until the piece measures 0-0-0 (0-1-2-3) cm from the division. Now work A.1 on the front piece as follows: Work 1 edge stitch in garter stitch, stocking stitch over 62-68-72 (76-82-84-89) stitches, A.1 (= 35-35-39 (46-46-51-51) stitches), stocking stitch over 9-11-11 (10-12-11-13) stitches and 1 edge stitch in garter stitch. Continue this pattern. When A.1 has been worked 1 time in height, finish the piece with hazelnut. Work stocking stitch with 1 edge stitch in garter stitch on each side until the piece measures 13-14-15 (17-20-23-26) cm from the division. On the next row from the right side increase 2-2-2 (0-0-2-3) stitches evenly spaced = 110-118-126 (134-142-150-158) stitches. Change to circular needle size 3.5 mm. On the next row from the right side work rib as follows: 1 edge stitch in garter stitch, * knit 2, purl 2 *, work from *-* until there is 1 stitch left and finish with 1 edge stitch in garter stitch. Cast off with knit from the right side when the rib measures 3 cm – read CASTING-OFF TIP. The jumper measures approx. 28-30-33 (36-40-44-48) cm from the shoulder down. SLEEVE: Place the 36-40-40 (42-44-46-48) stitches from the thread on the one side of the piece on double pointed needles size 4.5 mm and knit up 1 stitch in each of the 4-4-6 (6-6-6-6) stitches cast on under the sleeve = 40-44-46 (48-50-52-54) stitches. Insert 1 marker in the middle of the 4-4-6 (6-6-6-6) stitches under the sleeve. Allow the marker to follow your work onwards; it will be used when decreasing under the sleeve. Work stocking stitch in the round. When the sleeve measures 2 cm from the division decrease 1 stitch on each side of the marker – read DECREASE TIP! Decrease like this every 2-2-1½ (2½-3½-4-5) cm a total of 3-4-5 (5-5-5-5) times = 34-36-36 (38-40-42-44) stitches. When the sleeve measures 10-12-13 (16-21-25-28) cm from the division decrease 2-0-0 (2-0-2-0) stitches evenly spaced = 32-36-36 (36-40-40-44) stitches. Change to double pointed needles size 3.5 mm and work rib (= knit 2, purl 2). Cast off with knit when the rib measures 3 cm. Work the other sleeve in the same way. RAGLAN-BAND: Knit up from the right side approx. 28 to 36 stitches (divisible by 4) inside the 1 edge stitch along the sleeve’s raglan-opening with circular needle size 3.5 mm and hazelnut. Work rib (= knit 2, purl 2) with 1 edge stitch in garter stitch and 2 knitted stitches on each side (seen from the right side). When the band measures 2 cm, cast off with knit over knit and purl over purl. Repeat along the raglan-opening on the front piece but when the band measures 1 cm work 4 buttonholes evenly spaced. 1 buttonhole = purl 2 together in the purled section, (seen from the right side) and make 1 yarn over. ASSEMBLY: Sew the side seam inside the 1 edge stitch. Embroider the fox’s eyes and nose on the front piece using black. The ears are sewn using duplicate stitches and light beige, according to diagrams A.2 and A.3. The stitches are sewn top down. The stitch with the arrow and a star in diagrams A.2 and A.3, is sewn approx. 2 rows above the stitch with the arrow and a star in A.1. Sew the bands at the bottom of the raglan-openings (this is where the body starts) – the band on the front piece should lie over the band on the sleeve. Sew buttons onto the band on the sleeve. |
|||||||||||||
Diagram explanations |
|||||||||||||
|
|||||||||||||
 |
|||||||||||||
 |
|||||||||||||
 |
|||||||||||||
 |
|||||||||||||
 |
|||||||||||||
 |
|||||||||||||
Have you finished this pattern?Tag your pictures with #dropspattern #littlefoxsweater or submit them to the #dropsfan gallery. Do you need help with this pattern?You'll find 30 tutorial videos, a Comments/Questions area and more by visiting the pattern on garnstudio.com. © 1982-2026 DROPS Design A/S. We reserve all rights. This document, including all its sub-sections, has copyrights. Read more about what you can do with our patterns at the bottom of each pattern on our site. |
|||||||||||||


With over 40 years in knitting and crochet design, DROPS Design offers one of the most extensive collections of free patterns on the internet - translated to 17 languages. As of today we count 324 catalogues and 12290 patterns translated into English (UK/cm). 12290
We work hard to bring you the best knitting and crochet have to offer, inspiration and advice as well as great quality yarns at incredible prices! Would you like to use our patterns for other than personal use? You can read what you are allowed to do in the Copyright text at the bottom of all our patterns. Happy crafting!
Post a comment to pattern DROPS Baby 36-14
We would love to hear what you have to say about this pattern!
If you want to leave a question, please make sure you select the correct category in the form below, to speed up the answering process. Required fields are marked *.