
Popular categories
Looking for a yarn?


Comments / Questions (8)
![]() Katalin wrote:
Katalin wrote:
Kössünk, amíg 12-13-14-15 szem maradt a sorban, húzzuk meg a fonalat, és kössünk F szemekkel, amíg 12-13-14-15 szem marad a másik oldalon. Fordítsuk meg a darabot,meg a szálat, és kössünk S szemekkel, amíg 20-226 szem marad a sorban. Fordítsuk meg a darabot,húzzuk meg a szálat, és kössünk F szemekkel, amíg 20-22-24-26 szem marad a sorban a másik oldalon.
16.11.2025 - 13:51
![]() Christelle wrote:
Christelle wrote:
Bonjour Je ne trouve pas le lien pour imprimer le modèle. Il est magnifique.
13.07.2025 - 07:36DROPS Design answered:
Bonjour Christelle, l'icône de l'imprimante se trouve en haut de page, à droite du nom du modèle. Bon tricot!
13.07.2025 - 19:18
![]() Caroline wrote:
Caroline wrote:
Hei. Lurte på om dere kunne kommen med Run Run Rudolph heldress i mindre størrelser? Feks 1-3 mnd og 3-6 mnd?
21.05.2024 - 15:17DROPS Design answered:
Hej Caroline, vi sætter det på ønskelisten og så kan det være du kan bruge maskeantallet fra DROPS Baby 20-23 så længe :)
23.05.2024 - 11:23
![]() Brigitte Keslich wrote:
Brigitte Keslich wrote:
Hallo, kann es sein, dass ein Fehler im Diagramm A1 12/18+2 in der zweiten Reihe ist. In der Reihe 1 wird 1 Masche pro Diagramm zugenommen. In Reihe sind es auf einmal 2 Maschen mehr. Gibt es hierzu eine Korrektur?
12.07.2022 - 21:54DROPS Design answered:
Liebe Brigitte, In der ersten Reihe sind 2 Zunahmen: eine nach der ersten Masche von A.1 und die andere am Ende des Rapports, nach der 6. Masche.
24.07.2022 - 20:10
![]() Anne wrote:
Anne wrote:
Hallo, ich will jetzt die Passe stricken. Muss ich mit A2 anfangen und danach A1 und A2 im Wechsel ?
12.10.2021 - 23:25DROPS Design answered:
Liebe Anne, die Passe stricken Sie so: 5 Blenden-Maschen krausrechts, wiederholen Sie jetzt Diagram A.1 bis 6 Maschen übrig sind (= je nach der Größe 11 oder 12 Rapporte à 6-7 Maschen), dann stricken Sie A.2 (= 1 Masche) und 5 BlendenMaschen kraus rechts. Bei den Rückreihen stricken Sie: A.2, dann A.1 wiederholen aber jetzt von links nach rechts lesen. Viel Spaß beim stricken!
13.10.2021 - 08:09
![]() Margaretha Olsson wrote:
Margaretha Olsson wrote:
Såg just var jag gjort fel!
26.02.2021 - 15:56
![]() Margaretha Olsson wrote:
Margaretha Olsson wrote:
Fastnar på mönstret A1 3/4 år. 4e varvet ser ut att vara en maska mer i rapporten än vad det blir med bara en ökning i rapporten på varv 3. Jag får inte ihop det.
26.02.2021 - 15:52DROPS Design answered:
Hej Margaretha. Du har 2 ökningar på varv 3 i diagram A.1. Du har ett omslag mellan maska nr 1 och 2 och ett omslag efter sista maskan i diagrammet. Mvh DROPS Design
01.03.2021 - 09:52
![]() Ginet DuPerron wrote:
Ginet DuPerron wrote:
Vraiment original et très chaud.
17.08.2020 - 20:07
|
|||||||||||||
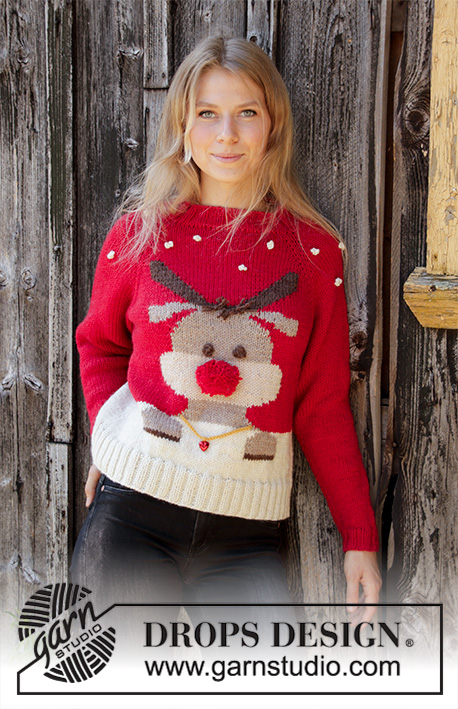
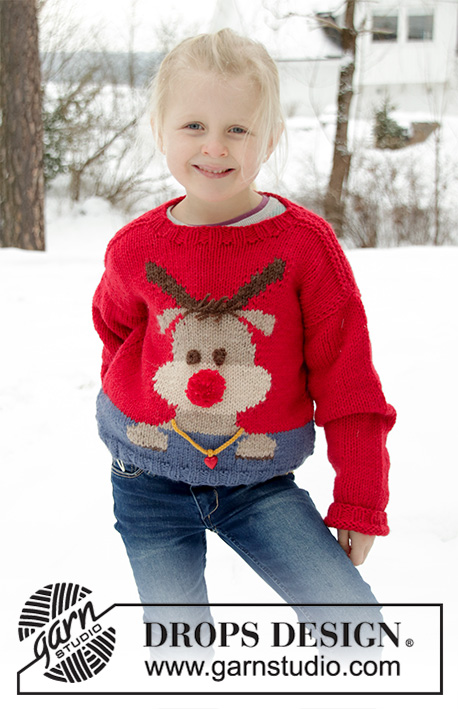
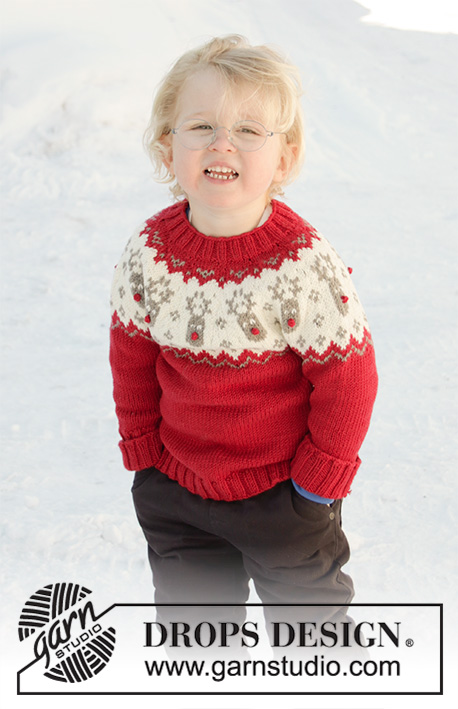
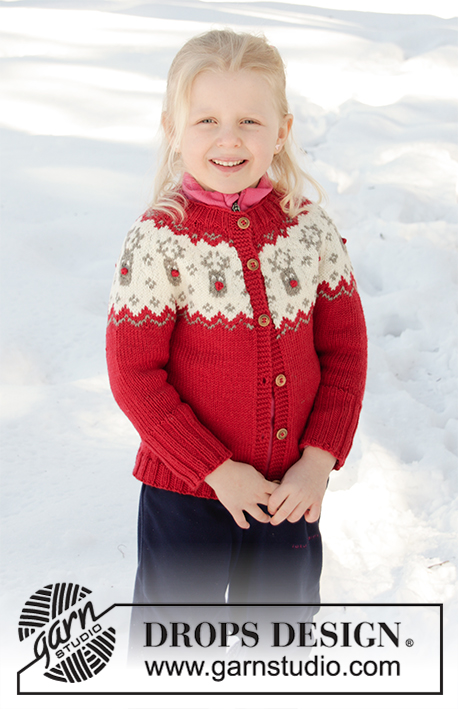
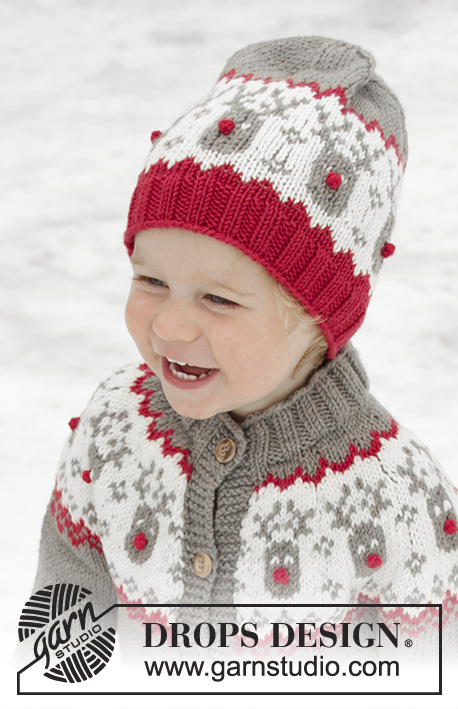
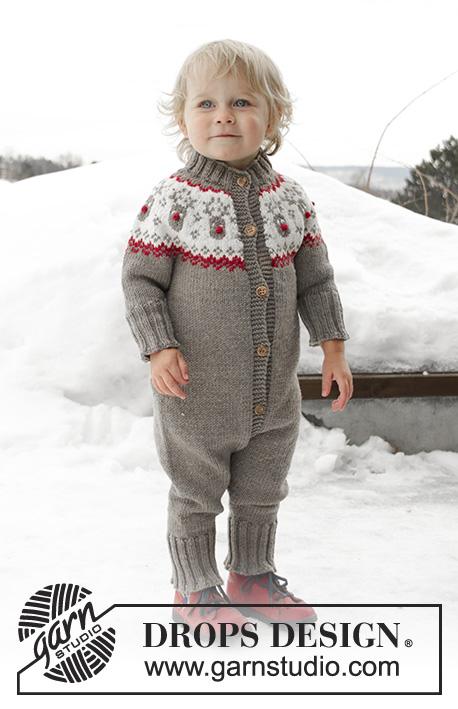
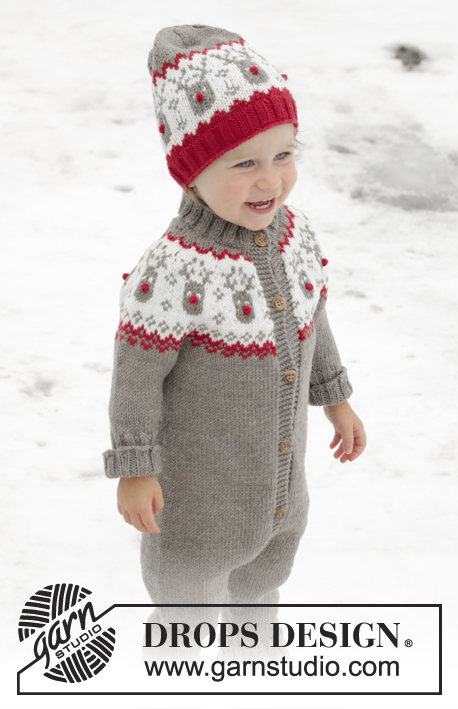
Run Run Rudolph#runrunrudolphonesie |
|||||||||||||
 |
 |
||||||||||||
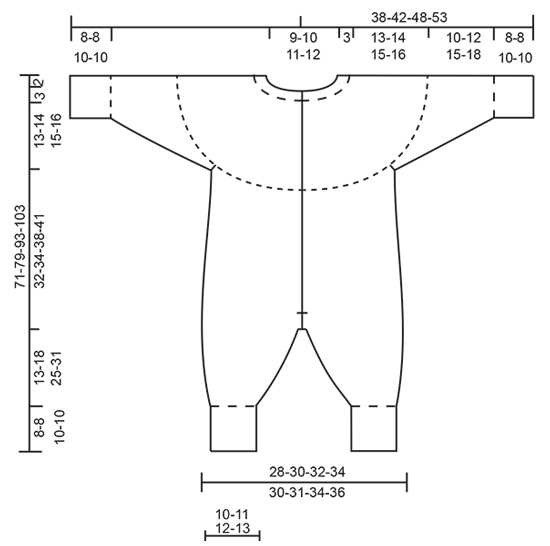
Knitted onesie for children, with round yoke in DROPS Merino Extra Fine. The piece is worked top down with Nordic pattern. Sizes 12 months – 6 years.
DROPS Children 32-3 |
|||||||||||||
|
EXPLANATIONS FOR THE PATTERN: ------------------------------------------------------- RIDGE/GARTER STITCH (worked back and forth): 1 ridge = Knit 2 rows. PATTERN: See diagrams A.1 and A.2. Choose diagram for your size. The whole pattern is worked in stocking stitch. KNITTING TIP (for bands): The whole band is worked in light brown. In other words use 1 ball of light brown for each band where needed (i.e. on the rows where light brown is not part of the pattern). Change strand between band and body (so you do not get a change of strands outermost on band). When changing strand, twist the strands together so that the stitches stay together. DECREASE/INCREASE TIP: To work out when to decrease/increase on the row, count the total number of stitches on the needle (e.g. 84 stitches), minus the bands (= 74 stitches) and divide by the number of decreases/increases to be made (e.g. 7) = 10.6. In this example, decrease by alternately working together each 9th and 10th stitch and each 10th and 11th stitch (approx.), or increase alternately after each 10th and 11th stitch (approx.) by making 1 yarn over (the yarn overs are worked twisted on the next row to avoid holes – NOTE: Do not decrease/increase over bands). INCREASE TIP (for sides of body): Increase 1 stitch on each side of marker thread as follows: Start 2 stitches before marker thread, make 1 yarn over, work 4 stitches (marker thread sits in the middle of these 4 stitches), make 1 yarn over (= 2 stitches increased). On the next row work the yarn overs twisted to avoid holes. DECREASE TIP (for mid under sleeve and inside of leg): Decrease 1 stitch on each side of the marker thread as follows: Start 3 stitches before the marker thread, knit 2 together, knit 2 (marker thread sits between these 2 stitches), slip 1 stitch as if to knit, knit 1 and pass the slipped stitch over the knitted stitch (= 2 stitches decreased). BUTTONHOLES: Work buttonholes on right band (when the garment is worn). 1 buttonhole = start from the wrong side and knit together stitches 2 and 3 from the edge, make 1 yarn over. On the next row knit the yarn over to leave a hole. The first buttonhole is worked after approx. 1½-2 cm on the neck, then work the next 4-5-6-6 buttonholes with approx. 8-8-7½-8 cm between each one. ------------------------------------------------------- START THE PIECE HERE: ------------------------------------------------------- ONESIE: The piece is worked back and forth with circular needle from mid front. To make measuring the length of the sleeves and legs easier, the onesie is worked top down. NECK: Cast on 84-88-92-96 stitches (including 5 band stitches in each side towards mid front) with circular needle size 3 mm and light brown. Purl 1 row from the wrong side with 5 band stitches in GARTER STITCH – read description above, in each side of the piece. The next row is worked as follows from the right side: 5 band stitches in garter stitch, * knit 2, purl 2 *, work from *-* until there are 7 stitches left and finish with knit 2 and 5 band stitches in garter stitch. Continue the rib like this for 3 cm – remember BUTTONHOLES on right band – read description above and finish after 1 row from the right side. YOKE: Change to circular needle size 4 mm. Purl 1 row from the wrong side with 5 band stitches in garter stitch in each side and decrease 7-5-4-1 stitches evenly on row – read DECREASE/INCREASE TIP = 77-83-88-95 stitches. Then work an elevation in the back of the neck in stocking stitch as follows (this gives the garment a better fit): Knit until there are 12-13-14-15 stitches left on the row, turn, tighten the strand and purl until there are 12-13-14-15 stitches left on the other side. Turn, tighten the strand and knit until there are 20-22-24-26 stitches left on the row, turn, tighten the strand and purl until there are 20-22-24-26 stitches left on the other side. Turn, tighten the strand and knit until there are 28-31-34-37 stitches left on the row, turn, tighten the strand and purl until there are 28-31-34-37 stitches left on the other side. Turn, tighten the strand and knit to end of row, then purl 1 row from the wrong side (bands worked in garter stitch). The next row is worked as follows from the right side: 5 band stitches in garter stitch, work pattern according to A.1 until there are 6 stitches left on the row – NOTE: Choose diagram for your size (= 11-12-11-12 repeats of 6-6-7-7 stitches), work A.2 (= 1 stitch) and finish with 5 band stitches in garter stitch. Continue this pattern and increase as shown in the diagram – read KNITTING TIP and REMEMBER THE KNITTING TENSION! When A.1 and A.2 have been completed there are 187-203-220-239 stitches on the needle. Continue with stocking stitch and 5 band stitches in garter stitch in each side in light brown. On the next row from the right side increase 7-7-10-7 stitches evenly on row (do not increase over bands) = 194-210-230-246 stitches. Work until the piece measures approx. 13-14-15-16 cm mid front (measured without the neck). Now divide the piece as follows: Work 29-31-34-36 stitches as before (= front piece), place the next 42-46-50-54 stitches on 1 thread for sleeve (without working then), cast on 6 new stitches on the needle, work 52-56-62-66 stitches (= back piece), place the next 42-46-50-54 stitches on 1 thread for sleeve (without working them), cast on 6 new stitches on the needle and work the remaining 29-31-34-36 stitches as before (= front piece) = 122-130-142-150 stitches. BODY: Insert 1 marker thread 32-34-37-39 stitches in from each side (= 58-62-68-72 stitches between marker threads for back piece). THE PIECE IS NOW MEASURED FROM HERE! Continue back and forth with stocking stitch and 5 band stitches in garter stitch in each side towards mid front – remember BUTTONHOLES on right band. When the piece measures 10-10-12-12 cm from where body and sleeves were divided, increase 1 stitch on each side of both marker threads – read INCREASE TIP (= 4 stitches increased). Repeat these increases when the piece measures 20-20-24-24 cm from where body and sleeves were divided = 130-138-150-158 stitches. When the piece measures 29-31-35-38 cm from where body and sleeves were divided, finish the bands mid front. Cast off the first 3 stitches at the beginning of the next 2 rows = 124-132-144-152 stitches. Then work stocking stitch in the round over all stitches for approx. 3 cm – the piece now measures 32-34-38-41 cm from the armhole down and 45-48-53-57 cm mid front (measured without neck). Now divide for the legs. LEG: Start mid front, change to double pointed needles size 4 mm and work stocking stitch in the round over the first 62-66-72-76 stitches (the remaining 62-66-72-76 stitches are left on the circular needle). Insert 1 marker thread at the beginning of the round (= inside of leg). On next round, decrease 2 stitches on the inside of the leg – read DECREASE TIP. Decrease like this every round a total of 2-3-3-3 times = 58-60-66-70 stitches. Then decrease on every 4th-5th-7th-9th round a total of 8-7-8-8 times = 42-46-50-54 stitches. When the leg measures 13-18-25-31 cm from the division increase 10 stitches evenly on round = 52-56-60-64 stitches. Change to double pointed needles size 3 mm and work rib in the round (= knit 2 / purl 2) for 8-8-10-10 cm or to desired length. On the next round increase all purl 2 to purl 3 = 65-70-75-80 stitches. Then cast off with knit over knit and purl over purl. Place stitches from the circular needle onto double pointed needles size 4 mm and work the other leg in the same way. The whole piece measures approx. 71-79-93-103 cm, measured from the shoulder down. SLEEVE: Place stitches from the thread on the one side of the piece on double pointed needles size 4 mm and knit up 1 stitch in each of the 6 stitches cast on under the sleeve = 48-52-56-60 stitches. Insert 1 marker thread in the middle of these 6 stitches = mid under sleeve). THE PIECE IS NOW MEASURED FROM HERE! Work stocking stitch in the round with light brown. When the sleeve measures 2-2-1-1 cm from where the sleeve was divided from the body, decrease 2 stitches mid under sleeve – remember DECREASE TIP. Decrease like this every 3rd-3rd-4th-4th round a total of 7-9-10-12 times = 34-34-36-36 stitches. When the sleeve measures 10-12-15-18 cm from where it was divided from the body, increase 6-6-8-8 stitches evenly on round = 40-40-44-44 stitches. Change to double pointed needles size 3 mm and work rib in the round (= knit 2 / purl 2) for 8-8-10-10 cm or to desired length. On the next round increase all purl 2 to purl 3 = 50-50-55-55 stitches. Then cast off with knit over knit and purl over purl. Place stitches from the circular needle onto double pointed needles size 4 mm. Work the other sleeve in the same way. NOSES: Crochet with red and crochet hook size 3 mm as follows: Work 4 chain stitches and 1 treble crochet in the 4th chain stitch from the hook, cut and fasten the strand. Work 1 nose for each reindeer (= 11-12-11-12 noses). Tie the noses to each reindeer and fasten the strands. ASSEMBLY: Lay the right band over the left band and sew down at the bottom with small stitches. Sew buttons onto left band. |
|||||||||||||
Diagram explanations |
|||||||||||||
|
|||||||||||||
 |
|||||||||||||
 |
|||||||||||||
 |
|||||||||||||
Have you finished this pattern?Tag your pictures with #dropspattern #runrunrudolphonesie or submit them to the #dropsfan gallery. Do you need help with this pattern?You'll find 35 tutorial videos, a Comments/Questions area and more by visiting the pattern on garnstudio.com. © 1982-2026 DROPS Design A/S. We reserve all rights. This document, including all its sub-sections, has copyrights. Read more about what you can do with our patterns at the bottom of each pattern on our site. |
|||||||||||||


With over 40 years in knitting and crochet design, DROPS Design offers one of the most extensive collections of free patterns on the internet - translated to 17 languages. As of today we count 325 catalogues and 12298 patterns translated into English (UK/cm). 12298
We work hard to bring you the best knitting and crochet have to offer, inspiration and advice as well as great quality yarns at incredible prices! Would you like to use our patterns for other than personal use? You can read what you are allowed to do in the Copyright text at the bottom of all our patterns. Happy crafting!
Post a comment to pattern DROPS Children 32-3
We would love to hear what you have to say about this pattern!
If you want to leave a question, please make sure you select the correct category in the form below, to speed up the answering process. Required fields are marked *.