
Popular categories
Looking for a yarn?


Comments / Questions (59)
![]() Ulrike wrote:
Ulrike wrote:
Hallo, ich stricke gerade die Blumenkästen und habe in Größe S 220 M. auf der Nadel. Wenn aber zwischen den einzelnen Blumen 3 M. liegen soll, besteht ein Rapport aus 12 M. Das geht aber bei 20 zu strickenden Rapporten auf 200 M. nicht auf. Was mache ich falsch?
19.02.2026 - 09:03DROPS Design answered:
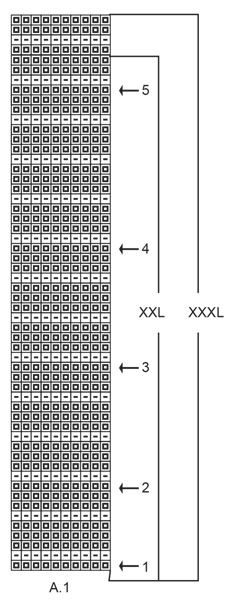
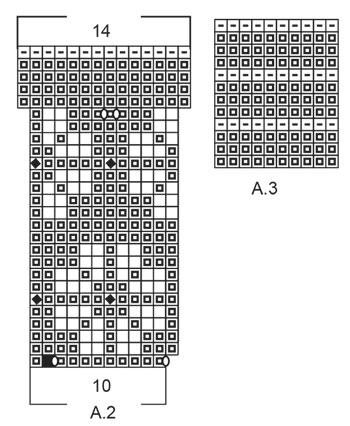
Liebe Ulrike, A.2 (Blumen) besteht aus 11 Maschen, nicht aus 12 (Sie beginnen mit 10 Maschen in der 1. Runde von A.2 und nehmen in dieser Runde 1 M zu, sodass Sie dann 11 Maschen haben), das geht in den 220 Maschen auf (20 Rapporte A.2). Viel Spaß beim Stricken!
23.02.2026 - 09:50
![]() Marion wrote:
Marion wrote:
Hallo. Ik wil het best met Flora breien maar die dat dit dan met 2 draden moet, terwijl de Flora dezelfde pennen gebruikt met 1 draad als de Baby Merino. Hoe zit dat?
11.12.2025 - 17:14DROPS Design answered:
Dag Marion,
Je kunt Flora als vervangend garen gebruiken omdat dit in dezelfde garencategorie zit en je hoeft dan maar 1 draad te gebruiken. Maak altijd wel even een proeflapje om de stekenverhouding te controleren.
11.12.2025 - 18:02
![]() Lena wrote:
Lena wrote:
Eine wirklich sehr schöne Passe. Ich habe allerdings im Rumpf Maschen abgenommen statt zugenommen, weil es sonst deutlich zu weit wird. Leider klappt mir der Saum immer hoch. Wie kann ich das verhindern?
26.12.2024 - 23:06DROPS Design answered:
Liebe Lena, Sie können den Pullover mit Stecknadeln auf einer geeigneten Unterlage spannen, anfeuchten (z.B. mit einer Sprühflasche für Blumen) und trocknen lassen, danach entfernen Sie die Stecknadeln, dann sollte sich der Rand nicht mehr rollen. NB: Es wird am Ende vor Bündchen zugenommen, da man mehr Maschen für Bündchen mit den kleineren Nadeln als für glatt rechts mit der grösseren Nadeln braucht. Viel Spaß beim Stricken!
02.01.2025 - 11:56
![]() Susanne Hansen wrote:
Susanne Hansen wrote:
Hvor kan man finde målene på de forskellige størrelser?
04.06.2024 - 21:07DROPS Design answered:
Hej Susanne, nederst i opskriften finder du en måleskitse. Vælg størrelsen med de mål som passer dig (mål evt en bluse du synes om at have på) :)
05.06.2024 - 10:30
![]() Anna Suihko wrote:
Anna Suihko wrote:
En oikein saa tolkkua ohjeeseen jossa kehoitetaan lisämään kuvion A2 toiseksi viimeisellä kerroksella 12 silmää ja tuloksena on 320 s koossa M kun silmukoita ennen lisäystä on 220. Mikähän multa on mennyt ohi?
21.04.2024 - 16:39DROPS Design answered:
Hei, myös piirroksen A.2 mallineuleen aikana tehdään lisäyksiä. Jokaiseen mallikertaan lisätään 4 silmukkaa, eli mallineuleen aikana lisätään yhteensä 88 silmukkaa + 12 silmukkaa.
22.04.2024 - 18:40
![]() Helena Saarinen wrote:
Helena Saarinen wrote:
It's very difficult to understand how I will make those loops after A2!!!! Never before get this kind of pattern in DROPS!!!
12.04.2024 - 15:52
![]() Linda Lavoie wrote:
Linda Lavoie wrote:
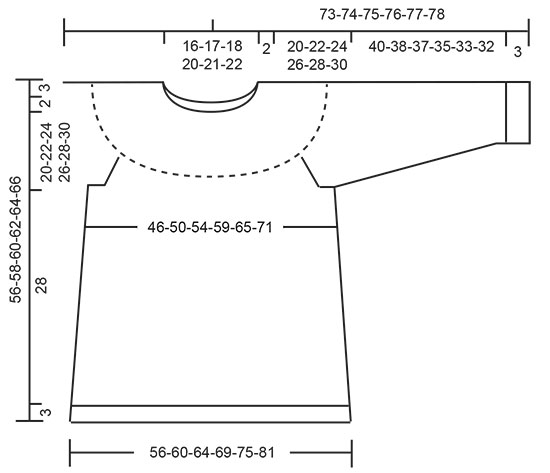
Dans le modèle 196-2 (Daisy delight), vous dites que quand A-1 a été tricoté 1fois en hauteur, l’ouvrage mesure 13 cm depuis le rang de montage au milieu du devant(dans le large). Est-ce depuis le tout début incluant le col ou depuis le début de A-1 ?
29.02.2024 - 13:04DROPS Design answered:
Bonjour Mme Lavoie, on doit bien mesurer depuis le rang de montage, autrement dit avec le col et A.1, depuis le tout début de l'ouvrage. Bon tricot!
29.02.2024 - 16:16
![]() Georgia Wilhelmsson wrote:
Georgia Wilhelmsson wrote:
Hej! Jag ska börja sticka mönster A2 i storlek S, tröjan Daisy Delight men förstår inte symbolerna på första raden. Hur ska jag gå tillväga? Hur många maskor blir det totalt i första raden i A2?
28.10.2023 - 17:12DROPS Design answered:
Hei Georgia 1.rad i A.2 går over 10 masker (den sorte firkanten er ingen maske). Når du har strikket 1.rad øker du med 2 kast pr gang A.2 strikkes = 12 masker når du skal strikke 2. rad. I str. S skal du ha 200 masker når du har strikket A.1 ferdig, og når du starter på A.2 strikker du A.2 20 ganger (= 10 masker i A.2 x 20 ganger = 200 masker). Sett maskemarkører mellom hver gang du strikker A.2 så har du en bedre oversikt. Bare husk å flytte maskemarkørene når det økes (så på 2. omgang er det 12 maske mellom maskemarkørene, mens når 22. omgang strikkes er det 14 masker mellom hver maskemarkør). mvh DROPS Design
30.10.2023 - 09:18
![]() Sandra wrote:
Sandra wrote:
Im Diagramm A1 bei den Reihen mit den Pfeilen soll zugenommen werden, immer beidseits der Markierungsfäden. Soll das mit Umschlägen gemacht werden, die dann in der nächsten Runde links verschränkt abgestrickt werden?
26.08.2023 - 09:59DROPS Design answered:
Liebe Sandra, ja gerne können Sie mit Umschläge zunehmen, dann stricken Sie 1 Masche zwischen jedem Umschlag, so gibt es nicht 2 Umschläge nebeneinander. Viel Spaß beim stricken!
28.08.2023 - 13:18
![]() Daska wrote:
Daska wrote:
Hallo, voor maat M staat bij de mouwen: 74 steken op een hulpdraad, dan 10 nieuwe. Dan voorpand en weer 74 op draad en 10 nieuwe. Maar eerst 10 nieuwe en dan 74 op draad is toch logischer qua symmetrie?
17.03.2023 - 20:32DROPS Design answered:
Dag Daska,
De 74 steken die je op de hulpdraad zet brei je niet, maar laat je eerst links liggen en de 10 steken die je opzet komen onder de oksel, dus aansluitend op het achterpand, daarna brei je de steken van het voorpand, zet je weer 74 steken op een hulpdraad en zet je 10 nieuwe steken op. De 10 nieuwe steken komen dus aan beide kanten onder de oksel en verbinden de voor- en achterpanden met elkaar.
19.03.2023 - 16:39
|
||||||||||||||||||||||
Daisy Delight#daisydelightsweater |
||||||||||||||||||||||
 |
 |
|||||||||||||||||||||
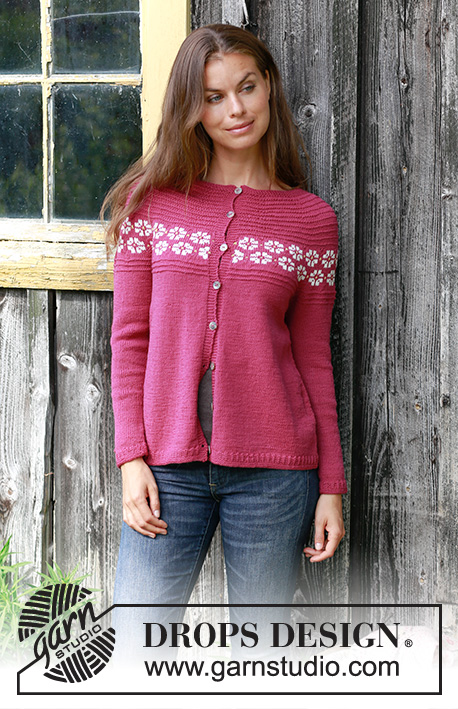
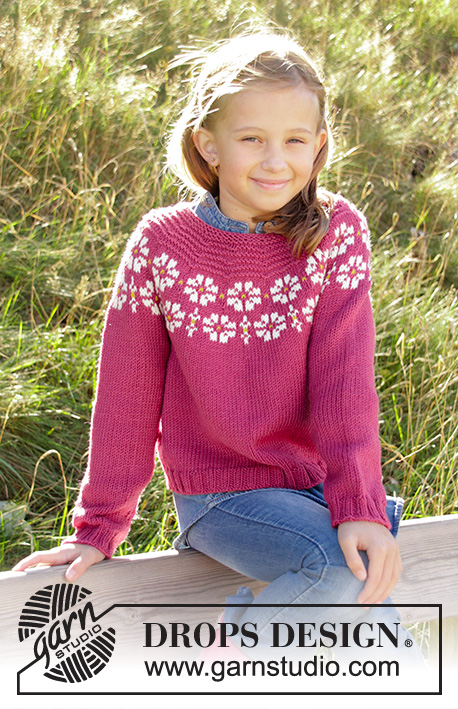
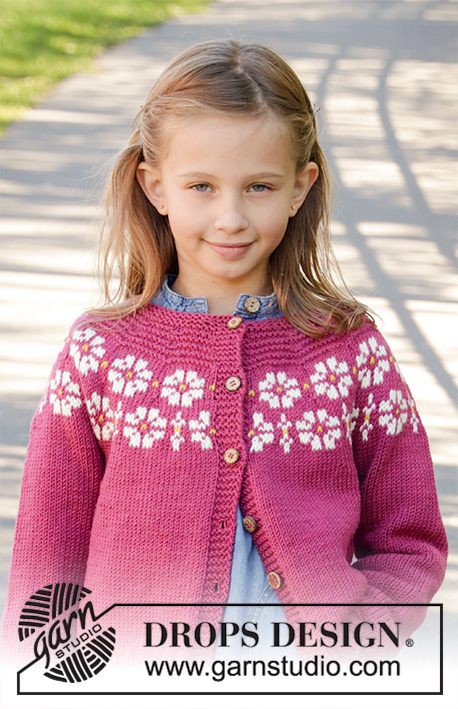
Knitted jumper with round yoke in DROPS BabyMerino. Piece is knitted top down with Nordic pattern and garter stitch. Size: S - XXXL
DROPS 196-2 |
||||||||||||||||||||||
|
EXPLANATION FOR THE PATTERN: ---------------------------------------------------------- GARTER STITCH (worked in the round): 1 ridge = 2 rounds. Knit 1 round and purl 1 round. PATTERN: See diagrams A.1 to A.3. Choose diagram for your size (applies to A.1). KNITTING TIP: To avoid the garment losing elasticity when working pattern, it is important not to tighten the strands on back side of piece. Switch to a higher needle number when working pattern if the pattern is somewhat tight. INCREASE TIP-1 (evenly): To calculate how to increase evenly, use the total number of stitches on row (e.g. 106 stitches) and divide stitches by number of increases to be done (e.g. 4) = 26.5. In this example increase by making 1 yarn over after alternately every 26th and 27th stitch. On next round work yarn over twisted to avoid hole. INCREASE TIP-2 (applies to sides of body): Work until 8 stitches remain before marker thread, make 1 yarn over, knit 16 (marker thread is in the middle of these stitches), make 1 yarn over. On next round knit yarn over twisted to avoid holes. ELEVATION: Insert a marker thread mid back = beginning of round. Begin from right side with plum and work in stocking stitch until 8-8-8-9-9-10 stitches have been worked past marker, turn, tighten yarn and work 16-16-16-18-18-20 stitches in stocking stitch. Turn, tighten yarn and work 24-24-24-27-27-30 stitches in stocking stitch, turn, tighten yarn and work 32-32-32-36-36-40 stitches in stocking stitch, turn, tighten yarn and work until mid back. RAGLAN: Increase 1 stitch on each side of every marker thread (= 8 stitches increased on round) as follows: Work until 1 stitch remains before marker thread, make 1 yarn over, knit 2 (marker thread is between these stitches), make 1 yarn over. Repeat at the other marker threads. On next round work yarn overs twisted to avoid holes. DECREASE TIP (applies to sleeves): Decrease 1 stitch on each side of marker thread as follows: Work until 3 stitches remain before marker thread and knit 2 together, knit 2 (marker thread is between these stitches), slip 1 stitch knitwise, knit 1, pass slipped stitch over stitch worked. ---------------------------------------------------------- START THE PIECE HERE: ---------------------------------------------------------- JUMPER - SHORT OVERVIEW OF THE PIECE: Worked in the round on circular needle, top down. Work sleeves in the round on double pointed needles/a short circular needle. NECK EDGE: Cast on 106-110-115-125-130-134 stitches on a short circular needle size 2.5 mm with plum. Work 5 ridges in GARTER STITCH - read explanation above. YOKE: Switch to circular needle size 3 mm. Knit 1 round while increasing 4-10-15-15-20-26 stitches evenly - read INCREASE TIP-1 = 110-120-130-140-150-160 stitches. Knit 1 round (all stitches are knitted twisted to avoid holes). For better fit work an elevation at the back of neck so that yoke is somewhat higher on back piece. This elevation can be skipped, to make the neck the same at the front and back - read ELEVATION. Insert 9-10-10-10-11-11 marker threads in piece without working as follows: Insert first marker thread after 7-6-7-7-5-5 stitches, insert each of the next 8-9-9-9-10-10 marker threads after 12-12-13-14-14-15 stitches, 7-6-6-7-5-5 stitches remain on round after last marker thread. Move the marker threads upwards when working. Now work pattern A.1 (choose diagram for your size) the entire round – read KNITTING TIP, AT THE SAME TIME on every round with arrow in diagram increase on each side of marker threads as follows: REMEMBER THE KNITTING TENSION! ARROW-1: Increase 1 stitch on each side of every marker thread (= 18-20-20-20-22-22 stitches increased) = 128-140-150-160-172-182 stitches. ARROW-2: Increase 1 stitch on each side of every marker thread (= 18-20-20-20-22-22 stitches increased) = 146-160-170-180-194-204 stitches. ARROW-3: Increase 1 stitch on each side of every marker thread (= 18-20-20-20-22-22 stitches increased) = 164-180-190-200-216-226 stitches. ARROW-4: Increase 1 stitch on each side of every marker thread (= 18-20-20-20-22-22 stitches increased) = 182-200-210-220-238-248 stitches. ARROW-5: Increase 1 stitch on each side of every marker thread (= 18-20-20-20-22-22 stitches increased) = 200-220-230-240-260-270 stitches. When entire A.1 has been worked vertically, piece measures approx. 11-12-13-14-15-16 cm from cast-on edge and down mid front. Remove the marker threads. Now work pattern A.2 (= 20-22-23-24-26-27 repetitions of 10 stitches) in the round. On next to last round in A.2 increase 10-12-14-16-12-12 stitches evenly = 290-320-336-352-376-390 stitches. When entire A.2 has been worked vertically, piece measures approx. 19-20-21-22-23-24 cm from cast-on edge and down mid front. Now insert 4 marker threads in the piece as follows: Insert 1st marker thread after the first 45-49-51-55-60-64 stitches (= half back piece), insert 2nd marker thread after the next 55-62-66-66-68-67 stitches (= sleeve), insert 3rd marker thread after the next 90-98-102-110-120-128 stitches (= front piece) and insert 4th marker thread after the next 55-62-66-66-68-67 stitches (= sleeve). 45-49-51-55-60-64 stitches remain on round after last marker thread (= half back piece). Now work pattern A.3 in the round, at the same time on first round begin increase for RAGLAN – read explanation above. Increase like this every other round 5-6-8-10-11-13 times in total = 330-368-400-432-464-494 stitches. NOTE: When A.3 has been worked vertically 1 time, continue with stocking stitch until all increases for raglan are done and piece measures 22-24-26-28-30-32 cm from cast-on edge. Work next round as follows: 50-55-59-65-71-77 stitches in stocking stitch (= half back piece), slip the next 65-74-82-86-90-93 stitches on 1 stitch holder for sleeve, cast on 10-10-12-12-14-16 new stitches on row (= in the side under sleeve), work 100-110-118-130-142-154 stitches in stocking stitch (= front piece), slip the next 65-74-82-86-90-93 stitches on 1 stitch holder for sleeve edges, cast on 10-10-12-12-14-16 new stitches on row (= in the side under sleeve) and work the remaining 50-55-59-65-71-77 stitches in stocking stitch (= half back piece). Finish body and sleeves separately. NOW MEASURE THE PIECE FROM HERE! BODY: = 220-240-260-284-312-340 stitches. Insert 1 marker thread in each side in the middle of the 10-10-12-12-14-16 stitches cast on under each sleeve (= 110-120-130-142-156-170 stitches between marker threads). Continue in the round with plum and in stocking stitch. When piece measures 4 cm from division, increase 2 stitches in each side - read INCREASE TIP-2 (= 4 stitches increased). Increase like this approx. every 2 cm 12 times in total = 268-288-308-332-360-388 stitches. Work the new stitches in stocking stitch. When piece measures 28 cm from division, increase 8-12-13-13-15-17 stitches = 276-300-321-345-375-405 stitches. Switch to circular needle size 2.5 mm. Work rib * knit 1, 2 stitches in garter stitch *, work from *-* in the round for 2 cm. Work 2 ridges and cast off. Jumper measures approx. 56-58-60-62-64-66 cm from shoulder and down. SLEEVE: Slip the 65-74-82-86-90-93 stitches from stitch holder in one side of piece on double pointed needles or a short circular needle size 3 mm and pick in addition up 1 stitch in each of the 10-10-12-12-14-16 new stitches cast on under sleeve = 75-84-94-98-104-109 stitches. Insert 1 marker thread in the middle of the 10-10-12-12-14-16 stitches mid under sleeve and begin round here. Continue with plum and in stocking stitch. When piece measures 4 cm, decrease 2 stitches mid under sleeve - read DECREASE TIP. Decrease like this every 8th-6th-5th-4th-4th-3rd round 13-17-21-22-23-24 times in total = 49-50-52-54-58-61 stitches. Continue until piece measures 40-38-37-35-33-32 cm from division (shorter measurements in the larger sizes because of wider neck and longer yoke). Knit 1 round while increasing 2-4-5-6-5-5 stitches evenly = 51-54-57-60-63-66 stitches. Switch to double pointed needles size 2.5 mm. Now work rib * knit 1, 2 stitches in garter stitch *, work from *-* in the round for 2 cm. Work 2 ridges and cast off. Work the other sleeve the same way. |
||||||||||||||||||||||
Diagram explanations |
||||||||||||||||||||||
|
||||||||||||||||||||||
 |
||||||||||||||||||||||
 |
||||||||||||||||||||||
 |
||||||||||||||||||||||
 |
||||||||||||||||||||||
 |
||||||||||||||||||||||
Have you finished this pattern?Tag your pictures with #dropspattern #daisydelightsweater or submit them to the #dropsfan gallery. Do you need help with this pattern?You'll find 29 tutorial videos, a Comments/Questions area and more by visiting the pattern on garnstudio.com. © 1982-2026 DROPS Design A/S. We reserve all rights. This document, including all its sub-sections, has copyrights. Read more about what you can do with our patterns at the bottom of each pattern on our site. |
||||||||||||||||||||||


With over 40 years in knitting and crochet design, DROPS Design offers one of the most extensive collections of free patterns on the internet - translated to 17 languages. As of today we count 325 catalogues and 12298 patterns translated into English (UK/cm). 12298
We work hard to bring you the best knitting and crochet have to offer, inspiration and advice as well as great quality yarns at incredible prices! Would you like to use our patterns for other than personal use? You can read what you are allowed to do in the Copyright text at the bottom of all our patterns. Happy crafting!
Post a comment to pattern DROPS 196-2
We would love to hear what you have to say about this pattern!
If you want to leave a question, please make sure you select the correct category in the form below, to speed up the answering process. Required fields are marked *.