
Popular categories
Looking for a yarn?


Comments / Questions (15)
![]() Barb Baronas wrote:
Barb Baronas wrote:
Are there standard measurements for your sizing? I'm looking at 2 different patterns that are marked s/m/l/xl/xxl but I don't see bust sizes for them. I would like to make the Let's play and the Strawberry Vanilla pullovers. Thanks!
11.07.2017 - 06:38DROPS Design answered:
Dear Barb, sizing always depends on several factors, mainly the style of the piece, and teh yarn used. You should always refer to the schematics found at the bottom of the pattern to figure out what size to knit. Happy crafting!
11.07.2017 - 08:17
![]() Mimi Routh wrote:
Mimi Routh wrote:
I see this in bright colors perhaps for just after the holidays when it's still cold but one is yearning to wear flower colors. Beautiful & flattering!
19.06.2017 - 17:09
![]() Marta Moro Rodríguez wrote:
Marta Moro Rodríguez wrote:
Me gustaría que sibierais el patrón para poder descargarlo, sólo se ve la foto. Muchas gracias
02.02.2017 - 09:59
![]() Mary Kersey wrote:
Mary Kersey wrote:
I love this one - looks so fresh and comfortable
17.01.2017 - 15:33
![]() Frisoline wrote:
Frisoline wrote:
Un régal ces tranches mousseuses !
26.12.2016 - 10:36
|
|
Let's Play#letsplaysweater |
|
|
|
|
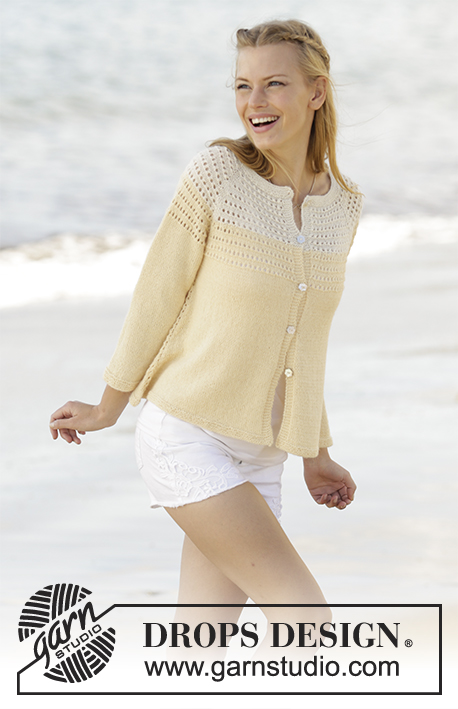
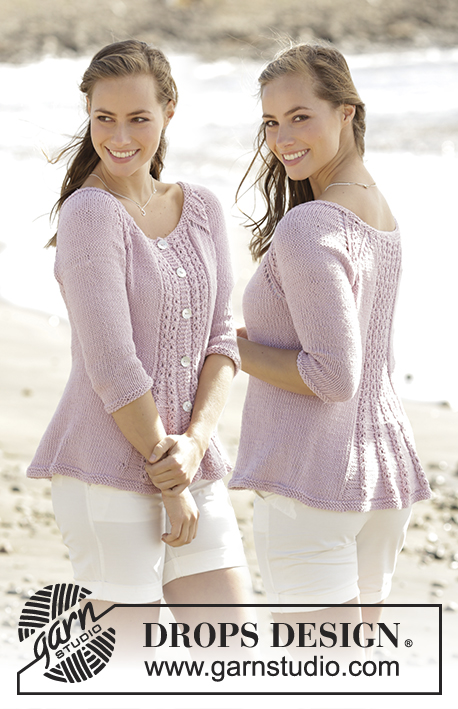
Jumper with raglan and stripes worked top down in DROPS Alpaca and DROPS Brushed Alpaca Silk. Sizes S - XXXL.
DROPS 176-6 |
|
|
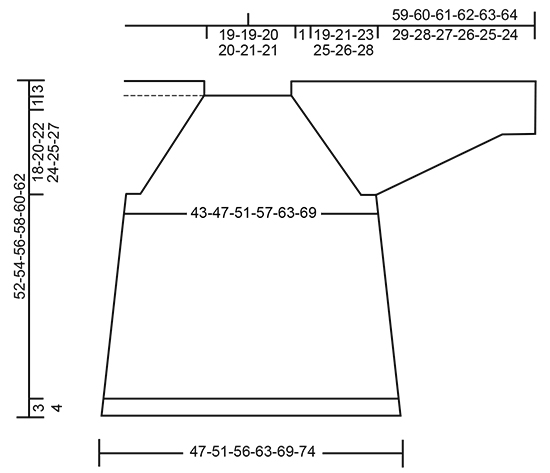
RIDGE/GARTER STITCH (worked in the round): 1 ridge = 2 rounds. Knit 1 round and purl 1 round. INCREASE TIP-1: To work out how to increase evenly, count the total number of stitches on the needle (e.g. 68 stitches) and divide by the number of increases to be made (e.g. 8) = 8.5. In this example, increase alternately after approx. every 8th and 9th stitch. Increase 1 stitch by making 1 yarn over, on the next round knit the yarn overs twisted to prevent holes. RAGLAN: Increase to raglan on each side of the four marker threads. NOTE: For sizes XL + XXL + XXXL the number of increases is different on the front/back pieces and the sleeves as described in the text. INCREASE AS FOLLOWS WHEN INCREASING 2 STITCHES (i.e. 1 stitch in each side): After the marker thread: knit 1, make 1 yarn over (= 1 stitch increased). On the next round, knit the yarn over so that you make holes. Before the marker thread: Start 1 stitch before the marker thread, make 1 yarn over, knit 1 (= 1 stitch increased). On the next round knit the yarn over so that you make holes. INCREASE AS FOLLOWS WHEN INCREASING 4 STITCHES (i.e. 2 stitches in each side): After the marker thread: Knit 1, make 1 yarn over, knit 1, make 1 yarn over (= 2 stitches increased). On the next round, knit the yarn over nearest the marker thread (= hole), the other is knitted twisted (= no hole). Before the marker thread: Start 2 stitches before the marker thread, make 1 yarn over, knit 1, make 1 yarn over, knit 1 (= 2 stitches increased). On the next round knit the first yarn over twisted (= no hole), the other yarn over (i.e. the yarn over nearest the marker thread) is knitted (= hole). STRIPES: Alpaca = A, Brushed Alpaca Silk = BAS. NOTE: The stripes are given alternately in rounds and cm. All the stripes are worked in stocking stitch. STRIPES BODY: 2 rounds with 1 strand dusty pink A + 1 strand off white BAS. 2 rounds with 1 strand off white A + 1 strand off white BAS. 9-9-10-10-10-11 cm with 1 strand dusty pink A + 1 strand off white BAS. 2 rounds with 1 strand medium pink A + 1 strand off white BAS. 2 rounds with 1 strand dusty pink A + 1 strand off white BAS. 9-9-10-10-10-11 cm with 1 strand medium pink A + 1 strand off white BAS. 2 rounds with 1 strand golden rod A + 1 strand off white BAS. 2 rounds with 1 strand medium pink A + 1 strand off white BAS. 9-9-10-10-10-11 cm with 1 strand golden rod A + 1 strand off white BAS. 2 rounds with 1 strand off white A + 1 strand off white BAS. 2 rounds with 1 strand golden rod A + 1 strand off white BAS. To finished length: 1 strand off white A + 1 strand off white BAS. STRIPES SLEEVE: 2 rounds with 1 strand medium pink A + 1 strand off white BAS. 2 rounds with 1 strand dusty pink A + 1 strand off white BAS. 9-9-9-9-8-9 cm with 1 strand medium pink A + 1 strand off white BAS. 2 rounds with 1 strand golden rod A + 1 strand off white BAS. 2 rounds with 1 strand medium pink A + 1 strand off white BAS. 9-9-9-9-8-9 cm with 1 strand golden rod A + 1 strand off white BAS. 2 rounds with 1 strand off white A + 1 strand off white BAS. 2 rounds with 1 strand golden rod A + 1 strand off white BAS. To finished length: 1 strand off white A + 1 strand off white BAS. INCREASE TIP-2 (for the sides of the body): Start 1 stitch before the marker thread, make 1 yarn over, knit 2 (the marker thread sits in the middle of these 2 stitches), make 1 yarn over (= 2 stitches increased). On the next round knit the yarn overs twisted to prevent holes. DECREASE TIP (for mid under sleeve): Start 3 stitches before the marker thread, knit 2 together, knit 2 (the marker thread sits in the middle of these 2 stitches), slip 1 stitch as if to knit, knit 1, pass the slipped stitch over the knitted stitch (= 2 stitches decreased). ---------------------------------------------------------- JUMPER: The piece is worked in the round with circular needle from mid back and top down. The sleeves are worked in the round with double pointed needles. YOKE: Cast on 68-68-72-72-76-76 stitches with short circular needle size 5 mm and 1 strand off white Alpaca (= A) + 1 strand off white Brushed Alpaca Silk (= BAS). Work 2 RIDGES – see description above. AT THE SAME TIME on the third round (= a round of knit) increase 8-12-12-12-16-16 stitches evenly along the round – READ INCREASE TIP-1 = 76-80-84-84-92-92 STITCHES. Change to a short circular needle size 6 mm after the ridges and insert 4 marker threads in the piece as follows (without working the stitches): 1st marker thread inserted after the first 13-14-15-15-17-17 stitches (= ½ the back piece), 2nd marker thread inserted after the next 12 stitches (= right sleeve), 3rd marker thread inserted after the next 26-28-30-30-34-34 stitches (= front piece) and the 4th marker thread is inserted after the next 12 stitches (= left sleeve). There are now 13-14-15-15-17-17 stitches left on the back piece after the last marker thread. Work stocking stitch in the round. REMEMBER THE KNITTING TENSION! AT THE SAME TIME on the 2nd round with stocking stitch increase to RAGLAN in each transition between the body and sleeves – see description above. Increase as follows: SIZES S + M + L (front/back piece + sleeves): Increase 1 stitch on each side of each of the four marker threads every 2nd round in total 14-16-17 times. SIZES XL + XXL + XXXL: Increase 2 stitches in each side on the front and back pieces every 2nd round in total 2-3-4 times, then increase 1 stitch in each side on the front and back pieces every 2nd round in total 17-17-18 times. AT THE SAME TIME increase 1 stitch in each side on the sleeves every 2nd round in total 19-20-22 times. STRIPES: AT THE SAME TIME when the piece measures 9-11-10-11-13-12 cm (measured from the cast-on edge mid front) work STRIPES BODY – see description above. After all the increases to raglan there are 188-208-220-244-264-284 stitches on the needle and the piece measures approx. 19-21-23-25-26-28 cm from the cast-on edge mid front (i.e. approx. 22-24-26-28-29-31 cm from the shoulder). The next round is worked as follows: Work 27-30-32-36-40-43 stitches stocking stitch (= ½ the back piece), place the next 40-44-46-50-52-56 stitches on 1 thread (= right sleeve), cast on 6-6-8-8-8-10 new stitches on the needle (= in the side under the sleeve), work 54-60-64-72-80-86 stitches stocking stitch (= front piece), place the next 40-44-46-50-52-56 stitches on 1 thread (= left sleeve), cast on 6-6-8-8-8-10 new stitches on the needle (= in the side under the sleeve) and work the remaining 27-30-32-36-40-43 stitches in stocking stitch (= ½ the back piece). The body and sleeves are now continued separately. THE PIECE IS NOW MEASURED FROM HERE! BODY: = 120-132-144-160-176-192 stitches. Insert 1 marker thread in the middle of the 6-6-8-8-8-10 stitches which were cast on under the sleeves in each side. Continue in the round with stocking stitch and stripes body. AT THE SAME TIME when the piece measures 4 cm increase 2 stitches in each side – READ INCREASE TIP-2 (= 4 stitches increased). Increase in this way every 8-8-8-6-6-6 cm in total 3-3-3-4-4-4 times = 132-144-156-176-192-208 stitches. When the piece measures 46-48-50-51-53-55 cm from the cast on edge mid front (i.e. approx. 49-51-53-54-56-58 cm from the shoulder) the stripes should be finished. Knit 1 round with 1 strand off white Alpaca + 1 strand off white Brushed Alpaca Silk where you increase 30-30-36-40-42-44 stitches evenly along the round = 162-174-192-216-234-252 stitches. Change to circular needle size 5 mm and work rib in the round (= knit 2 / purl 4). When the rib measures 2 cm increase all purl 4 to purl 5 = 189-203-224-252-273-294 stitches. When the rib measures 3-3-3-4-4-4 cm cast off loosely with knit over knit and purl over purl. The jumper measures approx. 52-54-56-58-60-62 cm from the shoulder and down. SLEEVE: Place the 40-44-46-50-52-56 stitches from the one side of the piece on double pointed needles size 6 mm and in addition knit up 1 stitch in each of the 6-6-8-8-8-10 stitches cast on under the sleeve and insert a marker thread in the middle of these stitches 6-6-8-8-8-10 stitches (= mid under sleeve) = 46-50-54-58-60-66 stitches on the needle. Continue in the round with the colour from the stripe on the body until the stripe measures 9-9-10-10-10-10 cm, then work STRIPES SLEEVE – see description above. AT THE SAME TIME when the piece measures 2 cm from the separation in all sizes, decrease 2 stitches mid under the sleeve – READ DECREASE TIP. Decrease in this way every 4½-3½-2½-2-2-1½ cm in total 6-7-9-10-11-13 times = 34-36-36-38-38-40 stitches. Continue working until the sleeve measures 28-27-26-25-24-23 cm from the separation. Change to double pointed needles size 5 mm and 1 strand off white Alpaca + 1 strand off white Brushed Alpaca Silk. Work 2 ridges, change back to double pointed needles size 6 mm and cast off loosely. Work the other sleeve the same way. |
|
 |
|
Have you finished this pattern?Tag your pictures with #dropspattern #letsplaysweater or submit them to the #dropsfan gallery. Do you need help with this pattern?You'll find 29 tutorial videos, a Comments/Questions area and more by visiting the pattern on garnstudio.com. © 1982-2026 DROPS Design A/S. We reserve all rights. This document, including all its sub-sections, has copyrights. Read more about what you can do with our patterns at the bottom of each pattern on our site. |


With over 40 years in knitting and crochet design, DROPS Design offers one of the most extensive collections of free patterns on the internet - translated to 17 languages. As of today we count 324 catalogues and 12290 patterns translated into English (UK/cm). 12290
We work hard to bring you the best knitting and crochet have to offer, inspiration and advice as well as great quality yarns at incredible prices! Would you like to use our patterns for other than personal use? You can read what you are allowed to do in the Copyright text at the bottom of all our patterns. Happy crafting!
Post a comment to pattern DROPS 176-6
We would love to hear what you have to say about this pattern!
If you want to leave a question, please make sure you select the correct category in the form below, to speed up the answering process. Required fields are marked *.