
Popular categories
Looking for a yarn?


Comments / Questions (65)
![]() Karine wrote:
Karine wrote:
Ma ei saanud aru kuidas teha kasvatusi raglaanil? Kas kehaosal ja varruka lmustril tuleb teha üheaegselt kasvatusi ? Kuidas saab 99 silma.
02.06.2021 - 09:11DROPS Design answered:
Tere! M suurusel kasvatate igal ragalaanijoonel mõlemal pool skeemil A.1 kehaosal igal ringil kokku 4 korda (st. igal ringil kasvatatakse 2s esiosal ja 2 s seljaosal ja nii 4 korda), siis igal teisel ringil 27 korda (st. igal teisel ringil kasvatatakse 2s esiosal ja 2 s seljaosal ja nii 27 korda). Varrukatel kasvatatakse igal teisel ringil 19 korda, siis igal neljandal ringil 5 korda. St et mõnel ringil kasvatatakse ainult esi- ja seljaosal, mõnel ringil ka varrukatel. (Ehk algul on esi- ja seljaosal 37 s, siis kasvatatakse 4x 2s, siis 27x 2 s = 99 s on esiosal ja seljaosal kui raglaan on tehtud). Head kudumist!
02.06.2021 - 22:52
![]() Blanquet Elysabeth wrote:
Blanquet Elysabeth wrote:
Bonjour, juste une remarque, autant Drops a bien renouvelé les modèles femmes pour les modèles hommes ce n'est pas le cas! les modèles sont assez anciens, des années 90 sans doute. je cherche un modèle pour homme tout simple pour le printemps/été en Belle, j'aime bien cette matière. Mais à part celui ci qui ne me satisfait pas vraiment, il n'y a pas grand choix. cordialement
12.04.2021 - 17:39DROPS Design answered:
Bonjour Mme Blanquet, vous pourrez trouver ici tous les modèles de pull homme tricotés dans un fil du groupe B, comme Belle, si vous ne trouvez pas votre bonheur, vous pouvez adapter un modèle femme - cf ce point de la FAQ. Bon tricot!
13.04.2021 - 07:52
![]() Victoria wrote:
Victoria wrote:
Bonjour, Je tricote la taille M et je suis bloquée à la première étape du raglan Dos et Devant : Augmenter 0-4-4-4-4-4 fois au total tous les tours, puis 28-27-29-30-32-33 fois tous les 2 tours. Je ne comprends pas "x fois tous les tours/tous les 2 tours" Dois-je augmenter après et avant A1 du dos et devant (soit 4 en tout) sur 1 tour (combien de tour représente "tous les tours dans ce cas ?") et puis 27 tours en augmentant à ces mêmes endroits 1 tour sur 2 ? Merci beaucoup
28.03.2021 - 08:04DROPS Design answered:
Bonjour Victoria, en M, vous augmentez: pour le devant/le dos d'abord 4x tous les tours puis 27x tous les 2 tours; en même temps, vous augmentez pour les 19x tous les 2 tours et 5x tous les 4 tours; autrement dit vous augmentez soit 8 m (= devant/dos + manches) soit 4 m seulement par tour (= quand vous augmentez tous les tours pour le devant et le dos mais tous les 2 tours pour les manches). Bon tricot!
06.04.2021 - 08:02
![]() TP wrote:
TP wrote:
Hei! Pitäisikö hihan pituus todellakin olla alle 4cm siinä vaiheessa kun A1:n silmukat on ”hävitetty”? Minulla pituus on jostain syystä lähemmäs 10cm. Ymmärsinhän oikein että hihan alun kavennukset ja levennykset tehdään symmetrisesti molemmilla puolilla?
21.03.2021 - 22:06DROPS Design answered:
Hei, piirroksen A.1 silmukoiden vähentäminen jatkuu vielä sen jälkeen kun kavennukset keskellä hihan alla on aloitettu.
22.03.2021 - 16:43
![]() Alexander wrote:
Alexander wrote:
Hello! I'm confused about the increasing. I understand that Y/Os are worked on each side of the A.1s but if I understand correctly this only adds 4 new stitches. Should I add 4 more increases in the 6 stitches between the A.1s? Also, when working the raglan body increases, should I aim for an even distribution of increases ending with 45 stitches ea in the front and back panels? Lastly, should ALL increases be worked as Y/Os or should the ones not adjacent to A.1 be worked as KFB? Thank you!
20.03.2021 - 04:29DROPS Design answered:
Dear Alexander, you will increase 2 sts on each piece (front, back piece or sleeves), but the increases are worked on a different rythm on body and sleeve, ie you will increase alternately 8 sts (= body + sleeves) or only 4 sts (body only when increasing on every round - except in first size). The yarn over should be worked after A.1 at the beg of piece that should be indreased + before the A.1 at the end of piece that should be increased. Hope this helps. Happy knitting!
22.03.2021 - 07:30
![]() Anne-Marie Bourgeois wrote:
Anne-Marie Bourgeois wrote:
I'm confused with the raglan part. Do we do the raglan body and raglan sleeve at the same time, or we start with raglan body first for 64 round and then start the raglan sleeve ? Also it says to Inc differently on body and sleeves. What type of increase do we do for sleeve ?
07.11.2020 - 19:05DROPS Design answered:
Dear Mrs Bourgeois, raglan will be worked on a different rythm on body and on sleeves, ie depending on the size you will increase 4 sts (= body or sleeves only) or 8 sts (body and sleeves). Raglan increased are done with yarn over - see RAGLAN; Hope this helps. Happy knitting!
09.11.2020 - 10:13
![]() Susan Underwood wrote:
Susan Underwood wrote:
A1 disappear way after 4cm. So do you decrease every row once either side of marker or twice I.e. k2, k2 work to last 4 sts slk1, sl1k1. at 4cm ?
01.07.2020 - 15:41DROPS Design answered:
Dear Mrs Underwood, A.1 is not supposed to disappear, the stitches worked in A.1 are the raglan stitches, they are worked at the transition between front/back piece and sleeves - and you will increase either/or after A.1 at the beg of front/back/sleeve and/or before A.1 at the end of front/back/sleeve. See RAGLAN. Happy knitting!
01.07.2020 - 16:26
![]() Fabienne wrote:
Fabienne wrote:
Bonjour, j'aimerais être sûre d'une chose, la rehausse déborde bien sur le haut des manches ?
15.06.2020 - 20:35DROPS Design answered:
Bonjour Fabienne, tout à fait. Bon tricot!
16.06.2020 - 08:57
![]() Hayley De Gee wrote:
Hayley De Gee wrote:
Hi!! I've read through the part of SLEEVE and cannot understand the process of how both A1's disappear under the sleeve. I also don't know how where exactly to YO and K2tog. My understanding after increasing the 8 stitches would be to knit until before A1 , then YO, [k1, P2, K4,P2,K1=A1 pattern], then K2tog, k4, YO,{K1,P2,K4,P2,K1=A1 pattern] THEN K2tog???? PLS HELP :( I'm totally confused.. its my 1st time doing a raglan and I have 4 more days before my man's birthday
24.05.2020 - 22:20DROPS Design answered:
Dear Mrs De Gee, mid under sleeve there are: A.1, new sts picked up, A.1 - you have to increase on either side of these sts and decrease between both A.1: work until before first of both A.1 mid under sleeve,YO, A.1, work until 2 sts remain before marker mid under sleeve, K2 tog, K2 tog, work to A.1, work A.1, YO - you increased 2 sts. Continue like this decreasing with K2 tog on each side of marker mid under sleeve + 1 yarn over on either side of these sts until all sts in A.1 will have disappear (the new sts are worked in stockign st). Happy knitting!
25.05.2020 - 10:26
![]() Marie-Laure wrote:
Marie-Laure wrote:
Bonjour, Je vous remercie pour vos explications. Du coup, j'ai commencé avec les aiguilles circulaires :-) Il est noté qu'à 4 cm de hauteur, il faut diminuer 1 m de chaque côté du marqueur et cela 11 fois pour le modèle S. Pourquoi arrive-t'on alors à 54 mailles et non 56 (78 - 22) ? Par ailleurs, je dois bien faire en même temps ces diminutions dès 4 cm de hauteur (calculé depuis sous la manche) et poursuivre les augmentations avec les jetés ? Merci d'avance pour votre aide.
10.04.2020 - 16:48Marie-Laure answered:
Bonjour, Désolée, je vous ai dérangé pour rien. Je n'avais pas compté le premier tour ;-). Pas nécessaire de me répondre. Merci et joyeuses pâques !
11.04.2020 - 17:28
|
|||||||
Carter |
|||||||
 |
 |
||||||
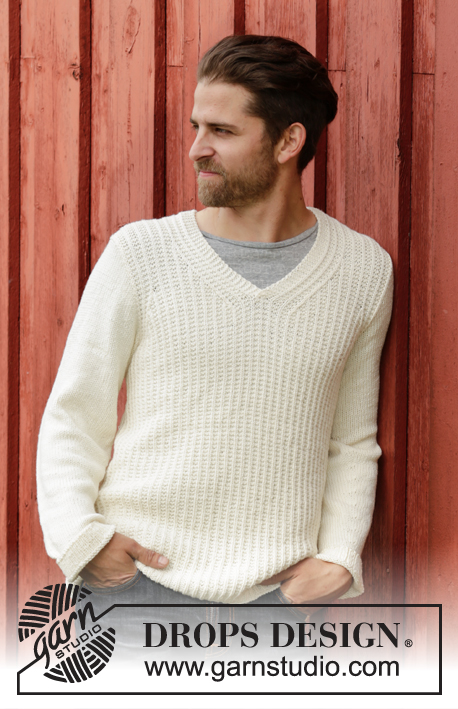
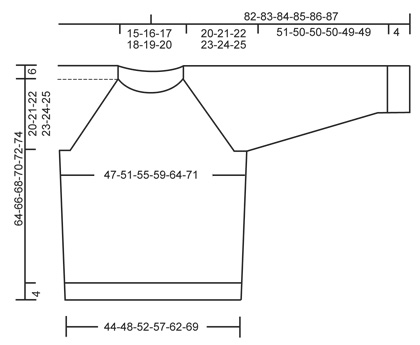
Men's knitted jumper in DROPS Belle, with raglan and worked top down. Size: S - XXXL.
DROPS Extra 0-1131 |
|||||||
|
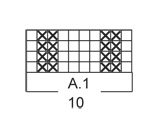
GARTER ST (back and forth): K all rows. 1 ridge = 2 rows K. RAGLAN: Inc for raglan by working a YO on each side of A.1 in every raglan. On next round K YOs twisted to avoid holes. PATTERN: See diagram A.1. DECREASE TIP: Dec 1 st before marker as follows: Work until 2 sts remain before marker, slip 1 st as if to K, K 1, psso. Dec 1 st after marker as follows: K 2 tog. ---------------------------------------------------------- JUMPER: Worked in the round on circular needle, top down. Cast on 114-117-120-123-126-129 sts on circular needle size 3.5 mm with Belle. K 1 round. Then work rib (= K 1/P 2). Switch to circular needle size 4 mm when piece measures 2 cm. Now continue piece in stocking st. On first round dec 18-17-16-15-14-13 sts evenly = 96-100-104-108-112-116 sts (this is done to give the garment better shape). On next round, inc 24-26-30-40-48-70 sts evenly = 120-126-134-148-160-186 sts. Insert 1 marker at beg of round = mid back. On next round work as follows from mid back: K 17-18-20-24-27-33 (= half back piece), A.1, K 6, A.1 (= sleeve), K 34-37-41-48-54-67 (= front piece), A.1, K 6, A.1 (= sleeve ), K 17-19-21-24-27-34 (= half back piece). Continue pattern like this while AT THE SAME TIME working an elevation in the back as follows: Work 8 sts past marker, turn, tighten yarn and work 16 sts back, turn, tighten yarn and work 24 sts, turn, continue to work 8 sts more for every turn until a total of 64 sts have been worked after last turn, turn and work 1 round over all sts until mid back again. On next round start inc for RAGLAN – see explanation above - NOTE: Inc differently on body and sleeves. REMEMBER THE KNITTING TENSION RAGLAN BODY: Inc every round 0-4-4-4-4-4 times in total, then every other round 28-27-29-30-32-33 times. There are 90-99-107-116-126-141 sts on front and back piece. RAGLAN SLEEVE: Inc every other round 16-19-21-22-24-27 times, then every 4th round 6-5-5-5-5-4 times. There are 70-74-78-80-84-88 sts for each sleeve. When all inc are done there are 320-346-370-392-420-458 sts on needle. On next round, work as follows: K 45-49-53-58-63-70, slip the next 70-74-78-80-84-88 sts on a stitch holder for sleeve, cast on 8 new sts under sleeve (insert a marker in the middle of these new sts), K 90-99-107-116-126-141, slip the next 70-74-78-80-84-88 sts on a stitch holder for sleeve, cast on 8 new sts under sleeve (insert a marker in the middle of these new sts), K 45-50-54-58-63-71 = 196-214-230-248-268-298 sts. NOW MEASURE PIECE FROM HERE! BODY: When piece measures 4 cm, dec 1 st on each side of markers in the side - READ DECREASE TIP (= 4 sts dec). Repeat dec every 14-14-14-30-30-30 cm 2-2-2-1-1-1 more times = 184-202-218-240-260-290 sts. When piece measures 42-43-44-45-46-47 cm, K 1 round while AT THE SAME TIME inc 20-17-16-15-16-13 sts evenly = 204-219-234-255-276-303 sts. Switch to circular needle size 3.5 mm. Work rib = K 1/P 2. When rib measures 4 cm, loosely cast off K over K and P over P. SLEEVE: Worked in the round on double pointed needles. Slip the 70-74-78-80-84-88 sts from stitch holder back on double pointed needles size 4 mm. Cast on 8 new sts under sleeve, insert 1 marker in the middle of the new sts = 78-82-86-88-92-96 sts. NOW MEASURE PIECE FROM HERE! Work in stocking st AT THE SAME TIME continue A.1 as follows: Inc 1 YO before A.1 up towards middle of sleeve, K 2 tog after A.1 towards under sleeve (i.e. the 8 new sts cast on under sleeve). This is done so that A.1 meets under sleeve and disappears, repeat dec every other round until all sts in both A.1 are gone. K YO twisted on next round, it should not make holes. When piece measures 4 cm, dec 1 st on each side of marker - READ DECREASE TIP. Repeat dec every 3½-3½-3-3-2½-2½ cm 11-12-13-13-14-15 more times = 54-56-58-60-62-64 sts. Work in stocking st until piece measures 51-50-50-50-49-49 cm. K 1 round while AT THE SAME TIME inc 6-4-5-3-4-2 sts evenly = 60-60-63-63-66-66 sts. Switch to double pointed needles size 3.5 mm and work rib = K 1/P 2. Cast off when piece measures 55-54-54-54-53-53 cm (shorter measurements in the larger sizes because of wider shoulders). Work the other sleeve the same way. POCKET: Cast on 23 sts (incl 1 edge st in each side) on double pointed needles size 4 mm with Belle. Continue in stocking st back and forth with 1 edge st in GARTER ST - see explanation above - in each side of piece. When piece measures 8 cm, adjust so that next row is from WS, inc 4 sts evenly from WS = 27 sts. Switch to double pointed needles size 3.5 mm and work as follows from RS: 1 edge st in garter st, rib = K 1/P 2 until 2 sts remain, finish with K 1 and 1 edge st in garter st. When piece measures 10 cm, cast off K over K and P over P. ASSEMBLY: Sew the openings under the sleeves. Sew the pocket on the left sleeve, approx 45 cm from cast off edge. |
|||||||
Diagram explanations |
|||||||
|
|||||||
 |
|||||||
 |
|||||||
Have you finished this pattern?Tag your pictures with #dropspattern or submit them to the #dropsfan gallery. Do you need help with this pattern?You'll find 25 tutorial videos, a Comments/Questions area and more by visiting the pattern on garnstudio.com. © 1982-2026 DROPS Design A/S. We reserve all rights. This document, including all its sub-sections, has copyrights. Read more about what you can do with our patterns at the bottom of each pattern on our site. |
|||||||


With over 40 years in knitting and crochet design, DROPS Design offers one of the most extensive collections of free patterns on the internet - translated to 17 languages. As of today we count 324 catalogues and 12199 patterns translated into English (UK/cm). 12199
We work hard to bring you the best knitting and crochet have to offer, inspiration and advice as well as great quality yarns at incredible prices! Would you like to use our patterns for other than personal use? You can read what you are allowed to do in the Copyright text at the bottom of all our patterns. Happy crafting!
Post a comment to pattern DROPS Extra 0-1131
We would love to hear what you have to say about this pattern!
If you want to leave a question, please make sure you select the correct category in the form below, to speed up the answering process. Required fields are marked *.