
Popular categories
Looking for a yarn?


Comments / Questions (65)
![]() Monika wrote:
Monika wrote:
Dzień dobry, czy ten sweter można zrobić rozpinany na guziki lub suwak?
23.02.2026 - 12:19DROPS Design answered:
Witaj Moniko, oczywiście, że można, jeśli tylko masz odpowiednie doświadczenie. Nie sądzę, żeby powstał wzór na kardigan na podstawie tego wzoru. W razie pytań pisz. Pozdrawiam!
23.02.2026 - 22:23
![]() Torsten wrote:
Torsten wrote:
Warum werden nach dem Bund in der ersten Reihe mit Nadel 4 erst 18 Maschen abgenommen und in der nächsten Runde wieder 24 Maschen zugenommen und nicht einfach 6 Maschen zugenommen?
02.09.2023 - 20:30DROPS Design answered:
Lieber Torsten, damit die Halsblende schön liegt, wird man zuerst abnehmen dann zunehmen. Viel Spaß beim stricken!
04.09.2023 - 08:03
![]() Birgit Urke wrote:
Birgit Urke wrote:
Skjønner ikke hvordan jeg skal felle/ øke på erme for å få bort A1. Ønsker en enkel forklaring på hvor jeg skal øke med kast og hvor jeg skal felle.
08.01.2023 - 00:08DROPS Design answered:
Hej Birgit, du skal ikke få bort A.1, du fortsætter med A.1 i hver overgang og så øker du med 1 kast på hver side af A.1 :)
10.01.2023 - 12:22
![]() Francesca wrote:
Francesca wrote:
Mi spiace, ma con una risposta così superficiale oltreché vana, non mi aiutate a capire un pattern a me poco chiaro. Ci rinuncio definitivamente a seguire i vostri pattern e a inoltrarvi le domande, visto che continuo a ricevere risposte imprecise.e incomplete. Grazie lo stesso
02.05.2022 - 09:19DROPS Design answered:
Buonasera Francesca, ci dispiace per questo pensiero: abbiamo risposto a tutte le sue domande. Per poter comprendere meglio gli aumenti, provi a farsi uno schema dei vari aumenti delle maniche e del corpo in modo da poter identificare come lavorare ogni giro. Buon lavoro!
03.05.2022 - 00:00
![]() Sylvie wrote:
Sylvie wrote:
"brei 8 st voorbij de markeerder, keer, trek de draad aan en brei 16 st terug, keer, trek de draad aan en brei 24 st, keer, ga verder en brei 8 st meer elke keer voor u keert tot er totaal 64 st zijn gebreid na het laatste keerpunt, keer en brei 1 nld over alle st tot u weer bij middenachter aankomt. " Dus met de rondbreinaald terug dezelfde steken breien want terugbreien kan ook steken ongedaan maken?
25.04.2022 - 12:37DROPS Design answered:
Dag Sylvie,
Na het laatste keerpunt brei je inderdaad 1 toer helemaal in de rondte met de rondbreinaald, tot je weer terug bent bij midden achter.
28.04.2022 - 09:29
![]() Francesca wrote:
Francesca wrote:
Buona sera. Non riesco a capire : sto facendo la taglia L, ho eseguito i primi 4 giri di aumenti raglan (su dav e dietro ho ottenuto 49maglie, sulle maniche 22)...x come ho capito io, dovrei ora continuare ad aumentare x altri 29 giri su dav e dietro e su altri 26 giri sulle maniche. Corretto? Ogni giro aumento o a giri alterni? Ho il dubbio xke x una taglia L m sembra poco 33 giri totali di aumento. Ci tengo tanto a questo modello Non vorrei buttare tutto x aver fallito. Grazie del supporto
15.04.2022 - 22:24DROPS Design answered:
Buonasera Francesca, gli aumenti per il corpo sono diversi da quelli delle maniche: i successivi aumenti sul corpo sono a ferri alterni, mentre per le maniche deve seguire le istruzioni riportate. Buon lavoro!
01.05.2022 - 23:46
![]() Francesca wrote:
Francesca wrote:
Innanzitutto grazie per la gentile risposta. Mi avete chiarito un grande punto di domanda. Ho un ultimo dubbio: io farò la taglia L, x gli aumenti raglan al primo giro 4 poi ogni 2 giri 29 volte, significa che al primo giro aumento su entrambi i punti e i 29 come li smisto, visto che devono essere differenti per davanti e dietro? Grazie ancora per l aiuto
05.04.2022 - 23:25DROPS Design answered:
Buonasera Francesca, gli aumenti per il raglan si lavorano in modo diverso sulle maniche e il corpo secondo quanto riportato sotto i rispettivi paragrafi. Buon lavoro!
06.04.2022 - 20:26
![]() Francesca wrote:
Francesca wrote:
Inoltre non capisco anche : l alzata dietro, dovendo lavorare 64 maglie totali, queste non vanno a spostare le divisioni (dietro/davanti/raglan/maniche)?
03.04.2022 - 15:07DROPS Design answered:
Buonasera Francesca, le 64 maglie dell'alzata non sono aumenti, sono semplicemente maglie lavorate a ferri accorciati, cioè solo su una parte delle maglie e non su tutte le maglie, per cui sono già incluse nelle varie divisioni. Buon lavoro!
05.04.2022 - 19:17
![]() Francesca wrote:
Francesca wrote:
Ho difficoltà a seguire il pattern. Cosa significa aumentare 0 volte in tutto e poi ogni 2 giri 28 volte? (raglan) LE 64 maglie che ottengo a fine alzata, non vanno a spostare le linee di divisione (davanti dietro maniche e raglan)? Aiutatemi per favore
02.04.2022 - 23:15DROPS Design answered:
Buonasera Francesca, al primo giro di aumenti non deve lavorare nessun aumento, poi deve aumentare ogni 2 giri per 28 volte. Le 64 maglie dell'alzata sono già incorporate nelle diverse parti, non sono aumenti. Buon lavoro!
05.04.2022 - 19:16
![]() Laurence wrote:
Laurence wrote:
Bonjour je tricote la taille M. Si je pars de mes 37 mailles devant que j'augmente 4 fois 2 mailles et 27 fois 2 mailles je tombe bien sur mes 99 mailles. Par contre pour les manches 6 mailles j'augmente 19 fois 2 mailles puis 5 fois 2 mailles j'arrive à 54 mailles et non 74. Pouvez vous m'expliquer ce que je n'ai pas compris ?
17.03.2022 - 10:56DROPS Design answered:
Bonjour Laurence, bien sûr, les 10 mailles de A.1 de chaque côté de la manche sont comprises dans ces 74 mailles d'où 54 + 10 avant les 54 + 10 après les 54 = 74 mailles. Bon tricot!
17.03.2022 - 11:20
|
|||||||
Carter |
|||||||
 |
 |
||||||
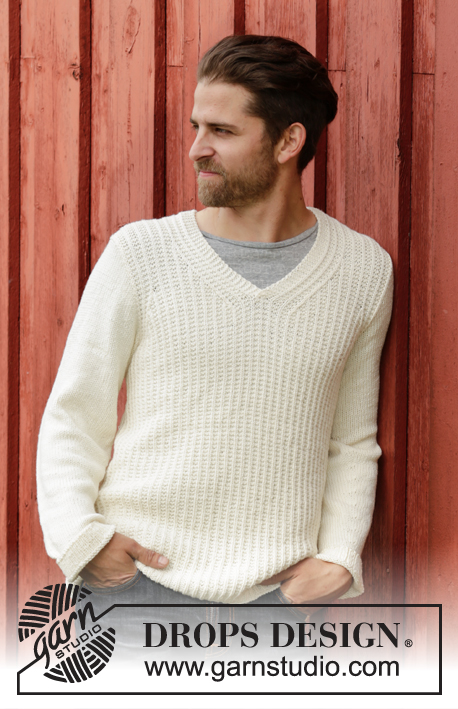
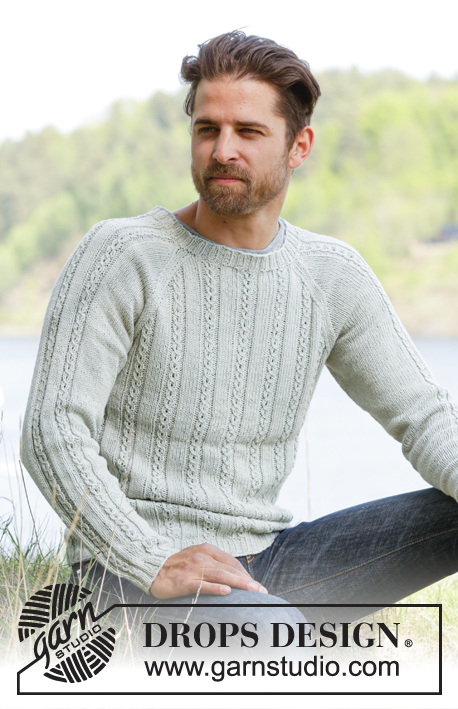
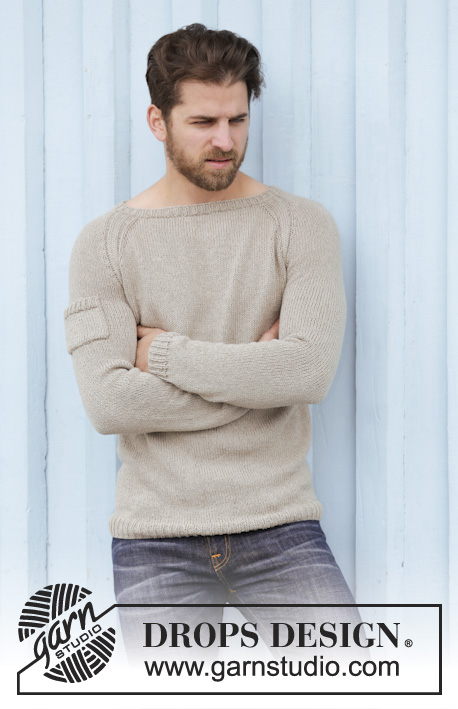
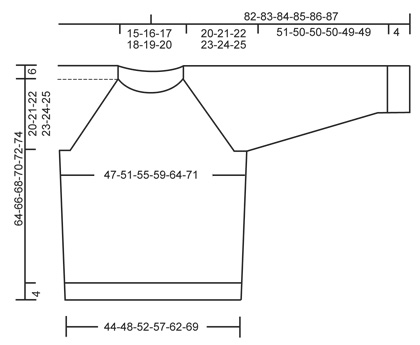
Men's knitted jumper in DROPS Belle, with raglan and worked top down. Size: S - XXXL.
DROPS Extra 0-1131 |
|||||||
|
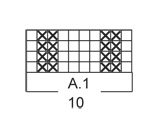
GARTER ST (back and forth): K all rows. 1 ridge = 2 rows K. RAGLAN: Inc for raglan by working a YO on each side of A.1 in every raglan. On next round K YOs twisted to avoid holes. PATTERN: See diagram A.1. DECREASE TIP: Dec 1 st before marker as follows: Work until 2 sts remain before marker, slip 1 st as if to K, K 1, psso. Dec 1 st after marker as follows: K 2 tog. ---------------------------------------------------------- JUMPER: Worked in the round on circular needle, top down. Cast on 114-117-120-123-126-129 sts on circular needle size 3.5 mm with Belle. K 1 round. Then work rib (= K 1/P 2). Switch to circular needle size 4 mm when piece measures 2 cm. Now continue piece in stocking st. On first round dec 18-17-16-15-14-13 sts evenly = 96-100-104-108-112-116 sts (this is done to give the garment better shape). On next round, inc 24-26-30-40-48-70 sts evenly = 120-126-134-148-160-186 sts. Insert 1 marker at beg of round = mid back. On next round work as follows from mid back: K 17-18-20-24-27-33 (= half back piece), A.1, K 6, A.1 (= sleeve), K 34-37-41-48-54-67 (= front piece), A.1, K 6, A.1 (= sleeve ), K 17-19-21-24-27-34 (= half back piece). Continue pattern like this while AT THE SAME TIME working an elevation in the back as follows: Work 8 sts past marker, turn, tighten yarn and work 16 sts back, turn, tighten yarn and work 24 sts, turn, continue to work 8 sts more for every turn until a total of 64 sts have been worked after last turn, turn and work 1 round over all sts until mid back again. On next round start inc for RAGLAN – see explanation above - NOTE: Inc differently on body and sleeves. REMEMBER THE KNITTING TENSION RAGLAN BODY: Inc every round 0-4-4-4-4-4 times in total, then every other round 28-27-29-30-32-33 times. There are 90-99-107-116-126-141 sts on front and back piece. RAGLAN SLEEVE: Inc every other round 16-19-21-22-24-27 times, then every 4th round 6-5-5-5-5-4 times. There are 70-74-78-80-84-88 sts for each sleeve. When all inc are done there are 320-346-370-392-420-458 sts on needle. On next round, work as follows: K 45-49-53-58-63-70, slip the next 70-74-78-80-84-88 sts on a stitch holder for sleeve, cast on 8 new sts under sleeve (insert a marker in the middle of these new sts), K 90-99-107-116-126-141, slip the next 70-74-78-80-84-88 sts on a stitch holder for sleeve, cast on 8 new sts under sleeve (insert a marker in the middle of these new sts), K 45-50-54-58-63-71 = 196-214-230-248-268-298 sts. NOW MEASURE PIECE FROM HERE! BODY: When piece measures 4 cm, dec 1 st on each side of markers in the side - READ DECREASE TIP (= 4 sts dec). Repeat dec every 14-14-14-30-30-30 cm 2-2-2-1-1-1 more times = 184-202-218-240-260-290 sts. When piece measures 42-43-44-45-46-47 cm, K 1 round while AT THE SAME TIME inc 20-17-16-15-16-13 sts evenly = 204-219-234-255-276-303 sts. Switch to circular needle size 3.5 mm. Work rib = K 1/P 2. When rib measures 4 cm, loosely cast off K over K and P over P. SLEEVE: Worked in the round on double pointed needles. Slip the 70-74-78-80-84-88 sts from stitch holder back on double pointed needles size 4 mm. Cast on 8 new sts under sleeve, insert 1 marker in the middle of the new sts = 78-82-86-88-92-96 sts. NOW MEASURE PIECE FROM HERE! Work in stocking st AT THE SAME TIME continue A.1 as follows: Inc 1 YO before A.1 up towards middle of sleeve, K 2 tog after A.1 towards under sleeve (i.e. the 8 new sts cast on under sleeve). This is done so that A.1 meets under sleeve and disappears, repeat dec every other round until all sts in both A.1 are gone. K YO twisted on next round, it should not make holes. When piece measures 4 cm, dec 1 st on each side of marker - READ DECREASE TIP. Repeat dec every 3½-3½-3-3-2½-2½ cm 11-12-13-13-14-15 more times = 54-56-58-60-62-64 sts. Work in stocking st until piece measures 51-50-50-50-49-49 cm. K 1 round while AT THE SAME TIME inc 6-4-5-3-4-2 sts evenly = 60-60-63-63-66-66 sts. Switch to double pointed needles size 3.5 mm and work rib = K 1/P 2. Cast off when piece measures 55-54-54-54-53-53 cm (shorter measurements in the larger sizes because of wider shoulders). Work the other sleeve the same way. POCKET: Cast on 23 sts (incl 1 edge st in each side) on double pointed needles size 4 mm with Belle. Continue in stocking st back and forth with 1 edge st in GARTER ST - see explanation above - in each side of piece. When piece measures 8 cm, adjust so that next row is from WS, inc 4 sts evenly from WS = 27 sts. Switch to double pointed needles size 3.5 mm and work as follows from RS: 1 edge st in garter st, rib = K 1/P 2 until 2 sts remain, finish with K 1 and 1 edge st in garter st. When piece measures 10 cm, cast off K over K and P over P. ASSEMBLY: Sew the openings under the sleeves. Sew the pocket on the left sleeve, approx 45 cm from cast off edge. |
|||||||
Diagram explanations |
|||||||
|
|||||||
 |
|||||||
 |
|||||||
Have you finished this pattern?Tag your pictures with #dropspattern or submit them to the #dropsfan gallery. Do you need help with this pattern?You'll find 25 tutorial videos, a Comments/Questions area and more by visiting the pattern on garnstudio.com. © 1982-2026 DROPS Design A/S. We reserve all rights. This document, including all its sub-sections, has copyrights. Read more about what you can do with our patterns at the bottom of each pattern on our site. |
|||||||


With over 40 years in knitting and crochet design, DROPS Design offers one of the most extensive collections of free patterns on the internet - translated to 17 languages. As of today we count 324 catalogues and 12278 patterns translated into English (UK/cm). 12278
We work hard to bring you the best knitting and crochet have to offer, inspiration and advice as well as great quality yarns at incredible prices! Would you like to use our patterns for other than personal use? You can read what you are allowed to do in the Copyright text at the bottom of all our patterns. Happy crafting!
Post a comment to pattern DROPS Extra 0-1131
We would love to hear what you have to say about this pattern!
If you want to leave a question, please make sure you select the correct category in the form below, to speed up the answering process. Required fields are marked *.