
Popular categories
Looking for a yarn?


Comments / Questions (154)
![]() Irene Milillo wrote:
Irene Milillo wrote:
Ho una domanda generale: i ferri n°3,5 e n°4 con cui bisogna lavorare sono rispettivamente i 3,5 mm e 4mm oppure si riferiscono alla notazione americana? Grazie
16.06.2016 - 16:40DROPS Design answered:
Buongiorno Irene. Sono i ferri 3,5 mm e 4 mm. Buon lavoro!
16.06.2016 - 17:05
![]() Kristina wrote:
Kristina wrote:
Kan man strikke den i mælkegarn?
05.06.2016 - 08:26DROPS Design answered:
Hej Kristina. Det ved jeg ikke, da det vist ikke er et DROPS garn :) Men pröv at kontakte butikken du vil köbe det i og spörg om de kan hjaelpe dig.
06.06.2016 - 14:47
![]() Kathleen Butler wrote:
Kathleen Butler wrote:
I have questions about the Diagram. Do you start top to bottom and left to right. I don't see anything that tell me that.
01.04.2016 - 13:24DROPS Design answered:
Dear Kathleen, diagrams should be read from bottom to top and from right to left. You can read more about diagrams here. Happy knitting!
01.04.2016 - 14:26
![]() Anne Kilpatrick wrote:
Anne Kilpatrick wrote:
Am struggling to get started. Is there a picture of the back? Are the cables the same as on the front? Regards
04.02.2016 - 19:39DROPS Design answered:
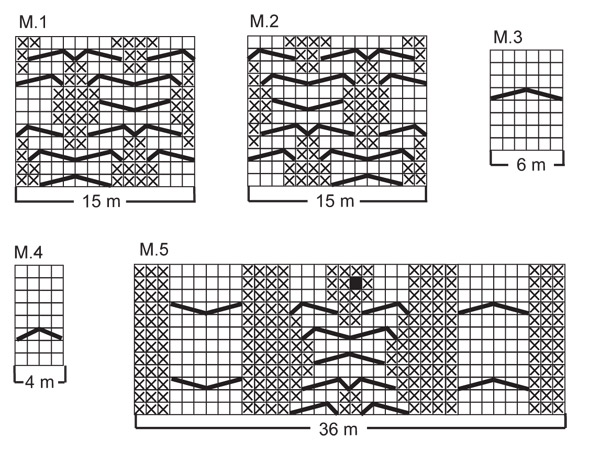
Dear Mr Kilpatrick, you are working cables on back piece ie: 1 edge st, 4-11 moss sts (see size), P 2, diagram M.1 (= 15 sts), P 4-11, diagram M.3 (= 6 sts), P 2, diagram M.3 (= 6 sts), P 4-11, diagram M.2 (= 15 sts), P 2, 4-11 moss sts and 1 edge st. Happy knitting!
05.02.2016 - 09:42
![]() Juliana wrote:
Juliana wrote:
I am on the right front, making the 12-18 month and it is measuring 30 cm. I am lost on the finishing it up. It says to slip 10 stitches toward the middle on a holder then to bind off at each row? This makes no sense. It doesn't say what to do with the 10 stitches. It doesn't make any sense. Please help.
22.01.2016 - 19:14DROPS Design answered:
Dear Juliana, work from RS as follows: work the first 10 sts and slip them on a stith holder/thread, work remaining sts on row, turn and work the first 10 sts from WS, slip them on another stitch holder, work remaining sts on row. Continue back and forth binding off for neckline as stated. These 10 sts will then slipped back onto needle when working hood - see "Assembly/Hood" at the end of jacket pattern. Happy knitting!
25.01.2016 - 10:16
![]() Frannek wrote:
Frannek wrote:
Je suis entrain de tricoter les manches et me retrouve en difficultés au niveau des diminutions finales. La question a déjà été posée mais la réponse ne paraît pas suffisamment précise. Il s'agit de diminuer 1 fois 4 m puis 2 m jusqu'à une certaine hauteur. Cette diminution de 2 m se fait-elle une seule fois ou autant de fois nécessaire jusqu'à arriver à la hauteur demandée ? Merci pour votre aide.
10.11.2015 - 17:46DROPS Design answered:
Bonjour Mme Frannek, pour l'arrondi de la manche, après avoir rabattu 4 m de chaque côté, vous rabattez 2 m de chaque côté tous les 2 rangs (= 2 m au début de chaque rang sur l'endroit et sur l'envers) jusqu'à ce que la manche ait la hauteur indiquée pour la taille, rabattez ensuite 1 fois 3 m de chaque côté. Bon tricot!
11.11.2015 - 09:12
![]() Nicole wrote:
Nicole wrote:
Ich stricke gerade die Jacke, genau das vordere linke Teilstück! Nun wird das Muster nicht schön ich habe gerade bei M3 immer verkehrte Maschen mitdrinnenvon der linken gestrickten Seite her! Müsste ich beim zurückstricken also auf der linken Seite beim Muster etwas beachten, denn nun stricke ich ja zuerst M3 und danach M1? Vielen Dank im Voraus
04.11.2015 - 11:48DROPS Design answered:
Beim linken Vorderteil stricken Sie M.2 und M.3, nicht M.1. Die Muster zeigen ja alle R, also Hin- und Rück-R. Wenn Sie sich genau daran halten, sollte es klappen. Markieren Sie sich die einzelnen Musterabschnitte (Perlmuster, 2 M li, M.2, Linksmaschen, M.3, 1 M li) am besten, dann sehen Sie besser, in welchem Musterabschnitt Sie sich befinden.
07.11.2015 - 13:40Mouna wrote:
Pour le dos de la veste je doit tricoter sur l'endroit: 1 m lis.11 points riz.2m env. M1.11m env.M3..... et sur l'envers comment je doit tricoter les m env? Merci
10.10.2015 - 20:52DROPS Design answered:
Bonjour Mouna, ces m env se tricotent à l'endroit sur l'envers (= jersey envers). Bon tricot!
12.10.2015 - 09:42Jana wrote:
I want to share Drops with other people from Russia but I am afraid of doing this out of your site.
07.09.2015 - 15:20Jana wrote:
I am from Russia and often use your pattern for babies. Can you make translaion of pattern in russian language? Or can I send you ready translation in russian any pattern , those I have already done? Can you post it on your site? I make translation from english to russion better than speak, so sorry for my english.
07.09.2015 - 15:10DROPS Design answered:
Dear Jana, if you need any help with a pattern, you are wlecome to contact your DROPS store. Happy knitting!
07.09.2015 - 16:01
|
|||||||||||||||||||||||||
Matheo#matheojacket |
|||||||||||||||||||||||||
 |
 |
||||||||||||||||||||||||
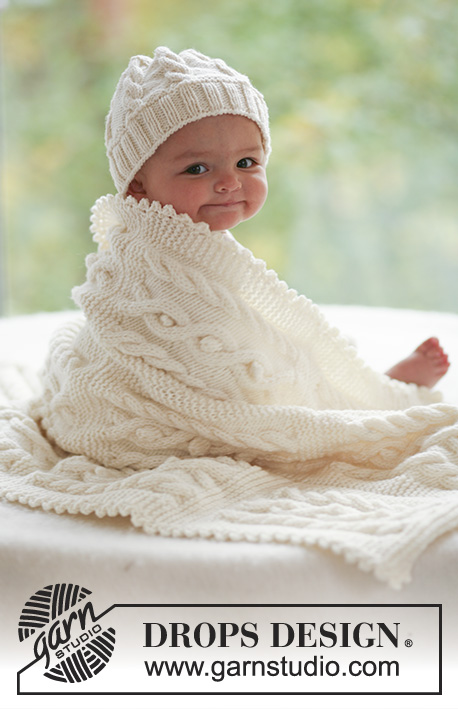
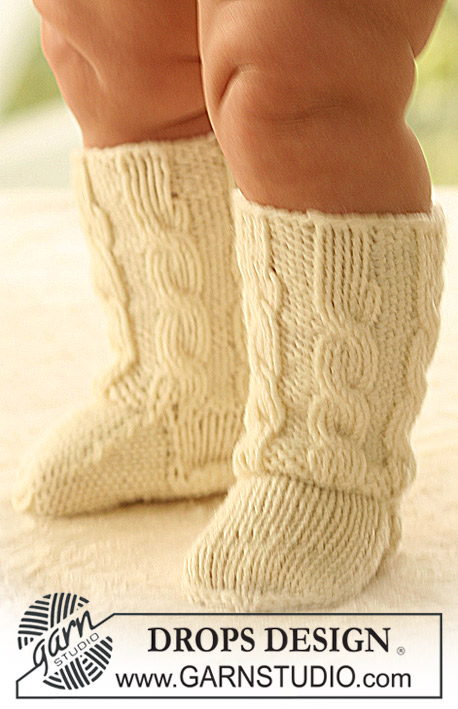
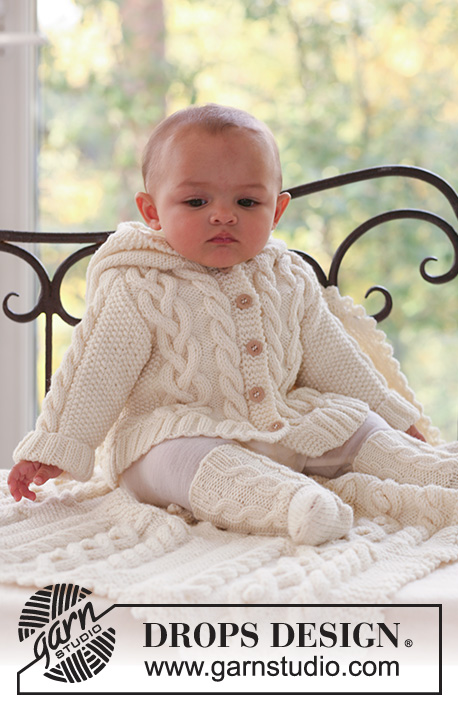
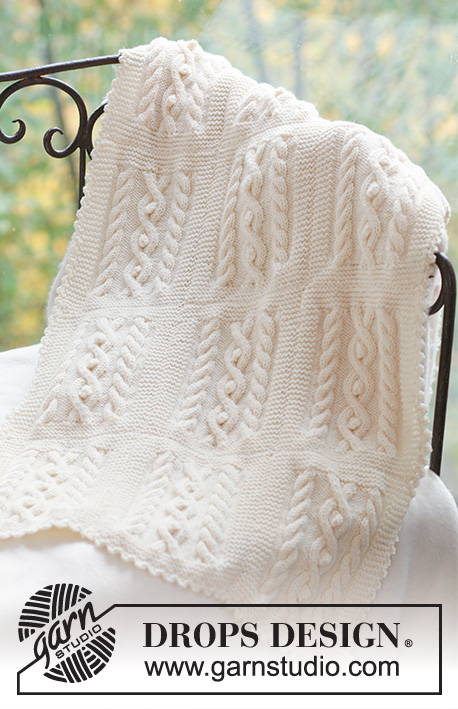
Set of knitted jacket with hood, socks and blanket with cables for baby and children in DROPS Merino Extra Fine. Theme: Baby blanket
DROPS Baby 17-2 |
|||||||||||||||||||||||||
|
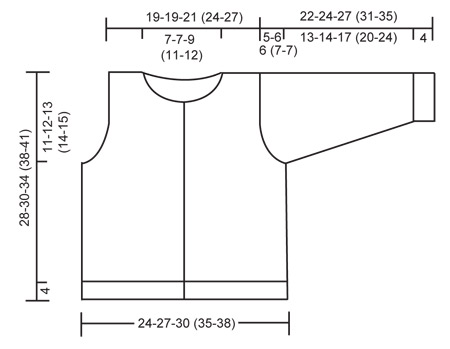
JACKET: MOSS ST: Row 1: * K1, P1 *, repeat from *-*. Row 2: K over P and P over K. Repeat row 2. PATTERN: See diagram M.1, M.2 and M.3. The diagrams show the pattern from the RS. BUTTONHOLES: Make buttonholes on right front band by K tog 2nd and 3rd st from edge and make 1 YO. Make buttonholes when piece measures: SIZE 1/3 months: 3, 8, 13, 18 and 23 cm SIZE 6/9 months: 5, 10, 15, 20 and 25 cm SIZE 12/18 months: 5, 11, 17, 23 and 29 cm SIZE 2 years: 5, 11, 16, 21, 27 and 32 cm SIZE 3/4 years: 5, 11, 17, 23, 29 and 35 cm ---------------------------------------------------------- BACK PIECE: Worked back and forth on needle. Cast on 72-80-84 (96-104) sts (includes 1 edge st each side) on needle size 3.5 mm with Merino Extra Fine. Work rib as follows (first row = RS): 1 edge st, * K2, P2 *, repeat from *-*, and finish with K2 and 1 edge st. When rib measures 4 cm change to needle size 4.5 mm and K 1 row from RS, AT THE SAME TIME dec 6-8-6 (8-10) sts evenly = 66-72-78 (88-94) sts. K 1 row from WS and continue as follows from RS: 1 edge st, 4-7-8 (11-11) moss sts – SEE ABOVE – P 2, M.1 (= 15 sts), P 4-4-6 (8-11), M.3 (= 6 sts), P 2, M.3 (= 6 sts), P 4-4-6 (8-11), M.2 (= 15 sts), P 2, 4-7-8 (11-11) moss sts and 1 edge st. Continue in pattern like this. REMEMBER THE KNITTING TENSION! When piece measures 17-18-21 (24-26) cm cast off for armhole each side at the beg of every row from the side: 3 sts 1 time, 2 sts 0-1-2 (3-3) times and 1 st 2-3-2 (2-2) times = 56-56-60 (66-72) sts. When piece measures 26-28-32 (36-39) cm work the 6 sts on M.3 tog 2 by 2 = 50-50-54 (60-66) sts. On next row cast off the middle 12-12-16 (20-22) sts for neck and complete each side separately. Cast off 1 st on neckline on next row = 18-18-18 (19-21) sts left on shoulder. When piece measures 28-30-34 (38-41) cm dec 6 sts evenly on row = 12-12-12 (13-15) sts left on shoulder, cast off on next row. RIGHT FRONT PIECE: Worked back and forth on needle from mid front. Cast on 42-46-50 (54-58) sts (includes 1 edge st at side and 5 front band sts towards mid front) on needle size 3.5 mm with Merino Extra Fine. Work rib as follows from mid front (first row = RS): 5 garter sts (= front band), * K2, P2 *, repeat from *-* and finish with 1 edge st. Remember buttonholes on front band - SEE ABOVE. When piece measures 4 cm change to needle size 4.5 mm, K 1 row from RS, AT THE SAME TIME dec 4-5-6 (5-6) sts evenly (do not dec on front band) = 38-41-44 (49-52) sts. K 1 row from WS and work next row as follows from RS: 5 garter sts (= front band), P 1, M.3 (= 6 sts), P 4-4-6 (8-11), M.1 (= 15 sts), P 2, 4-7-8 (11-11) moss sts and 1 edge st. Continue in pattern like this. When piece measures 17-18-21 (24-26) cm cast off for armhole at the side as described for back piece = 33-33-35 (38-41) sts. When piece measures 24-26-30 (33-36) cm work the 6 sts on M.3 tog 2 by 2 = 30-30-32 (35-38) sts. Now slip the 8-8-10 (12-13) sts towards mid front on a stitch holder for neck. Cast off to shape the neckline at the beg of every row from mid front: 2 sts 1 time and 1 st 2 times = 18-18-18 (19-21) sts left on shoulder. When piece measures 28-30-34 (38-41) cm dec 6 sts evenly = 12-12-12 (13-15) sts left on shoulder, cast off LEFT FRONT PIECE: Cast on and work like right front piece, but mirrored, i.e. work first row as follows from the side: 1 edge st * P2, K2 *, repeat from *-*, and finish with 5 garter sts (= front band). When working pattern work row from RS as follows: 1 edge st, 4-7-8 (11-11) moss sts, P 2, M.2 (= 15 sts), P 4-4-6 (8-11), M.3 (= 6 sts), P 1 and 5 garter sts (= front band). Do not make buttonholes! SLEEVE: Worked back and forth on needle. Cast on 46-46-46 (50-50) sts (includes 1 edge st each side) on needle size 3.5 mm with Merino Extra Fine. Work 4 cm rib, K2/P2, with 1 edge st each side. Change to needle size 4.5 mm and K 1 row from RS, AT THE SAME TIME dec 10-8-8 (10-10) sts evenly = 36-38-38 (40-40) sts. K 1 row from WS and work next row as follows from RS: 1 edge st, 12-13-13 (14-14) moss sts, P 2, M.3 (= 6 sts), P 2, 12-13-13 (14-14) moss sts and 1 edge st. Continue in pattern like this. AT THE SAME TIME when piece measures 7 cm inc 1 st each side and repeat the inc on every 4th row a total of 6-7-9 (10-12) times = 48-52-56 (60-64) sts – work the inc sts in moss st. When piece measures 17-18-21 (24-28) cm cast off for sleeve cap each side at the beg of every row: 4 sts 1 time, and then 2 sts until piece measures 21-23-26 (30-34) cm, now cast off 3 sts each side 1 time, AT THE SAME TIME on the last row work the 6 sts on M.3 tog 2 by 2. Cast off remaining sts on next row. Piece measures approx 22-24-27 (31-35) cm. ASSEMBLY: Sew shoulder seams. HOOD: Pick up approx 46 to 68 sts (incl sts on stitch holders at front) round neckline on needle size 4.5 mm. K 2 rows, AT THE SAME TIME on second row inc evenly to 68-72-76 (80-84) sts. Continue in reverse stocking st with 5 garter sts each side until hood measures 21-23-25 (27-28) cm, cast off. Sew hood tog at the top, edge to edge to avoid a chunky seam. Set in sleeves. Sew sleeve and side seams inside 1 edge st. Sew on buttons. ---------------------------------------------------------- SOCK: PATTERN: See diagram M.4. The diagram shows the pattern from the RS. DECREASING TIP: Dec as follows before marker: K 2 tog. Dec as follows after marker: Slip 1 st as if to K, K1, psso. HEEL DECREASES: ROW 1 (= RS): Work row until 5-5-6 (6-6) sts remain, slip next st as if to K, K1, psso, turn piece, ROW 2 (= WS): Work row until 5-5-6 (6-6) sts remain, slip next st as if to P, P1, psso, turn piece, ROW 3 (= RS): Work row until 4-4-5 (5-5) sts remain, slip next st as if to K, K1, psso, turn piece, ROW 4 (= WS): Work row until 4-4-5 (5-5) sts remain, slip next st as if to P, P1, psso, turn piece. Continue dec like this with 1 less st between each dec until there are 9-9-12 (12-12) sts on row. ---------------------------------------------------------- SOCK: Worked in the round on double pointed needles. Cast on 36-36-42 (42-42) sts on double pointed needles size 3 mm with Merino Extra Fine and work 2 cm rib, K3/P3. Work 1 round rib, AT THE SAME TIME inc all K3 to K4 = 42-42-49 (49-49) sts. Work 1 round K4/P3. Now continue as follows: * M.4, P3 *, repeat from *-* a total of 6-6-7 (7-7) times. After 3 vertical repeats of M.4 work sts in M.4 tog 2 by 2 = 30-30-35 (35-35) sts. Now keep the first 17-17-22 (22-22) sts on needle for heel and slip remaining 13 sts on a stitch holder (= upper foot). Work 3-3.5-4 (4-4.5) cm stocking st back and forth on heel sts. Insert a marker in piece and now dec for heel – SEE ABOVE. After heel dec pick up 7-8-9 (9-10) sts on each side of heel and slip sts from stitch holder back on needle = 36-38-43 (43-45) sts. Continue in stocking st on all sts, AT THE SAME TIME dec as follows on each side of the 13 sts on upper foot: K tog the 2 sts before the 13 sts on upper foot into back of loop and K tog the 2 sts after the 13 sts. Dec on every other row a total of 5-6-7 (6-6) times = 26-26-29 (31-33) sts. When piece measures approx 8-9-9.5 (11.5-12.5) cm from marker on heel (approx 2-2-2.5 (2.5-3.5) cm remain) insert 1 marker each side with 13-13-15 (15-17) sts on upper foot and 13-13-14 (16-16) sts under foot. Dec on each side of both markers – SEE DECREASING TIP – on every other round 2-2-3 (3-5) times and then on every round 3-3-3 (3-2) times = 6-6-5 (7-5) sts. Cut the thread, pull through remaining sts and fasten. Sock measures approx 10-11-12 (14-16) cm. ---------------------------------------------------------- : BLANKET GARTER ST (back and forth on needle): K all rows. INCREASING TIP: Make all inc from RS. Inc 1 st by making 1 YO. Work YO into back of loop on return row to avoid a hole. PATTERN: See diagram M.5. The diagram shows the pattern from the RS. --------------------------------------------------------- BLANKET: Blanket is made up of 12 squares, sewn tog 3 by 4. 1 square measures approx: width 18 cm, length 22.5 cm 1 SQUARE: Cast on 36 sts on needle size 5 mm with Merino Extra Fine. Work 8 rows garter st – SEE ABOVE. K 1 row from RS, AT THE SAME TIME inc 10 sts evenly on the middle 26 sts = 46 sts. Work next row from WS as follows: 5 garter sts, K3, P6, K 4, P3, K4, P3, K4, P6, K3 and 5 garter sts. Continue as follows from RS: 5 garter sts, M.5 on the next 36 sts, 5 garter sts. Work 4 vertical repeats of M.5 like this, but on the last repeat finish when 2 rows of diagram remain. K 1 row from RS on all sts, AT THE SAME TIME dec 10 sts on the middle 36 sts = 36 sts. Work 8 rows garter st on all sts and cast of loosely. Note: You may work 4 squares in a row without casting off, i.e. beg a new square after the last 8 rows in garter st. ASSEMBLY: Sew the squares tog, 3 by 4. Sew in outer loops of sts to avoid a chunky seam. CROCHET BORDER: Crochet a border round the whole blanket with crochet hook size 5 mm as follows: * 1 dc in edge st, 3 ch, 1 dc in the first of these 3 ch, skip 1 cm *, repeat from *-*, and finish with 1 sl st in first dc from beg of round. |
|||||||||||||||||||||||||
Diagram explanations |
|||||||||||||||||||||||||
|
|||||||||||||||||||||||||
 |
|||||||||||||||||||||||||
 |
|||||||||||||||||||||||||
Have you finished this pattern?Tag your pictures with #dropspattern #matheojacket or submit them to the #dropsfan gallery. Do you need help with this pattern?You'll find 34 tutorial videos, a Comments/Questions area and more by visiting the pattern on garnstudio.com. © 1982-2026 DROPS Design A/S. We reserve all rights. This document, including all its sub-sections, has copyrights. Read more about what you can do with our patterns at the bottom of each pattern on our site. |
|||||||||||||||||||||||||


With over 40 years in knitting and crochet design, DROPS Design offers one of the most extensive collections of free patterns on the internet - translated to 17 languages. As of today we count 325 catalogues and 12298 patterns translated into English (UK/cm). 12298
We work hard to bring you the best knitting and crochet have to offer, inspiration and advice as well as great quality yarns at incredible prices! Would you like to use our patterns for other than personal use? You can read what you are allowed to do in the Copyright text at the bottom of all our patterns. Happy crafting!
Post a comment to pattern DROPS Baby 17-2
We would love to hear what you have to say about this pattern!
If you want to leave a question, please make sure you select the correct category in the form below, to speed up the answering process. Required fields are marked *.