
Popular categories
Looking for a yarn?


Comments / Questions (21)
![]() Heli wrote:
Heli wrote:
Ohjeessa ei ole mainintaa, kuinka jatketaan etukappaleen 10 silmukan kavennuksen jälkeen seuraavat kerrokset ennen lisäyksiä. Tehdäänkö reunoihin 3 ainaoikeaa ja 6 joustinneletta? Ja tehdäänkö joka toinen puoli nurjalla ja joka toinen puoli oikealla neuleella?
02.03.2026 - 06:36DROPS Design answered:
Hei, reunoissa neulotaan 3 silmukkaa ainaoikeaa ja 6 silmukkaa joustinneuletta kuten aiemmin, muilla silmukoilla neulotaan sileää neuletta. Joka toinen kerros neulotaan työn oikealta puolelta ja joka toinen kerros neulotaan työn nurjalta puolelta.
03.03.2026 - 18:45
![]() Odile wrote:
Odile wrote:
Je souhaite faire le plastron ! Ma fille souhaite une laine non « mohair » par quoi puis je remplacer là Kid Silk ? Ou quel fil unique pour obtenir le même échantillon ? Merci Cordialement
30.12.2025 - 16:50DROPS Design answered:
Bonjour Odile, vous pouvez utiliser un fil du group C pour ce projet (DROPS Air, Alaska, Nepal, Big Merino, a votre choix). Bon tricot!
31.12.2025 - 14:12
![]() Sophie wrote:
Sophie wrote:
Bonjour Je souhaiterais tricoter ce modèle avec Lima blush et Kid-silk sorbet cerise unicolor 46. est-ce que ces deux couleurs vont bien ensemble ? Sinon quelle couleur de Kid-silk conseillez-vous pour aller avec Lima blush mix 9022 ? Merci beaucoup !
08.11.2025 - 13:44DROPS Design answered:
Bonjour Sophie, pour toute aide au choix des couleurs, merci de bien vouloir contacter directement votre magasin qui pourra ainsi vous assister en vous proposant les alternatives possibles. Bon tricot!
10.11.2025 - 07:08
![]() Uschi Müller wrote:
Uschi Müller wrote:
Die Anleitung ist sehr gut beschrieben und die Größe ist passend
18.07.2025 - 21:36
![]() Sofia wrote:
Sofia wrote:
Jag undrar om stickfasthet när flera stickor ska användas. Ex gällande mössan: när det står ”18 m på bredden och 23 v på höjden = 10x10cm”, gäller det sticka nr 4 eller 3? Har samma fråga gällande stickfastheten för halsvärmaren, har ni utgått från sticka nr 4,5 eller 3,5? Tack på förhand!
24.01.2025 - 22:41DROPS Design answered:
Hei Sofia. Jo, strikkefastheten er oppgitt i slätstickning (se øverst i oppskriften under STICKFASTHET) og når man leser oppskriften går det frem at vrangbordene (1 rett/1 vrang) strikkes med pinne 3 / 3,5 og når det skiftes til pinne 4 / 4,5 skal det strikkes slätstickning. Strikkefastheten som er oppgitt i en oppskrift er som regel hva plagget er strikket mest i. mvh DROPS Design
27.01.2025 - 10:17
![]() Christine wrote:
Christine wrote:
Désolée mais je ne trouve pas où se trouve comment adapter le modèle sur aiguilles droite
02.01.2025 - 12:35DROPS Design answered:
Bonjour Christine, cette leçon vous explique comment procéder, votre magasin saura également vous apporter toute l'assistance nécessaire dont vous pourrez avoir besoin, même par mail ou téléphone. Bon tricot!
02.01.2025 - 16:24
![]() Christine wrote:
Christine wrote:
Je voudrai faire ce bonnet mais je n'ai pas d'aiguilles circulaires comment dois-je faire les diminutions merci
27.12.2024 - 16:58DROPS Design answered:
Bonjour Christine, dans cette leçon, nous expliquons comment adapter un modèle sur aiguilles droites, les diminutions se font ici tous les 2 tours, autrement dit, vous pourrez les faire tous les rangs sur l'endroit. Bon tricot!
02.01.2025 - 12:29
![]() Branislava wrote:
Branislava wrote:
Ribbing for the front piece of the neck warmer is done with 3.5mm needles and for the back piece with 4mm needles? I just wanted to check if that is so because 4mm is not in the list of needles for neck warmer. Very nice pattern anyway 👍
02.12.2024 - 18:58DROPS Design answered:
Dear Branislava, there seems to be a typo in this pattern. We use 3.5mm for the ribbing in the neck warmer and 4.5mm for the main piece. We will correct it as soon as possible. Happy knitting!
07.12.2024 - 23:12
![]() Reetta wrote:
Reetta wrote:
Hei! Aloin tekemään ohjeen mukaan vasenta olkaa. Ohjeessa on, että ensimmäinen kerros tehdään oikeaa puolta. Silloinhan reunakuviointiin tulee kahteen kertaan päällekkäin oikeaa silmukkaa, ja tekee isomman välin kuviointiin. Onko tähän jokin syy miksi vasen olka aloitetaan nimenomaan oikealta puolen? Eikö se voisi alkaa nurjalta, jolloin reunakuviointi pysyisi koko työssä samannäköisenä?
01.12.2024 - 19:58DROPS Design answered:
Hei, teemme tarvittaessa tähän ohjeeseen korjauksen. Voit neuloa vasemman olan ensimmäisen kerroksen työn nurjalta puolelta.
06.12.2024 - 18:15
![]() Kirsi wrote:
Kirsi wrote:
I knitted the beanie and made a huge mistake by "blocking" it. This beanie would now fit a giant. How to fix this? Maybe throw it in the washer 30°c, medium spin?
23.11.2024 - 13:59DROPS Design answered:
Dear Kirsi, DROPS Lima is a feltable yarn, so the piece might get felted when soaked. That's why we don't recommend blocking this piece. Both yarns used are therefore quite delicate and you have to be careful when soaking them and hand wash them (you can find more information on how to wash them here: https://www.garnstudio.com/yarn-care.php?cid=19). Washing it in the washer at medium spin will more likely deteriorate the yarns and the piece. You can try soaking the piece in a basin as in the following video: https://www.garnstudio.com/video.php?id=516&lang=en and then lay it flat and let it dry (without stretching). Happy knitting!
24.11.2024 - 20:38
|
|
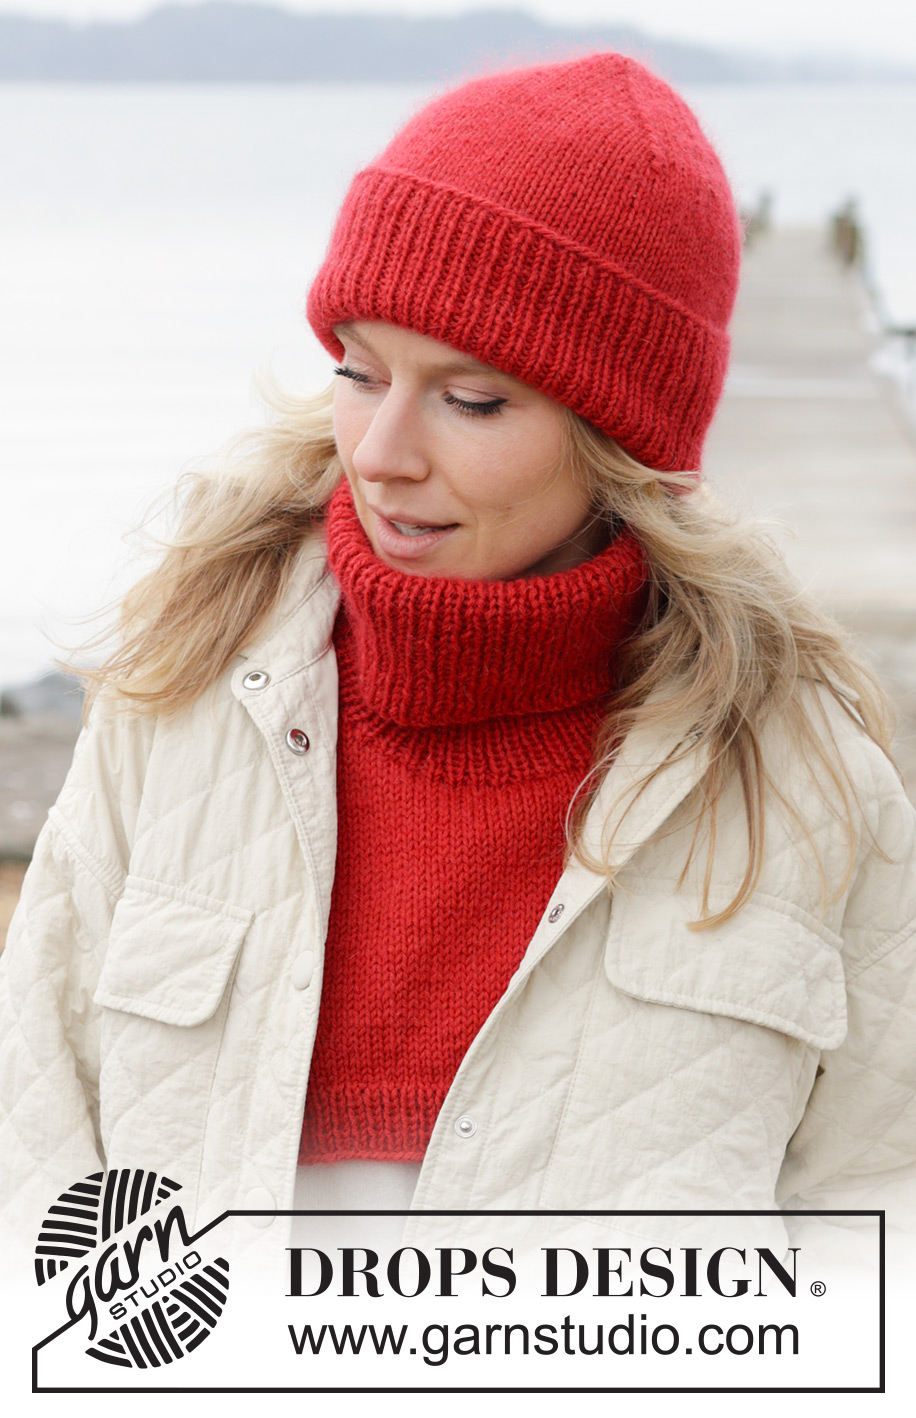
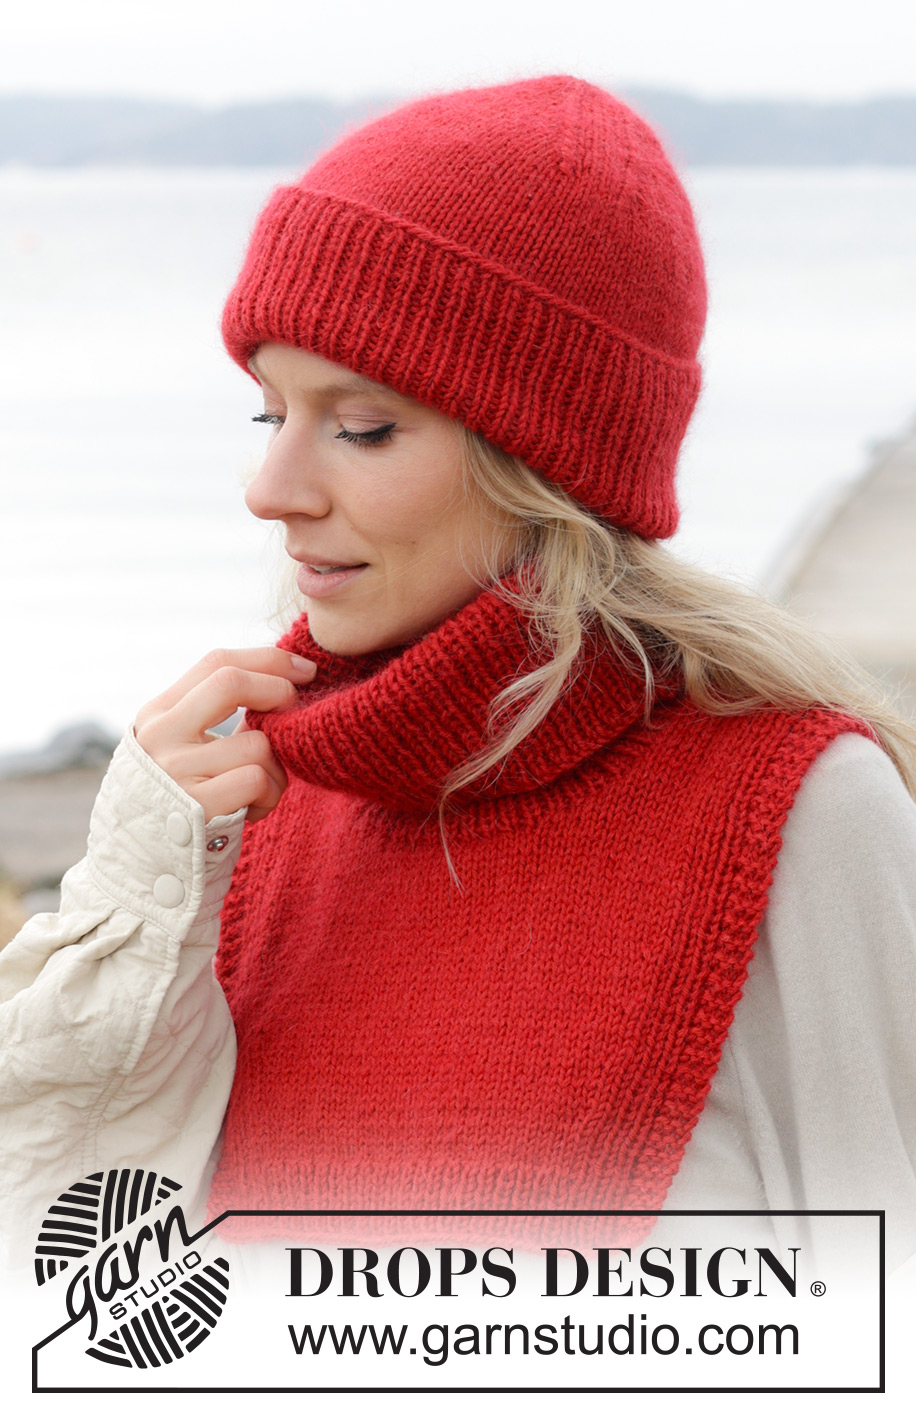
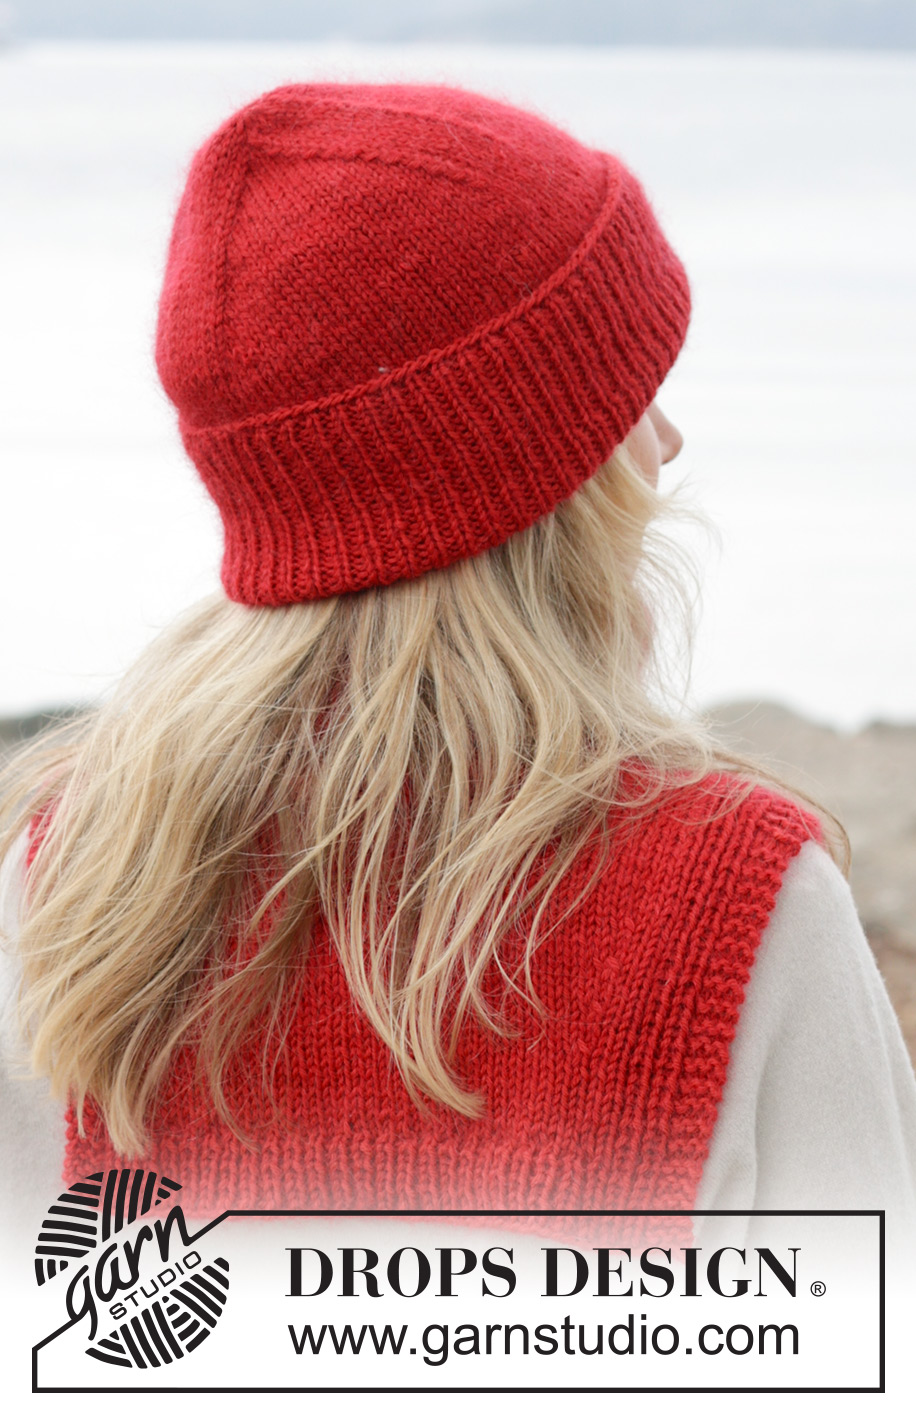
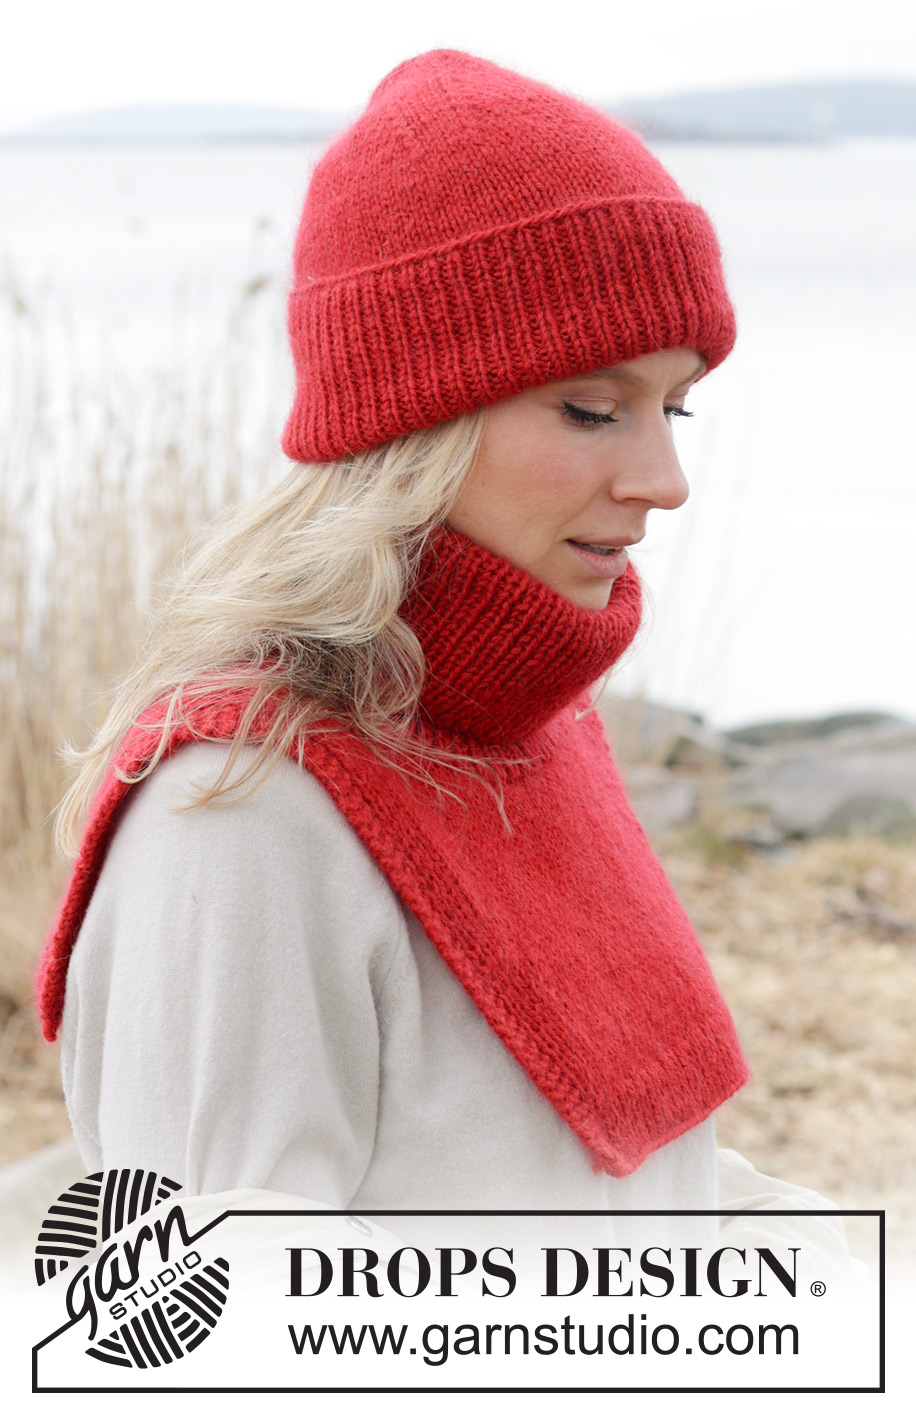
Cardinal Song#cardinalsongset |
|
 |
 |
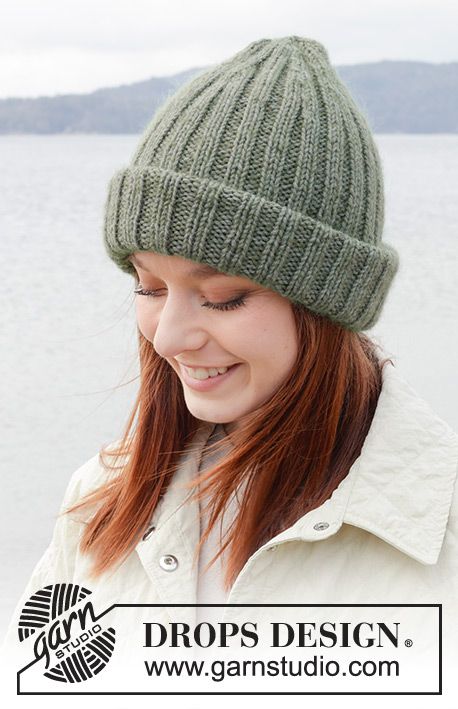
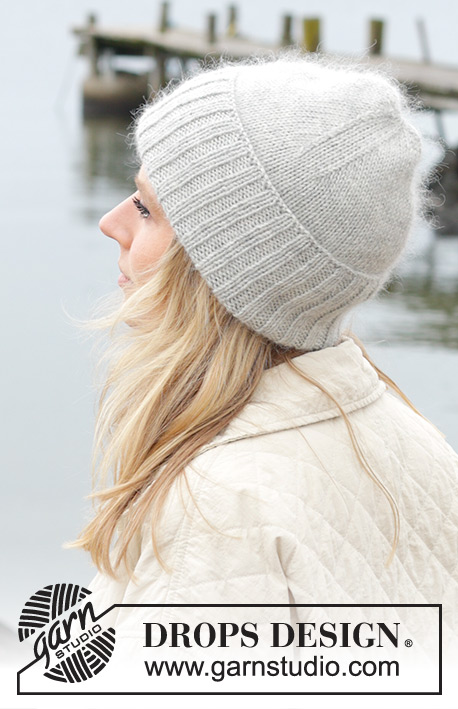
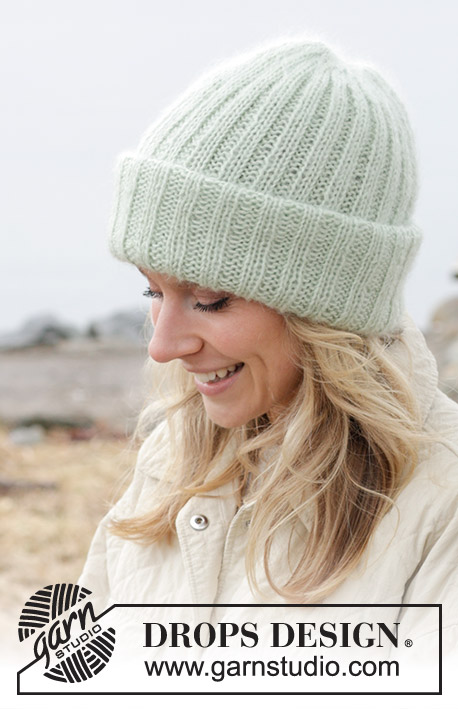
Knitted neck-warmer and hat in DROPS Lima and DROPS Kid-Silk. The piece is worked bottom up.
DROPS 242-22 |
|
|
------------------------------------------------------- EXPLANATIONS FOR THE PATTERN: ------------------------------------------------------- DECREASE TIP (for hat): Work until there are 4 stitches left before the marker, knit 2 together, knit 4 (marker sits between these 4 stitches), slip 1 stitch knit-wise, knit 1 and pass the slipped stitch over the knitted stitch. Decrease like this at each marker. GARTER STITCH (worked back and forth): Knit all rows. 1 ridge = knit 2 rows. ------------------------------------------------------- START THE PIECE HERE: ------------------------------------------------------- HAT - SHORT OVERVIEW OF THE PIECE: The hat is worked in the round, bottom up. Change to double pointed needles when necessary as you decrease at the top. HAT: Cast on 108-116 stitches with circular needle size 3 mm, 1 strand DROPS Lima and 1 strand DROPS Kid-Silk (2 strands). Purl 1 round. Work rib in the round (knit 1, purl 1) for 11 cm. Change to circular needle size 4 mm. Work stocking stitch and, on the first round, decrease 18-20 stitches evenly spaced = 90-96 stitches. Continue with stocking stitch until the hat measures 22-23 cm (10-10 cm left to finished length). Insert 3 markers, with 30-32 stitches between each one. Begin to decrease for the top of the hat - read DECREASE TIP. Decrease like this every 2nd round 12-13 times = 18-18 stitches. Knit all stitches together 2 and 2 = 9-9 stitches. Cut the strand, thread it through the remaining stitches, tighten and fasten well. The hat measures 32-34 cm from the cast-on edge. ASSEMBLY: Fold 7 cm of the rib up to the right side. The hat measures 25-27 cm with this fold-up. ------------------------------------------------------- NECK-WARMER – SHORT OVERVIEW OF THE PIECE: The front piece is worked back and forth, bottom up. Stitches are cast off for the neckline and each shoulder worked separately. Stitches are increased for the neckline, at the back, the shoulders are joined and the back piece finished back and forth, top down. The neck is worked to finish. FRONT PIECE: Cast on 55-59-63 stitches with circular needle size 3.5 mm, 1 strand DROPS Lima and 1 strand DROPS Kid-Silk (2 strands). Purl 1 row, then work as follows from the right side: 3 edge stitches in GARTER STITCH – read description above, work rib (purl 1, knit 1) until there are 4 stitches left, purl 1 and 3 edge stitches in garter stitch. Continue this rib for 4 cm, with the next row from the right side. Change to circular needle size 4.5 mm. Work the first 9 stitches as before, work stocking stitch over the next 37-41-45 stitches and decrease 10 stitches evenly over these stitches, work the last 9 stitches as before = 45-49-53 stitches. When the piece measures 6 cm increase as follows on each row from the right side: Work the first 10 stitches as before, make 1 yarn over, work until there are 10 stitches left, make 1 yarn over and work to the end of the row. Work back as before, purling the yarn overs twisted to avoid holes. Repeat this increase (inside the 10 outermost stitches on each side) every 2½ cm a total of 4-4-5 times on each side = 53-57-63 stitches. REMEMBER THE KNITTING TENSION! Work until the piece measures 19-20-21 cm. Now work the neckline from the right side as follows: Work the first 21-22-24 stitches as before, then place these stitches on a stitch holder (left shoulder), cast off the next 11-13-15 stitches and work to the end of the row. The shoulders are continued separately. RIGHT SHOULDER: = 21-22-24 stitches. Work back from the wrong side. Cast off for the neckline at the beginning of each row from the right side as follows: 2 stitches 2 times and 1 stitch 2 times = 15-16-18 stitches. Work until the piece measures 26-28-30 cm from the cast-on edge. Insert a marker in the last row (top of shoulder). Work for a further 3-4-5 cm from the marker, with the next row from the wrong side. Cast on stitches at the end of each row from the wrong side as follows: 1 stitch 2 times and 2 stitches 2 times = 21-22-24 stitches. The piece measures 7-8-9 cm from the marker on the shoulder. Cut the strand and place the stitches on a stitch holder. LEFT SHOULDER: Place the 21-22-24 stitches from the stitch holder back on the needle. Start from the wrong side and cast off for the neckline at the beginning of each row from the wrong side as follows: 2 stitches 2 times and 1 stitch 2 times = 15-16-18 stitches. Work until the piece measures 26-28-30 cm from the cast-on edge. Insert a marker in the last row (top of shoulder). Work for a further 3-4-5 cm from the marker, with the next row from the right side. Cast on stitches at the end of each row from the right side as follows: 1 stitch 2 times and 2 stitches 2 times, then cast on 11-13-15 stitches at the end of the next row from the right side = 32-35-39 stitches. The piece measures approx. 7-8-9 cm from the marker on the shoulder. Join the 2 shoulders by placing the stitches from the right shoulder back on the needle and working them from the right side = 53-57-63 stitches. BACK PIECE: Continue the pattern as before, AT THE SAME TIME when the piece measures 12½-14-14 cm from the marker on the shoulder, decrease on each side as follows from the right side: Work the first 10 stitches as before, knit 2 together, work until there are 12 stitches left, slip 1 stitch knit-wise, knit 1 and pass the slipped stitch over the knitted stitch, work the last 10 stitches as before. Repeat this decrease (inside the 10 outermost stitches on each side) every 2½ cm a total of 4-4-5 times on each side = 45-49-53 stitches. Work until the piece measures 22-24-26 cm from the marker on the shoulder – matching the length to the front piece (without the rib). Change to circular needle size 3.5 mm. Work 1 row and increase 10 stitches evenly over the stitches between the ribbing on each side = 55-59-63 stitches. Work as follows from the right side: 3 edge stitches in garter stitch, rib (purl 1, knit 1) until there are 4 stitches left, purl 1 and 3 edge stitches in garter stitch. Continue this rib for 4 cm, with the next row from the right side. The piece measures approx. 26-28-30 cm from the marker on the shoulder. Cast off with knit over knit and purl over purl. NECK: Use circular needle size 3.5 mm and 1 strand of each quality (2 strands). Start from the right side by the marker and knit up 96-102-106 stitches (the stitch count must be divisible by 2). Work rib in the round (knit 1, purl 1) for 24 cm. Cast off with knit over knit and purl over purl. |
|
Have you finished this pattern?Tag your pictures with #dropspattern #cardinalsongset or submit them to the #dropsfan gallery. Do you need help with this pattern?You'll find 30 tutorial videos, a Comments/Questions area and more by visiting the pattern on garnstudio.com. © 1982-2026 DROPS Design A/S. We reserve all rights. This document, including all its sub-sections, has copyrights. Read more about what you can do with our patterns at the bottom of each pattern on our site. |
|


With over 40 years in knitting and crochet design, DROPS Design offers one of the most extensive collections of free patterns on the internet - translated to 17 languages. As of today we count 324 catalogues and 12290 patterns translated into English (UK/cm). 12290
We work hard to bring you the best knitting and crochet have to offer, inspiration and advice as well as great quality yarns at incredible prices! Would you like to use our patterns for other than personal use? You can read what you are allowed to do in the Copyright text at the bottom of all our patterns. Happy crafting!
Post a comment to pattern DROPS 242-22
We would love to hear what you have to say about this pattern!
If you want to leave a question, please make sure you select the correct category in the form below, to speed up the answering process. Required fields are marked *.