


Komentáře / Otázky (17)
![]() Sofia napsala:
Sofia napsala:
Jag undrar om stickfasthet när flera stickor ska användas. Ex gällande mössan: när det står ”18 m på bredden och 23 v på höjden = 10x10cm”, gäller det sticka nr 4 eller 3? Har samma fråga gällande stickfastheten för halsvärmaren, har ni utgått från sticka nr 4,5 eller 3,5? Tack på förhand!
24.01.2025 - 22:41Odpověď DROPS Design :
Hei Sofia. Jo, strikkefastheten er oppgitt i slätstickning (se øverst i oppskriften under STICKFASTHET) og når man leser oppskriften går det frem at vrangbordene (1 rett/1 vrang) strikkes med pinne 3 / 3,5 og når det skiftes til pinne 4 / 4,5 skal det strikkes slätstickning. Strikkefastheten som er oppgitt i en oppskrift er som regel hva plagget er strikket mest i. mvh DROPS Design
27.01.2025 - 10:17
![]() Christine napsala:
Christine napsala:
Désolée mais je ne trouve pas où se trouve comment adapter le modèle sur aiguilles droite
02.01.2025 - 12:35Odpověď DROPS Design :
Bonjour Christine, cette leçon vous explique comment procéder, votre magasin saura également vous apporter toute l'assistance nécessaire dont vous pourrez avoir besoin, même par mail ou téléphone. Bon tricot!
02.01.2025 - 16:24
![]() Christine napsala:
Christine napsala:
Je voudrai faire ce bonnet mais je n'ai pas d'aiguilles circulaires comment dois-je faire les diminutions merci
27.12.2024 - 16:58Odpověď DROPS Design :
Bonjour Christine, dans cette leçon, nous expliquons comment adapter un modèle sur aiguilles droites, les diminutions se font ici tous les 2 tours, autrement dit, vous pourrez les faire tous les rangs sur l'endroit. Bon tricot!
02.01.2025 - 12:29
![]() Branislava napsala:
Branislava napsala:
Ribbing for the front piece of the neck warmer is done with 3.5mm needles and for the back piece with 4mm needles? I just wanted to check if that is so because 4mm is not in the list of needles for neck warmer. Very nice pattern anyway 👍
02.12.2024 - 18:58Odpověď DROPS Design :
Dear Branislava, there seems to be a typo in this pattern. We use 3.5mm for the ribbing in the neck warmer and 4.5mm for the main piece. We will correct it as soon as possible. Happy knitting!
07.12.2024 - 23:12
![]() Reetta napsala:
Reetta napsala:
Hei! Aloin tekemään ohjeen mukaan vasenta olkaa. Ohjeessa on, että ensimmäinen kerros tehdään oikeaa puolta. Silloinhan reunakuviointiin tulee kahteen kertaan päällekkäin oikeaa silmukkaa, ja tekee isomman välin kuviointiin. Onko tähän jokin syy miksi vasen olka aloitetaan nimenomaan oikealta puolen? Eikö se voisi alkaa nurjalta, jolloin reunakuviointi pysyisi koko työssä samannäköisenä?
01.12.2024 - 19:58Odpověď DROPS Design :
Hei, teemme tarvittaessa tähän ohjeeseen korjauksen. Voit neuloa vasemman olan ensimmäisen kerroksen työn nurjalta puolelta.
06.12.2024 - 18:15
![]() Kirsi napsala:
Kirsi napsala:
I knitted the beanie and made a huge mistake by "blocking" it. This beanie would now fit a giant. How to fix this? Maybe throw it in the washer 30°c, medium spin?
23.11.2024 - 13:59Odpověď DROPS Design :
Dear Kirsi, DROPS Lima is a feltable yarn, so the piece might get felted when soaked. That's why we don't recommend blocking this piece. Both yarns used are therefore quite delicate and you have to be careful when soaking them and hand wash them (you can find more information on how to wash them here: https://www.garnstudio.com/yarn-care.php?cid=19). Washing it in the washer at medium spin will more likely deteriorate the yarns and the piece. You can try soaking the piece in a basin as in the following video: https://www.garnstudio.com/video.php?id=516&lang=en and then lay it flat and let it dry (without stretching). Happy knitting!
24.11.2024 - 20:38
![]() Jasmijn napsala:
Jasmijn napsala:
Hoi! Ik loop tegen een probleem aan bij het terugzetten van de steken voor de linkerschouder. Er wordt aangegeven dat ik aan de goede kant moet beginnen en dan steken moet afkanten aan de verkeerde kant, maar aangezien ik vorige keer ook aan de goede kant ben geëindigd, worden mijn drie kantstekken twee keer recht gebreid en klopt de ribbel niet meer. Ik denk dus dat ik beter aan de verkeerde kant kan beginnen zodat de drie kantsteken altijd recht kan blijven breien?
02.10.2024 - 09:53
![]() Villanen napsala:
Villanen napsala:
Hei! Minä en ymmärtänyt kaulurin ohjeessa olevaa kohtaa. Oikeaa olkaa aloittaessa lukee: ”Päätä jokaisen oikean puolen kerroksen alusta pääntietä varten näin: Päätä 2 silmukkaa 2 kertaa ja 1 silmukka 2 kertaa = 15-16-18 silmukkaa.” Miten tarkoittaa ”2 silmukkaa 2 kertaa” ja miten sen tehdään? Kiitos etukäteen :)
29.09.2024 - 17:56Odpověď DROPS Design :
Hei, silmukat päätetään joka toisen kerroksen alusta (oikealta puolelta). Päätä aluksi 2 silmukkaa, neulo kerroksen lopt silmukat. Neulo takaisin työn nurjalta puolelta. Päätä sitten seuraavan oikean puolen kerroksen alusta 2 silmukkaa jne.
30.09.2024 - 17:51
![]() Ulrika napsala:
Ulrika napsala:
Det står i mönstret att man ska lägga upp med en tråd Lima och en tråd Kid-Silk. Hur länge ska Kid-slik vara med? Är det bara i resåren då det endast går åt 25g?
19.03.2024 - 19:58Odpověď DROPS Design :
Hej Ulrika. Kid-silk ska var med hela tiden, det är mycket fler meter per gram av Kid-Silk så det räcker med 25 gram till hela mössan. Mvh DROPS Design
20.03.2024 - 07:15
![]() Hanne napsala:
Hanne napsala:
Der står i opskriften “strik glatstrik til arbejdet måler ca 22-23 cm” . Der det incl rib eller er det glatstrikken som skal måle det? Mvh Hanne
17.02.2024 - 10:21Odpověď DROPS Design :
Hej Hanne, det er hele arbejdet som skal måle det :)
23.02.2024 - 11:16
|
|
Cardinal Song#cardinalsongset |
|
 |
 |
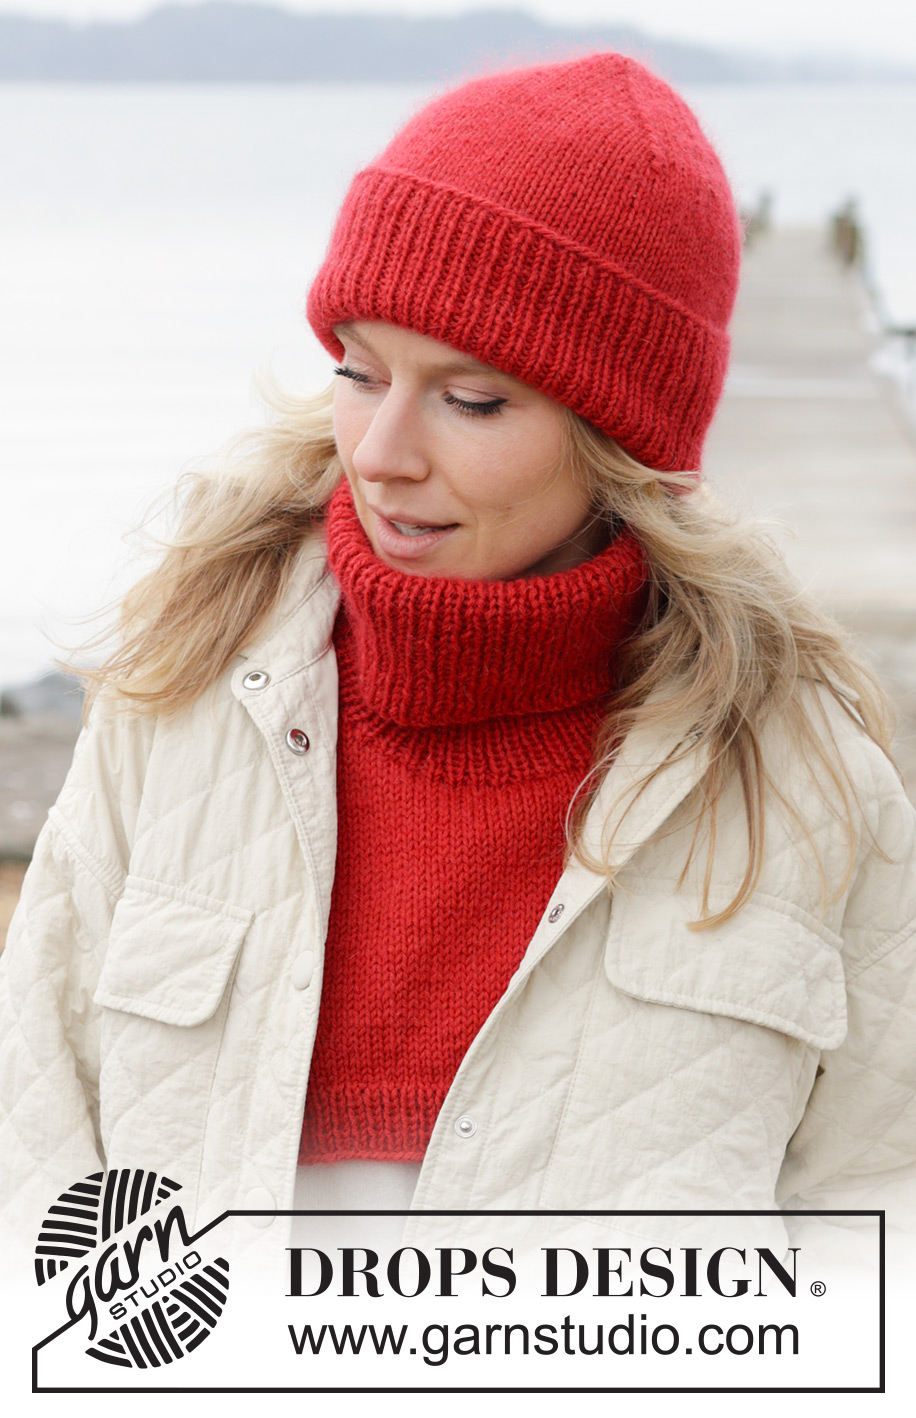
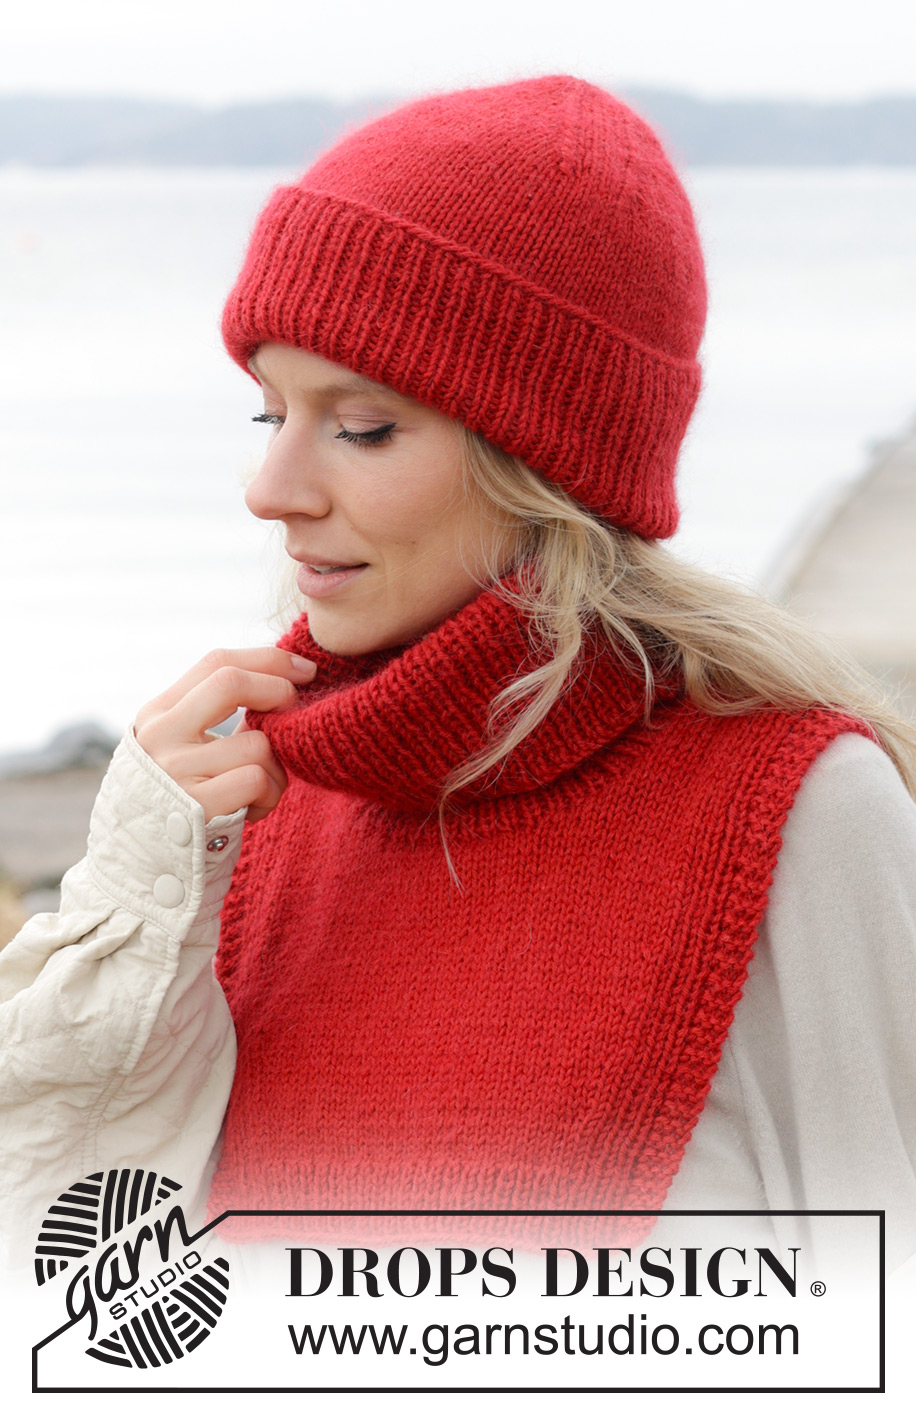
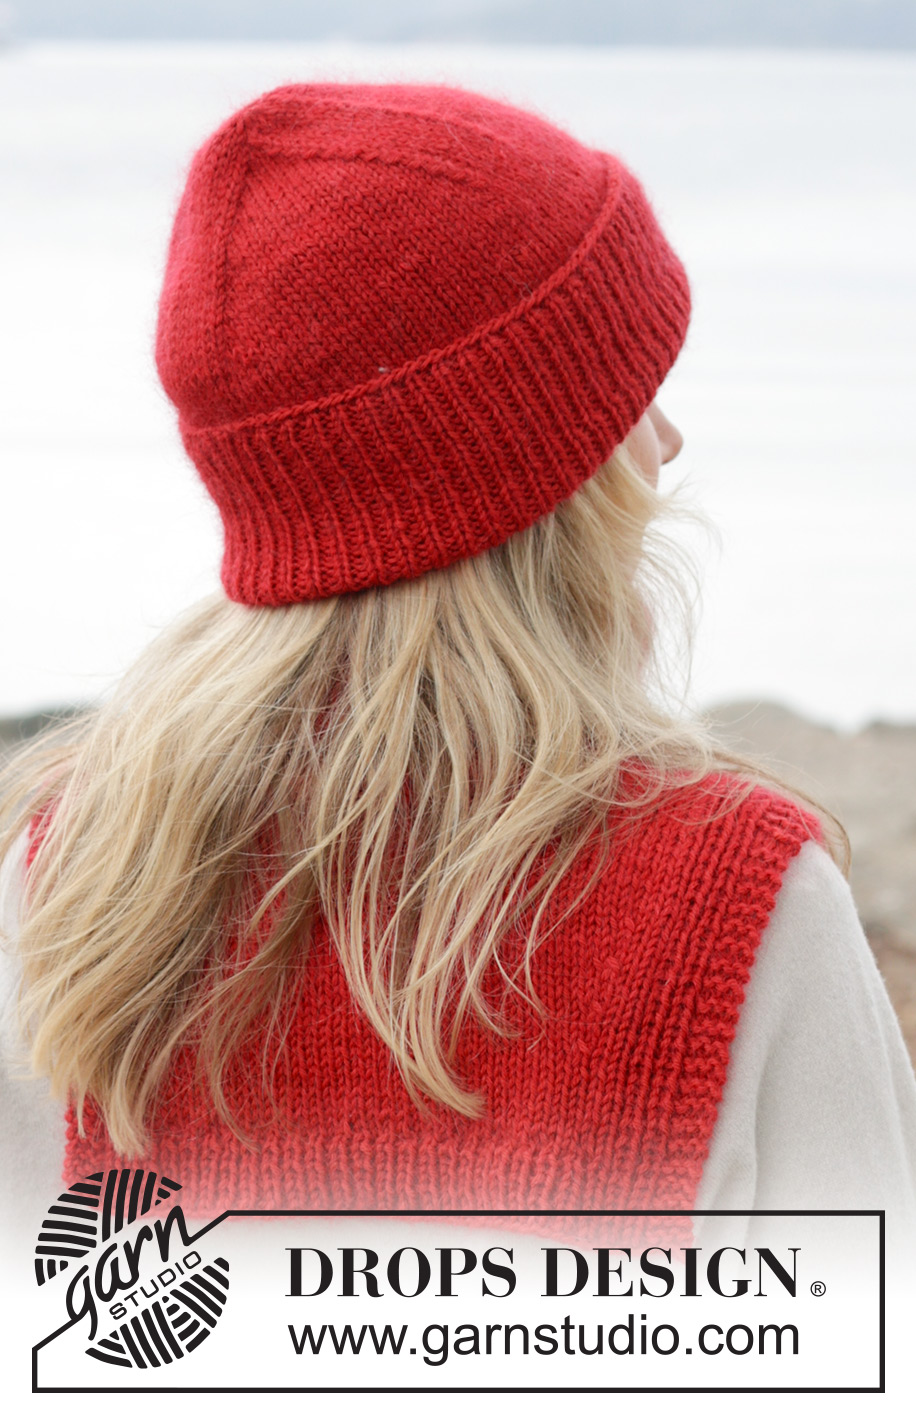
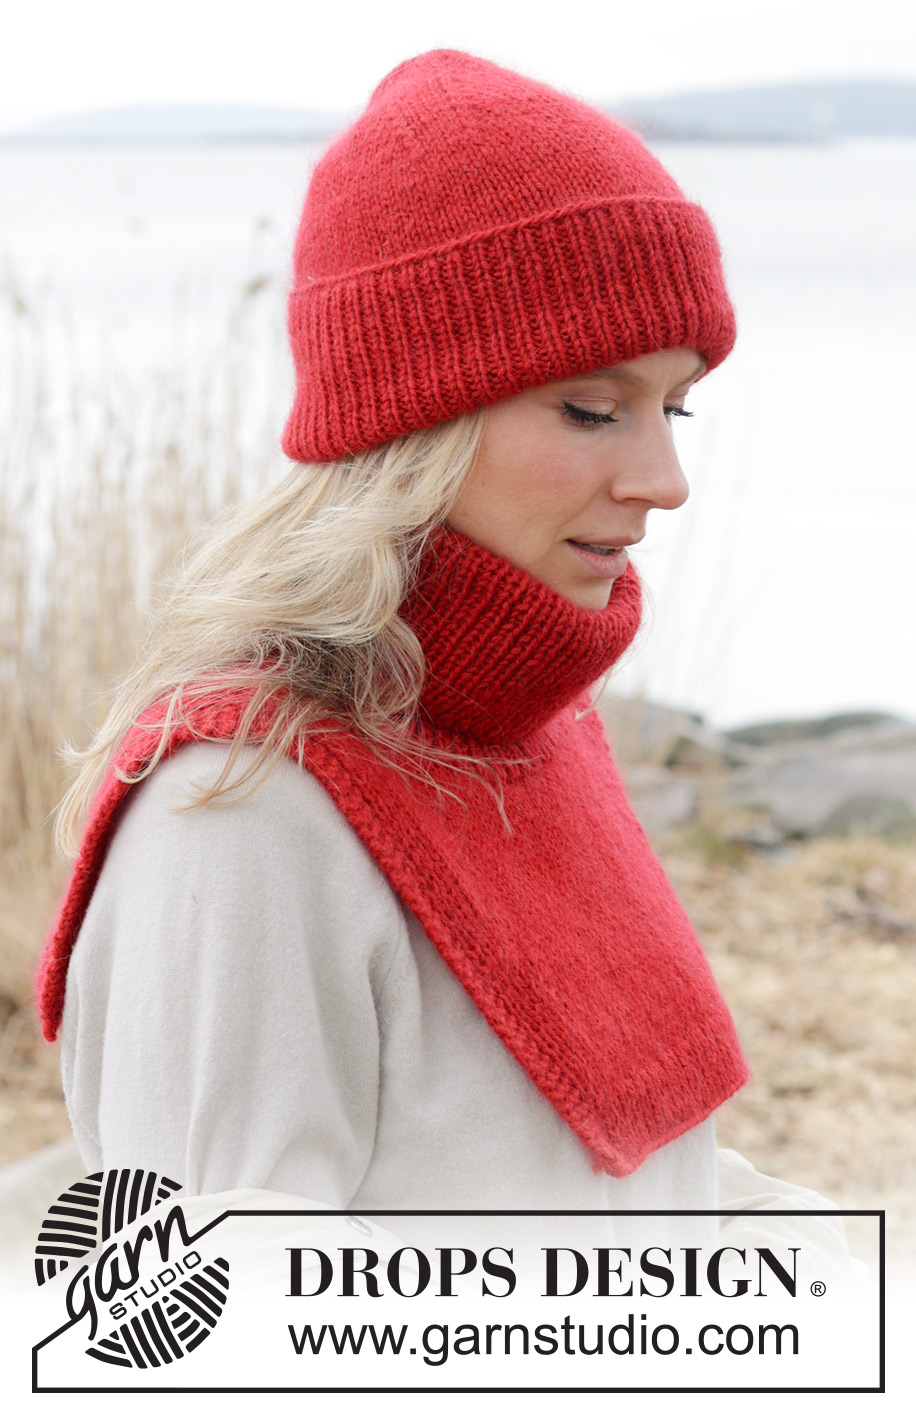
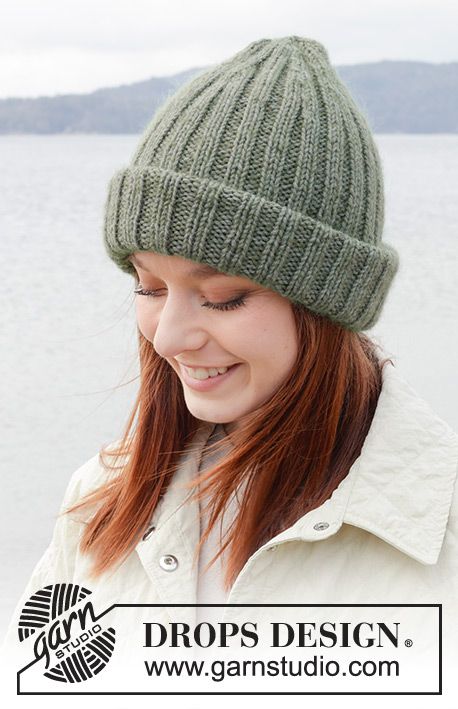
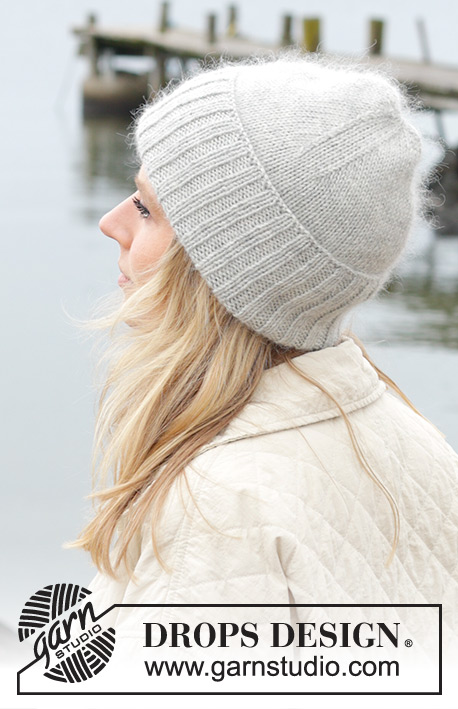
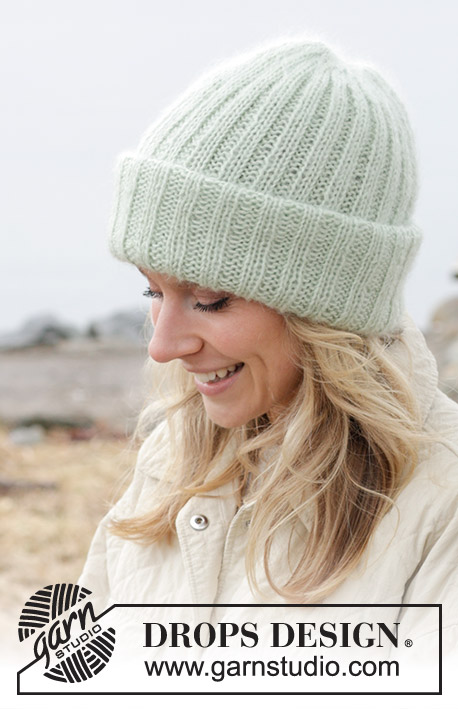
Čepice a nákrčník pletené zdola nahoru z příze DROPS Lima a DROPS Kid-Silk.
DROPS 242-22 |
|
|
------------------------------------------------------ VYSVĚTLIVKY: ------------------------------------------------------- TIP – UJÍMÁNÍ (čepice): Pleteme až po poslední 4 oka před značkou, 2 oka spleteme hladce, 4 oka upleteme hladce (značka leží uprostřed těchto ok), 1 oko sejmeme hladce, 1 upleteme hladce a sejmuté přes ně přetáhneme. Tento postup opakujeme u každé značky. VROUBKOVÝ VZOR (nákrčník): Pleteme stále hladce, lícové i rubové řady. 1 vroubek = 2 řady hladce. ------------------------------------------------------- POPIS PRÁCE: ------------------------------------------------------- ČEPICE - JAK BUDEME POSTUPOVAT: Pleteme v kruhových řadách zdola nahoru. Podle potřeby převedeme s ubývajícím počtem ok na ponožkové jehlice. ČEPICE: Na krátkou kruhovou jehlici č.3 nahodíme 1 vláknem příze DROPS Lima a 1 vláknem příze DROPS Kid-Silk (= dvojitou přízí) 108-116 ok a upleteme 1 kruhovou řadu obrace. Pak pleteme v kruhových řadách pružným vzorem 1/1 (tj. střídáme 1 oko hladce, 1 obrace). Ve výši 11 cm převedeme pleteninu na kruhovou jehlici č.4. Pleteme lícovým žerzejem a SOUČASNĚ v 1. kruhové řadě ujmeme rovnoměrně 18-20 ok = 90-96 ok. Pokračujeme lícovým žerzejem až do výše 22-23 cm (do ukončení práce zbývá doplést 10-10 cm výšky). Nyní vložíme do pleteniny 3 značky, vždy po 30-32 okách. Pak začneme tvarovat vršek čepice – ujímáme podle instrukcí výše, viz TIP – UJÍMÁNÍ. Toto ujímání opakujeme v každé 2. kruhové řadě, celkem 12-13x = 18-18 ok. V dalších kruhové řadě splétáme každá 2 oka hladce dohromady = 9-9 ok. Přízi odstřihneme, protáhneme ji zbylými oky, stáhneme a zapošijeme. Čepice měří asi 32-34 cm (od počáteční, nahozené řady). DOKONČENÍ: Dolních 7 cm lemu ohrneme na lícovou stranu. S ohrnutým lemem měří čepice 25-27 cm. ------------------------------------------------------- NÁKRČNÍK - JAK BUDEME POSTUPOVAT: Přední díl pleteme v řadách zdola nahoru. Uzavřeme oka pro průkrčník a obě náramenice dopleteme odděleně. Pak oka opět přidáme a vytvoříme tak zadní stranu průkrčníku. Tím obě náramenice opět spojíme a upleteme v řadách zadní díl nákrčníku, tentokrát shora dolů. Nakonec připleteme rolák. PŘEDNÍ DÍL: Na kruhovou jehlici č.3,5 nahodíme 1 vláknem příze DROPS Lima a 1 vláknem příze DROPS Kid-Silk (= dvojitou přízí) 55-59-63 ok a upleteme 1 řadu obrace. Pokračujeme lícovou řadou v tomto rozvržení: 3 krajní oka VROUBKOVÝM VZOREM – viz výše, pak pleteme pružným vzorem 1/1 (tj. střídáme 1 oko hladce, 1 obrace) – začínáme 1 okem obrace, a to až po poslední 4 oka, 1 oko upleteme obrace a 3 krajní oka vroubkovým vzorem. V tomto rozvržení pleteme do výše 4 cm, končíme rubovou řadou. Pleteninu pak převedeme na kruhovou jehlici č.4,5. Prvních 9 ok upleteme jako dříve, následujících 37-41-45 ok pleteme lícovým žerzejem a SOUČASNĚ mezi těmito oky ujmeme rovnoměrně 10 ok, posledních 9 ok upleteme jako dříve = 45-49-53 ok. Ve výši 6 cm začneme přidávat – přidáváme v každé lícové řadě, takto: prvních 10 ok upleteme jako dříve, 1x nahodíme, pleteme až po posledních 10 ok, 1x nahodíme a dopleteme zbytek řady. Rubovou řadu upleteme jako dříve, nahození pleteme obrace za zadní nit, aby se v pletenině netvořily dírky. Toto přidávání opakujeme (vedle 10 krajních ok na každé straně), a to vždy po 2,5 cm výšky, celkem 4-4-5x na každé straně dílu = 53-57-63 ok. Pleteme až do výše 19-20-21 cm. Nyní tvarujeme průkrčník – začínáme lícovou řadou: prvních 21-22-24 ok upleteme jako dříve, pak tato oka odložíme na pomocnou jehlici (= levá náramenice), následujících 11-13-15 ok uzavřeme a dopleteme zbytek řady. Obě náramenice dokončíme odděleně. PRAVÁ NÁRAMENICE = 21-22-24 ok. Upleteme rubovou řadu. Pro vytvarování průkrčníku uzavřeme na začátku každé lícové řady 2x 2 oka a 2x 1 oko = 15-16-18 ok. Pokračujeme do výše 26-28-30 cm od počáteční, nahozené řady. Poslední řadu si označíme (= vrcholek ramene). Upleteme ještě 3-4-5 cm výšky za značkou, končíme lícovou řadou. V následující rubové řadě začneme přidávat, takto: nahodíme na konci každé rubové řady 2x 1 oko a 2x 2 oka = 21-22-24 ok. Díl měří 7-8-9 cm od značky na rameni. Přízi odstřihneme a oka odložíme na pomocnou jehlici. LEVÁ NÁRAMENICE: Odložených 21-22-24 ok vrátíme z pomocné jehlice zpět na jehlici. Začínáme lícovou řadou a pro vytvarování průkrčníku uzavřeme na začátku každé rubové řady 2x 2 oka a 2x 1 oko = 15-16-18 ok. Pokračujeme do výše 26-28-30 cm od počáteční, nahozené řady. Poslední řadu si označíme (= vrcholek ramene). Upleteme ještě 3-4-5 cm výšky za značkou, končíme rubovou řadou. V následující rubové řadě začneme přidávat, takto: nahodíme na konci každé lícové řady 2x 1 oko a 2x 2 oka, poté nahodíme na konci následující lícové řady 11-13-15 ok = 32-35-39 ok. Díl měří asi 7-8-9 cm od značky na rameni. Náramenice spojíme – odložená oka pravé náramenice vrátíme z pomocné jehlice zpět na jehlice a upleteme je z lícové strany = 53-57-63 ok. ZADNÍ DÍL: Pokračujeme v pletení jako dříve. SOUČASNĚ ve výši 12,5-14-14 cm od značky na rameni začneme na každé straně díl ujímat, takto – začínáme lícovou řadou: prvních 10 ok upleteme jako dříve, 2 oka spleteme hladce, pleteme až po posledních 12 ok, 1 oko sejmeme hladce, 1 upleteme hadce a sejmuté přes ně přetáhneme, posledních 10 ok upleteme jako dříve. Toto ujímání opakujeme (vedle krajních 10 ok na každé straně dílu) vždy po 2,5 cm výšky, a to celkem 4-4-5x na každé straně = 45-49-53 ok. Pleteme až do výše 22-24-26 cm od značky na rameni – délka dílu musí odpovídat přednímu dílu (bez pružného lemu). Pleteninu převedeme na kruhovou jehlici č. 3,5. Pleteme 1 řadu a SOUČASNĚ přidáme mezi pružnými lemy na obou okrajích dílu rovnoměrně 10 ok (tj. přidáváme mimo oba pružné lemy) = 55-59-63 ok. Následující lícovou řadu pleteme takto: 3 krajní oka vroubkovým vzorem, 1 oko obrace, pružný vzor 1/1 (tj. střídáme 1 oko hladce, 1 obrace), a to až po poslední 4 oka, 1 oko obrace, 3 krajní oka vroubkovým vzorem. V tomto rozvržení upleteme lem vysoký 4 cm, končíme rubovou řadou. Díl měří asi 26-28-30 cm od značky na rameni. Pak všechna oka volně dle vzoru uzavřeme. ROLÁK: Kruhovou jehlicí č.3,5 nabereme z lícové strany 1 vláknem každého druhu příze (= dvojitou přízí) z okraje průkrčníku 96-102-106 ok - začínáme u značky na rameni a celkový počet nabraných ok musí být sudý (tj. dělitelný 2). Pleteme v kruhových řadách pružným vzorem 1/1 do výše 24 cm. Poté všechna oka volně dle vzoru uzavřeme. |
|
Dokončili jste tento model?Pak označte své fotky tagem #dropspattern #cardinalsongset nebo je pošlete do galerie #dropsfan. Potřebujete s tímto návodem poradit?Otevřete-li si návod na stránce garnstudio.com, najdete tam 29 výukových video-ukázek, Komentáře/Dotazy a další užitečné informace. © 1982-2025 DROPS Design A/S. Vyhrazujeme si veškerá práva. Tento dokument, včetně všech jeho dílčích částí, podléhá autorským právům. Podrobnější komentář k možnostem užití našich návodů najdete dole pod každým návodem na našich stránkách. |
|


V oblasti pletené a háčkované módy působí DROPS Design více než 40 let. Díky tomu vám můžeme nabídnout jednu z nejrozsáhlejších kolekcí modelů s bezplatnými návody dostupnými na internetu - navíc v 17 jazycích. K dnešnímu dni máme na 314 katalogů a 11821 návodů celkem - z nich je už 7047 dostupných v [češtině].
Přidejte komentář k návodu DROPS 242-22
Rádi bychom věděli, co si o tomto modelu myslíte!
Pokud se chcete na něco zeptat, dbejte prosím na to, abyste ve formuláři níže vybrali správnou kategorii - díky tomu se dříve dozvíte, co potřebujete vědět. Povinná pole jsou označena *.