
Popular categories
Looking for a yarn?


Comments / Questions (28)
![]() Christine Di Iorio wrote:
Christine Di Iorio wrote:
Bonjour Je commence les augmentations raglan après encolure. Tous les 2 rangs dos/devant tous les 4 rangs manches. Je dois donc augmenter pour les manches entre les 2 anneaux marqueurs de la manche et dos/ devant de l'autre côté de l'anneau marqueur ?? Merci pour votre réponse
10.02.2026 - 10:10DROPS Design answered:
Bonjour Mme Di Lorio, pour augmenter 4 mailles seulement, augmentez avant le 1er fil marqueur (fin du dos), après le 2ème fil marqueur (début du devant) et avant le 3ème fil marqueur (fin du devant) et enfin après le 4ème fil marqueur (début du dos). Bon tricot!
10.02.2026 - 17:50
![]() Roberta wrote:
Roberta wrote:
Buongiorno. Ho un dubbio in merito a questo modello. Lavorando il primo giro di ferri accorciati, sul diritto del lavoro, il secondo segnapunti che incontro partendo dal centro dietro dovrebbe essere quello tra spalla destra e davanti del lavoro, non sul lato sinistro come indicato nel pattern, o sbaglio? Grazie
04.12.2025 - 09:30DROPS Design answered:
Buonasera Roberta, al momento non sono previste correzioni nel modello. Buon lavoro!
04.12.2025 - 22:54
![]() Guery wrote:
Guery wrote:
Bonjour comment eviter de faire un "trou" en rangs raccourcis
19.11.2025 - 15:03DROPS Design answered:
Bonjour Mme Guery, découvrez ici différentes techniques de rangs raccourcis, qui vous permettront d'éviter des trous dans les rangs raccourcis. Bon tricot!
19.11.2025 - 16:35
![]() Fabi wrote:
Fabi wrote:
Bij de halslijn staat \'\'Ga verder met rondbreinaald 5.5 mm.\'\' Is dit rondbreinaald 40cm of 80cm?
17.11.2025 - 19:32
![]() Monika wrote:
Monika wrote:
Ich verstehe die Raglanzugaben nicht. Warum wird in der Rückreihe rechts gestrickt und nicht links? das ergibt ja ein Rippenmuster. Die Anleitung ist schlecht und nicht zu verstehen. Was kann ich tun?
29.10.2025 - 21:05DROPS Design answered:
Liebe Monika, schade, dass Sie mit der Anleitung nicht gut zurechtkommen. "Glatt rechts" in der Rück-Reihe bedeutet, dass Sie links stricken (glatt rechts = Hin-R rechts, Rück-R links). Die Raglanlinien werden aber tatsächlich in einer Art Rippenmuster gestrickt, also 2 M links, 2 M rechts, 2 M links. Das können Sie auch gut auf den Fotos erkennen. Die Raglanzunahmen arbeiten Sie jeweils beidseitig dieser 6 M (der Markierungsfaden sitzt in der Mitte zwischen den 2 Rechtsmaschen) an jeder Raglanlinie (= 4 Raglanlinien aus je 6 M). Die zugenommenen Maschen stricken Sie in Hin-R rechts und in Rück-R links, also glatt rechts. Bei weiteren Fragen melden Sie sich gerne.
30.10.2025 - 23:42
![]() Yvette wrote:
Yvette wrote:
Ah d’accord!! Merci !! Ça y est!! J’ai compris maintenant!! C’est très gentil à vous !!
22.11.2024 - 16:10
![]() Yvette wrote:
Yvette wrote:
Merci pour votre réponse, néanmoins même après la vidéo ma question continue. Sur la vidéo les marqueurs sont sur une maille et non pas entre deux mailles comme indiqué sur le modèle, donc impossible de faire les jetés avant et après le marqueur ou alors il y a quelque chose que je ne comprends toujours pas…
22.11.2024 - 14:05DROPS Design answered:
Bonjour Yvette, la vidéo montre la technique des rangs raccourcis et les augmentations des raglans, ici, comme indiqué précédemment, le marqueur se trouve au milieu des 6 mailles du raglan et vous augmentez avant/après les 6 mailles du raglan (uniquement sur l'endroit = comme indiqué dans les explications) et pas de chaque côté du marqueur (comme dans la vidéo, qui montre la technique "standard"). Bon tricot!
22.11.2024 - 14:22
![]() Yvette wrote:
Yvette wrote:
Bonjour, j’essaye de faire l’encolure mais je ne comprends pas comment je dois répartir les 6 mailles de chaque raglan (2 m envers, 2 m endroit, 2 m envers; on doit avoir un fil marqueur entre les 2 mailles endroit) avec les augmentations… je fais les augmentations avant et après les deux endroit ? Merci!
21.11.2024 - 23:00DROPS Design answered:
Bonjour Yvette, les 6 mailles des raglans se tricotent à raison de 3 m avant + 3 m après chacun des 4 fils marqueurs insérés juste avant; vous avez automatiquement (vu sur l'endroit): 2 m env, 1 m end, fil marqueur, 1 m end, 2 m env. Augmentez ensuite pour l'encolure aux fils marqueurs (au 1er rang, vous augmentez seulement à 2 des fils marqueurs, au dernier des rangs raccourcis, vous augmenterez aux 2 autres marqueurs (jusqu'au milieu dos). Cette vidéo devrait pouvoir vous aider (tricotez bien les 6 m des raglans comme indiqué précédemment). Bon tricot!
22.11.2024 - 09:49
![]() Christie wrote:
Christie wrote:
In the neckline it says purl past last stitch marker. Does that mean the fourth numbering 1,2,3,4 clockwise? Or complete the round and past the fourth marker?
11.11.2024 - 17:21DROPS Design answered:
Dear Christie, the. marker numbers are in the order they have been inserted seen from RS, so that the front piece is between 2nd and 3rd marker - see also this video where we show how to work such short rows. Happy knitting!
12.11.2024 - 08:55
![]() Linda wrote:
Linda wrote:
Goededag, ik wil de trui Blue Moon Rising alleen Drops Soft Tweed breien, dus zonder de Kid-silk. Hoeveel garen van Drops Soft Tweed heb ik dan ongeveer nodig en wat verandert er dan aan het patroon? Dank voor uw antwoord.
21.10.2024 - 18:10DROPS Design answered:
Dag Linda,
Als je dat doet krijg je een andere stekenverhouding, of je zorgt ervoor dat je dezelfde stekenverhouding krijgt waarbij het breiwerk dus wat opener wordt. In dat geval heb je allen de aangegeven hoeveelheden DROPS Soft Tweed nodig.
23.10.2024 - 09:42
|
|
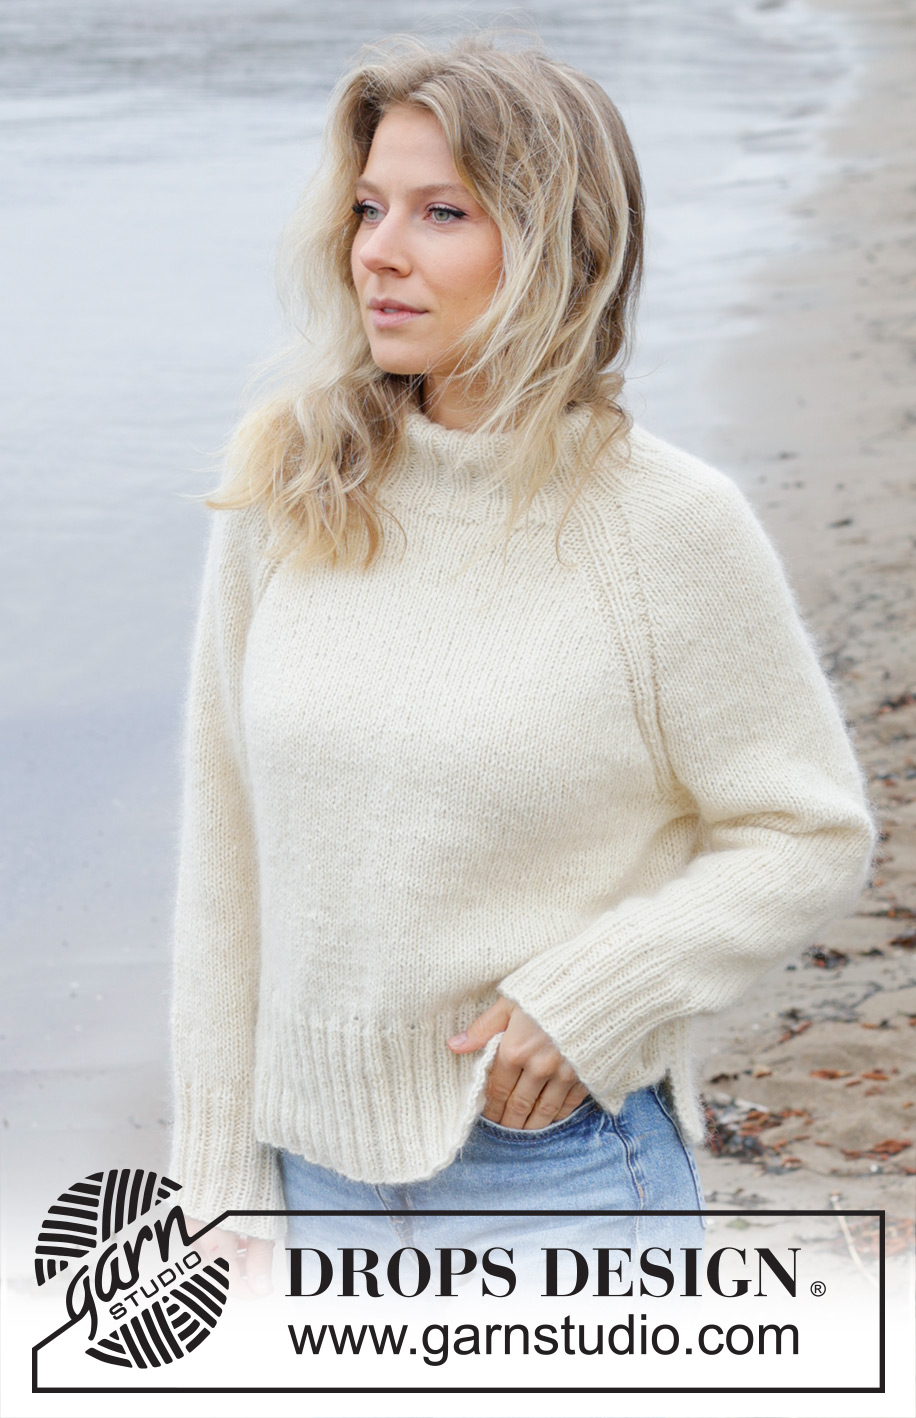
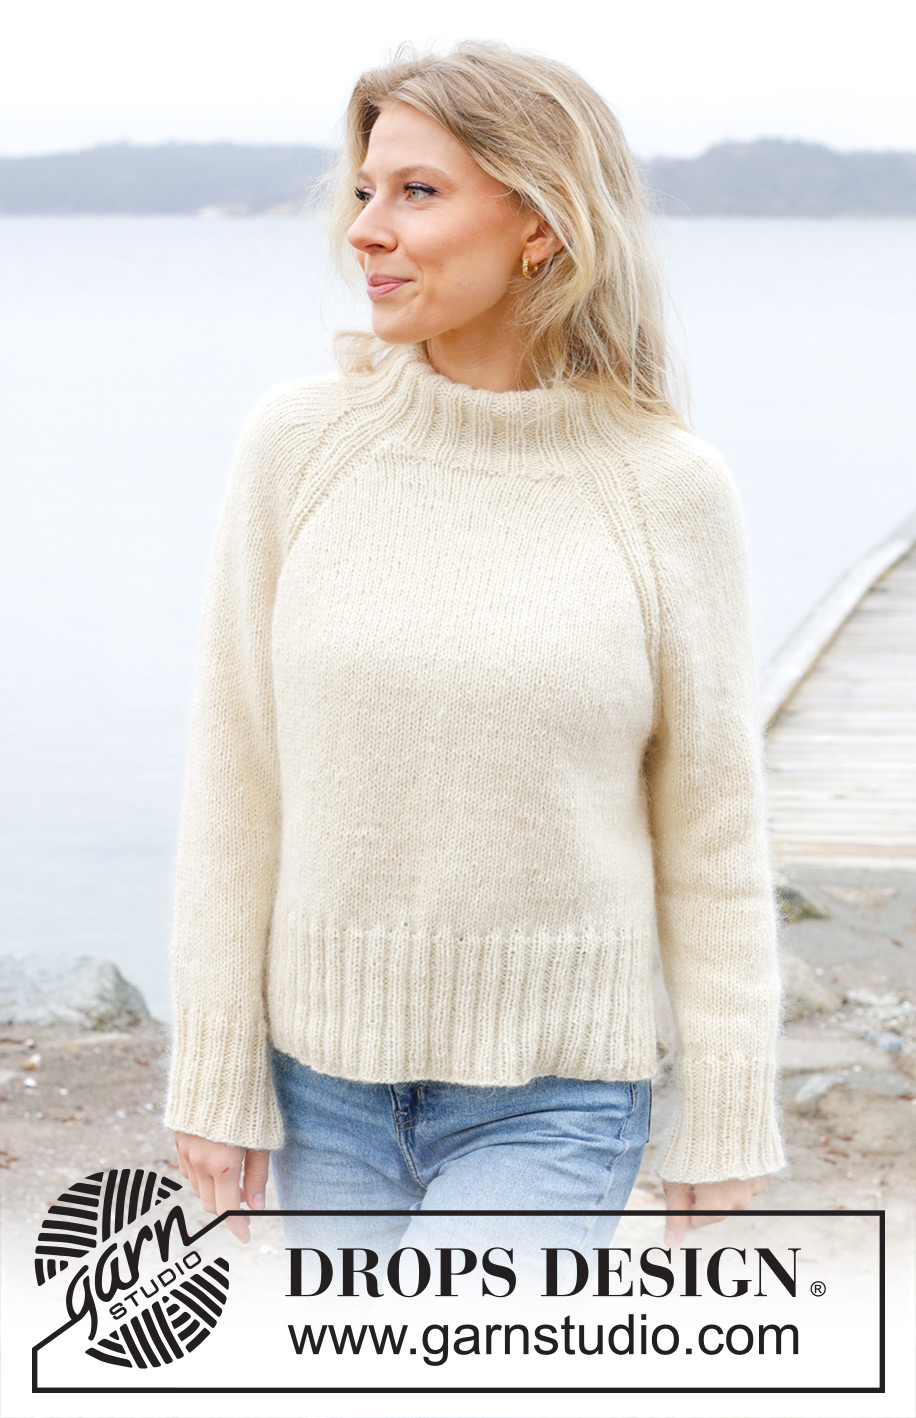
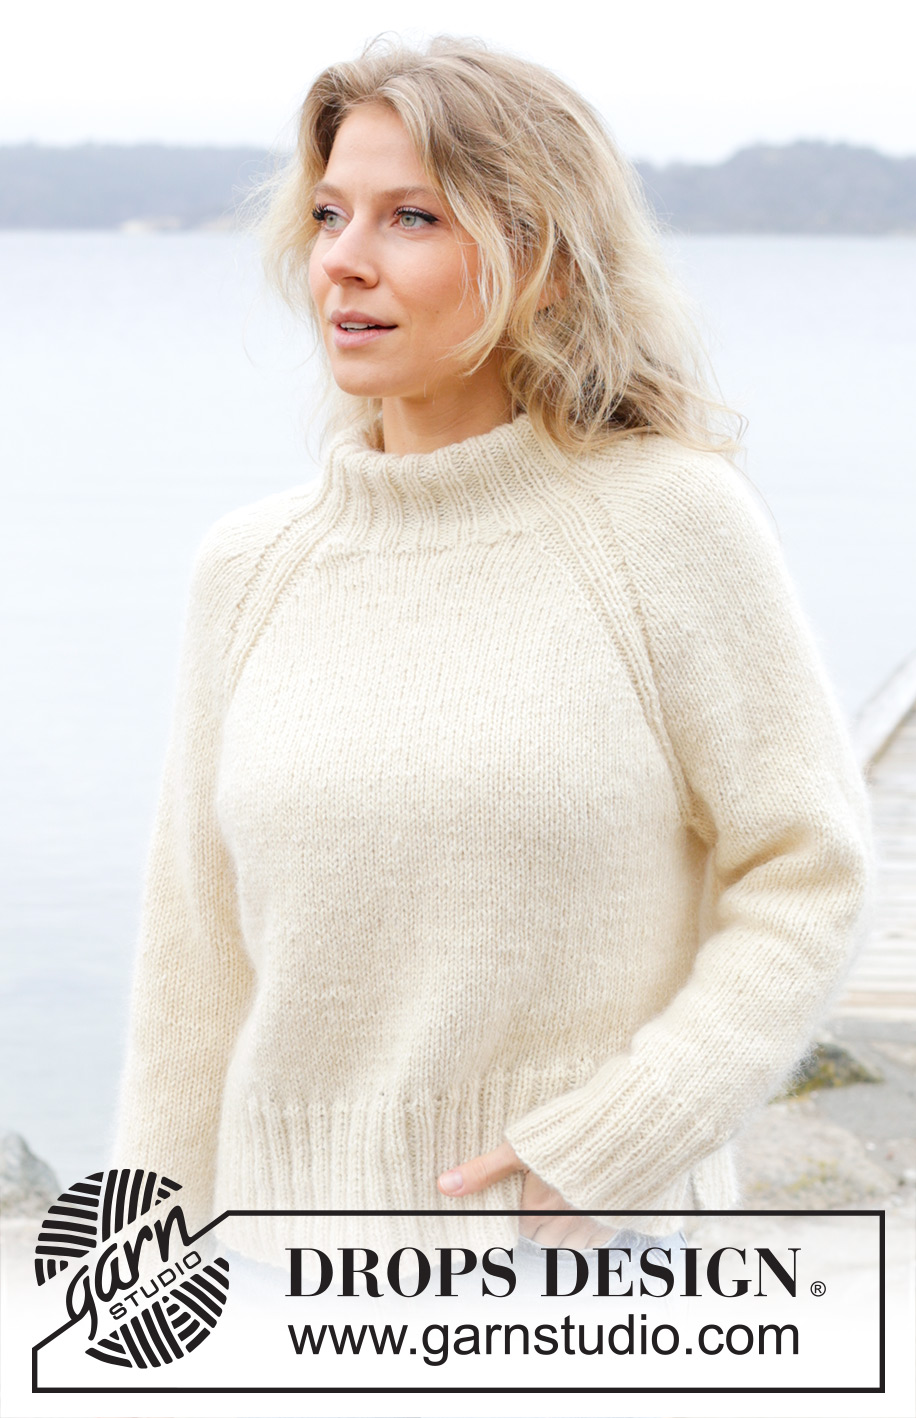
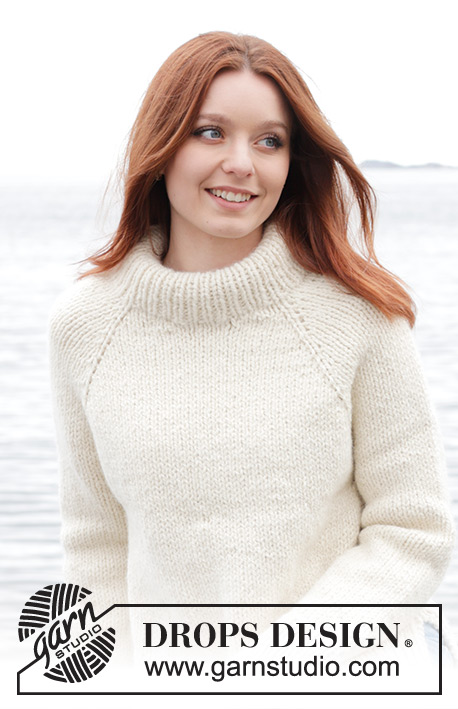
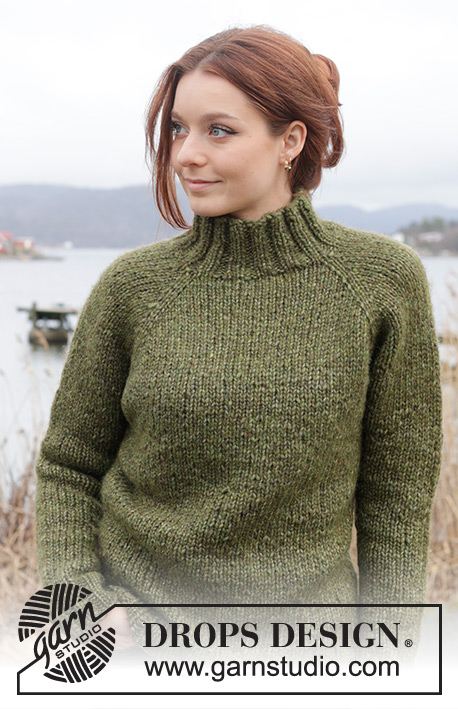
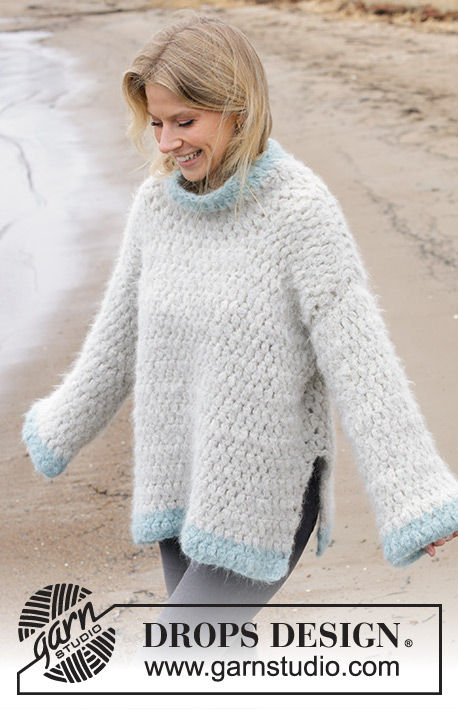
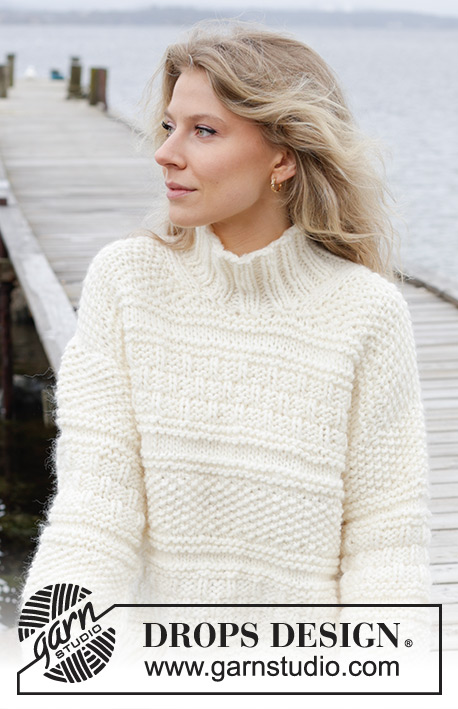
Bright Moon Rising#brightmoonrisingsweater |
|
 |
 |
Knitted jumper in DROPS Soft Tweed and DROPS Kid-Silk. The piece is worked top down with raglan, double neck and split in sides. Sizes S - XXXL.
DROPS 245-23 |
|
|
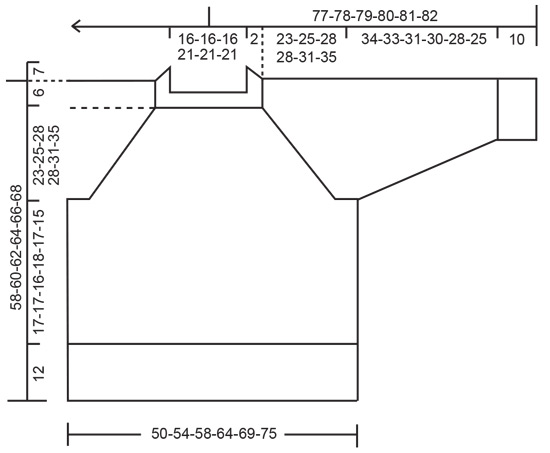
------------------------------------------------------- EXPLANATIONS FOR THE PATTERN: ------------------------------------------------------- GARTER STITCH (worked back and forth): Knit all rows. 1 ridge = knit 2 rows. RAGLAN: Increase 1 stitch before/after 6 stitches in each transition between the body and sleeves; marker-thread sits in the middle of these 6 stitches (2 purled, 2 knitted, 2 purled). Increase 1 stitch by making 1 yarn over, which is knitted twisted on the next round to avoid a hole. The new stitches are worked in stocking stitch. DECREASE TIP (for sleeves): Start 3 stitches before the marker-thread, knit 2 together, knit 2 (marker-thread sits between these 2 stitches), slip 1 stitch knit-wise, knit 1 and pass the slipped stitch over the knitted stitch. ------------------------------------------------------- START THE PIECE HERE: ------------------------------------------------------- JUMPER – SHORT OVERVIEW OF THE PIECE: The neck and yoke are worked in the round with circular needle, from mid back and top down. The yoke is divided for body and sleeves and the body is continued in the round with circular needle. The sleeves are worked with short circular needle/double pointed needles. DOUBLE NECK: Cast on 88-88-88-104-104-104 stitches with 1 strand DROPS Soft Tweed and 1 strand DROPS Kid-Silk using short circular needles size 5.5 and 4.5 mm held together. Remove the needle size 5.5 mm keeping stitches on the circular needle size 4.5 mm (this gives you an elastic cast-on edge). Knit 1 round, then work rib as follows: Knit 1, *purl 2, knit 2 *, work from *-* until there are 3 stitches left, purl 2 and knit 1. Work this rib for 9 cm. Insert 4 marker-threads without working the stitches. These threads are used when increasing for raglan and each one is inserted between 2 knitted stitches. Count 12-12-12-16-16-16 stitches (half back piece), insert 1 marker-thread, count 20 stitches (sleeve), insert 1 marker-thread, count 24-24-24-32-32-32 stitches (front piece), insert 1 marker-thread, count 20 stitches (sleeve), insert 1 marker-thread, there are 12-12-12-16-16-16 stitches left after the last marker-thread (half back piece). NECKLINE: Change to circular needle size 5.5 mm. Work a neckline with short rows as described below. Work stocking stitch with 6 stitches in each raglan-line (2 purled, 2 knitted, 2 purled, seen from the right side, and with the marker-thread between the 2 knitted stitches). ROW 1 (right side): Knit and increase for RAGLAN – read description above, on each side of the first 2 marker-threads (4 stitches increased). Turn when you have knitted 5 stitches past the 2nd marker-thread (front left of neck when the garment is worn). ROW 2 (wrong side): Purl, turn when you have purled 5 stitches past the last marker-thread. ROW 3 (right side): Knit and increase for raglan on each side of all 4 marker-threads (8 stitches increased), Turn when you have knitted 2 stitches past the previous turn. ROW 4 (wrong side): Purl, turn when you have purled 2 stitches past the previous turn. ROW 5 (right side): Knit and increase for raglan on each side of all 4 marker-threads (8 stitches increased), turn when you have knitted 2 stitches past the previous turn. ROW 6 (wrong side): Purl, turn when you have purled 2 stitches past the previous turn. ROW 7 (right side): Knit and increase for raglan on each side of the first 2 marker-threads (4 stitches increased), knit to mid-back. The short rows are finished and you have increased for raglan 3 times at each marker-thread = 112-112-112-128-128-128 stitches. Knit 1 round without increasing. YOKE: Work stocking stitch in the round and increase for raglan as follows: Increase every 2nd round on each side of all 4 marker-threads 3 times = 136-136-136-152-152-152 stitches. Continue to increase every 2nd round but every 2nd increase is only on the front/back pieces, i.e., increase on the front/back pieces every 2nd round and on the sleeves every 4th round (alternately 4 and 8 increased stitches). REMEMBER THE KNITTING TENSION! Increase like this 14-16-20-22-24-24 times on the body (7-8-10-11-12-12 times on the sleeves) = 220-232-256-284-296-296 stitches. Sizes S, M, L, XXL and XXXL (increases in size XL are finished): Continue with stocking stitch and increase for raglan on the front/back pieces. The sleeve increases are finished. Increase every 2nd round 3-3-2-1-5 times. ALL SIZES: You have now increased a total of 23-25-28-28-31-35 times on the body and 13-14-16-17-18-18 times on the sleeves (including the increases on the short rows). There are 232-244-264-284-300-316 stitches. Continue with stocking stitch, without further increases, until the yoke measures 23-25-28-28-31-35 cm, measured mid-front after the ribbed neck. Divide for the body and sleeves: Work the first 35-37-40-44-47-51 stitches (half back piece), place the next 46-48-52-54-56-56 stitches on 1 thread for the sleeve, cast on 10-12-12-14-16-18 stitches (in side under sleeve), work 70-74-80-88-94-102 stitches (front piece), place the next 46-48-52-54-56-56 stitches on 1 thread for the sleeve, cast on 10-12-12-14-16-18 stitches (in side under sleeve), work the remaining 35-37-40-44-47-51 stitches (half back piece). BODY: = 160-172-184-204-220-240 stitches. Start in the middle of the cast-on stitches under one sleeve and continue stocking stitch in the round for a further 17-17-16-18-17-15 cm. Place the last 80-86-92-102-110-120 stitches on a thread and work the first 80-86-92-102-110-120 stitches. Knit 1 row and increase 22-24-28-28-28-30 stitches evenly spaced = 102-110-118-130-138-150 stitches. Change to circular needle 4.5 mm. Work rib as follows (from the wrong side): 2 GARTER STITCHES – read description above, * purl 2, knit 2 *, work from *-* until there are 4 stitches left, purl 2 and 2 garter stitches. Work this rib for 12 cm. Cast off. The jumper measures approx. 58-60-62-64-66-68 cm from the shoulder. Work the back piece in the same way. SLEEVES: Place the 46-48-52-54-56-56 stitches from the thread on the one side of the piece on short circular needle/double pointed needles size 5.5 mm and knit up 1 stitch in each of the 10-12-12-14-16-18 stitches cast on under the sleeve = 56-60-64-68-72-74 stitches. Insert a marker in the middle of the new stitches under the sleeve. Work stocking stitch in the round When the sleeve measures 3 cm decrease 2 stitches mid under sleeve – read DECREASE TIP. Decrease like this every 4-3-2½-1½-1½-1 cm a total of 6-8-9-11-10-10 times = 44-44-46-46-52-54 stitches. Continue working until the sleeve measures 34-33-31-30-28-25 cm from the division. Knit 1 round and increase 8-8-10-10-8-10 stitches evenly spaced = 52-52-56-56-60-64 stitches. Change to double pointed needles size 4.5 mm and work rib (knit 2, purl 2) for 10 cm. Cast off. The sleeve measures approx. 44-43-41-40-38-35 cm from the division. Work the other sleeve in the same way. ASSEMBLY: Fold the neck double to the inside and fasten down. Sew the top 4 cm of each split together, sewing in the outermost loop of the outermost stitch so the seam is flat (leaves a 8 cm split). |
|
 |
|
Have you finished this pattern?Tag your pictures with #dropspattern #brightmoonrisingsweater or submit them to the #dropsfan gallery. Do you need help with this pattern?You'll find 34 tutorial videos, a Comments/Questions area and more by visiting the pattern on garnstudio.com. © 1982-2026 DROPS Design A/S. We reserve all rights. This document, including all its sub-sections, has copyrights. Read more about what you can do with our patterns at the bottom of each pattern on our site. |
|


With over 40 years in knitting and crochet design, DROPS Design offers one of the most extensive collections of free patterns on the internet - translated to 17 languages. As of today we count 324 catalogues and 12290 patterns translated into English (UK/cm). 12290
We work hard to bring you the best knitting and crochet have to offer, inspiration and advice as well as great quality yarns at incredible prices! Would you like to use our patterns for other than personal use? You can read what you are allowed to do in the Copyright text at the bottom of all our patterns. Happy crafting!
Post a comment to pattern DROPS 245-23
We would love to hear what you have to say about this pattern!
If you want to leave a question, please make sure you select the correct category in the form below, to speed up the answering process. Required fields are marked *.