DROPS Soft Tweed
DROPS Soft Tweed
50% Wool, 25% Alpaca, 25% Viscose
from 4.00 £ /50g
DROPS Kid-Silk
DROPS Kid-Silk
75% Mohair, 25% Silk
from 4.60 £ /25g
Get the yarn to make this pattern from 42.40£.

The yarn cost is calculated from the pattern’s smallest size and the yarn’s cheapest product type. Looking for an even better price? You might find it on the DROPS Deals!

DROPS SS24

Bright Moon Rising

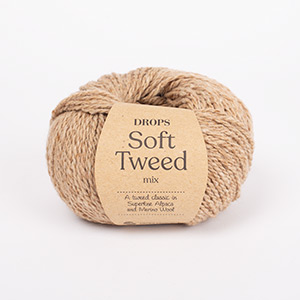
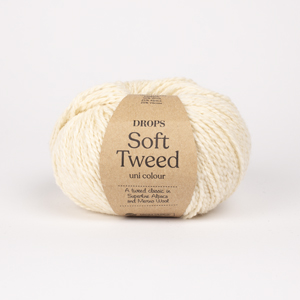
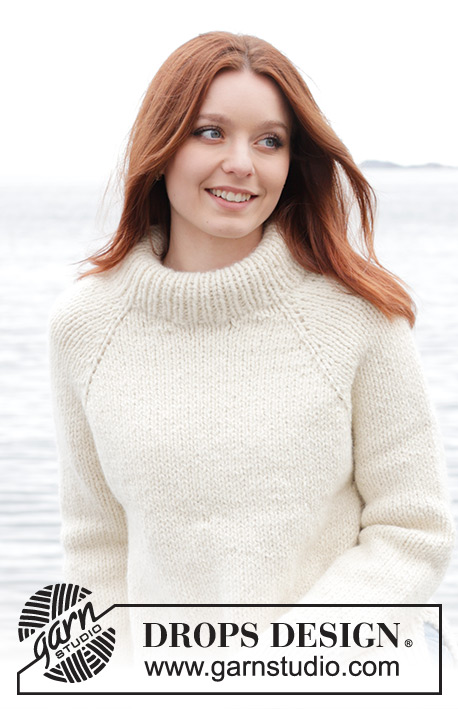
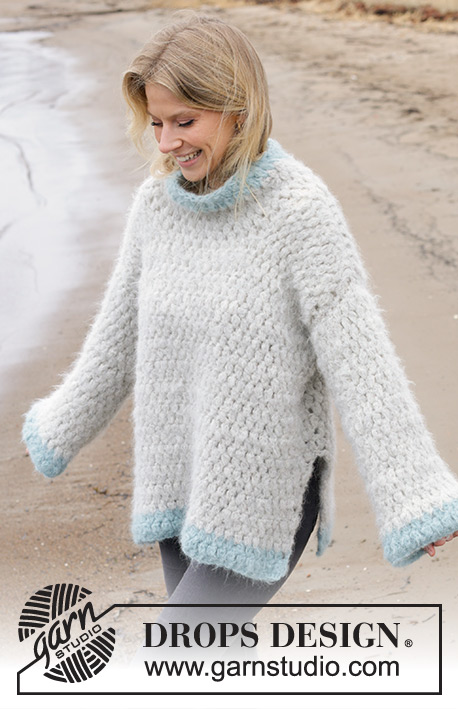
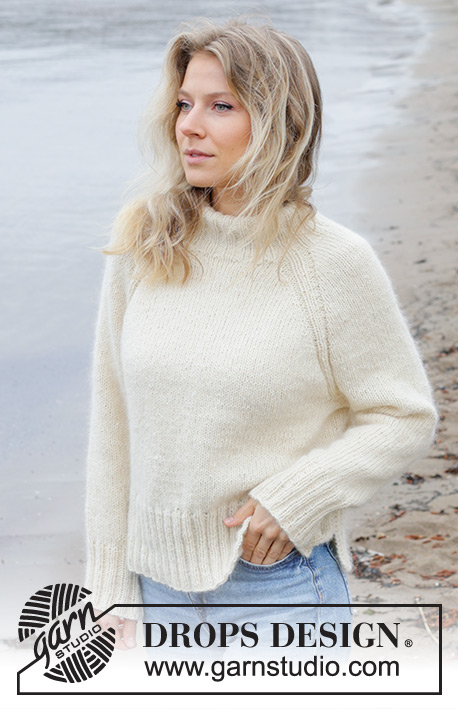
Knitted jumper in DROPS Soft Tweed and DROPS Kid-Silk. The piece is worked top down with raglan, double neck and split in sides. Sizes S - XXXL.

DROPS 245-23
DROPS Design: Pattern st-041
Yarn group B + A
-------------------------------------------------------

SIZES:
S - M - L - XL - XXL - XXXL

YARN:
DROPS SOFT TWEED from Garnstudio (belongs to yarn group B)
300-350-350-400-450-500 g colour 01, off white
And use:
DROPS KID-SILK fra Garnstudio (belongs to yarn group A)
100-100-125-125-150-150 g colour 01, off white

NEEDLES:
DROPS CIRCULAR NEEDLE SIZE 5.5 MM: Length 40 cm and 80 cm.
DROPS CIRCULAR NEEDLE SIZE 4.5 MM: Length 40 cm and 80 cm.
DROPS DOUBLE POINTED NEEDLES SIZE 5.5 MM.
DROPS DOUBLE POINTED NEEDLES SIZE 4.5 MM.
The technique MAGIC LOOP can be used – you then only need 80 cm circular needle in each size.

KNITTING TENSION:
16 stitches in width and 20 rows in height with stocking stitch and 1 strand of each quality = 10 x 10 cm.
NOTE: Needle size is only a guide. If you get too many stitches on 10 cm, change to a larger needle size. If you get too few stitches on 10 cm, change to a smaller needle size.

-------------------------------------------------------

Alternative Yarn – See how to change yarns here
Yarn Groups A to F – Use the same pattern and change the yarn here
Yarn usage using an alternative yarn – Use our yarn converter here

-------------------------------------------------------

DROPS Soft Tweed
DROPS Soft Tweed
50% Wool, 25% Alpaca, 25% Viscose
from 4.00 £ /50g
DROPS Kid-Silk
DROPS Kid-Silk
75% Mohair, 25% Silk
from 4.60 £ /25g
Get the yarn to make this pattern from 42.40£.

The yarn cost is calculated from the pattern’s smallest size and the yarn’s cheapest product type. Looking for an even better price? You might find it on the DROPS Deals!

Pattern instructions

NOTE: This pattern is written in British English. All measurements in charts are in cm. For conversion from cm to inches - click here. There are different terms for crocheting in British and American English. If this pattern includes crochet, click for "crochet terms" here. For this pattern in American English, please click here.
-------------------------------------------------------

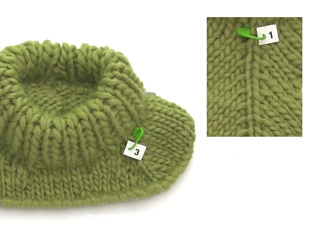
EXPLANATIONS FOR THE PATTERN:
-------------------------------------------------------

GARTER STITCH (worked back and forth):
Knit all rows.
1 ridge = knit 2 rows.

RAGLAN:
Increase 1 stitch before/after 6 stitches in each transition between the body and sleeves; marker-thread sits in the middle of these 6 stitches (2 purled, 2 knitted, 2 purled). Increase 1 stitch by making 1 yarn over, which is knitted twisted on the next round to avoid a hole. The new stitches are worked in stocking stitch.

DECREASE TIP (for sleeves):
Start 3 stitches before the marker-thread, knit 2 together, knit 2 (marker-thread sits between these 2 stitches), slip 1 stitch knit-wise, knit 1 and pass the slipped stitch over the knitted stitch.

-------------------------------------------------------

START THE PIECE HERE:

-------------------------------------------------------

JUMPER – SHORT OVERVIEW OF THE PIECE:
The neck and yoke are worked in the round with circular needle, from mid back and top down. The yoke is divided for body and sleeves and the body is continued in the round with circular needle. The sleeves are worked with short circular needle/double pointed needles.

DOUBLE NECK:
Cast on 88-88-88-104-104-104 stitches with 1 strand DROPS Soft Tweed and 1 strand DROPS Kid-Silk using short circular needles size 5.5 and 4.5 mm held together. Remove the needle size 5.5 mm keeping stitches on the circular needle size 4.5 mm (this gives you an elastic cast-on edge). Knit 1 round, then work rib as follows: Knit 1, *purl 2, knit 2 *, work from *-* until there are 3 stitches left, purl 2 and knit 1. Work this rib for 9 cm.
Insert 4 marker-threads without working the stitches. These threads are used when increasing for raglan and each one is inserted between 2 knitted stitches.

Count 12-12-12-16-16-16 stitches (half back piece), insert 1 marker-thread, count 20 stitches (sleeve), insert 1 marker-thread, count 24-24-24-32-32-32 stitches (front piece), insert 1 marker-thread, count 20 stitches (sleeve), insert 1 marker-thread, there are 12-12-12-16-16-16 stitches left after the last marker-thread (half back piece).

NECKLINE:
Change to circular needle size 5.5 mm. Work a neckline with short rows as described below. Work stocking stitch with 6 stitches in each raglan-line (2 purled, 2 knitted, 2 purled, seen from the right side, and with the marker-thread between the 2 knitted stitches).
ROW 1 (right side): Knit and increase for RAGLAN – read description above, on each side of the first 2 marker-threads (4 stitches increased). Turn when you have knitted 5 stitches past the 2nd marker-thread (front left of neck when the garment is worn).
ROW 2 (wrong side): Purl, turn when you have purled 5 stitches past the last marker-thread.
ROW 3 (right side): Knit and increase for raglan on each side of all 4 marker-threads (8 stitches increased), Turn when you have knitted 2 stitches past the previous turn.
ROW 4 (wrong side): Purl, turn when you have purled 2 stitches past the previous turn.
ROW 5 (right side): Knit and increase for raglan on each side of all 4 marker-threads (8 stitches increased), turn when you have knitted 2 stitches past the previous turn.
ROW 6 (wrong side): Purl, turn when you have purled 2 stitches past the previous turn.
ROW 7 (right side): Knit and increase for raglan on each side of the first 2 marker-threads (4 stitches increased), knit to mid-back.

The short rows are finished and you have increased for raglan 3 times at each marker-thread = 112-112-112-128-128-128 stitches. Knit 1 round without increasing.

YOKE:
Work stocking stitch in the round and increase for raglan as follows: Increase every 2nd round on each side of all 4 marker-threads 3 times = 136-136-136-152-152-152 stitches. Continue to increase every 2nd round but every 2nd increase is only on the front/back pieces, i.e., increase on the front/back pieces every 2nd round and on the sleeves every 4th round (alternately 4 and 8 increased stitches). REMEMBER THE KNITTING TENSION! Increase like this 14-16-20-22-24-24 times on the body (7-8-10-11-12-12 times on the sleeves) = 220-232-256-284-296-296 stitches.

Sizes S, M, L, XXL and XXXL (increases in size XL are finished):
Continue with stocking stitch and increase for raglan on the front/back pieces. The sleeve increases are finished. Increase every 2nd round 3-3-2-1-5 times.

ALL SIZES:
You have now increased a total of 23-25-28-28-31-35 times on the body and 13-14-16-17-18-18 times on the sleeves (including the increases on the short rows).

There are 232-244-264-284-300-316 stitches. Continue with stocking stitch, without further increases, until the yoke measures 23-25-28-28-31-35 cm, measured mid-front after the ribbed neck.

Divide for the body and sleeves:
Work the first 35-37-40-44-47-51 stitches (half back piece), place the next 46-48-52-54-56-56 stitches on 1 thread for the sleeve, cast on 10-12-12-14-16-18 stitches (in side under sleeve), work 70-74-80-88-94-102 stitches (front piece), place the next 46-48-52-54-56-56 stitches on 1 thread for the sleeve, cast on 10-12-12-14-16-18 stitches (in side under sleeve), work the remaining 35-37-40-44-47-51 stitches (half back piece).

BODY:
= 160-172-184-204-220-240 stitches. Start in the middle of the cast-on stitches under one sleeve and continue stocking stitch in the round for a further 17-17-16-18-17-15 cm. Place the last 80-86-92-102-110-120 stitches on a thread and work the first 80-86-92-102-110-120 stitches. Knit 1 row and increase 22-24-28-28-28-30 stitches evenly spaced = 102-110-118-130-138-150 stitches. Change to circular needle 4.5 mm. Work rib as follows (from the wrong side): 2 GARTER STITCHES – read description above, * purl 2, knit 2 *, work from *-* until there are 4 stitches left, purl 2 and 2 garter stitches. Work this rib for 12 cm. Cast off. The jumper measures approx. 58-60-62-64-66-68 cm from the shoulder. Work the back piece in the same way.

SLEEVES:
Place the 46-48-52-54-56-56 stitches from the thread on the one side of the piece on short circular needle/double pointed needles size 5.5 mm and knit up 1 stitch in each of the 10-12-12-14-16-18 stitches cast on under the sleeve = 56-60-64-68-72-74 stitches. Insert a marker in the middle of the new stitches under the sleeve.
Work stocking stitch in the round
When the sleeve measures 3 cm decrease 2 stitches mid under sleeve – read DECREASE TIP. Decrease like this every 4-3-2½-1½-1½-1 cm a total of 6-8-9-11-10-10 times = 44-44-46-46-52-54 stitches. Continue working until the sleeve measures 34-33-31-30-28-25 cm from the division. Knit 1 round and increase 8-8-10-10-8-10 stitches evenly spaced = 52-52-56-56-60-64 stitches. Change to double pointed needles size 4.5 mm and work rib (knit 2, purl 2) for 10 cm. Cast off. The sleeve measures approx. 44-43-41-40-38-35 cm from the division.
Work the other sleeve in the same way.

ASSEMBLY:
Fold the neck double to the inside and fasten down.
Sew the top 4 cm of each split together, sewing in the outermost loop of the outermost stitch so the seam is flat (leaves a 8 cm split).

Diagram

diagram measurements

Each of our patterns has specific tutorial videos to help you.

Do you have a question? See a list of frequently asked questions (FAQ)

Knitting tension is what determines the final measurements of your work, and is usually measured per 10 x 10 cm. It is provided like so: number of stitches in width x number of rows in height - eg: 19 stitches x 26 rows = 10 x 10 cm.

The knitting tension is very individual; some people knit/crochet loosely while others work tightly. You adjust the knitting tension with the needle size, which is why the suggested needle size is only meant as a guide! You need to adjust this (up or down) to ensure that YOUR knitting tension matches the knitting tension provided in the pattern. If you work with a different knitting tension than provided you will have a different yarn consumption, and your work will have different measurements than what the pattern suggests.

The knitting tension also determines which yarns can replace each other. As long as you achieve the same knitting tension you can replace one yarn with another.

See DROPS lesson: How to measure your tension/gauge

See DROPS video: How to make a gauge tension swatch

The required amount of yarn is provided in grams, eg: 450 g. To calculate how many balls you’ll need you first need to know how many grams are in 1 ball (25g, 50g or 100g). This information is available if you click on the individual yarn quality on our pages. Divide the amount required with the amount of each ball. For example, if each ball is 50g (the most common amount), the calculation will be as follows: 450 / 50 = 9 balls.

The important thing when changing from one yarn to another is that the knitting/crochet tension remains the same. This is so that the measurements of the finished piece will be the same as on the sketch provided. It is easier to achieve the same knitting tension using yarns from the same yarn group. It is also possible to work with multiple strands of a thinner yarn to achieve the knitting tension of a thicker one. Please try our yarn converter. We recommend you to always work a test swatch.

Please NOTE: when changing yarn the garment might have a different look and feel to the garment in the photo, due to individual properties and qualities of each yarn.

See DROPS lesson: Can I use a different yarn than the one mentioned in the pattern?

All our yarns are categorised into yarn groups (from A to F) according to thickness and knitting tension – group A contains the thinnest yarns and group F the thickest. This makes it easier for you to find alternative yarns to our patterns, should you wish to switch yarn. All yarns within the same group have a similar knitting tension and can easily replace each other. However, different yarn qualities have different structures and properties which will give the finished work a unique look and feel.

Click here for an overview of the yarns in each yarn group

At the top of all our patterns you’ll find a link to our yarn calculator, which is a helpful tool should you wish to use a different yarn than suggested. By filling in the yarn quality you wish to replace, the amount (in your size) and number of strands, the calculator will present good alternative yarns with the same knitting tension. Additionally it will tell you how much you’ll require in the new qualities and whether you’ll need to work with multiple strands. Most skeins are 50g (some are 25g or 100g).

If the pattern is worked with multiple colours, every colour will have to be calculated separately. Similarly, if the pattern is worked with several strands of different yarns (for example 1 strand Alpaca and 1 strand Kid-Silk) you will have to find alternatives for each, individually.

Click here to see our yarn calculator

Since different yarns have different qualities and textures we have chosen to keep the original yarn in our patterns. However, you can easily find options among our available qualities by using our yarn calculator, or simply pick a yarn from the same yarn group.

It is possible that some retailers still have discontinued yarns in stock, or that someone has a few skeins at home that they would like to find patterns for.

The yarn calculator will provide both alternative yarn as well as required amount in the new quality.

If you think it's hard to decide what size to make, it can be a good idea to measure a garment you own already and like the size of. Then you can pick the size by comparing those measures with the ones available in the pattern's size chart.

You'll find the size chart at the bottom of the pattern.

See DROPS lesson: How to read size chart

The needle size provided in the pattern serves only as a guide, the important thing is to follow the knitting tension. And since knitting tension is very individual, you will have to adjust the needle size to ensure that YOUR tension is the same as in the pattern – maybe you’ll have to adjust 1, or even 2 needle sizes, up or down to achieve the correct tension. For this, we recommend that you work test swatches.

Should you work with a different knitting tension than the one provided, the measurements of the finished garment might deviate from the measurement sketch.

See DROPS lesson: How to measure your tension/gauge

See DROPS video: How to make a tension/gauge swatch

Working a garment top-down provides more flexibility and room for personal adjustment. For example it is easier to try the garment on while working, as well as making adjustments to length of yoke and shoulder caps.

The instructions are carefully explaining every step, in the correct order. Diagrams are adjusted to the knitting direction and are worked as usual.

The diagram depicts all rows/rounds, and every stitch seen from the right side. It is read from bottom to top, from right to left. 1 square = 1 stitch.

When working back and forth, every other row is worked from the right side and every other row is worked from the wrong side. When working from the wrong side, the diagram will have to be worked reversed: from left to right, knit stitches are purled, purl stitches are knit etc.

When working in the round every round is worked from the right side and the diagram are worked from right to left on all rounds.

See DROPS lesson: How to read knitting diagrams

The diagram depicts all rows/rounds, and every stitch seen from the right side. It is worked from bottom to top, from right to left.

When working back and forth every other row is worked from the right side: from right to left and every other row is worked from the wrong side: from left to right.

When working in the round, every row in the diagram are worked from the right side, from right to left.

When working a circular diagram you start in the middle and work your way outwards, counter clockwise, row by row.

The rows usually start with a given number of chain stitches (equivalent to the height of the following stitch), this will either be depicted in the diagram or explained in the pattern.

See DROPS lesson: How to read crochet diagrams

Instructions for working several diagrams after each other on the same row/round, will often be written like so: “work A.1, A.2, A.3 a total of 0-0-2-3-4 times". This means you work A.1 once, then A.2 is worked once, and A.3 is repeated (in width) the number of times provided for your size – in this case like so: S = 0 times, M = 0 times, L=2 times, XL= 3 times and XXL = 4 times.

The diagrams are worked as usual: begin with the first row in A.1, then work the first row in A.2 etc.

See DROPS lesson: How to read knitting diagrams

See DROPS lesson: How to read crochet diagrams

The total width of the garment (from wrist-to-wrist) will be larger in the larger sizes, despite the actual sleeves being shorter. The larger sizes have longer sleeve caps and wider shoulders, so there will be a good fit in all sizes.

The measurement sketch/schematic drawing provides information regarding the full length of the garment. If it’s a jumper or a jacket the length is measured from the highest point on the shoulder closest to the neckline, and straight down to the bottom of the garment. It is NOT measured from the tip of shoulder. Similarly, the length of yoke is measured from the highest point on the shoulder and down to where yoke is split into body and sleeves.

On a jacket measures are never taken along bands, unless specifically stated. Always measure inside band stitches when measuring the length.

See DROPS lesson: How to read a schematic drawing

Diagrams are often repeated on the round or in height. 1 repeat is the diagram the way it appears in the pattern. If it says to work 5 repeats of A.1 in the round, then you work A.1 a total of 5 times after/next to each other in the round. If it says to work 2 repeats of A.1 vertically/in height you work the entire diagram once, then begin again at the start and work the entire diagram one more time.

Chain stitches are slightly narrower than other stitches and to avoid working the cast-on edge too tight, we simply chain more stitches to begin with. The stitch count will be adjusted on the following row to fit the pattern and measurement sketch.

The rib edge is more elastic and will contract slightly compared to, for example, stocking stitch. By increasing before the rib edge, you avoid a visible difference in width between the rib edge and the rest of the body.

It’s very easy to cast off too tightly, and by making yarn overs while casting off (and simultaneously casting these off) you avoid a too tight cast off edge.

See DROPS video: How to bind off with yarn overs (yo)

To achieve an even increase (or decrease) you can increase on, for example: every 3rd and 4th row alternately, like so: work 2 rows and increase on the 3rd row, work 3 rows and increase on the 4th. Repeat this until the increase is complete.

See DROPS lesson: Increase or decrease 1 st on every 3rd and 4th row alternately

Should you prefer to work in the round instead of back and forth, you may of course adjust the pattern. You’ll need to add steeks mid-front (usually 5 stitches), and follow the instructions. When you would normally turn and work from the wrong side, simply work across the steek and continue in the round. At the end you’ll cut the piece open, pick up stitches to work bands, and cover the cut edges.

See DROPS video: How to knit steeks and cut open

Should you prefer to work back and forth instead of in the round, you may of course adjust the pattern so you work the pieces separately and then assemble them at the end. Divide the stitches for the body in 2, add 1 edge stitch in each side (for sewing) and work the front and back pieces separately.

See DROPS lesson: Can I adapt a pattern for circular needles into straight needles?

Pattern repeats can vary slightly in the different sizes, in order to get the correct proportions. If you’re not working the exact same size as the garment in the photo, yours might deviate slightly. This has been carefully developed and adjusted so that the complete impression of the garment is the same in all sizes.

Make sure to follow instructions and diagrams for your size!

If you have found a pattern you like which is available in women’s size it’s not very difficult to convert it to men’s size. The biggest difference will be the length of sleeves and body. Start working on the women size that you think would fit across the chest. The additional length will be worked right before you cast off for the armhole/sleeve cap. If the pattern is worked top-down you can add the length right after the armhole or before the first decrease on sleeve.

Regarding additional yarn amount, this will depend on how much length you add, but it is better with a skein too many than too few.

All yarns will have excess fibres (from production) that might come off as lint or shedding. Brushed yarns (ie hairier yarns) have more of these loose, excess fibres, causing more shedding.

Shedding also depends on what is worn under or over the garment, and whether this pulls at the yarn fibres. It’s therefore not possible to guarantee that there will be no shedding

Below are some tips on how to get the best result when working with hairier yarns:

1. When the garment is finished (before you wash it) shake it vigorously so the looser hairs come off. NOTE: do NOT use a lint roller, brush or any method that pulls at the yarn.

2. Place the garment in a plastic bag and put it in your freezer - the temperature will cause the fibres to become less attached to each other, and excess fibres will come off easier.

3. Leave in the freezer for a few hours before taking it out and shaking it again.

4. Wash the garment according to the instructions on the yarn label.

Pilling is a natural process that happens to even the most exclusive of fibers. It's a natural sign of wear and tear that is hard to avoid, and that is most visible in high friction areas of your garment like a sweater's arms and cuffs.

You can make your garment look as new by removing the pilling, using a fabric comb or a pill/lint remover.

Still can't find the answer you need? Then scroll down and leave your question so one of our experts can try to help you. This will be done normally within 5 to 10 working days.
In the meantime, you can read the questions and answers that others have left to this pattern or join the DROPS Workshop on Facebook to get help from fellow knitters/crocheters!

You might also like...

Post a comment to pattern DROPS 245-23

We would love to hear what you have to say about this pattern!

If you want to leave a question, please make sure you select the correct category in the form below, to speed up the answering process. Required fields are marked *.

Comments / Questions (11)

country flag Davesne wrote:

Je penses qu’il y a une inversion des mesures entre col et fin de raglan et fin de raglan et début des côtes sur vos explications ! 17 au lieu de 25 et vice versa

25.02.2024 - 15:49

DROPS Design answered:

Bonjour Mme Davesne, les mesures indiquées sont justes dans le schéma et dans les explications, en taille M, on va augmenter 25 fois pour le devant/le dos tous les 2 rangs soit 50 rangs sur la base de 20 rangs = 10 cm, vos 50 rangs doivent mesurer 25 cm (+ 6 cm d'épaules). Bon tricot!

26.02.2024 - 10:21

country flag Tuna wrote:

Non capisco …. Devo lavorare semore a maglia rasata eccetto per il raglan che è questo : (2 maglie rovescio, 2 maglie diritto, 2 maglie rovescio)… mentre faccio i Ferri accorciati ho dei giri di rovescio , in quel caso devo lavorare i punti del raglan per come si trovano ?

10.02.2024 - 09:20

DROPS Design answered:

Buonasera Tuna, corretto, deve mantenere le maglie del raglan come indicato. Buon lavoro!

17.03.2024 - 18:38

country flag Marianne Brager wrote:

Hej Drops 245-23, bluse med raglan. Ved Hals udtagning står der: 2. pind: vend når du har strikket 5 masker forbi den sidste mærketråd.. Men er det den sidste mærketråd FØR midterrækken bag, eller den sidste mærketråd (nr 4) når man har strikket Hele vejen rundt (vrangsiden)? Tak

04.02.2024 - 10:34

DROPS Design answered:

Hei Marianne. Det er 3. merke. Når du strikker 1. pinne (retten) starter du midt bak, strikker 5 masker forbi 2 merke (du har da strikket forbi 1. og 2. merke og du har også økt til raglan 4 steder). Snu og nå strikkes det (fra vrangen) først forbi 2. merke, så 1. merke, deretter forbi 4. merke og tilsutt 5 masker forbi 3. merke. Snu og strikk etter 3. pinne i diagrammet. mvh DROPS Design

12.02.2024 - 12:59

country flag Catherine wrote:

Bonjour, Je vous écris de Belgique . Après les augmentations du raglan, il me reste a tricoter quelques cm avant de séparer corps et manches. Vous indiquez qu'il faut continuer en Jersey, mais faut-il garder le motif du raglan ou non ? Merci d'avance pour votre réponse.

23.12.2023 - 15:15

DROPS Design answered:

Bonjour Catherine, vous pouvez effectivement tricoter les mailles des raglans comme avant pour la continuité. Bon tricot!

02.01.2024 - 07:56

country flag Angelika Wick-Bork wrote:

Danke für ihre Antwort, leider löst das nicht das Problem. Natürlich habe ich den Garnumwandler benutzt, leider gibt es für Kid-silk keine direkte Alternative. In der Anleitung wird ein Faden aus Gruppe B (soft tweed) und ein Faden aus Gruppe A (Kid silk) verwendet. Könnte man denn ein Garn aus Gruppe C verwenden und dann die Maschenangaben von Größe M stricken um Größe S zu erhalten? MfG Wick-Bork

02.11.2023 - 20:32

DROPS Design answered:

Liebe Frau Wick-Bork, gerne können Sie auch ein Garn vom Garngruppe C benutzen, die Maschenprobe sollte diegleiche sein, aber wie immer stricken Sie sie zuerst und passen Sie die Nadelgrösse an - hier finden Sie diese Garnkombination und lesen Sie mehr. Viel Spaß beim stricken!

03.11.2023 - 06:33

country flag Angelika Wick-Bork wrote:

Guten Abend, ich möchte das Modell 245-23 stricken. Da meine Tochter kratzempfindlich ist, möchte ich die Wolle Kid silk auf keinen Fall nutzen. Welche Wolle könnte ich für dieses Muster verwenden, damit ich die gleiche Maschenzahl nutzen kann ? MfG Angelika Wick-Bork

31.10.2023 - 19:49

DROPS Design answered:

Liebe Frau Wick-Bork, benutzen Sie den Garnumrechner, um die Alternativen sowie die neue Garnmenge zu finden, gerne kann Ihnen Ihr DROPS Händler damit helfen, die besten passenden Garne zu empfehen (auch per Telefon oder per E-Mail). Viel Spaß beim stricken!

01.11.2023 - 15:00

country flag Julia wrote:

Mam jeszcze pytanie do momentu: " Zaczynając od boku, na środku oczek nabranych pod jednym z rękawów" - kończąc oddzielanie rękawów znajduję się na połowie tyłu, to się zgadza ze wzorem. Ale dalej mam zacząć pod rękawem. Czy mam więc po prostu przerobić pół tyłu żeby znaleźć się pod rękawem i dopiero od tego momentu liczyć nowy rząd? Z góry dziękuję za odpowiedź :)

10.10.2023 - 18:41

DROPS Design answered:

Witaj Julio, jest dokładnie tak jak piszesz. Miłej pracy!

12.10.2023 - 08:40

country flag Julia wrote:

Czy przy tym wzorze mogę użyć Merino extra fine zamiast Soft-Tweed + kid silk? Czy chcąc dziergać jedną włóczką powinnam wybrać grubszą? Drugie pytanie przy rzędzie skróconym nr 2- przerabiamy prawie całość rządka, tak? Przechodzimy przez wszystkie 4 nitki?

03.10.2023 - 10:57

DROPS Design answered:

Witaj Julio, aby próbka wyszła zgodna, do Merino Extra Fine musisz jeszcze dodać 1 nitkę Kid-Silka. Co do pytania 2: dokładnie jest jak piszesz, w 2-gim rzędzie skróconym przerabiamy aż za nitkę z prawej strony przodu. Pozdrawiamy!

04.10.2023 - 13:43

country flag Jeannine wrote:

Mont Blanc

04.08.2023 - 08:25

country flag Hannele Gabrielsson wrote:

Kiva klassinen neule ja vielä valkoisenakin😍

03.08.2023 - 19:46