
Popular categories
Looking for a yarn?


Comments / Questions (32)
![]() Astrid wrote:
Astrid wrote:
Hello. I'm about to start decreasing for the sleeve cap, but I'm not sure as I am knitting in the round with dpns. Do I decrease 2 stitches just at the beginning of each round or do I decrease 2 stitches at the beginning AND the end of each round? Thanks in advance for clearing up this mis-understanding for me!!
19.03.2026 - 14:43DROPS Design answered:
Hi Astrid, Each decrease is worked equally on both sides (at the beginning of each row from the right and wrong side): For example, in size S you cast off 2 stitches at the beginning of the round, work round the sleeve to these cast off stitches, turn and cast off 2 stitches at the beginning of the row from the wrong side. Turn when you reach the gap and cast off 1 stitch at the beginning of the row from the right side, work to end of row, turn and cast off 1 stitch from the wrong side, etc. You cast off 1 stitch like this a total of 6 times (3 times on each side). Regards, Drops Team.
20.03.2026 - 05:52
![]() Aline wrote:
Aline wrote:
Bonjour, Je suis à la fin de la manche . Au moment où il faut rabattre 2 mailles de chaque côté .Puis 3 mailles. Du coup ça fait une manche avec un arrondi convexe sur le haut? Pourtant sur le schéma ça paraît une manche droite. Est ce que c’est ça ? Merci de votre réponse.
13.03.2026 - 23:28DROPS Design answered:
Bonjour Aline, dans ce modèle, on forme la tête de manche en forme d'arrondi, vous devez bien rabattre le même nombre de mailles de chaque côté (autant en début de rang sur l'endroit qu'en début de rang sur l'envers), la tête de manche mesure entre 8 et 15 cm selon la taille, comme l'indique le schéma. Bon tricot!
16.03.2026 - 07:43
![]() Aline wrote:
Aline wrote:
Bonjour, Pour les diminutions des manches en taille L, quand j'ai rabattu les 8 mailles centrales et que j’ai 54 mailles Je diminue 2 fois 2 mailles puis 3 fois 1 maille à chaque début de rang? ou au début et à la fin du rang ? Merci de votre réponse. Aline.
01.03.2026 - 20:47DROPS Design answered:
Bonjour Aline, vous allez rabattre les mailles en début de rang, d'abord sur l'envers, puis sur l'endroit, veillez toujours à bien rabattre le même nombre de mailles de chaque côté pour que la tête de manche soit bien symétrique. Autrement dit, quand vous devez rabattrez 2 x 2 m de chaque côté, rabattez 2 m au début des 4 rangs suivants. Bon tricot!
02.03.2026 - 11:15
![]() Aline wrote:
Aline wrote:
Bonjour Pour la diminution 1 maille . Rang 1 : 3 maille ensemble 2 mailles jersey 1 maille lisière Rang 2: 1 jeté Rang 3 : 3 maille envers dont la lisière Est ce que c’est ça ? Merci de votre réponse. Aline.
01.02.2026 - 22:36DROPS Design answered:
Bonjour Aline, pour diminuer 1 maille en fin de rang, tricotez effectivement A.3 ainsi: 1er rang: 3 m ens à l'end, 2 m jersey, 1 m point mousse; au 2ème rang, tricotez: 1 m point mousse, 2 m jersey, 1 jeté, 1 m envers. Au 3ème et 4ème rang, tricotez les 2 mailles de A.3 en jersey. Bon tricot!
02.02.2026 - 09:14
![]() Aline wrote:
Aline wrote:
Bonjour, Pour les diminutions de l'encolure 2 mailles de chaque côté tous les 4 rangs. Ça veut dire rang 1,4,7,10,13? Merci de votre réponse. Aline.
21.01.2026 - 19:25DROPS Design answered:
Bonjour Aline, pas exactement, pour diminuer tous les 4 rangs on procède ainsi: (1 rang de diminutions, 3 rangs sans diminuer) et on répète de (à), ainsi, on va diminuer au rang 1, 5, 9, etc.. autrement dit, tous les 2 rangs sur l'endroit. Bon tricot!
23.01.2026 - 09:21
![]() Mariette wrote:
Mariette wrote:
In het patroon zie ik wel minderen volgens A1, maar ik kom nergens A2 en A3 tegen. Wanneer gebruik ik die? Ik heb alleen A1 aan de halskant gebruikt en dan minder je 5x2=10 en 4x1=4 Totaal 14. Voor L minder ik voor de arm 3x2=6. 43 - 20=23 en niet de 19 die moeten overblijven. Waar zit de vergissing?
20.11.2025 - 20:49DROPS Design answered:
Dag Mariette,
A.2 gebruik je wanneer je aan het begin van de naald 1 steek mindert en A.3 gebruik je wanneer je aan het eind van de naald 1 steek mindert. Dit wordt bovenaan uitgelegd bij de 'uitleg voor het patroon'.
24.11.2025 - 21:15
![]() Silvia wrote:
Silvia wrote:
Come mai dopo il bordo di 4 cm del corpo, fa fare delle diminuzioni? Il disegno del modello non le riporta. Si possono omettere? Grazie
09.11.2025 - 00:09DROPS Design answered:
Buonasera Silvia, le diminuzioni vengono lavorate perchè per la lavorazione a coste si avviano più maglie di quelle necessarie dal momento che le coste contraggono il lavoro. Buon lavoro!
10.11.2025 - 20:37
![]() Inge wrote:
Inge wrote:
Kan ik voor de mouwen ook steken opnemen van het voor en achterpand in plaats van de mouwen los te breien en later eraan te naaien? Ik begrijp dat ik het patroon dan ahw achterstevoren moet lezen. Alvast bedankt
02.10.2025 - 16:56DROPS Design answered:
Dag Inge,
Ja, je zou de mouwen ook van boven naar beneden kunnen breien, waarbij je eerst steken opneemt langs het armsgat. Je leest dan het patroon a.h.w. omgekeerd. Je kunt ook verkorte toeren breien om een mouwkop te maken.
08.10.2025 - 20:23
![]() Ida wrote:
Ida wrote:
Ben begonnen met linker pand. medium Hoeveel keer moet ik 2 p minderen voor de hals en 1 voor de armsgat? Ik heb reeds 3x verminderd voor de hals en 1 maal voor de armsgat en ik heb 30 steken. Graag aangeven. Dank
30.08.2025 - 10:24DROPS Design answered:
Dag Ida,
Voor het armsgat minder je eerst 2 keer 2 steken iedere 4e naald en daarna minder je 1 keer 1 steek iedere 4e naald.
17.09.2025 - 22:19
![]() Erica Nederland wrote:
Erica Nederland wrote:
Geacht team, Hoe moet ik 2 steken tegelijk minderen, rechts en links op de goede pen, aan de voorkant van het in tricotsteek gebreide werk? Het patroon waar ik nu mee bezig ben heeft de naam "Twinkle Tweed" en is van DROPS Design. Bij voorbaat mijn dank voor uw antwoord.
25.07.2025 - 14:40DROPS Design answered:
Dag Erica,
Bovenaan het patroon staan instructies hoe je 2 steken mindert aan het begin en/of einde van de naald.
28.07.2025 - 21:51
|
||||||||||
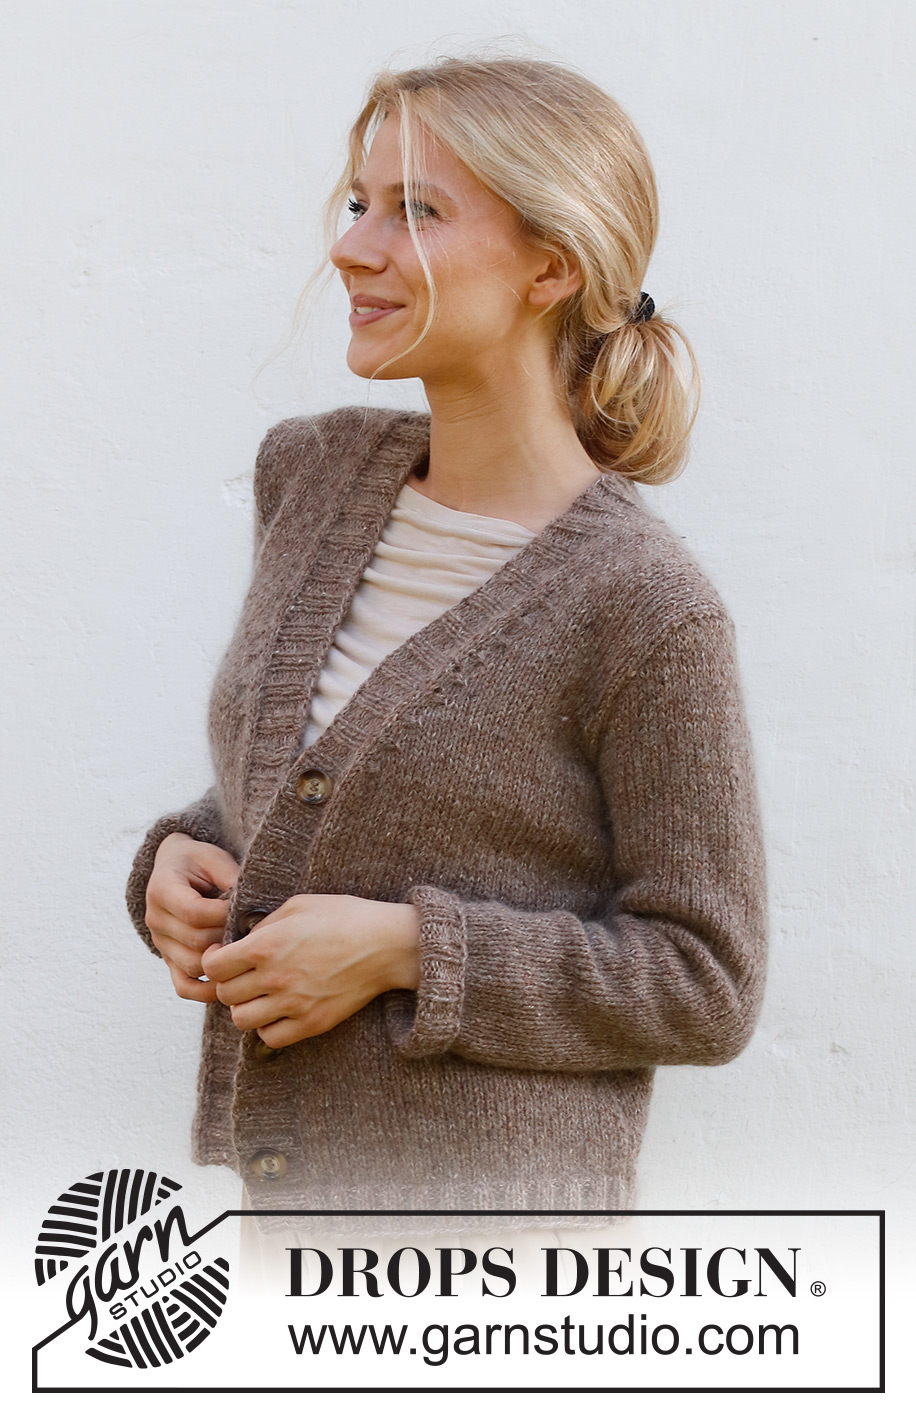
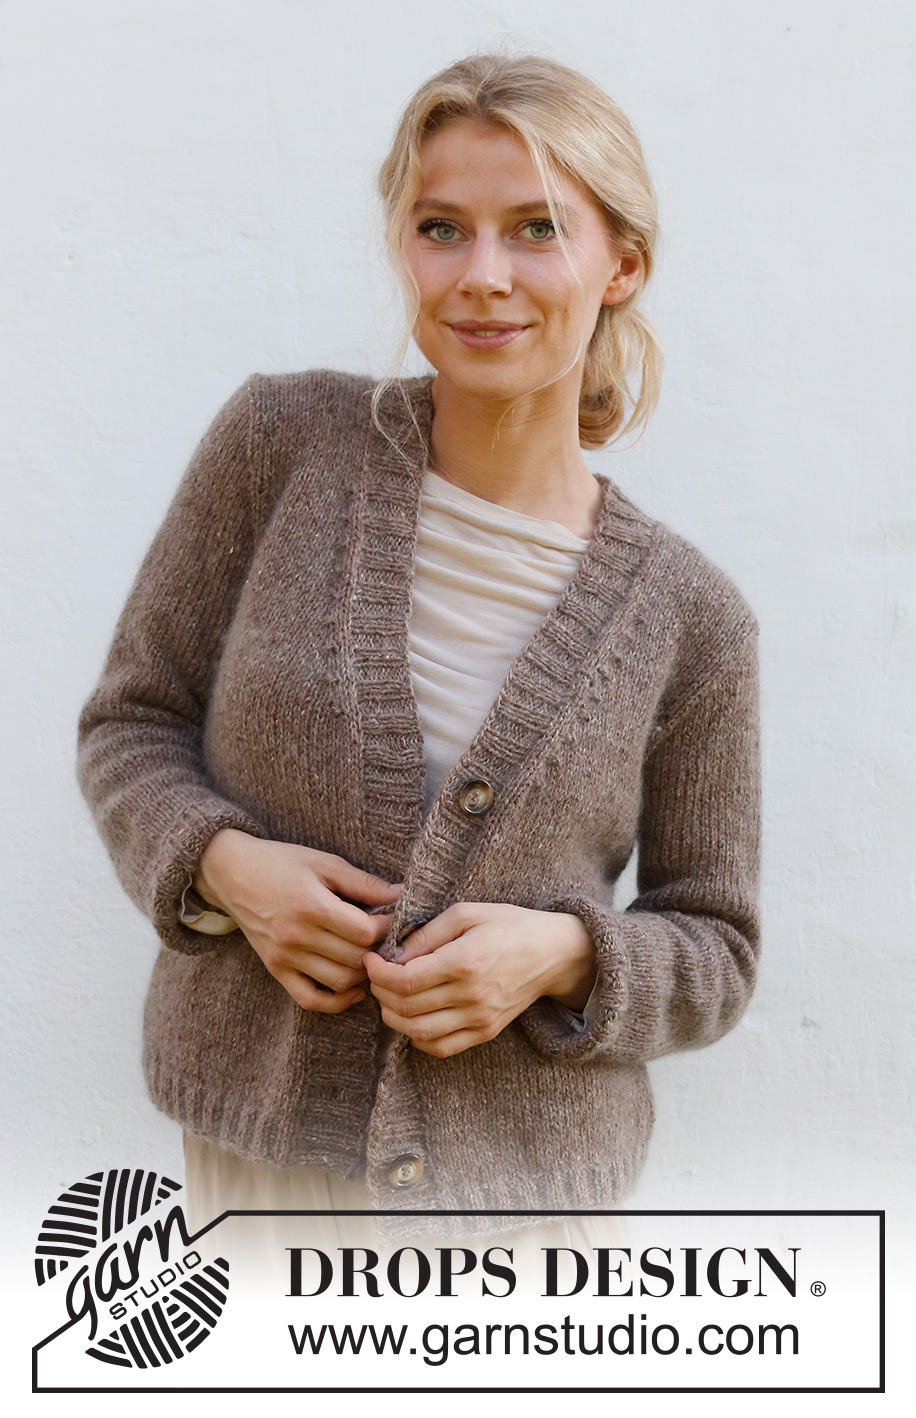
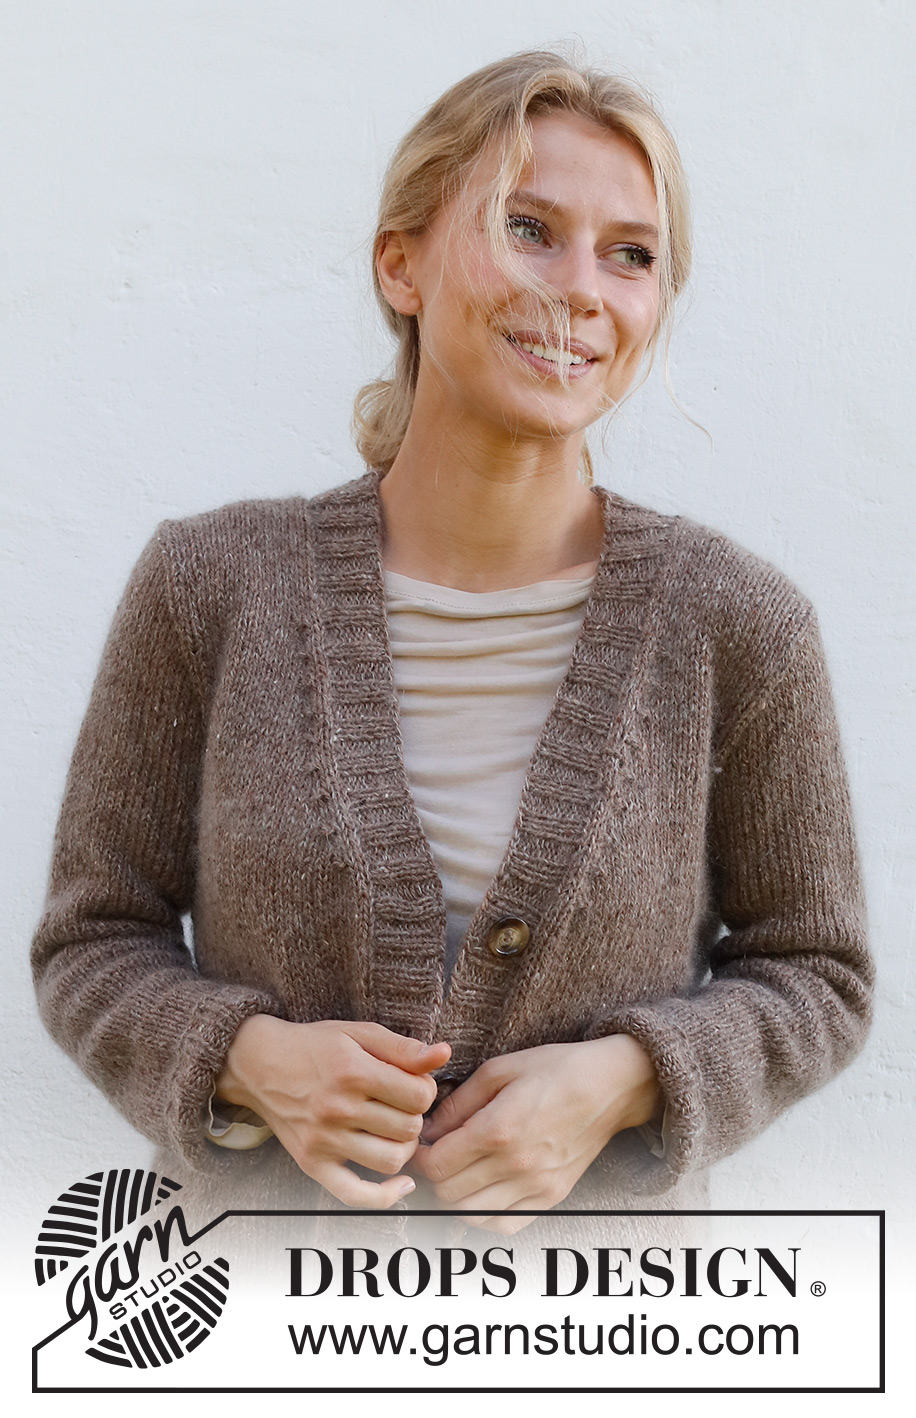
Twinkle Tweed#twinkletweedjacket |
||||||||||
 |
 |
|||||||||
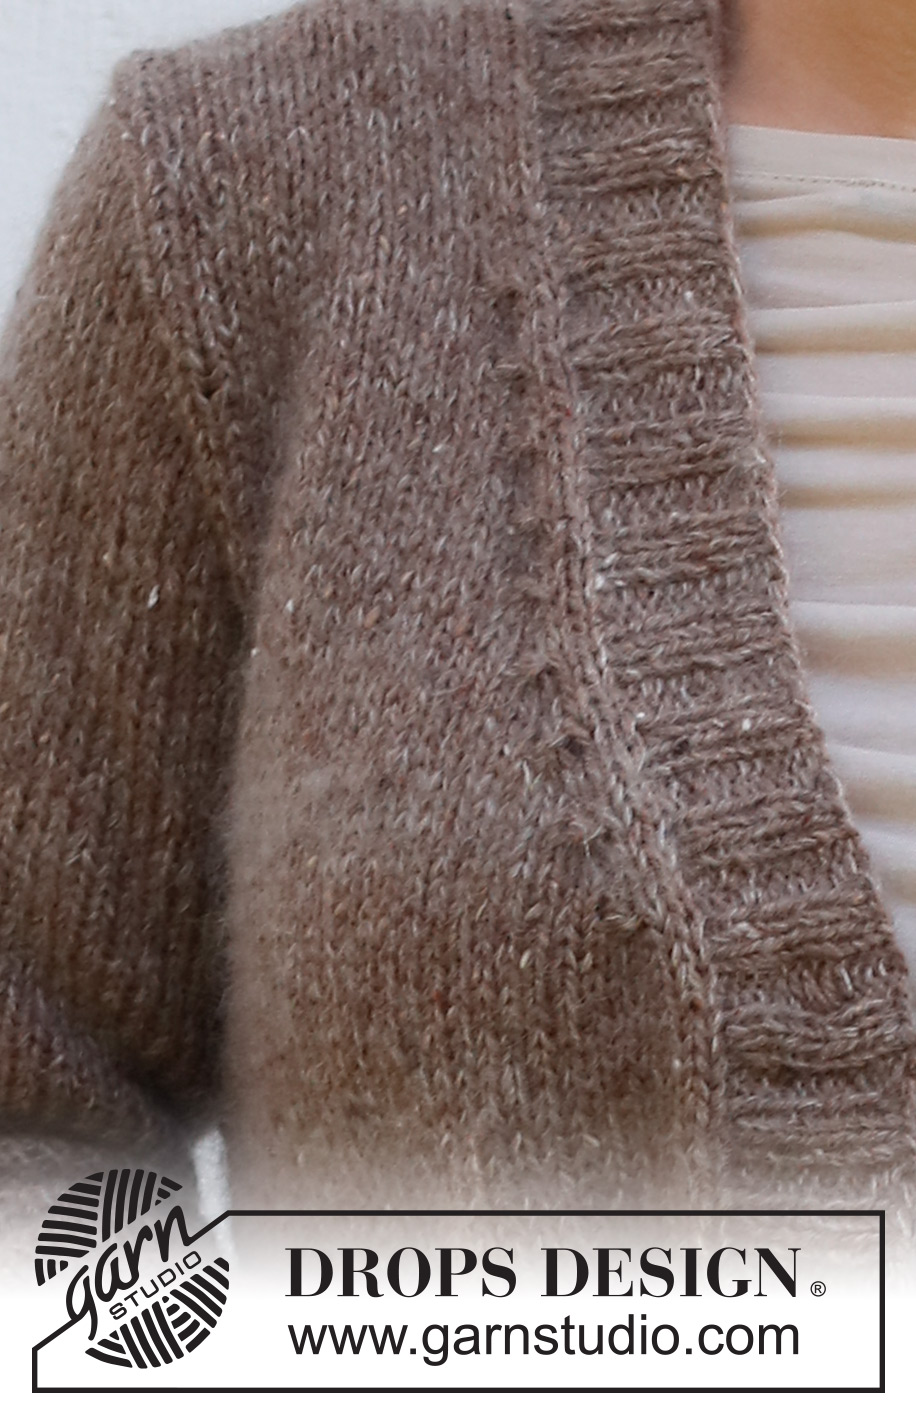
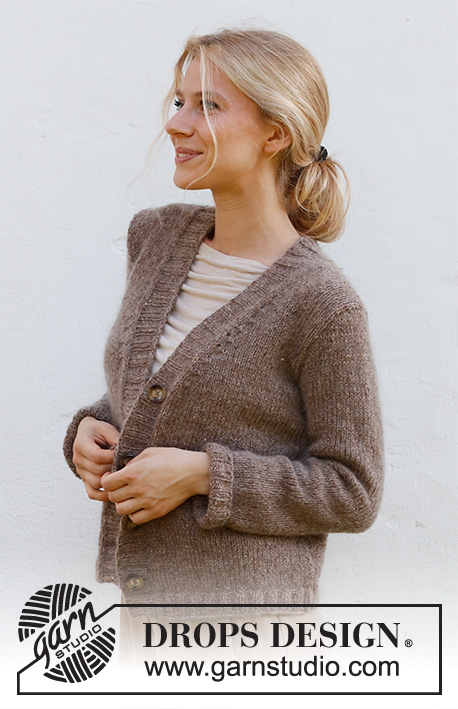
Knitted jacket in DROPS Soft Tweed and DROPS Kid-Silk. The piece is worked with V-neck and ribbed edges. Sizes: S - XXXL.
DROPS 227-45 |
||||||||||
|
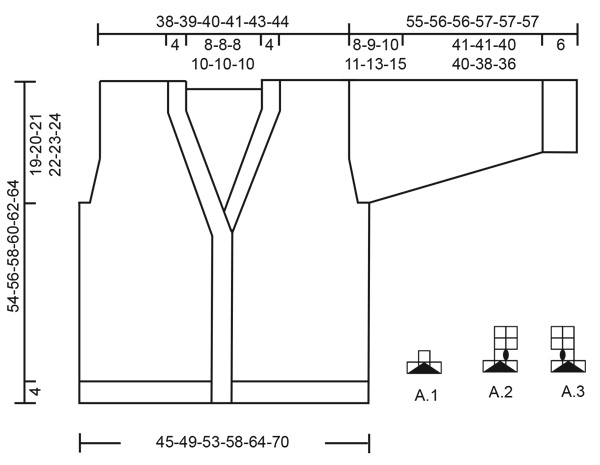
------------------------------------------------------- EXPLANATIONS FOR THE PATTERN: ------------------------------------------------------- RIDGE/GARTER STITCH (worked back and forth): Knit all rows. 1 ridge = knit 2 rows PATTERN (for decreases to neck and armholes– read DECREASE TIP-2): See diagrams A.1 to A.3. The diagrams show all rows in the pattern from the right side. DECREASE TIP-1 (evenly spaced): To work out how to decrease evenly, count the total number of stitches on needle (e.g. 176 stitches), minus the edge stitches (e.g. 2 stitches) and divide the remaining stitches by the number of decreases to be made (e.g. 30) = 5.8. In this example decrease by knitting together approx. each 5th and 6th stitch. Do not decrease the edge stitches. DECREASE TIP-2 (armholes and neck): All decreases are worked from the right side! DECREASE 2 STITCHES AT THE BEGINNING OF THE ROW: Work 1 edge stitch in garter stitch, 2 stitches in stocking stitch, A.1 over the next 3 stitches (= 2 stitches decreased). DECREASE 2 STITCHES AT THE END OF THE ROW: Work until there are 6 stitches left, A.1 over the next 3 stitches (= 2 stitches decreased), 2 stitches in stocking stitch,1 edge stitch in garter stitch. DECREASE 1 STITCH AT THE BEGINNING OF THE ROW: Work 1 edge stitch in garter stitch, 2 stitches in stocking stitch, A.2 over the next 3 stitches (= 1 stitch decreased). DECREASE 1 STITCH AT THE END OF THE ROW: Work until there are 6 stitches left, A.3 over the next 3 stitches (= 1 stitch decreased), 2 stitches in stocking stitch,1 edge stitch in garter stitch INCREASE TIP (sleeves): Work until there are 2 stitches left before the marker thread, 1 yarn over, knit 4 (marker thread sits between these 4 stitches), 1 yarn over (2 stitches increased). On the next round knit the yarn overs twisted to avoid holes. Then work the new stitches in stocking stitch. CASTING-OFF TIP: To avoid the cast-off edge being tight you can cast off with a larger size needle. If the edge is still tight, make 1 yarn over after approx. each 4th stitch at the same time as casting off; the yarn overs are cast off as normal stitches. ------------------------------------------------------- START THE PIECE HERE: ------------------------------------------------------- JACKET – SHORT OVERVIEW OF THE PIECE: The piece is worked back and forth with circular needle bottom up as far as the armholes, then the front and back pieces are finished separately. The sleeves are worked in the round with double pointed needles/short circular needle, bottom up as far as the sleeve cap, then finished back and forth. The piece is sewn together and the neck/bands are worked to finish. BODY: Cast on 176-192-204-224-248-272 stitches with circular needle size 4 mm and 1 strand of each quality (= 2 strands). Purl 1 row from the wrong side, then work rib as follows: 1 edge stitch in GARTER STITCH – read description above, * knit 2, purl 2 *, work from *-* until there are 3 stitches left, knit 2 and 1 edge stitch in garter stitch. Continue this rib for 4 cm. Knit 1 row from the right side where you decrease 30-34-34-38-42-46 stitches evenly spaced – read DECREASE TIP-1 = 146-158-170-186-206-226 stitches. Insert 1 marker thread 37-40-43-47-52-57 stitches in from each side (= sides). There are 72-78-84-92-102-112 stitches between the threads on the back piece. Allow the markers to follow your work onwards – they are used when casting off for the armholes. Change to circular needle size 5 mm and purl 1 row from the wrong side (the edge stitches are knitted). Continue with stocking stitch and 1 edge stitch in garter stitch in each side. REMEMBER THE KNITTING TENSION! OVERVIEW OF THE NEXT SECTION: When the piece measures 31-32-33-34-35-36 cm, start to decrease for the neck. AT THE SAME TIME cast off for the armholes, when each piece is finished separately. Read V-NECK and ARMHOLES before continuing. V-NECK: When the piece measures 31-32-33-34-35-36 cm, on the next row from the right side, decrease for the neck on each side – read DECREASE TIP-2. Decrease 2 stitches on each side every 4th row (every second row from the right side) a total of 5 times in all sizes. Then decrease 1 stitch on each side every 4th row 4-4-4-5-5-5 times. ARMHOLES: AT THE SAME TIME when the piece measures 35-36-37-38-39-40 cm and the next row is from the right side, cast off for the armholes as follows: Work until there are 3-3-4-4-5-6 stitches left before the first marker thread, cast off 6-6-8-8-10-12 stitches, work until there are 3-3-4-4-5-6 stitches left before the second marker thread, cast off 6-6-8-8-10-12 stitches and work to the end of the row. Front and back pieces are finished separately. LEFT FRONT PIECE (when the garment is worn): Start from the wrong side and continue with stocking stitch and 1 edge stitch in garter stitch on each side; continue to decrease for the neck as described above. In addition, decrease for the armhole at the beginning of the next row from the right side – remember DECREASE TIP-2. Decrease 2 stitches every 4th row 0-2-3-4-6-7 times. Then decrease 1 stitch every 4th row 3-1-0-1-0-1 times. After all the decreases to neck and armhole there are 17-18-19-19-20-21 stitches on the shoulder. Continue with stocking stitch and 1 edge stitch in garter stitch on each side until the piece measures 54-56-58-60-62-64 cm (19-20-21-22-23-24 cm from the bottom of the armhole). Cast off with knit from the right side. RIGHT FRONT PIECE: Start from the wrong side and continue with stocking stitch and 1 edge stitch in garter stitch on each side; continue to decrease for the neck as described above. In addition, decrease for the armhole at the end of the next row from the right side. Decrease 2 stitches every 4th row 0-2-3-4-6-7 times. Then decrease 1 stitch every 4th row 3-1-0-1-0-1 times. After all the decreases to neck and armhole there are 17-18-19-19-20-21 stitches on the shoulder. Continue with stocking stitch and 1 edge stitch in garter stitch on each side until the piece measures 54-56-58-60-62-64 cm (19-20-21-22-23-24 cm from the bottom of the armhole). Cast off with knit from the right side. BACK PIECE: = 66-72-76-84-92-100 stitches. Start from the wrong side and work stocking stitch back and forth with 1 edge stitch in garter stitch on each side. AT THE SAME TIME on the next row from the right side decrease for the armholes as follows: Decrease 2 stitches on each side every 4th row a total of 0-2-3-4-6-7 times. Then decrease 1 stitch on each side every 4th row 3-1-0-1-0-1 times = 60-62-64-66-68-70 stitches. When the piece measures 52-54-56-58-60-62 cm, cast off the middle 22-22-22-24-24-24 stitches for the neck and each shoulder is finished separately. On the next row from the right side decrease 2 stitches by the neck - remember DECREASE TIP-2 = 17-18-19-19-20-21 stitches on the shoulder. Continue working until the piece measures 54-56-58-60-62-64 cm (19-20-21-22-23-24 cm from the bottom of the armholes). Cast off with knit. Work the other shoulder in the same way. SLEEVES: Cast on 44-48-48-52-52-56 stitches with double pointed needles size 4 mm and 1 strand of each quality (= 2 strands). Knit 1 round, then work rib in the round (knit 2, purl 2) for 6 cm. Knit 1 round where you decrease 6-8-6-8-8-10 stitches evenly spaced = 38-40-42-44-44-46 stitches. Insert 1 marker thread at the beginning of the round (= mid-under sleeve). Allow the thread to follow your work onwards – it is used when increasing. Change to double pointed needles size 5 mm and work stocking stitch in the round for 10-9-11-9-10-8 cm. Now increase 1 stitch on each side of the marker thread – read INCREASE TIP. Increase like this every 5-4½-3½-3½-2½-2½ cm a total of 8-9-10-11-13-14 times = 54-58-62-66-70-74 stitches. When the sleeve measures 47-47-46-46-44-42 cm, work as follows: Start 3-3-4-4-5-6 stitches before the marker thread, cast off 6-6-8-8-10-12 stitches and work to the end of the round = 48-52-54-58-60-62 stitches. Starting from the wrong side, work stocking stitch back and forth for the sleeve cap. AT THE SAME TIME cast off at the beginning of each row as follows: 2 stitches 1-2-2-3-3-3 times and 1 stitch 3-3-3-3-5-6 times on each side. Then 2 stitches at the beginning of each row on each side until the piece measures 54-55-55-56-56-56 cm. Then 3 stitches at the beginning of the next 2 rows. Cast off the remaining stitches. The sleeve measures approx. 55-56-56-57-57-57 cm. Work the other sleeve in the same way. You can turn up the bottom 3 cm if you wish – see photo. ASSEMBLY: Sew the shoulder seams inside the cast-off edge. Sew in the sleeves, inside the 1 edge stitch on the armholes. BANDS/NECK: Insert a marker mid-back of the neck. Start from the right side at the bottom of the right front piece, knit up stitches inside the 1 edge stitch with circular needle size 4 mm and 1 strand of each quality (= 2 strands) as follows: 118-122-126-130-134-138 stitches up the front piece and around to the marker on the neck (number of stitches should be divisible by 4 + 2). Then knit up the same number of stitches from the marker and down the left front piece = a total of 236-244-252-260-268-276 stitches on the needle. Work the first row from the wrong side as follows: 1 edge stitch in garter stitch, * purl 2, knit 2 *, work from *-* until there are 3 stitches left, purl 2 and 1 edge stitch in garter stitch (the marker should sit between 2 knitted stitches seen from the right side). Continue this rib for 2 cm. Now work 4-4-4-5-5-5 buttonholes on the right band. The top buttonholes is worked 1 cm below the beginning of the V-neck and the bottom buttonhole 6 cm from the bottom edge. 1 BUTTONHOLE = Cast off, a little tightly, 2 purled stitches (seen from the right side) and cast on 2 new stitches over the cast-off stitches on the next row. Continue the rib until the bands measure 4 cm. Cast off with knit over knit and purl over purl – read CASTING-OFF TIP! Sew the buttons onto the left band. |
||||||||||
Diagram explanations |
||||||||||
|
||||||||||
 |
||||||||||
Have you finished this pattern?Tag your pictures with #dropspattern #twinkletweedjacket or submit them to the #dropsfan gallery. Do you need help with this pattern?You'll find 28 tutorial videos, a Comments/Questions area and more by visiting the pattern on garnstudio.com. © 1982-2026 DROPS Design A/S. We reserve all rights. This document, including all its sub-sections, has copyrights. Read more about what you can do with our patterns at the bottom of each pattern on our site. |
||||||||||


With over 40 years in knitting and crochet design, DROPS Design offers one of the most extensive collections of free patterns on the internet - translated to 17 languages. As of today we count 324 catalogues and 12290 patterns translated into English (UK/cm). 12290
We work hard to bring you the best knitting and crochet have to offer, inspiration and advice as well as great quality yarns at incredible prices! Would you like to use our patterns for other than personal use? You can read what you are allowed to do in the Copyright text at the bottom of all our patterns. Happy crafting!
Post a comment to pattern DROPS 227-45
We would love to hear what you have to say about this pattern!
If you want to leave a question, please make sure you select the correct category in the form below, to speed up the answering process. Required fields are marked *.