
Popular categories
Looking for a yarn?


Comments / Questions (69)
![]() Helga wrote:
Helga wrote:
I don't speak Danish. Did you say to Pia to take 3 stitches on each side of the sleeve sections and add them to the front/back sections? That is actually what I ended up doing but I would like you to confirm that. It is really annoying when you have knitted the entire yoke section and then find out that things don't work the way they are supposed to. I would appreciate very much a response because I'm obviously not the only one with that issue.
25.06.2020 - 18:00DROPS Design answered:
Dear Helga, this might change depending on your size, but you will have to start the dividing round some stitches before end of round to get some stitches from sleeves affected to body + the knit 1 from end of round. Happy knitting!
26.06.2020 - 15:52
![]() Pia wrote:
Pia wrote:
Jeg er også sikker på der er en fejl i opskriften. Jeg har samme problem som Susan og Helga, men med str. M. Når jeg skal dele til ryg/forstykke og ærmer, har jeg 80 masker til ryg og forstykke og 71 masker til hvert ærme. Det passer også med at der er 9 masker mere i A1 end i A2 fra start af mønster. Hvad er det rigtige ? Hvad skal jeg gøre ?
22.06.2020 - 21:44DROPS Design answered:
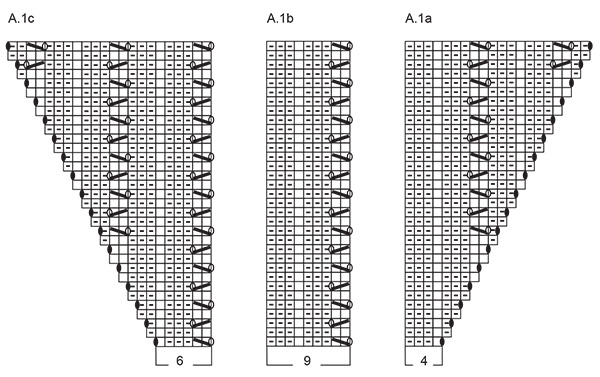
Hej Pia, stemmer det ikke hvis du strikker de midterste 86 masker (tager 3 masker fra ærmerne i hver side), lukker 65 masker af, strikker 86 masker, og lukker 65 masker af = 302 masker. God fornøjelse!
25.06.2020 - 09:32
![]() Helga wrote:
Helga wrote:
There is definitely an error in the pattern and not just in the large size. I figured out that in the large size, you have to increase the number of stitches in A.1a and A.1c by 3 stitches to 7 and 9 respectively and decrease the number of stitches in A.2 by 3 on each side starting out with 13 stitches in the first row. That will result after 28 increases in 71 stitches for the sleeve/shoulder section and 92 stitches for the back and front.
20.06.2020 - 19:28
![]() Susan wrote:
Susan wrote:
I have the same issue as Helga, with the number of stitches in the large size being incorrect for sleeves/body. I assume this is an error in the pattern
20.06.2020 - 08:43DROPS Design answered:
Thank you. We should explain it more clearly. Happy knitting!
15.12.2020 - 09:17
![]() Helga wrote:
Helga wrote:
I'm working on a large size and increased 8 stitches every other round 28 times ending up with 326 stitches. However, the back and front have only 86 instead of 92 stitches whereas the shoulder/sleeve sections have 77 rather than 71 stitches. I had to cheat and put 6 stitches (3 on each side) from the sleeve section onto the front and back sections. Is there a mistake in the pattern or did I make a mistake? It worked out okay and still looks lovely.
18.06.2020 - 05:35DROPS Design answered:
Hi Helga, you did ok, we should explain it more clearly. Happy knitting!
15.12.2020 - 09:16
![]() Denise 08 wrote:
Denise 08 wrote:
Bonjour, j'aurais aimé réaliser ce modèle avec des manches longues. Cela vous paraît-il possible ? Merci
07.06.2020 - 10:47DROPS Design answered:
Bonjour Denise08, vous pouvez fort probablement adapter ce modèle avec des manches longues. Nous ne sommes toutefois pas en mesure de pouvoir adapter chacun de nos modèles à chaque demande. Vous pouvez toutefois vous aider d'un modèle manches longues de même tension et/ou demander de l'aide à votre magasin ou bien sur un forum. Bon tricot!
08.06.2020 - 08:49
![]() Christa wrote:
Christa wrote:
Beste, in dit patroon staat verdeel de steken voor schouders en voor en achterpand. Hoe gaat dat in zijn werk? Want de volgende stap is reeds het patroon A1... Dankjewel
18.05.2020 - 13:30DROPS Design answered:
Dag Christa,
Helaas begrijp ik niet precies wat je bedoelt. Je kunt gewoon het patroon beginnen bij 'HALSRAND' door steken op te zetten en dan verder de beschrijving volgen. Wanneer je met het lijf begint heb je de steken voor de mouw/armsgaten al afgekant.
19.05.2020 - 13:21
![]() ESTER MARTINEZ wrote:
ESTER MARTINEZ wrote:
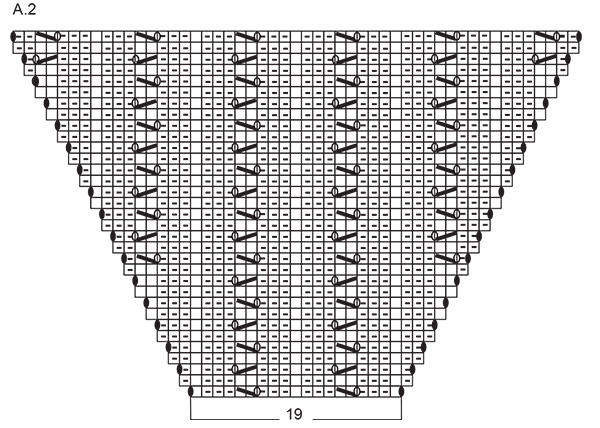
En el diagrama A1a, se indica que hay que cerrar el aumento del revés, no se cierra del derecho ?he contado los puntos y estan bien.... algo no entiendo.
10.05.2020 - 08:12DROPS Design answered:
Hola Ester, el diagrama es correcto, el diagrama muestra todas las filas del patrón vistas por el lado derecho (el cuadrado que ves de revés se trabajaría de derecho por el lado revés). Para más dudas sobre cómo leer el diagrama puedes consultar la siguiente lección: https://www.garnstudio.com/lesson.php?id=68&cid=23
20.11.2020 - 20:53
![]() Antje wrote:
Antje wrote:
Ich habe die Halsblende und die erste Runde der Passe gestrickt. Nun beginnt mein Problem. Ich stricke die zweite Runde *1 Masche rechts,dann A.1a lt.: Diagramm soll ich eine linke Masche stricken, aber das ist doch mein Umschlag aus der Reihe vorher, den ich laut Erklärungen zum Diagramm rechts verschränkt stricken soll. Wo liegt mein Fehler?
05.05.2020 - 22:17DROPS Design answered:
Liebe Antje, ja genau, die 1. Masche bei der 2. Reihe A.1a (und die letzte Masche in A.1c) ist der Umschlag von der 1. Reihe, den stricken Sie links (bei der 2. Reihe) verschränkt (bei anderen Runden sollen Sie diese Umschläge rechts verschränkt stricken). Viel Spaß beim stricken!
06.05.2020 - 10:19
![]() Mariarosaria wrote:
Mariarosaria wrote:
Poi un'altra domanda, sulle spiegazioni dice di lavorare a diritto ritorto il gettato, ma nello schema io leggo , già dal secondo rigo di lavorarci sopra un rovescio...sbaglio io ad interpretare ? sto terminando il cardigan n 766 e non ho incontrato queste difficolta, anche aiutandomi con le sue risposte in coda
04.05.2020 - 21:24DROPS Design answered:
Buongiorno Mariarosaria. Segue le indicazioni che trova al suggerimento per gli aumenti quando richiamate nel testo (quindi quando aumenta ai lati della maglia). Le maglie gettate dei diagrammi devono essere lavorate come spiegato nella legenda: quindi quelle bianche non ritorte, quelle nere ritorte. Buon lavoro!
05.05.2020 - 08:42
|
|||||||||||||||||||
Sweet Impressions#sweetimpressionstop |
|||||||||||||||||||
 |
 |
||||||||||||||||||
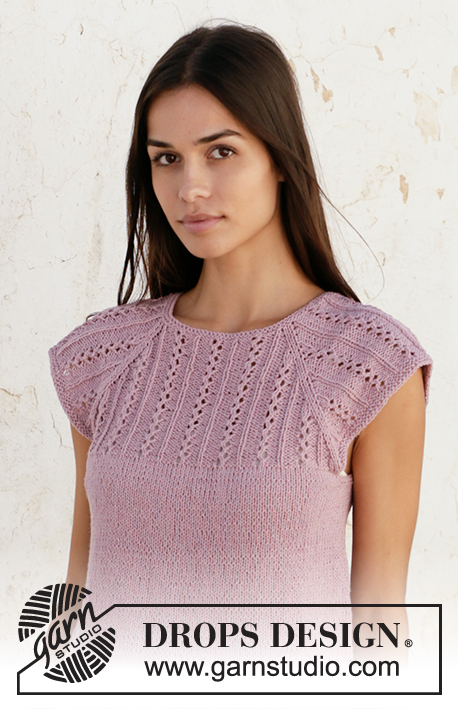
Knitted top with raglan in DROPS Belle. Piece is knitted top down with lace pattern. Size: S - XXXL
DROPS 211-12 |
|||||||||||||||||||
|
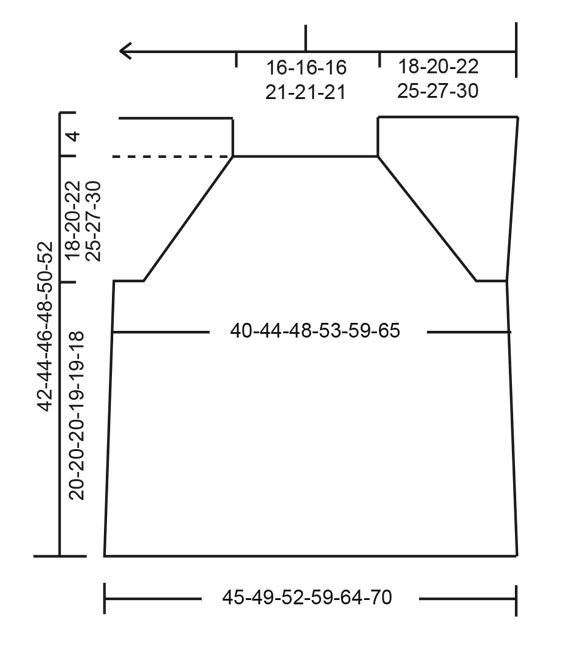
---------------------------------------------------------- EXPLANATION FOR THE PATTERN: ---------------------------------------------------------- GARTER STITCH (worked in the round): 1 ridge vertically = 2 rounds, i.e. knit 1 round and purl 1 round. PATTERN: See diagrams A.1 and A.2. INCREASE TIP (applies to sides of body): Work until 2 stitches remain before marker thread, 1 yarn over, knit 4 (marker thread is in the middle of these stitches), 1 yarn over. On next round knit yarn overs twisted to avoid holes. Then work the new stitches in stockinette stitch. BIND-OFF TIP: To avoid a tight bind-off edge you may use a larger needle. If this also is too tight, make 1 yarn over after approx. every 4th stitch, bind off these as regular stitches. ---------------------------------------------------------- START THE PIECE HERE: ---------------------------------------------------------- TOP - SHORT OVERVIEW OF THE PIECE: Neck edge and yoke are worked in the round on circular needle, top down. Now divide yoke for body and sleeves. Body is worked in the round on circular needle, top down. NECK EDGE: Cast on 102-102-102-120-120-120 stitches on circular needle size 3 mm = US 2,5 with Belle. Work 2 ridges in GARTER STITCH - see explanation above. Switch to circular needle size 4 mm = US 6. YOKE: Begin round in transition between left shoulder and back piece. Work pattern as follows: * Knit 1, A.1a (= 4 stitches), A.1b over the next 18-18-18-27-27-27 stitches (2-2-2-3-3-3 repetitions of 9 stitches), A.1c (= 6 stitches), knit 2, A.2 (= 19 stitches), knit 1 *, work from *-* 2 times. Work and increase as shown in diagram, when A.1 and A.2 have been worked one time vertically, continue pattern and increases the same way. Increase 8 stitches every other round, work stitches in pattern. Increase every other round 22-25-28-32-35-38 times in total. After all increases are done there are 278-302-326-376-400-424 stitches on needle. REMEMBER THE KNITTING GAUGE! Work next round as follows (start this round 2-3-3-1-3-5 stitches before end of previous round): Work the first 78-86-92-105-115-125 stitches as before (without increases), work in garter stitch over the next 61-65-71-83-85-87 stitches, work the next 78-86-92-105-115-125 stitches as before (without increases), work in garter stitch over the last 61-65-71-83-85-87 stitches. Continue like this until 2 ridges have been worked (= 4 rounds). Work next round as follows: Knit the first 78-86-92-105-115-125 stitches (= back piece), bind off the next 61-65-71-83-85-87 stitches, knit the next 78-86-92-105-115-125 stitches (= front piece), bind off the last 61-65-71-83-85-87 stitches. NOW MEASURE PIECE FROM HERE! BODY: Work the first 78-86-92-105-115-125 stitches in stockinette stitches, cast on 6-6-8-8-10-12 new stitches, work 78-86-92-105-115-125 stitches in stockinette stitch, cast on 6-6-8-8-10-12 new stitches, and work in the round = 168-184-200-226-250-274 stitches. Work in stockinette stitch, but over the new 6-6-8-8-10-12 stitches in each side work 2 ridges, before continuing with stockinette stitch over all stitches. Insert 1 marker thread in each side, in the middle of the new stitches that were cast on. When piece measures 4 cm = 1½", increase 1 stitch on each side of marker threads in each side - read INCREASE TIP. Repeat increase every 3 cm = 1⅛" 5 times in total = 188-204-220-246-270-294 stitches. When piece measures 19-19-19-18-18-17 cm = 7½"-7½"-7½"-7"-7"-6¾" from division, work 2 ridges over all stitches, then bind off - READ BIND-OFF TIP. |
|||||||||||||||||||
Diagram explanations |
|||||||||||||||||||
|
|||||||||||||||||||
 |
|||||||||||||||||||
 |
|||||||||||||||||||
 |
|||||||||||||||||||
Have you finished this pattern?Tag your pictures with #dropspattern #sweetimpressionstop or submit them to the #dropsfan gallery. Do you need help with this pattern?You'll find 21 tutorial videos, a Comments/Questions area and more by visiting the pattern on garnstudio.com. © 1982-2026 DROPS Design A/S. We reserve all rights. This document, including all its sub-sections, has copyrights. Read more about what you can do with our patterns at the bottom of each pattern on our site. |
|||||||||||||||||||


With over 40 years in knitting and crochet design, DROPS Design offers one of the most extensive collections of free patterns on the internet - translated to 17 languages. As of today we count 324 catalogs and 12260 patterns - 12250 of which are translated into English (US/in).
We work hard to bring you the best knitting and crochet have to offer, inspiration and advice as well as great quality yarns at incredible prices! Would you like to use our patterns for other than personal use? You can read what you are allowed to do in the Copyright text at the bottom of all our patterns. Happy crafting!
Post a comment to pattern DROPS 211-12
We would love to hear what you have to say about this pattern!
If you want to leave a question, please make sure you select the correct category in the form below, to speed up the answering process. Required fields are marked *.