
Popular categories
Looking for a yarn?


Comments / Questions (69)
![]() Lars Laursen wrote:
Lars Laursen wrote:
Der mangler mindst 10 cm i længden, h is toppen skal ligne den på modellen - uanset h ad mål skitsen siger
06.03.2022 - 22:52
![]() Annelise wrote:
Annelise wrote:
Jeg vil gerne ha resten af diagrammet , strikker str. m og skal tage ud 25 gange, der er kun til 17 udtagninger i diagrammet, hvordan gør jeg 🤔🤔 Mvh Annelise
13.08.2021 - 14:08
![]() Maj wrote:
Maj wrote:
Hej, Jeg forstår desværre slet ikke dette: "Der tages 8 masker ud på hver 2.omgang, maskerne strikkes løbende ind i mønsteret. Tag ud på hver 2.omgang totalt 22-25-28-32-35-38 gange." Jeg strikker i str. M. Jeg er færdig med at strikke A1+A2 en gang i højde. Hvor mange ekstra omgange med mønster skal jeg lave? (Jeg kan ikke forstå sammenhængen mellem 8 udtagninger og 25 gange. ) På forhånd tak for hjælpen Mvh Maj
14.06.2021 - 09:31DROPS Design answered:
Hej Maj, jo de 8 udtagninger på hver 2.omgang er samme som dem du strikker ifølge diagrammet, og dem fortsætter du med til du har taget ud totalt 25 gange. 8x25=200+ de 102 du startede med = 302 masker som det står i opskriften :)
15.06.2021 - 15:38
![]() Mor wrote:
Mor wrote:
Beklager. Mente jeg får 1 maske for LITE ..😯
09.06.2021 - 10:33
![]() Mor wrote:
Mor wrote:
Hei.. trenger hjelp 😯😊 str. denne i XL .. I beg. på første omg. har jeg 1 rett,1 kast, 1 rett, og 3 vrang.. I 2 omg. hvist jeg skal strikke etter mønster. : 1 rett ,1 vrang , strikke kastet,1 rett og 3 vrang får jeg 1 maske for mye ..😯???
09.06.2021 - 10:30DROPS Design answered:
Hej. Kastet är inritad i diagrammet så på omg 2 stickar du bara: 1 rett, 1 vrang (=kastet), 1 rett, 3 vrang osv. Mvh DROPS Design
10.06.2021 - 13:25
![]() Judith Jenkins wrote:
Judith Jenkins wrote:
I love my Sweet Impressions tee and thank you for the question answering service that you run. I will definitely knit a Drops Design project again, Judy
08.06.2021 - 14:29
![]() Mormor wrote:
Mormor wrote:
Hei.. skal de rette maskene som strikkes i begynnelsen ,etter A1c, og etter A2 strikkes inni mønsteret når jeg er ferdig med omg 1 ?? Eller var det bare første omg ?
03.06.2021 - 10:14DROPS Design answered:
Hei Mormor, De skal fortsatt strikkes rett. God fornøyelse!
04.06.2021 - 07:56
![]() Rigmor wrote:
Rigmor wrote:
Hei.. får ikke mønster til å stemmer i 3 omg.. når jeg starter på A1a så har jeg. 1 m for mye ?..
02.06.2021 - 18:38DROPS Design answered:
Hei Rigmor, Du sier ikke hvilken størrelse du strikker, men hvis vi tar størrelse S har du 102 masker før du begynner A.1a. Første omgang øker du 1 maske i A.1 a, ingen økning i A.1b, 1 økning i A.1 c (fordi økning og felling er likt) og 2 økninger i, A.2. Og du gjentar dette. Så du har økt totalt 8 masker på omgangen. Da burde antall masker være riktig for omgang 3. Håper dette hjelper og god fornøyelse!
03.06.2021 - 07:44
![]() Michaela Rasmussen wrote:
Michaela Rasmussen wrote:
Hej. Jeg har downloadet opskriften i pdf, men diagrammet er ikke med, når man downloader opskriften. Kan det passe?
19.05.2021 - 18:48DROPS Design answered:
Hej Michaela, Når du skriver opskriften ud, er det vigtigt at du klikker på "skriv ud" knappen som er inde på selve opskriften for at få diagrammerne med :)
20.05.2021 - 14:45
![]() Farmor wrote:
Farmor wrote:
Købte 5 ngl til str L, men der var desværre ikke nok garn
13.05.2021 - 10:00
|
|||||||||||||||||||
Sweet Impressions#sweetimpressionstop |
|||||||||||||||||||
 |
 |
||||||||||||||||||
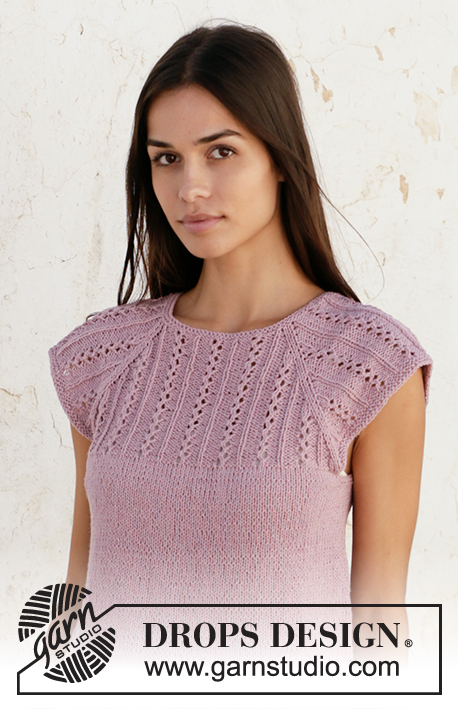
Knitted top with raglan in DROPS Belle. Piece is knitted top down with lace pattern. Size: S - XXXL
DROPS 211-12 |
|||||||||||||||||||
|
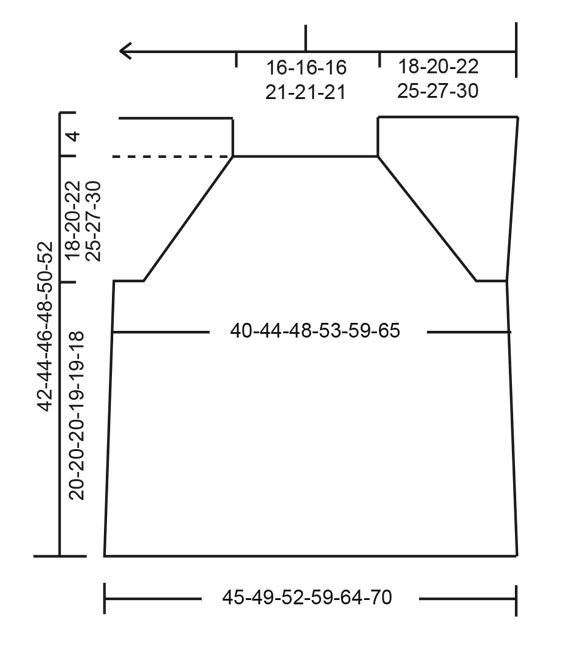
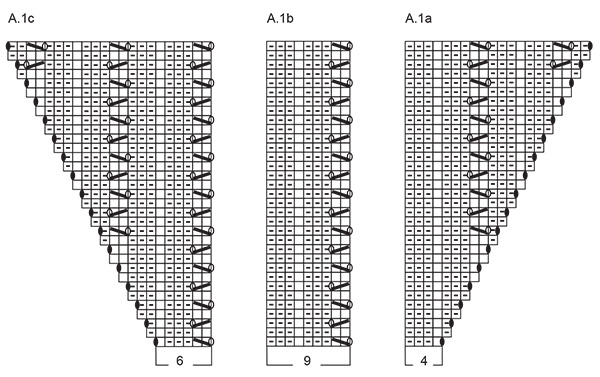
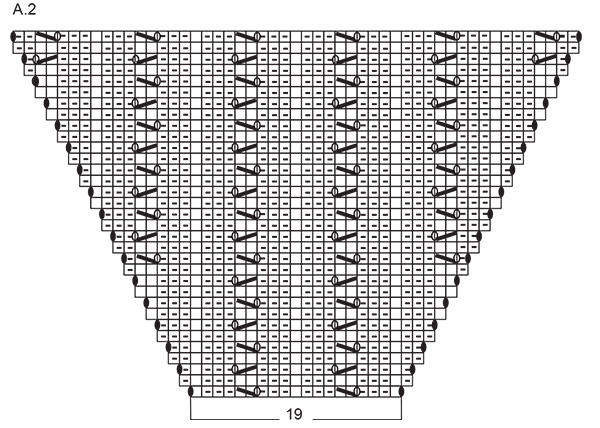
---------------------------------------------------------- EXPLANATION FOR THE PATTERN: ---------------------------------------------------------- GARTER STITCH (worked in the round): 1 ridge vertically = 2 rounds, i.e. knit 1 round and purl 1 round. PATTERN: See diagrams A.1 and A.2. INCREASE TIP (applies to sides of body): Work until 2 stitches remain before marker thread, 1 yarn over, knit 4 (marker thread is in the middle of these stitches), 1 yarn over. On next round knit yarn overs twisted to avoid holes. Then work the new stitches in stockinette stitch. BIND-OFF TIP: To avoid a tight bind-off edge you may use a larger needle. If this also is too tight, make 1 yarn over after approx. every 4th stitch, bind off these as regular stitches. ---------------------------------------------------------- START THE PIECE HERE: ---------------------------------------------------------- TOP - SHORT OVERVIEW OF THE PIECE: Neck edge and yoke are worked in the round on circular needle, top down. Now divide yoke for body and sleeves. Body is worked in the round on circular needle, top down. NECK EDGE: Cast on 102-102-102-120-120-120 stitches on circular needle size 3 mm = US 2,5 with Belle. Work 2 ridges in GARTER STITCH - see explanation above. Switch to circular needle size 4 mm = US 6. YOKE: Begin round in transition between left shoulder and back piece. Work pattern as follows: * Knit 1, A.1a (= 4 stitches), A.1b over the next 18-18-18-27-27-27 stitches (2-2-2-3-3-3 repetitions of 9 stitches), A.1c (= 6 stitches), knit 2, A.2 (= 19 stitches), knit 1 *, work from *-* 2 times. Work and increase as shown in diagram, when A.1 and A.2 have been worked one time vertically, continue pattern and increases the same way. Increase 8 stitches every other round, work stitches in pattern. Increase every other round 22-25-28-32-35-38 times in total. After all increases are done there are 278-302-326-376-400-424 stitches on needle. REMEMBER THE KNITTING GAUGE! Work next round as follows (start this round 2-3-3-1-3-5 stitches before end of previous round): Work the first 78-86-92-105-115-125 stitches as before (without increases), work in garter stitch over the next 61-65-71-83-85-87 stitches, work the next 78-86-92-105-115-125 stitches as before (without increases), work in garter stitch over the last 61-65-71-83-85-87 stitches. Continue like this until 2 ridges have been worked (= 4 rounds). Work next round as follows: Knit the first 78-86-92-105-115-125 stitches (= back piece), bind off the next 61-65-71-83-85-87 stitches, knit the next 78-86-92-105-115-125 stitches (= front piece), bind off the last 61-65-71-83-85-87 stitches. NOW MEASURE PIECE FROM HERE! BODY: Work the first 78-86-92-105-115-125 stitches in stockinette stitches, cast on 6-6-8-8-10-12 new stitches, work 78-86-92-105-115-125 stitches in stockinette stitch, cast on 6-6-8-8-10-12 new stitches, and work in the round = 168-184-200-226-250-274 stitches. Work in stockinette stitch, but over the new 6-6-8-8-10-12 stitches in each side work 2 ridges, before continuing with stockinette stitch over all stitches. Insert 1 marker thread in each side, in the middle of the new stitches that were cast on. When piece measures 4 cm = 1½", increase 1 stitch on each side of marker threads in each side - read INCREASE TIP. Repeat increase every 3 cm = 1⅛" 5 times in total = 188-204-220-246-270-294 stitches. When piece measures 19-19-19-18-18-17 cm = 7½"-7½"-7½"-7"-7"-6¾" from division, work 2 ridges over all stitches, then bind off - READ BIND-OFF TIP. |
|||||||||||||||||||
Diagram explanations |
|||||||||||||||||||
|
|||||||||||||||||||
 |
|||||||||||||||||||
 |
|||||||||||||||||||
 |
|||||||||||||||||||
Have you finished this pattern?Tag your pictures with #dropspattern #sweetimpressionstop or submit them to the #dropsfan gallery. Do you need help with this pattern?You'll find 21 tutorial videos, a Comments/Questions area and more by visiting the pattern on garnstudio.com. © 1982-2026 DROPS Design A/S. We reserve all rights. This document, including all its sub-sections, has copyrights. Read more about what you can do with our patterns at the bottom of each pattern on our site. |
|||||||||||||||||||


With over 40 years in knitting and crochet design, DROPS Design offers one of the most extensive collections of free patterns on the internet - translated to 17 languages. As of today we count 324 catalogs and 12260 patterns - 12250 of which are translated into English (US/in).
We work hard to bring you the best knitting and crochet have to offer, inspiration and advice as well as great quality yarns at incredible prices! Would you like to use our patterns for other than personal use? You can read what you are allowed to do in the Copyright text at the bottom of all our patterns. Happy crafting!
Post a comment to pattern DROPS 211-12
We would love to hear what you have to say about this pattern!
If you want to leave a question, please make sure you select the correct category in the form below, to speed up the answering process. Required fields are marked *.