
Popular categories
Looking for a yarn?


Comments / Questions (69)
![]() Ménestret wrote:
Ménestret wrote:
Bonjour Pour l’empiecement , les motifs se font bien tous les deux rangs ? A l’aiguille circulaire, Le deuxième rang se tricote comme les mailles se présentent ou bien tricoter ce rang en jersey ? Merci pour votre réponse Marie
05.03.2026 - 19:19DROPS Design answered:
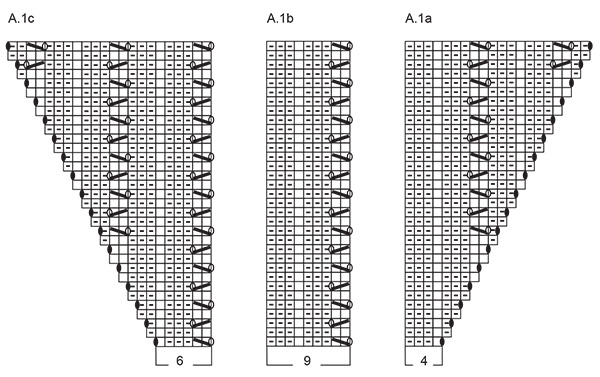
Bonjour Mme Ménestret, quand on tricote en rond, on tricote toujours les mailles comme elles doivent être sur l'endroit, ici les diagrammes se tricotent en rond tout le temps, vous allez les lire tous les tours de droite à gauche, ex A.1a: 1er tour: (1 jeté, 1 m end, 3 m env), 2ème tour: (1 m torse à l'envers (jeté du 1er tour), 1 m end, 3 m env), et ainsi de suite. Le point ajouré se fera ainsi effectivement tous les 2 tours. Bon tricot!
06.03.2026 - 07:37
![]() Jani wrote:
Jani wrote:
Wie muss ich mir die Zeile "in jeder 2. Runde insgesamt 25x zunehmend" vorstellen? Wo stbeite ich die Zunhmen? In einer Hinrunde oder in einer Runde ohne Zunahme? Steh grade auf dem Schlauch Lieben Dank
01.09.2025 - 17:01DROPS Design answered:
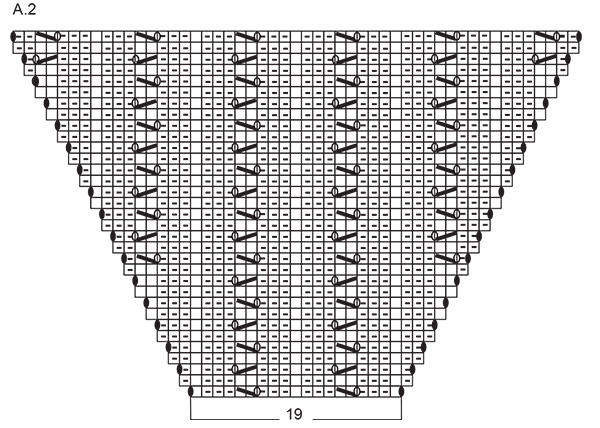
Liebe Jani, die Zunahmen sind in den Diagrammen A.1a/A.1c sowie A.2 gezeichnet, so werden Sie mit einem Umschlag (siehe 4. Symbol) zunehmen; wenn Sie 25 Mal zunehmen sollen, dann stricken Sie insgesamt 50 Runde (25 Runde mit einer Zunahme). Viel Spaß beim Stricken!
02.09.2025 - 17:33
![]() Lene wrote:
Lene wrote:
Har strikket halskant og første omgang af diagrammet på bærestykket hvor alle diagrammer strikkes to gange Jeg forstår ikke hvad der menes med: Strik og ta ud i følge diagrammerne., når diagrammerne A.1 og A.2 er strikket en gang i højden osv Skal jeg herefter fortsætte med at strikke alle diagrammer eller er det kun diagram A.1 og A.2 og skal de strikkes helt færdigt dvs til mønstret er strikket færdigt Det er i det hele taget svært at forstå hele dette afsnit
18.07.2025 - 16:23
![]() Astrid wrote:
Astrid wrote:
Hallo, ich habe den Pulli gerade angenagelt und jetzt verstehe ich nicht wie die Einteilung für die Markierungsfäden sein soll. Wo ist denn der Übergang zwischen den Ärmeln und den Rumpfteilen. danke euch schon mal
13.06.2025 - 13:11DROPS Design answered:
Liebe Astrid, wir setzen hier keine Markierung, aber einige können Sie gerne einsetzen, wenn Sie das so wollen, so wird es gestrickt: 1 Masche rechts, A.1a (= 4 Maschen), A.1b über die nächsten 18-18-18-27-27-27 Maschen (2-2-2-3-3-3 Rapporte à 9 Maschen), A.1c (= 6 Maschen), (= Rückenteil) 2 Maschen rechts (Raglanmascchen), A.2 (= 19 Maschen) (Ärmel), 1 Masche rechts (Raglanmasche), dann wieder: 1 Masche rechts (Raglan), A.1a (= 4 Maschen), A.1b über die nächsten 18-18-18-27-27-27 Maschen (2-2-2-3-3-3 Rapporte à 9 Maschen), A.1c (= 6 Maschen) (= Vorderteil) 2 Maschen rechts (Raglanmascchen), A.2 (= 19 Maschen) (Ärmel), 1 Masche rechts (Raglanmasche). Viel Spaß beim Stricken!
13.06.2025 - 16:42
![]() Ann-Sofi Skoglund wrote:
Ann-Sofi Skoglund wrote:
På varv 1 görs 1 rät maska innan A1a och 2 räta maskor innan A 2. Skall man fortsätta med detta genom hela diagrammet eller gäller detta bara varv 1?
11.06.2025 - 13:52DROPS Design answered:
Hej Ann-Sofi, ja det gör du på varje varv :)
12.06.2025 - 11:55
![]() Kat wrote:
Kat wrote:
Hello, if I follow the pattern, I get only 100 stitches after the 1st round because there are 10 times slip one stitch knitwise and only 8 times yarns over in the 1st round of the pattern? So, I lose 2 stitches instead of increase them.
24.05.2025 - 09:56DROPS Design answered:
Dear Kat, in the first round with the charts we have: *Knit 1, 4 stitches of A.1a, 18 stitches of A.1b, 6 stitches of A.1c, 2 knit stitches, 19 stitches of A.2, knit 1*, which is repeated twice. That is: 51 x2 = 102 stitches. In row 1 of A.1a we have 1 yarn over (we increase 1 stitch). In round 1 of A.1b we have 1 yarn over and 1 increase (stitches stay the same) . In A.1c we have 1 twisted yarn over (so it won't leave a hole), 1 decrease and 1 regular yarn over (so we increase 1 stitch). In A.2 we have 4 yarn overs and 2 decreases (we increase 2 stitches). After the first round we should have: (1+1+2)x2 = 8 increased stitches. Charts are read from the bottom up. Happy knitting!
25.05.2025 - 14:05
![]() Sanna wrote:
Sanna wrote:
Kun A.2 ja A.1 on neulottu, minkä mallin mukaan jatkan neulomista? Ilmeisesti lisäyksiä tehdään vielä 5 kierroksella eli 40 silmukkaa lisää?
30.04.2025 - 08:48DROPS Design answered:
Kun olet neulonut piirrokset loppuun, jatka mallineuletta kuten aiemmin. Eli lisää joka 2.kerroksella 8 silmukkaa samalla tavalla kuin aiemmin.
30.04.2025 - 16:14
![]() Sanna wrote:
Sanna wrote:
Alkaako JOKAINEN rivi yhdellä oikealla silmukalla?
27.04.2025 - 00:40DROPS Design answered:
Hei, kyllä jokaisen kerroksen alussa neulotaan 1 silmukka oikein.
28.04.2025 - 12:23
![]() Natalia wrote:
Natalia wrote:
Continuando con las dudas...en el cuerpo como trabajas dos pliegues en los puntos nuevos? Los pasas a otra aguja? La verdad es que me resulta un poco lioso... Gracias.
07.04.2025 - 22:15DROPS Design answered:
Hola Natalia, trabajar dos pliegues quiere decir trabajar 4 vueltas en punto musgo (1 vuelta de derecho, 1 vuelta de revés, 1 vuelta de derecho, 1 vuelta de revés). El cuerpo se trabaja en punto jersey (todas las vueltas de derecho) pero sobre los puntos indicados trabajarás en punto musgo. Eso quiere decir que en la 1ª vuelta trabajas todo de derecho, en la segunda vuelta trabajas todos los puntos menos los puntos para los pliegues de derecho; los puntos de los pliegues se trabajan de revés. Repetir estas 2 vueltas una vez más. No tienes que colocar los puntos aparte; es una forma de expresar que estos puntos se trabajan en punto musgo en 4 vueltas.
13.04.2025 - 20:15
![]() Natalia wrote:
Natalia wrote:
Buenas, disculpad pero no entiendo muy bien el patrón... Después de repetir de *a* dos veces...vas haciendo los diagramas aumentando y cuando ya has hecho en vertical A1 y A2 como continuas con el patrón y los aumentos de la misma manera? Que significa eso? Haces de nuevo todo A1 y A2? O solo repites la ultima vuelta de los diagramas? Y sobre eso que sigues trabajando vas aumentando 8 ptos cada dos vueltas x veces? Me podéis ayudar pro favor? Es que no se que hay que hacer... Muchas gracias!
07.04.2025 - 22:11DROPS Design answered:
Hola Natalia, en la primera vuelta trabajas el patrón como se explica en el texto. Después continúas trabajando los diagramas siguiendo la estructura de la 1ª vuelta. Como puedes ver en los diagramas A.1a, A.1c y A.2, en las vueltas pares tienes 1 aumento (o 2 en el caso de A.2) en cada vuelta, que son 8 en total, porque trabajas cada diagrama dos veces. Por lo tanto, seguir trabajando de la misma manera quiere decir que posicionas los diagramas como antes y sigues aumentando al principio y/o final de cada diagrama como en las vueltas anteriores, continuando con el patrón de puntos del diagrama sobre los puntos nuevos y aumentando 8 puntos cada 2ª vuelta/vuelta par.
13.04.2025 - 20:12
|
|||||||||||||||||||
Sweet Impressions#sweetimpressionstop |
|||||||||||||||||||
 |
 |
||||||||||||||||||
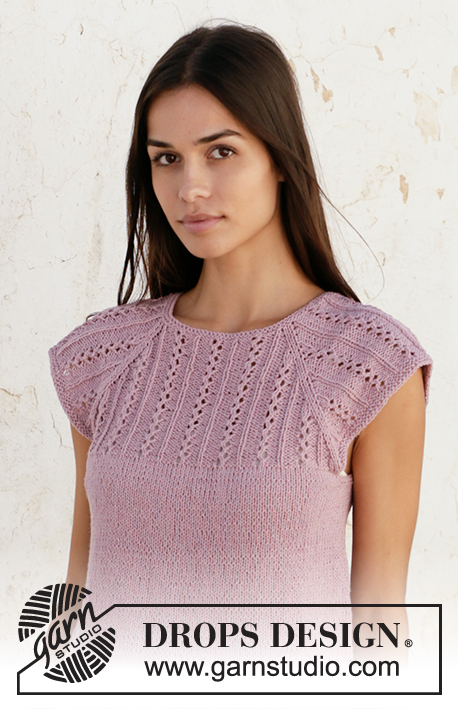
Knitted top with raglan in DROPS Belle. Piece is knitted top down with lace pattern. Size: S - XXXL
DROPS 211-12 |
|||||||||||||||||||
|
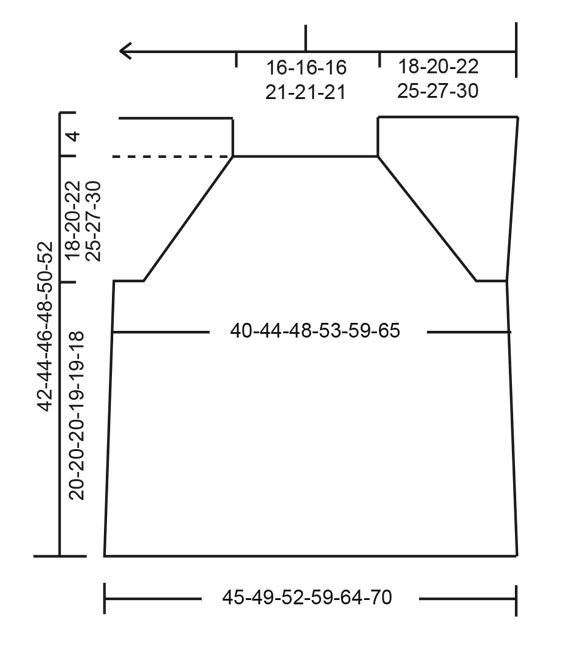
---------------------------------------------------------- EXPLANATION FOR THE PATTERN: ---------------------------------------------------------- GARTER STITCH (worked in the round): 1 ridge vertically = 2 rounds, i.e. knit 1 round and purl 1 round. PATTERN: See diagrams A.1 and A.2. INCREASE TIP (applies to sides of body): Work until 2 stitches remain before marker thread, 1 yarn over, knit 4 (marker thread is in the middle of these stitches), 1 yarn over. On next round knit yarn overs twisted to avoid holes. Then work the new stitches in stockinette stitch. BIND-OFF TIP: To avoid a tight bind-off edge you may use a larger needle. If this also is too tight, make 1 yarn over after approx. every 4th stitch, bind off these as regular stitches. ---------------------------------------------------------- START THE PIECE HERE: ---------------------------------------------------------- TOP - SHORT OVERVIEW OF THE PIECE: Neck edge and yoke are worked in the round on circular needle, top down. Now divide yoke for body and sleeves. Body is worked in the round on circular needle, top down. NECK EDGE: Cast on 102-102-102-120-120-120 stitches on circular needle size 3 mm = US 2,5 with Belle. Work 2 ridges in GARTER STITCH - see explanation above. Switch to circular needle size 4 mm = US 6. YOKE: Begin round in transition between left shoulder and back piece. Work pattern as follows: * Knit 1, A.1a (= 4 stitches), A.1b over the next 18-18-18-27-27-27 stitches (2-2-2-3-3-3 repetitions of 9 stitches), A.1c (= 6 stitches), knit 2, A.2 (= 19 stitches), knit 1 *, work from *-* 2 times. Work and increase as shown in diagram, when A.1 and A.2 have been worked one time vertically, continue pattern and increases the same way. Increase 8 stitches every other round, work stitches in pattern. Increase every other round 22-25-28-32-35-38 times in total. After all increases are done there are 278-302-326-376-400-424 stitches on needle. REMEMBER THE KNITTING GAUGE! Work next round as follows (start this round 2-3-3-1-3-5 stitches before end of previous round): Work the first 78-86-92-105-115-125 stitches as before (without increases), work in garter stitch over the next 61-65-71-83-85-87 stitches, work the next 78-86-92-105-115-125 stitches as before (without increases), work in garter stitch over the last 61-65-71-83-85-87 stitches. Continue like this until 2 ridges have been worked (= 4 rounds). Work next round as follows: Knit the first 78-86-92-105-115-125 stitches (= back piece), bind off the next 61-65-71-83-85-87 stitches, knit the next 78-86-92-105-115-125 stitches (= front piece), bind off the last 61-65-71-83-85-87 stitches. NOW MEASURE PIECE FROM HERE! BODY: Work the first 78-86-92-105-115-125 stitches in stockinette stitches, cast on 6-6-8-8-10-12 new stitches, work 78-86-92-105-115-125 stitches in stockinette stitch, cast on 6-6-8-8-10-12 new stitches, and work in the round = 168-184-200-226-250-274 stitches. Work in stockinette stitch, but over the new 6-6-8-8-10-12 stitches in each side work 2 ridges, before continuing with stockinette stitch over all stitches. Insert 1 marker thread in each side, in the middle of the new stitches that were cast on. When piece measures 4 cm = 1½", increase 1 stitch on each side of marker threads in each side - read INCREASE TIP. Repeat increase every 3 cm = 1⅛" 5 times in total = 188-204-220-246-270-294 stitches. When piece measures 19-19-19-18-18-17 cm = 7½"-7½"-7½"-7"-7"-6¾" from division, work 2 ridges over all stitches, then bind off - READ BIND-OFF TIP. |
|||||||||||||||||||
Diagram explanations |
|||||||||||||||||||
|
|||||||||||||||||||
 |
|||||||||||||||||||
 |
|||||||||||||||||||
 |
|||||||||||||||||||
Have you finished this pattern?Tag your pictures with #dropspattern #sweetimpressionstop or submit them to the #dropsfan gallery. Do you need help with this pattern?You'll find 21 tutorial videos, a Comments/Questions area and more by visiting the pattern on garnstudio.com. © 1982-2026 DROPS Design A/S. We reserve all rights. This document, including all its sub-sections, has copyrights. Read more about what you can do with our patterns at the bottom of each pattern on our site. |
|||||||||||||||||||


With over 40 years in knitting and crochet design, DROPS Design offers one of the most extensive collections of free patterns on the internet - translated to 17 languages. As of today we count 324 catalogs and 12260 patterns - 12250 of which are translated into English (US/in).
We work hard to bring you the best knitting and crochet have to offer, inspiration and advice as well as great quality yarns at incredible prices! Would you like to use our patterns for other than personal use? You can read what you are allowed to do in the Copyright text at the bottom of all our patterns. Happy crafting!
Post a comment to pattern DROPS 211-12
We would love to hear what you have to say about this pattern!
If you want to leave a question, please make sure you select the correct category in the form below, to speed up the answering process. Required fields are marked *.