
Popular categories
Looking for a yarn?


Comments / Questions (255)
![]() Sylvia wrote:
Sylvia wrote:
I have the same problem, es Swee Chang, (03.12.2020) that after I knitted the yoke twice (A1A2A3 and that A1A2A2A2A3) I don1t have the stiches I need to start the body part. Your answer was, that increases 31 times ( but that is just 24 - increased every second round) and you write 28 actually + the first rows from RS =16 Sts increase. Sorry but I still don't understand where I need to increase. :(
20.05.2025 - 15:46DROPS Design answered:
Dear Sylvia, in size L you increase a total of 31 times, so twice diagrams in height (every time you work the diagrams in height you increase 12 times (diagrams are 24 rows, and you increase 14 sts in each repeat in height); and work now diagrams one more time in height increasing 7 more times, ie until row 13 (you have increased 8 more sts), so that you have increased 24+7= 31 times and increased 14x2+8 sts= 36 sts, there are now 91 sts on needle for sleeves (remember to increase on body too). On next round divide piece for body and sleeves. Happy knitting!
21.05.2025 - 07:50
![]() Sylvia wrote:
Sylvia wrote:
What is the first 7 rows from RS? I just did's get it.
20.05.2025 - 12:24DROPS Design answered:
Dear Sylvia, what do you mean with "first 7 rows from RS"? you are working in the round - so you always work from the right side of piece, starting with 2 ridges (= K1 round, P1 round, K1 round, P 1 round), then start working sleeves with lace pattern and stocking stitch on both front and back pieces insteasing for raglan as explained in the written pattern and under RAGLAN. Can this help?
20.05.2025 - 13:22
![]() Md Tombeur wrote:
Md Tombeur wrote:
Bonjour je revient de nouveau vers vous n'arrivant toujours pas. voici ma correction du rang 11: 1m end, 1 m torse( dans le brin entre la m end et la m env) le jeté, la m env ,2 m ens , 3 m end et 1 jeté. de meme A3 : 1m end 1 jeté 3 m end 1surjet , m env, 1 jeté 1 m torse , 1 m end. Rang suivant 1m end ( la m torse) env, le jeté end, et la m env 5 m end. A3 la même chose. Et je tombe juste. Merci beaucoup et bon dimanche
11.05.2025 - 10:00DROPS Design answered:
Bonjour Mme Tombeur, je ne suis juste pas sûre pourquoi vous tricotez 1 m torse à l'endroit, mai si votre motif tombe juste, cela doit être bon. Bon tricot!
12.05.2025 - 08:01
![]() Lauren wrote:
Lauren wrote:
A few questions please. 1. When increasing the raglan every 2nd row, I'm assuming that means each wrong side row? 2. "Slip 1 stitch as if to knit, knit 1 and pass the slipped stitch over the knitted stitch". Do we drop the stitch, knit into it, or just leave it on the right needle? 3. When doing a YO after a knit stitch and before a purl, is that just the usual motion of moving the yarn to the front, or an additional YO? Thank you!
10.05.2025 - 23:57DROPS Design answered:
Dear Lauren, the top is worked in the round, so there are no purl side rows. You will increase on alternate rounds/every 2nd round (1st round has increases, 2nd round is worked straight, 3rd round has increases again, 4th round is worked straight, e.t.c). You can see this video on how to work the "Slip 1 stitch as if to knit, knit 1, pass the slipped stitch over". When working the yarn over do the usual motion of moving the yarn to the front but hold the yarn over with your finger so that it's not slipped off from the needle when you purl the next stitch. Happy knitting!
11.05.2025 - 01:32
![]() Md Tombeur wrote:
Md Tombeur wrote:
Bonjour , j'ai fait le 11 rang comme vous m'avez dit les jetés sont de chaque cote de la maille envers sur le diagramme vous vous me dite 1 jeté 1 m end 1 jeté je suppose que c'est une faute de frappe toute ma ligne est correcte me voici sur le rang suivant si je fait comme vous la maille envers est au dessus des jetés et ne suis plus le diagramme ou est le bug dsl merci
10.05.2025 - 10:26DROPS Design answered:
Bonjour Mme Tombeur, tout à fait désolée et on n'augmente 2 m pas, autrement dit vous avez bien au 11ème rang de A.1: 1 m end, 1 jeté, 1 m env (celle que l'on tricote depuis le début), 1 jeté, 2 m ens à l'end, 3 m end, 1 jeté = vous avez 9 m = vous avez bien augmenté 2 m (et non 9); au rang suivant, le 1er des jetés sera tricoté à l'envers (2ème m du diagramme), la m envers se tricote à l'endroit (3ème m) et le 2ème jeté se tricote à l'envers (début d'une nouvelle feuille en hauteur). Bon tricot!
12.05.2025 - 07:48
![]() Edyta wrote:
Edyta wrote:
To jednak dobrze robię. Pozdrawiam i dziękuję.
07.05.2025 - 16:09DROPS Design answered:
Powodzenia!
08.05.2025 - 08:46
![]() Wdyta wrote:
Wdyta wrote:
Dzień dobry. Mam pytanie co do dodawania 35 oczek ci 2 okrążenie. To znaczy prawa i lewa liczy się jedno okrążenie?
07.05.2025 - 13:46DROPS Design answered:
Witaj, przerabiając w okrążeniach, wszystkie okrążenia są przerabiane na prawej stronie robótki. Dodawać do 2 okrążenia oznacza dodawać oczka w okrążeniu 1, a nie dodawać w okrążeniu 2, itd. Pozdrawiamy!
07.05.2025 - 14:57
![]() Marja Stravers wrote:
Marja Stravers wrote:
Goedemiddag, ik heb een probleem met het volgen van het kantpatroon en de meerderingen door de raglan. Als ik die gemaakt heb brei ik die in de volgende naald eerst en daarna het kantpatroon?: Maak een lus, en brei de overige steken: zijn deze steken inclusief de eerder meerdering van de lus in het kantpatroon?Of brei ik die na het meerderen vanwege de raglan, dan de lus, en dan de overige steken?
06.05.2025 - 13:46DROPS Design answered:
Dag Marja,
Ja ik zou eerst de omslag op de volgende naald normaal breien en de naald daarna pas in kantpatroon. De meerderingen van de raglan op de mouw zijn al weergegeven in het telpatroon.
14.05.2025 - 13:07
![]() Md Tombeur wrote:
Md Tombeur wrote:
Dsl j'ai oublie de me mettre en Belgique lol.
05.05.2025 - 09:34
![]() Md Tombeur wrote:
Md Tombeur wrote:
Rebonjour si je fait ce que vous dite le souci sur le rang j'ai une maille de trop entre A1 et A2. Et le jeté de fin de A1 fait partie du dessin il ne compense pas. Je m'explique 11 ligne 1m end 1 jeté 1m env et (1 jeté) . Au rang suivant ce jeté compte entre A1 et A2 au lieu d'avoir 11mailles moi je me retrouve avec 12 mailles et je n'ai aucune faute dans mon dessin sauf cette maille qui ne devrais pas être la. merci bonne journée
05.05.2025 - 09:33DROPS Design answered:
Bonjour Mme Tombeur, vous avez 7 mailles dans A.1 au 11ème rang et vous tricotez ces 7 m ainsi: 1 m end, 1 jeté, 1 m end, 1 jeté, 2 m ens à l'end, 3 m end, 1 jeté = vous avez 9 m = vous avez bien augmenté 9 m; au tour suivant, tricotez: 1 m end, 1 m env, 1 m end, 1 m env, 5 m end. De même au 11ème rang de A.3, vous avez 8 mailles que vous tricotez ainsi: 1 m end, 1 jeté, 3 m end, 1 dim, 1 jeté, 1 m env, 1 jeté, 1 m end (= 10 m) que vous tricotez ainsi au tour suivant: 6 m end, 1 m env, 1 m end, 1 m env, 1 m end. Bon tricot!
05.05.2025 - 13:32
|
|||||||||||||||||||
Catch the Wind#catchthewindtop |
|||||||||||||||||||
 |
 |
||||||||||||||||||
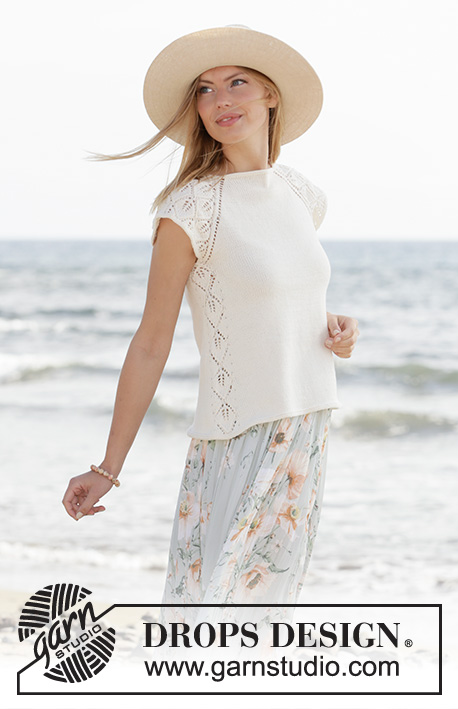
Knitted top with raglan and short sleeves in DROPS Safran. The piece is worked top down with lace pattern. Sizes XS - XXL.
DROPS 211-5 |
|||||||||||||||||||
|
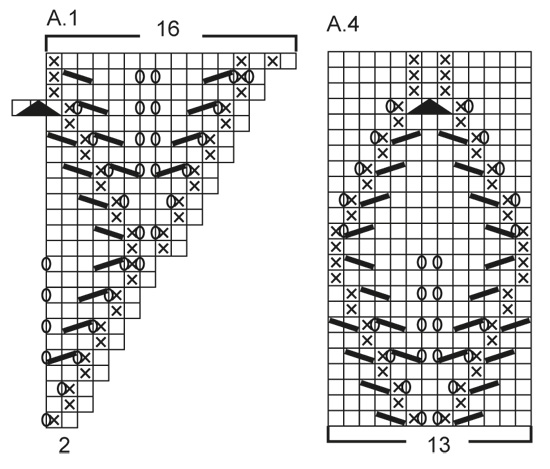
------------------------------------------------------- EXPLANATIONS FOR THE PATTERN: ------------------------------------------------------- RIDGE/GARTER STITCH (worked in the round): 1 ridge in height = 2 rounds; Knit 1 round and purl 1 round. PATTERN: See diagrams A.1 to A.4. RAGLAN: Increase to raglan on each side of the back piece and each side of the front piece (towards the sleeves). Increase by making 1 yarn over before/after the stitch with the marker thread; on the next round knit the yarn overs to leave holes. The increases on the sleeves are drawn into patterns A.1 and A.3. ------------------------------------------------------- START THE PIECE HERE: ------------------------------------------------------- TOP – SHORT OVERVIEW OF THE PIECE: The neck and yoke are worked in the round with circular needle, top down. The yoke is divided for body and sleeves and the body continued in the round. A small edge is worked around the armholes. NECK: Cast on 106-110-116-120-124-132 stitches with circular needle size 3 mm = US 2,5 and Safran. Work 2 RIDGES – read description above. Then work the yoke as described below. YOKE: Insert 4 marker threads in the piece as described below (without working the stitches). The threads will be used when increasing to raglan. Count 16-17-18-19-20-22 stitches (= half back piece), insert 1 marker thread in the next stitch, count 19 stitches (= sleeve), insert 1 marker thread in the next stitch, count 32-34-37-39-41-45 stitches (= front piece), insert 1 marker thread in the next stitch, count 19 stitches (= sleeve), insert 1 marker thread in the next stitch. There are 16-17-19-20-21-23 stitches after the last marker thread (half back piece). The first round is worked as follows: Work stockinette stitch as far as the first marker-stitch, make 1 yarn over (first increase to RAGLAN – see description above), work the marker-stitch in stockinette stitch, A.1 (= 2 stitches), A.2 (= 14 stitches) and A.3 ( = 3 stitches) (= 19 stitches on the sleeve), work the marker-stitch in stockinette stitch, 1 yarn over, work stockinette stitch as far as the next marker-stitch (= front piece), 1 yarn over, work the marker-stitch in stockinette stitch, A.1 (= 2 stitches), A.2 (= 14 stitches) and A.3 (= 3 stitches) (= 19 stitches on the sleeve), work the marker-stitch in stockinette stitch, 1 yarn over, work stockinette stitch over the remaining stitches (= half back piece). Continue this pattern with stockinette stitch on the front and back pieces and A.1, A.2 and A.3 on the sleeves. Each time A.1, A.2 and A.3 are worked 1 time in height, you work 2 more repeats of A.2 between A.1 and A.3. REMEMBER THE KNITTING GAUGE! AT THE SAME TIME continue to increase to raglan every 2nd round a total of 22-26-28-31-35-39 times at each marker thread (including the first increase described above). The new stitches are worked in stockinette stitch on the front and back pieces and in lace pattern as shown in the diagrams on the sleeves. When the increases to raglan are finished there are 294-334-356-388-424-468 stitches on the needle. The next round is worked as follows: Work 39-44-47-51-56-62 stitches (= half the back piece), place the next 69-79-83-91-99-109 stitches on 1 thread for the sleeve, cast on 9-9-9-11-13-15 new stitches on the needle (= in side under sleeve), work 78-88-95-103-113-125 stitches (= front piece), place the next 69-79-83-91-99-109 stitches on 1 thread for the sleeve, cast on 9-9-9-11-13-15 new stitches on the needle (= in side under sleeve), work the last 39-44-48-52-57-63 stitches (= half back piece). Body and sleeves are finished separately. THE PIECE IS NOW MEASURED FROM HERE! BODY: = 174-194-208-228-252-280 stitches. Insert 1 marker thread in the middle of the 9-9-9-11-13-15 stitches cast on under each sleeve. Cut the strand and begin the round 6 stitches before 1 of the stitches with marker thread. Work A.4 (= 13 stitches), work 74-84-91-101-113-127 stitches in stockinette stitch, work A.4 and then stockinette stitch over the last 74-84-91-101-113-127 stitches. Continue this pattern, AT THE SAME TIME, when the piece measures 2 cm = ¾", increase by making 1 yarn over on each side of A.4, on the next round knit the yarn over twisted to avoid holes (= 4 increased stitches). Repeat the increase every 1 ½ cm = ½" a total of 18 times; the increased stitches are worked in stockinette stitch = 246-266-280-300-324-352 stitches. When the piece measures 28-29-29-30-29-29 cm = 11"-11⅜"-11⅜"-11¾"-11⅜"-11⅜" from the division work 2 ridges over all stitches, then bind off. SLEEVE-EDGE: Place the 69-79-83-91-99-109 stitches on one of the threads on short circular needle size 3 mm = US 2,5 and knit up 1 stitch in each of the 9-9-9-11-13-15 new stitches under the sleeve = 78-88-92-102-112-124 stitches. Work 2 ridges over all stitches, then bind off. Work the other sleeve-edge in the same way. |
|||||||||||||||||||
Diagram explanations |
|||||||||||||||||||
|
|||||||||||||||||||
 |
|||||||||||||||||||
 |
|||||||||||||||||||
 |
|||||||||||||||||||
Have you finished this pattern?Tag your pictures with #dropspattern #catchthewindtop or submit them to the #dropsfan gallery. Do you need help with this pattern?You'll find 19 tutorial videos, a Comments/Questions area and more by visiting the pattern on garnstudio.com. © 1982-2026 DROPS Design A/S. We reserve all rights. This document, including all its sub-sections, has copyrights. Read more about what you can do with our patterns at the bottom of each pattern on our site. |
|||||||||||||||||||


With over 40 years in knitting and crochet design, DROPS Design offers one of the most extensive collections of free patterns on the internet - translated to 17 languages. As of today we count 324 catalogs and 12278 patterns - 12268 of which are translated into English (US/in).
We work hard to bring you the best knitting and crochet have to offer, inspiration and advice as well as great quality yarns at incredible prices! Would you like to use our patterns for other than personal use? You can read what you are allowed to do in the Copyright text at the bottom of all our patterns. Happy crafting!
Post a comment to pattern DROPS 211-5
We would love to hear what you have to say about this pattern!
If you want to leave a question, please make sure you select the correct category in the form below, to speed up the answering process. Required fields are marked *.