
Popular categories
Looking for a yarn?


Comments / Questions (255)
![]() Sylvie Chevrier wrote:
Sylvie Chevrier wrote:
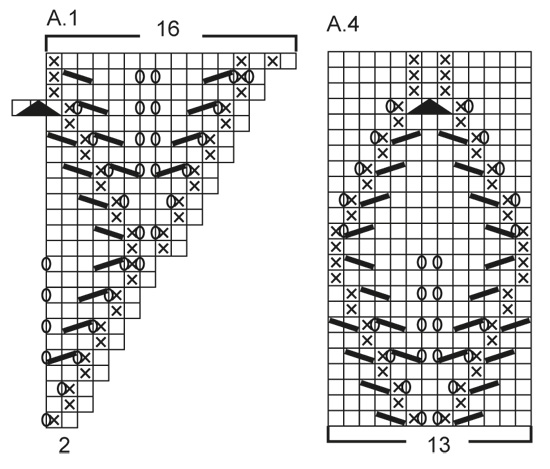
Bonjour. Je ne comprends pas le 2eme Rang sur le diagramme a1 comment la maille envers peut être décalée par rapport au rang 1 étant donné qu il n y a pas d augmentation à cet endroit au rang 1 ?
04.06.2024 - 01:14DROPS Design answered:
Bonjour Mme Chevrier, pour des raisons techniques les augmentations des diagrammes sont représentées à droite (dans A.1) ou à gauche (dans A.3), autrement dit, au 1er tour, vous augmentez (vous faites 1 jeté) après la maille envers =(= 1 m end, 1 m env, 1 jeté) vous aurez donc 1 m en plus après la maille envers au 2ème tour, soit: 1 m end, 1 m env, 1 m end (le jeté du 1er tour). Bon tricot!
04.06.2024 - 08:17
![]() Sylvie Chevrier wrote:
Sylvie Chevrier wrote:
Bonjour. Je ne comprends pas le 2eme Rang sur le diagramme a1 comment la maille envers peut être décalée par rapport au rang 1 étant donné qu il n y a pas d augmentation à cet endroit au rang 1 ?
04.06.2024 - 01:13
![]() Lia Van Velzen wrote:
Lia Van Velzen wrote:
Zijn de markeersteken in patroondeel A1 en A3 aangegeven? Graag uw reactie.
03.06.2024 - 16:49DROPS Design answered:
Dag Lia,
Nee, je breit de markeersteken zijn niet in de telpatronen aangegeven. In de beschrijving van de pas staat ook '...brei de markeerdraad-steek in tricotsteek, A.1 (= 2 steken), A.2 (= 14 steken) en A.3 ( = 3 steken) (= 19 steken op de mouw), brei de markeerdraad-steek in tricotsteek, 1 omslag... enz'
03.06.2024 - 20:22
![]() Lia Van Velzen wrote:
Lia Van Velzen wrote:
Het patroon van A2 is bij de regels 1 3 5 fout. De omslagen moeten na en voor de mindering komen te staan, anders kan je nooit van 7 steken 9 steken krijgen.
03.06.2024 - 07:17
![]() Petra Geißert wrote:
Petra Geißert wrote:
Bei der Anleitung 211-5 steht, wenn 1x A1,A2 u A3 in der höhe gestrickt wurde.dann 2 Rapport mehr von A2 stricken ? Also dann A2 3x , dann 5x. Habe ich das richtig verstanden? Dankeschön im voraus. Lg
30.05.2024 - 20:05DROPS Design answered:
Liebe Frau Geißelt, wenn A.1 fertig ist sind es 16 Maschen, bei der nächsten Reihe stricken Sie A.1 über die ersten 2 Maschen dann A.2 über die letzten 14 Maschen (1 x A.2 mehr in der Breite); wenn A.3 fertig ist sind es 17 Maschen, bei der nächsten Reihe stricken Sie 1 x A.2 über die ersten 14 Maschen und A.3 über die letzten 3 Maschen; so sind es 2 Rapporte A.2 mehr. So genau sind es dann 3 x A.2, dann 5 x A.2 usw Viel Spaß beim Stricken!
31.05.2024 - 07:36
![]() Rhoda wrote:
Rhoda wrote:
Hi, I am very confused on the raglan increase part. ``To work up to the first marker-stitch,1 yarn over, work marker stitch ,A1,A2,A3,marker stitch, 1 yarn over, marker stitch again.`` That would be very long it doesn't make sense from what I understand on knitting raglan.' please help to make me understand how to knit this.
27.05.2024 - 08:27DROPS Design answered:
Dear Rhoda, you will increase for the raglan on each side of each of the 4 stitches with a marker thread - see RAGLAN - as the rounds started on mid back, you will first work the stitches for half back piece, increase before the stitch with the marker thread, work A.1 (including raglan increase), A.2 and A.3 (including raglan increase) for the sleeve, increase after the stitch with the marker thread, work front piece, increase before the stitch with the marker, work increasing for 2nd sleeve as for 1st one, increase for back piece after the stitch with marker thread and finish round. Happy knitting!
27.05.2024 - 12:56
![]() Laudrain wrote:
Laudrain wrote:
Comment fait on 2 jetee de rang?
19.05.2024 - 12:56DROPS Design answered:
Bonjour Mme Laudrain, dans cette vidéo, nous montrons comment faire 1 jeté; comme on tricote ici en rond (et pas en rangs, comme dans la vidéo), les jetés seront tricotés à l'endroit, dans le brin avant (= normalement) pour qu'ils forment des jours. Bon tricot!
21.05.2024 - 12:48
![]() Joanna wrote:
Joanna wrote:
Witam. Wzór przepiękny. Niestety nie zgadza mi się robiąc w schematach A1, A2, A3. Najbardziej w 3. Zostaje mii za dużo oczek do przerobienia w stosunku do wzoru. Pierwsze części się pokrywają bo wzór się zgadza. Widziałam zdjęcia innych dziewiarek,czyli da się zrobić. To co się nie zgadza? Co robię źle?
10.05.2024 - 18:40DROPS Design answered:
Witaj Joanno, napisz który rozmiar wykonujesz i w którym miejscu we wzorze jesteś.
13.05.2024 - 17:15
![]() Marti wrote:
Marti wrote:
I’m having a really hard time figuring out DROPS 211-5 to knit in the round. Is this pattern completely written out row by row anywhere? I love the sweater but just can’t follow the “at the same time”. I’m a visual learner aand need to see it written out.
26.04.2024 - 20:50DROPS Design answered:
Dear Marti, we are sorry, but we do not have written out, row by row description of the pattern, not only because our patterns are available in many languages, but also, because we believe that with diagrams, and our way of patternwriting you can see the "bigger picture" in other words, not only the very next stitch, but also how the rows and stitches relate to each other en large. If you click on the "Videos" sign, there will be many tutorials to help, and you can also ask for help (either over the phone or in person) in the store where you bought your DROPS yarn from. Happy Knitting!
26.04.2024 - 21:35
![]() Elaine Wulfsohn wrote:
Elaine Wulfsohn wrote:
I loved making this and put a row of pattern around the edge
09.04.2024 - 22:54
|
|||||||||||||||||||
Catch the Wind#catchthewindtop |
|||||||||||||||||||
 |
 |
||||||||||||||||||
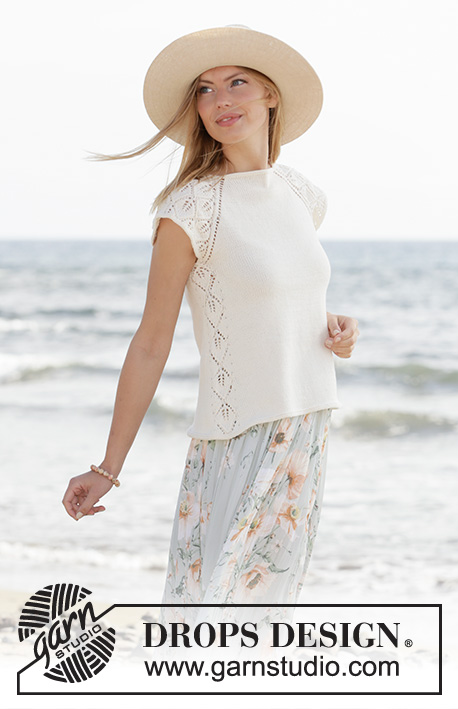
Knitted top with raglan and short sleeves in DROPS Safran. The piece is worked top down with lace pattern. Sizes XS - XXL.
DROPS 211-5 |
|||||||||||||||||||
|
------------------------------------------------------- EXPLANATIONS FOR THE PATTERN: ------------------------------------------------------- RIDGE/GARTER STITCH (worked in the round): 1 ridge in height = 2 rounds; Knit 1 round and purl 1 round. PATTERN: See diagrams A.1 to A.4. RAGLAN: Increase to raglan on each side of the back piece and each side of the front piece (towards the sleeves). Increase by making 1 yarn over before/after the stitch with the marker thread; on the next round knit the yarn overs to leave holes. The increases on the sleeves are drawn into patterns A.1 and A.3. ------------------------------------------------------- START THE PIECE HERE: ------------------------------------------------------- TOP – SHORT OVERVIEW OF THE PIECE: The neck and yoke are worked in the round with circular needle, top down. The yoke is divided for body and sleeves and the body continued in the round. A small edge is worked around the armholes. NECK: Cast on 106-110-116-120-124-132 stitches with circular needle size 3 mm = US 2,5 and Safran. Work 2 RIDGES – read description above. Then work the yoke as described below. YOKE: Insert 4 marker threads in the piece as described below (without working the stitches). The threads will be used when increasing to raglan. Count 16-17-18-19-20-22 stitches (= half back piece), insert 1 marker thread in the next stitch, count 19 stitches (= sleeve), insert 1 marker thread in the next stitch, count 32-34-37-39-41-45 stitches (= front piece), insert 1 marker thread in the next stitch, count 19 stitches (= sleeve), insert 1 marker thread in the next stitch. There are 16-17-19-20-21-23 stitches after the last marker thread (half back piece). The first round is worked as follows: Work stockinette stitch as far as the first marker-stitch, make 1 yarn over (first increase to RAGLAN – see description above), work the marker-stitch in stockinette stitch, A.1 (= 2 stitches), A.2 (= 14 stitches) and A.3 ( = 3 stitches) (= 19 stitches on the sleeve), work the marker-stitch in stockinette stitch, 1 yarn over, work stockinette stitch as far as the next marker-stitch (= front piece), 1 yarn over, work the marker-stitch in stockinette stitch, A.1 (= 2 stitches), A.2 (= 14 stitches) and A.3 (= 3 stitches) (= 19 stitches on the sleeve), work the marker-stitch in stockinette stitch, 1 yarn over, work stockinette stitch over the remaining stitches (= half back piece). Continue this pattern with stockinette stitch on the front and back pieces and A.1, A.2 and A.3 on the sleeves. Each time A.1, A.2 and A.3 are worked 1 time in height, you work 2 more repeats of A.2 between A.1 and A.3. REMEMBER THE KNITTING GAUGE! AT THE SAME TIME continue to increase to raglan every 2nd round a total of 22-26-28-31-35-39 times at each marker thread (including the first increase described above). The new stitches are worked in stockinette stitch on the front and back pieces and in lace pattern as shown in the diagrams on the sleeves. When the increases to raglan are finished there are 294-334-356-388-424-468 stitches on the needle. The next round is worked as follows: Work 39-44-47-51-56-62 stitches (= half the back piece), place the next 69-79-83-91-99-109 stitches on 1 thread for the sleeve, cast on 9-9-9-11-13-15 new stitches on the needle (= in side under sleeve), work 78-88-95-103-113-125 stitches (= front piece), place the next 69-79-83-91-99-109 stitches on 1 thread for the sleeve, cast on 9-9-9-11-13-15 new stitches on the needle (= in side under sleeve), work the last 39-44-48-52-57-63 stitches (= half back piece). Body and sleeves are finished separately. THE PIECE IS NOW MEASURED FROM HERE! BODY: = 174-194-208-228-252-280 stitches. Insert 1 marker thread in the middle of the 9-9-9-11-13-15 stitches cast on under each sleeve. Cut the strand and begin the round 6 stitches before 1 of the stitches with marker thread. Work A.4 (= 13 stitches), work 74-84-91-101-113-127 stitches in stockinette stitch, work A.4 and then stockinette stitch over the last 74-84-91-101-113-127 stitches. Continue this pattern, AT THE SAME TIME, when the piece measures 2 cm = ¾", increase by making 1 yarn over on each side of A.4, on the next round knit the yarn over twisted to avoid holes (= 4 increased stitches). Repeat the increase every 1 ½ cm = ½" a total of 18 times; the increased stitches are worked in stockinette stitch = 246-266-280-300-324-352 stitches. When the piece measures 28-29-29-30-29-29 cm = 11"-11⅜"-11⅜"-11¾"-11⅜"-11⅜" from the division work 2 ridges over all stitches, then bind off. SLEEVE-EDGE: Place the 69-79-83-91-99-109 stitches on one of the threads on short circular needle size 3 mm = US 2,5 and knit up 1 stitch in each of the 9-9-9-11-13-15 new stitches under the sleeve = 78-88-92-102-112-124 stitches. Work 2 ridges over all stitches, then bind off. Work the other sleeve-edge in the same way. |
|||||||||||||||||||
Diagram explanations |
|||||||||||||||||||
|
|||||||||||||||||||
 |
|||||||||||||||||||
 |
|||||||||||||||||||
 |
|||||||||||||||||||
Have you finished this pattern?Tag your pictures with #dropspattern #catchthewindtop or submit them to the #dropsfan gallery. Do you need help with this pattern?You'll find 19 tutorial videos, a Comments/Questions area and more by visiting the pattern on garnstudio.com. © 1982-2026 DROPS Design A/S. We reserve all rights. This document, including all its sub-sections, has copyrights. Read more about what you can do with our patterns at the bottom of each pattern on our site. |
|||||||||||||||||||


With over 40 years in knitting and crochet design, DROPS Design offers one of the most extensive collections of free patterns on the internet - translated to 17 languages. As of today we count 324 catalogs and 12278 patterns - 12268 of which are translated into English (US/in).
We work hard to bring you the best knitting and crochet have to offer, inspiration and advice as well as great quality yarns at incredible prices! Would you like to use our patterns for other than personal use? You can read what you are allowed to do in the Copyright text at the bottom of all our patterns. Happy crafting!
Post a comment to pattern DROPS 211-5
We would love to hear what you have to say about this pattern!
If you want to leave a question, please make sure you select the correct category in the form below, to speed up the answering process. Required fields are marked *.