
Popular categories
Looking for a yarn?


Comments / Questions (62)
![]() Nina wrote:
Nina wrote:
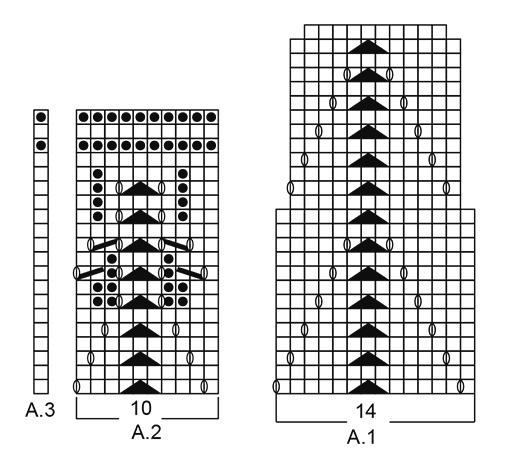
I forhold til A.2 har jeg meget besvær ved række 9 og 11. Hvordan strikker jeg omslagene i disse to rækker? Jeg kan simpelthen ikke få det til at gå op eller blive pænt…
30.08.2021 - 16:59DROPS Design answered:
Hei Nina. Kastene strikkes vrang fra vrangen = blir et hull. Kan kanskje være litt vanskelig å se at det blir pent før du har strikket A.2 noen ganger i høyden. Strikke gjerne en prøvelapp med f.eks 2 rapporter av A.2 i bredden og strikk 2-3 ganger i høyden, så vil du se det pene hullmønstret. mvh DROPS design
06.09.2021 - 11:43
![]() Marie wrote:
Marie wrote:
Si je comprends bien on ne tricote le diagramme A1 qu'une seule fois. Ensuite on répète le A2/A3 ? Sinon comment récupérer les 4 mailles entre A2 et A1 ?
11.05.2021 - 15:42DROPS Design answered:
Bonjour Marie, tout à fait, A.1 ne se tricote qu'une seule fois, puis on continue en répétant A.2/A.3 (dernière m du rang). Bon tricot!
12.05.2021 - 06:58
![]() Lulu wrote:
Lulu wrote:
Bonjour, j'ai déjà tricotée A1 une fois, est-ce que dès que je vais commencer le A2 et A3 j'aurai la même largueur que pour le A1 afin que cette couverture soit ne soit pas asymétrique ?? merci
23.02.2021 - 17:29DROPS Design answered:
Bonjour Lulu, la couverture est en fait, un peu plus large dans le bas qu'en haut (côté visage du bébé) et ne forme donc pas un parfait rectangle. Bon tricot!
24.02.2021 - 07:11
![]() Malene Hansen wrote:
Malene Hansen wrote:
Hej :) Jeg forstår ikke helt, hvordan jeg skal strikke de 3 kantmasker retstrik? Strikker jeg bare 3 masker ret, eller hvordan får jeg den fine kant, som er på billedet?
07.02.2021 - 15:21DROPS Design answered:
Hei Malene. Du strikker rett fra retten og rett fra vrangen, da får du den kanten du ser på bildet. mvh DROPS design
08.02.2021 - 13:50
![]() Marta wrote:
Marta wrote:
Is that blanket going to be bigger from one side since I start with 203 stitches and I finish with 147? or it will be equal on all sides?
21.10.2020 - 10:08DROPS Design answered:
Dear Marta, yes that's correct, the blanket will be somewhat smaller at the top (towards the baby face on the photo) than at the bottom. Happy knitting!
21.10.2020 - 10:57
![]() Barb Weselak wrote:
Barb Weselak wrote:
I have worked A1, A2 and A3 one time each. The patter reads "continue pattern like this". How do I start A1 again to repeat the pattern when there are only 10 stitches for each repetition on my needles at the end of A2/A3? I will need 14 stiches in each repetition to start A1 again?
21.09.2020 - 03:55DROPS Design answered:
Dear Mrs Weselak, A.1 is worked only one time in height, then you work A.2 and A.3 like this: 3 sts in garter st, repeat A.2 in width (9-14 times), work A.3 once and finish with 3 sts in garter st. Repeat A.2/A.3 lke this until piece measures 49-79 cm. Happy knitting!
21.09.2020 - 15:37
![]() Lyne Marcotte wrote:
Lyne Marcotte wrote:
Est- ce que la partie A3 donnera 17 rangs de jersey et 3 de points mousse ? Je ne vois pas cela sur la photo de la couverture ?
27.02.2020 - 16:27DROPS Design answered:
Bonjour Mme Marcotte, A.3 ne se tricote pas tout seul, il va terminer les rangs de A.2, autrement dit, quand l'ouvrage mesure 10 cm, on tricote en largeur ainsi: 3 m point mousse, 9 ou 14 fois A.2 en largeur, A.3 (= 1 m pour que le motif soit symétrique) et 3 m point mousse. Bon tricot!
27.02.2020 - 16:50
![]() Jill Payne wrote:
Jill Payne wrote:
Do you have this written in form, I'm rubbish at charts!
09.11.2019 - 17:15DROPS Design answered:
Dear Jane, unfortunately we do not have this pattern in written out form. Please try to make sense of the charts, with the help of our lesson about reading charts here. In the long run it is well worth the effort, as these charts not only show the very next stitch, but also how the stitches relate to each other in the rows above each other etc. Happy Knitting!
10.11.2019 - 11:17
![]() Sally Allerton wrote:
Sally Allerton wrote:
Hi, I am planning to make this blanket using baby alpaca and silk, I have checked the yarn converter and it says I need slighly more yarn than the 350g that I have. Please could you let me know the pattern repeat on this to reduce the width of the blanket slightly. I wanted to do a larger size, but dont know if I can begin by casting on 189 to achieve this? Will everything work out if I reduce the cast on by the 14 stitch patter of A1? Or will I have enough with the 350g? Many thanks
04.10.2019 - 13:59DROPS Design answered:
Dear Mrs Allerton, you would need almost 400g DROPS BabyAlpacaSilk to work the larger blanket and approx. 300 g for the smaller blanket - you can try with one more repeat in width (= each A.2 = 10 sts), but we cannot garantee that you would have enough to work the total height. Happy knitting!
04.10.2019 - 14:36
![]() Ziegler Angelika wrote:
Ziegler Angelika wrote:
Hallo Zusammen, ist es richtig, dass die Decke mit dem Muster A2 ( dann kraus) endet? D. h. die Decke ist oben und unten unterschiedlich? vielen Dank und liebe Grüße
12.09.2019 - 09:46DROPS Design answered:
Liebe Frau Ziegler, ja die beiden Ende der Decke sind unterschiedlich (ausser die Krausrippen), Sie stricken zuerst A.1 einmal in der Höhe dann wiederholen Sie A.2 in der Höhe. Viel Spaß beim stricken!
12.09.2019 - 13:07
|
|||||||||||||||||||
Milk Dreams#milkdreamsblanket |
|||||||||||||||||||
 |
 |
||||||||||||||||||
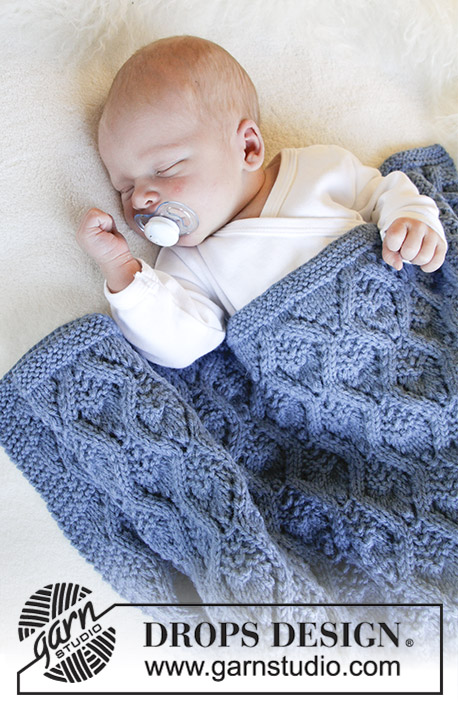
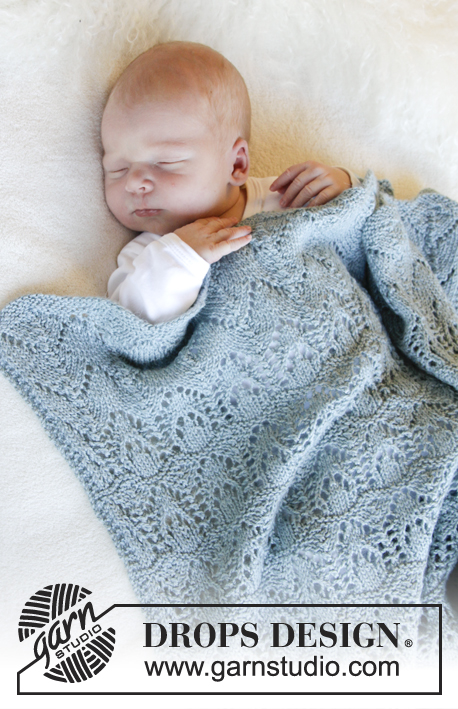
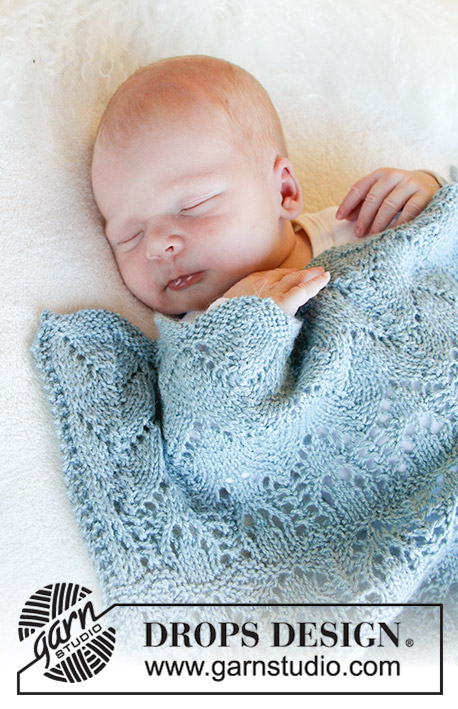
Knitted blanket with lace pattern for baby. Piece is knitted in DROPS BabyMerino. Theme: Baby blanket
DROPS Baby 31-23 |
|||||||||||||||||||
|
INFORMATION FOR PATTERN: GARTER STITCH (back and forth): 1 ridge = knit 2 rows. PATTERN: See diagrams A.1 to A.3. ---------------------------------------------------------- BLANKET: Worked back and forth. Cast on 133-203 stitches on circular needle size 3.5 mm / US 4 with BabyMerino. Work 3 ridges in GARTER STITCH - see explanation above. Work next row as follows from right side: Work 3 edge stitches in garter stitch, work pattern according to A.1 until 4 stitches remain (= 9-14 repetitions of 14 stitches), knit 1 stitch and finish with 3 edge stitches in garter stitch. Continue pattern like this. REMEMBER THE GAUGE! When A.1 has been worked 1 time vertically, there are 97-147 stitches on needle and piece measures approx. 10 cm / 4". Work next row as follows from right side: Work 3 edge stitches in garter stitch, work pattern according to diagram A.2 until 4 stitches remain (= 9-14 repetitions of 10 stitches), work A.3 over next stitch and finish with 3 edge stitches in garter stitch. Continue pattern like this. When piece measures 49-79 cm/19¼"-31", work 3 ridges over all stitches. Bind off by knitting. Make sure to avoid a tight bind-off edge, bind off with 1 larger needle size if needed. |
|||||||||||||||||||
Diagram explanations |
|||||||||||||||||||
|
|||||||||||||||||||
 |
|||||||||||||||||||
Have you finished this pattern?Tag your pictures with #dropspattern #milkdreamsblanket or submit them to the #dropsfan gallery. Do you need help with this pattern?You'll find 15 tutorial videos, a Comments/Questions area and more by visiting the pattern on garnstudio.com. © 1982-2026 DROPS Design A/S. We reserve all rights. This document, including all its sub-sections, has copyrights. Read more about what you can do with our patterns at the bottom of each pattern on our site. |
|||||||||||||||||||

With over 40 years in knitting and crochet design, DROPS Design offers one of the most extensive collections of free patterns on the internet - translated to 17 languages. As of today we count 324 catalogs and 12177 patterns - 12166 of which are translated into English (US/in).
We work hard to bring you the best knitting and crochet have to offer, inspiration and advice as well as great quality yarns at incredible prices! Would you like to use our patterns for other than personal use? You can read what you are allowed to do in the Copyright text at the bottom of all our patterns. Happy crafting!
Post a comment to pattern DROPS Baby 31-23
We would love to hear what you have to say about this pattern!
If you want to leave a question, please make sure you select the correct category in the form below, to speed up the answering process. Required fields are marked *.