
Popular categories
Looking for a yarn?


Comments / Questions (12)
![]() Dorthe Holmelund wrote:
Dorthe Holmelund wrote:
Har strikket puden “don’t Leaf me behind”, men kan ikke se hvordan man aflukker? Der står i opskriften, hent aflukningstips??? Mvh Dorthe
03.01.2026 - 09:45DROPS Design answered:
Hei Dorthe. Når ruten måler 45 x 45 cm felles det løst av (vanlig avfelling, men løst). For å få det løst kan man følge avfellingstipset der man skal bruke en pinne som er ½ pinnenummer større. SÅ har du brukt pinne 3 mm på puten, kan du felle av med pinne str. 3,5. mvh DROPS Design
12.01.2026 - 13:46
![]() Elisabeth Koudela wrote:
Elisabeth Koudela wrote:
Mir ist nicht klar, was ich in der dropsfan galerie in das Feld mit valider URL für das Projekt dontleafemebehindpillow eingeben muss um ein Foto meines Polsters mit diesem Muster zu senden
05.12.2025 - 06:44DROPS Design answered:
Liebe Frau Koudela, Sie müssen Ihr Foto zunächst bei Diensten wie Instagram, Ravelry, Facebook, Ihrem Blog o.Ä. hochladen und können dann dort den Link aus der Adresszeile herauskopieren und im Formular einfügen. Wir sind schon entspannt!
05.12.2025 - 09:48
![]() Natalie wrote:
Natalie wrote:
Hallo, es hat sich ein Fehler in die deutsche Übersetzung eingeschlichen: Quadrat mit Punkt = 1 Masche links in HIN-Reihen. Und bei "Muster" wird stricken in Hin- und Rückreihen beschrieben, allerdings wird in der Runde gestrickt. Liebe Grüße
03.10.2025 - 12:02DROPS Design answered:
Liebe Nathalie, danke für den Hinweis, das wurde korrigiert. Viel Spaß beim Stricken!
04.11.2025 - 09:15
![]() AnnieDax wrote:
AnnieDax wrote:
Bonjour, Ce modèle est-il adaptable pour créer une couverture bébé de 60 cm en l’entourant de plusieurs rangs en point de riz ? Merci.
25.02.2022 - 11:03DROPS Design answered:
Bonjour AnnieDax, probablement, la couverture bébé Golden Slumber pourra peut-être vous inspirer pour votre projet. Bon tricot!
25.02.2022 - 12:50
![]() Christine Runci wrote:
Christine Runci wrote:
Are there written instructions instead of a chart. I have previously tried to do. Drops pattern but I find it difficult to follow
30.05.2021 - 08:04DROPS Design answered:
Dear Mrs Runci, there is only diagrams to this pattern, but this lesson will help you to understand how to read diagrams. Happy knitting!
31.05.2021 - 08:26
![]() Aida Carla wrote:
Aida Carla wrote:
Hallo! Ich verstehe den Anfang nicht. Werden die Ersten 8 Maschen auf 4 Nadeln aufgeteilt und dann in Runden gestrickt? Wenn ja, warum wird das Muster hin und zurück gelesen und nicht immer von rechts nach links? Ausserdem weiss ich nicht wie ich in der ersten Runde bei 2 Maschen zwei Zunahmen machen soll! Sorry ich glaube ich stehe gerade komplett auf dem Schlauch. Vielen Dank schon mal
20.04.2021 - 21:11DROPS Design answered:
Liebe Frau Carla, die Arbeit wird von Anfang an in Runden gestrickt: 2 Maschen auf jeder Nadel x 4 Nadel = 8 Maschen. Bei der 1. Runde stricken Sie *1 M re, 1 Umschlag, 1 M re, 1 Umschlag*, von *-* 4 Mal wiederholen. Diagramme lesen Sie (in Runden) immer rechts nach links. Hier lesen Sie mehr über Diagramme. Viel Spaß beim stricken!
21.04.2021 - 07:39
![]() Edel Juárez Calderón wrote:
Edel Juárez Calderón wrote:
Les felicito por tan lindos proyectos y sus respectivos diagramas y videos. Saludos
24.07.2020 - 03:04
![]() Kathy wrote:
Kathy wrote:
Is it possible to see all the comments in English?
18.01.2020 - 04:28DROPS Design answered:
Dear Kathy, unfortunately we cannot translate each comment to each language the site is working with. We work hard to answer each question at the language it comes in. Happy Crafting!
19.01.2020 - 00:45
![]() Charlene Clarke-Clifford wrote:
Charlene Clarke-Clifford wrote:
How do i print your patterns ?
11.11.2019 - 20:25DROPS Design answered:
Hello Charlene! Please click Print button under materials description part. Happy printing and knitting!
11.11.2019 - 21:46
![]() Gina Wall wrote:
Gina Wall wrote:
Hi there\\r\\nWhen you have a Yarn over at the end of the round, do you mean to make an extra stitch between the final stitch of one round and the beginning stitch of the next round? Or does it only refer to pattern repeats within the round ? \\r\\nAppreciate the help please \\r\\nGins
26.07.2018 - 06:43DROPS Design answered:
Dear Gina, Yes a yarn over at the end of the round will be between the last stitch on the round and the first stitch on the next round. Happy knitting!
26.07.2018 - 08:07
|
||||||||||||||||||||||
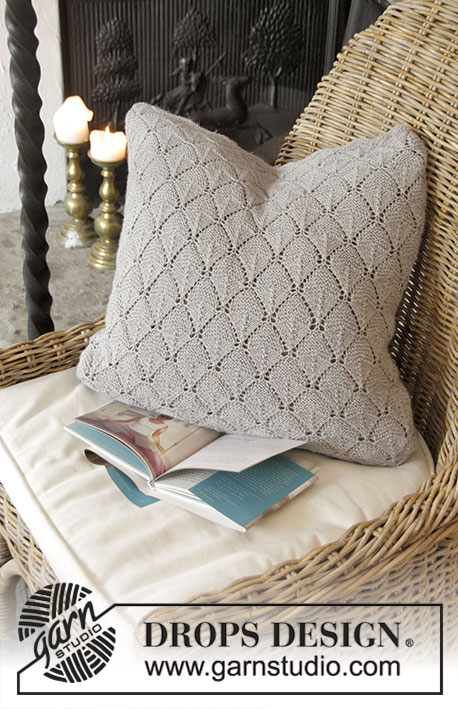
Don't Leaf Me Behind Pillow#dontleafmebehindpillow |
||||||||||||||||||||||
|
|
||||||||||||||||||||||
Knitted pillow in square with lace pattern. Piece is knitted in DROPS Merino Extra Fine.
DROPS 183-39 |
||||||||||||||||||||||
|
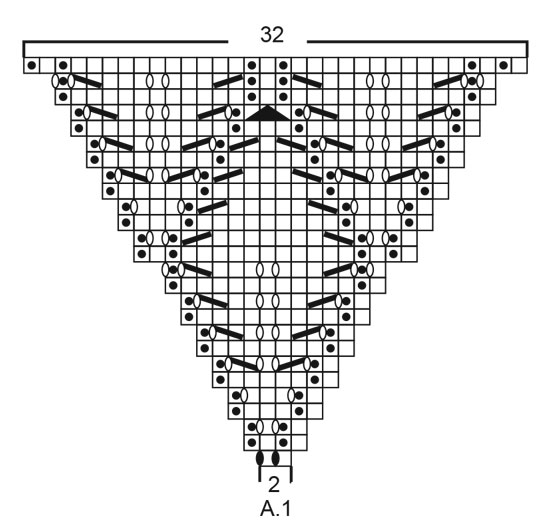
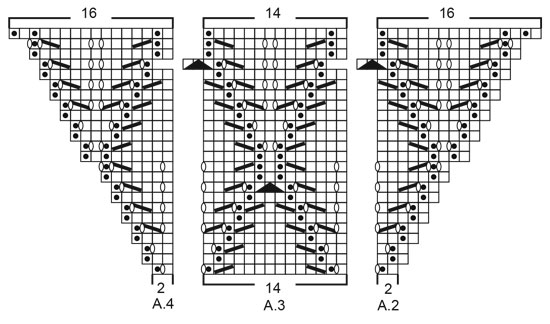
INFORMATION FOR PATTERN: PATTERN: See diagrams A.1 to A.4. Diagrams show all rows in pattern seen from the right side. BIND-OFF TIP: To avoid a tight bind-off edge you may use a needle ½ size larger. ---------------------------------------------------------- PILLOW: Worked in the round in a square on double pointed needles/circular needle, begin from the middle of square. Work 2 equal parts and sew together when finished. Cast on 8 stitches on double pointed needles size 3 mm / US 2.5 with Merino Extra Fine. Work pattern in the round according to diagram A.1 (= 2 stitches) 4 times in total on round - read PATTERN above. Switch to circular needle when needed. REMEMBER THE GAUGE! When entire diagram A.1 has been worked, there are 128 stitches on round. Insert 4 markers without working as follows: Insert first marker at beginning of round, insert second marker after 32 stitches, insert third marker after 32 stitches and insert 4th marker after 32 stitches, move markers upwards when working. Then work pattern as follows: Work * A.2 (= 2 stitches), A.3 over the next 28 stitches (= 2 repetitions of 14 stitches) and A.4 (= 2 stitches) *, work from *-* 4 times in total on round. When A.2/A.3/A.4 are done vertically, there are 60 stitches between each marker (= 240 stitches on round). Then work pattern as follows: Work * A.2 (= 2 stitches), A.3 over the next 56 stitches (= 4 repetitions of 14 stitches) and A.4 (= 2 stitches) *, work from *-* 4 times in total on round. When A.2/A.3/A.4 are done vertically, there are 88 stitches between each marker (= 352 stitches on round). Square measures approx. 45 x 45 cm / 17¾" x 17¾". Loosely bind off - read BIND-OFF TIP above. Knit another part the same way. ASSEMBLY: Place squares wrong side against wrong side. Sew 3 of the sides edge to edge in outer loops of edge stitches. Lay a pillow inside the casing and then sew along the last side. |
||||||||||||||||||||||
Diagram explanations |
||||||||||||||||||||||
|
||||||||||||||||||||||
 |
||||||||||||||||||||||
 |
||||||||||||||||||||||
Have you finished this pattern?Tag your pictures with #dropspattern #dontleafmebehindpillow or submit them to the #dropsfan gallery. Do you need help with this pattern?You'll find 20 tutorial videos, a Comments/Questions area and more by visiting the pattern on garnstudio.com. © 1982-2026 DROPS Design A/S. We reserve all rights. This document, including all its sub-sections, has copyrights. Read more about what you can do with our patterns at the bottom of each pattern on our site. |
||||||||||||||||||||||


With over 40 years in knitting and crochet design, DROPS Design offers one of the most extensive collections of free patterns on the internet - translated to 17 languages. As of today we count 324 catalogs and 12290 patterns - 12280 of which are translated into English (US/in).
We work hard to bring you the best knitting and crochet have to offer, inspiration and advice as well as great quality yarns at incredible prices! Would you like to use our patterns for other than personal use? You can read what you are allowed to do in the Copyright text at the bottom of all our patterns. Happy crafting!
Post a comment to pattern DROPS 183-39
We would love to hear what you have to say about this pattern!
If you want to leave a question, please make sure you select the correct category in the form below, to speed up the answering process. Required fields are marked *.