
Popular categories
Looking for a yarn?


Comments / Questions (196)
![]() Heli wrote:
Heli wrote:
Jag har en fråga beträffande avslutning av maskor med att sticka två ihop. Skall detta göras alltid med denna modell eller bara om man har stickat mönstren A1, A2 och A3 på mitten. Jag håller på att sticka en tröja utan mittflätor. Skall jag alltså även i detta fall avsluta maskorna med att samtidigt sticka en del ihop.
30.12.2020 - 08:48DROPS Design answered:
Hej Heli, Nej det är bara om du har stickat flätor du skall sticka ihop två när du maskar av. Lycka till :)
14.01.2021 - 12:57
![]() Stefanie C wrote:
Stefanie C wrote:
Hallo liebes Drops-Team! Ich habe ein Problem mit der Abnahme der 19 Maschen beim Ärmel --> hier heißt es, 8 Maschen davon sollen vor dem Abketten paarweise zusammengestrickt werden... Heißt das, es sollen 8x je 2 Maschen zusammengestrickt werden vor dem Abketten (also 8 Abnahmen ), oder sollen INSGESAMT nur 8 Maschen von den 19 zusammengestrickt werden (also 4 Maschen weniger) ? Über eine Rückmeldung würde ich mich sehr freuen! Vielen Dank und liebe Grüße!
23.12.2020 - 14:14
![]() Laurence wrote:
Laurence wrote:
Bonjour, j'ai suivi le diagramme mais le motif des torsades apparait sur l'envers de l'ouvrage, et la partie tricotée en jersey endroit est en jersey envers. Bref, je ne comprends pas. Le diagramme est-il conçu pour un tricot en rond ? Merci pour votre réponse. Cordialement, Laurence
16.12.2020 - 10:55DROPS Design answered:
Bonjour Laurence, les diagrammes seront tricotées d'abord en rond puis en rangs - le pull se tricote d'abord en rond jusqu'aux emmanchures, puis en allers et retours à partir des emmanchures. Lorsque vous divisez l'ouvrage pour terminer le dos et le devant séparément, veillez à bien continuer de tricoter soit sur l'endroit/soit sur l'envers pour que les torsades se retrouvent bien sur l'endroit et non sur l'envers. Bon tricot!
16.12.2020 - 13:58
![]() Sylvie Jonckheere wrote:
Sylvie Jonckheere wrote:
Bonjour,je ne comprends pas vos explications pour terminer le dos est ce qu on rabat en une fois?
07.12.2020 - 12:49DROPS Design answered:
Bonjour Mme Jonckheere, pour conserver la bonne largeur quand on rabat les mailles du dos, on va diminuer les mailles des torsades en les rabattant - cf ASTUCE POUR RABATTRE - cette vidéo montre comment faire. Bon tricot!
07.12.2020 - 15:56
![]() Annemarie Børresen wrote:
Annemarie Børresen wrote:
Ærmer. Der står i montering, at ærmer skal sys sammen midt bag, men de er strikket på rundpinde, så de er jo strikket sammen. Forstår ikke hvordan de 16 masker man har til sidst på ærmet skal indgå i halskanten. Skal de strikkes med i optagningen af masker rundt eller skal de lukkes af?
30.11.2020 - 11:48DROPS Design answered:
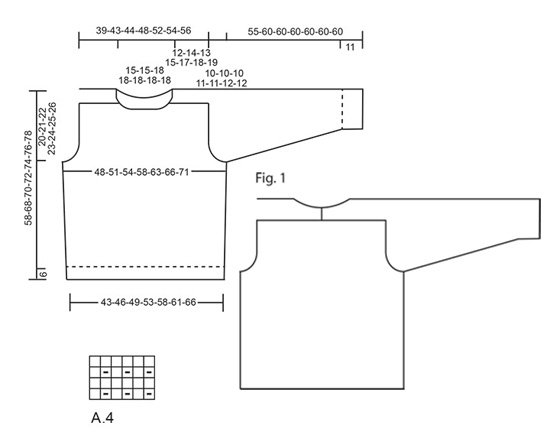
Hej Annemarie, de masker som skal syes sammen midt bagpå ser du på Fig.1, det er der hvor de sidste masker til sadelskulder når sammen i nakken. God fornøjelse!
07.12.2020 - 12:09
![]() Dorothée wrote:
Dorothée wrote:
Bonjour J'ai un doute sur la dernière phrase du dos "qd l'ouvrage mesure xx cm rabattre [...] au-dessus des mailles des diagrammes". Est ce que ça veut dire qu'on laisse en attente les mailles de jersey ? Mais je ne vois pas d'explications pour les assembler ensuite. Merci pour votre aide !
29.11.2020 - 11:39DROPS Design answered:
Bonjour Dorothée, vous devez rabattre toutes les mailles, mais pour que le bord de ces mailles rabattues ne soit pas trop large à cause des torsades, on va diminuer en même temps que l'on rabat - cette vidéo montre et explique comment faire. On assemblera ensuite la partie longue des manches marteau = les épaules le long du dos - cf fig. 1. Bon tricot!
30.11.2020 - 10:33
![]() Giulia wrote:
Giulia wrote:
Nella manica ad un certo punto dice di "Lavorare 1 costa a legaccio e, ALLO STESSO TEMPO, diminuire 5 maglie a intervalli regolari = 51-53-55-57-59-61-63 maglie. Inserire 1 segno all’inizio del giro. Passare ai ferri a doppia punta n° 4 e sul giro successivo, lavorare il motivo come segue: Maglia rasata sulle prime 4.. maglie" la maglia rasata sarà quindi a rovescio come il secondo giro della costa a legaccio?
23.11.2020 - 10:38DROPS Design answered:
Buonasera Giulia, questo modello è lavorato in tondo: la maglia rasata si lavora a diritto su tutti i giri. Buon lavoro!
23.11.2020 - 22:00
![]() Malin Aune wrote:
Malin Aune wrote:
Hei! jeg holder på med avfellingen til bakstykket, og det er litt ulike ting som forvirrer meg. på bildet av genserens deler, som ligger ovenfor mønsteret, ser det ut til at det felles rett av, men oppskriften forvirrer meg, med tanke på at man skal felle masker samtidig som man feller av. Skal altså da maskene strikkes sammen to og to, jevnt fordelt, også felles av? Det hadde vært fint om det var et bildet av den ferdige genseren bakfra også. Det er en fin genser og en super utfordring!
03.11.2020 - 19:49
![]() Anne Whelan wrote:
Anne Whelan wrote:
Thank you!
01.11.2020 - 15:00
![]() Anne Whelan wrote:
Anne Whelan wrote:
Orry but this doesn't answer my question. I decreased on both ends of the RS and both ends of the WS. But the piece does not measure as it should. It is too short. Should I only decrease at the beginning of the RS and the beginning of the WS? NOT the beginning and end of both sides? Thanks for your help. Anne Whelan
29.10.2020 - 10:54DROPS Design answered:
Dear Mrs Whelan, you should cast off at the beginning of every row, both from RS and from WS, ie in 4th size you cast off 2 sts on each side a total of 7 times, this means you will cast off 2 stitches at the beginning of next 14 rows. (you won't decrease nor cast off at the end of the rows) Hope this will help. Happy knitting!
29.10.2020 - 13:53
|
||||||||||||||||||||||
Siberia#siberiasweater |
||||||||||||||||||||||
 |
 |
|||||||||||||||||||||
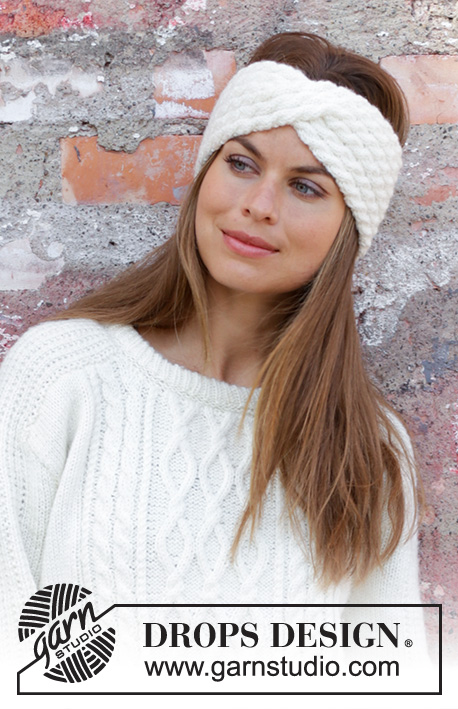
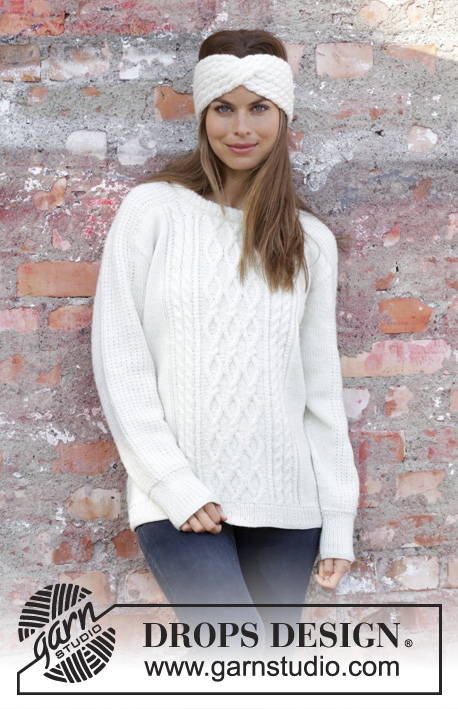
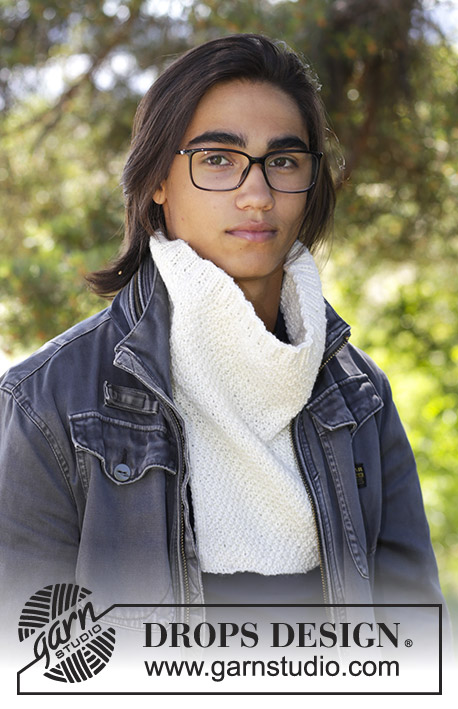
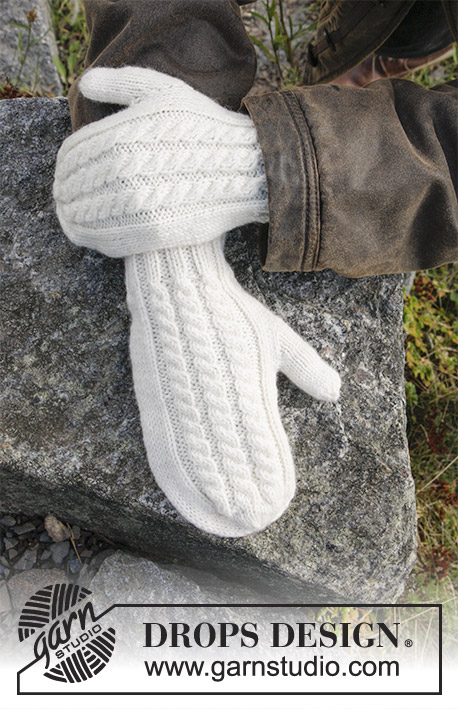
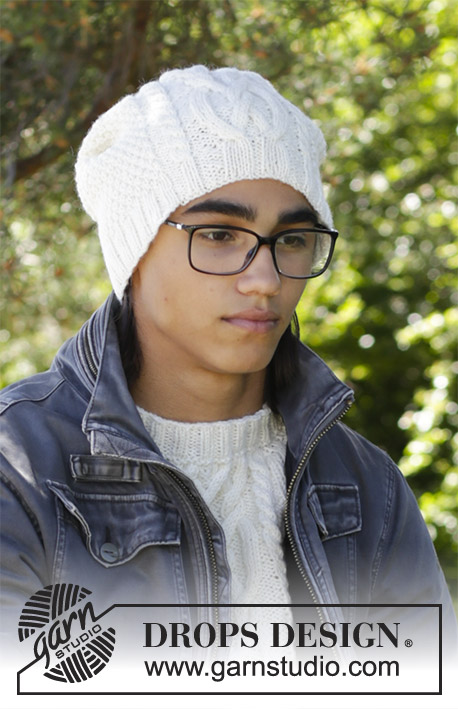
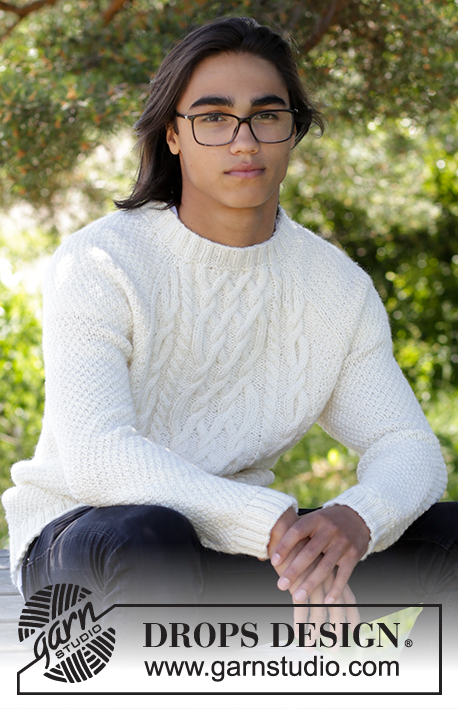
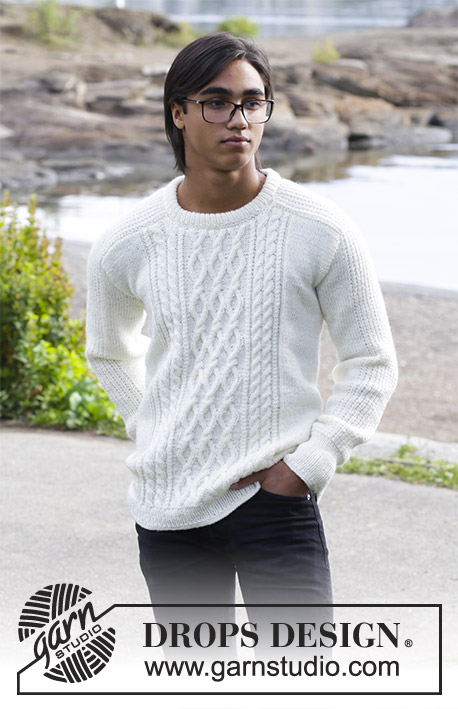
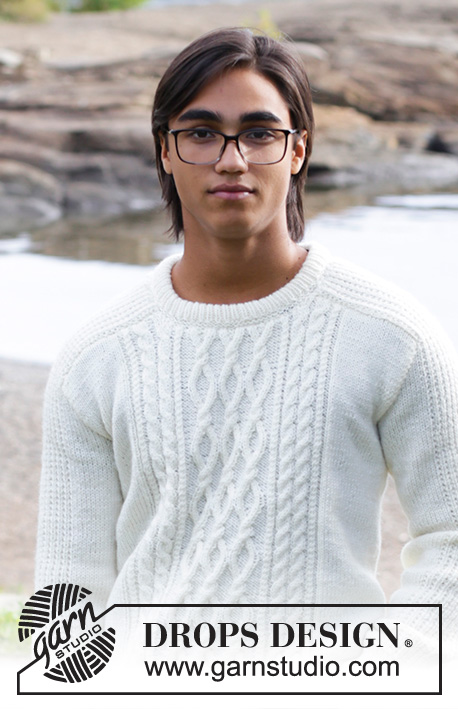
Men’s knitted sweater with cables. Sizes 13/14 years – XXXL. The piece is worked in DROPS Merino Extra Fine.
DROPS 185-2 |
||||||||||||||||||||||
|
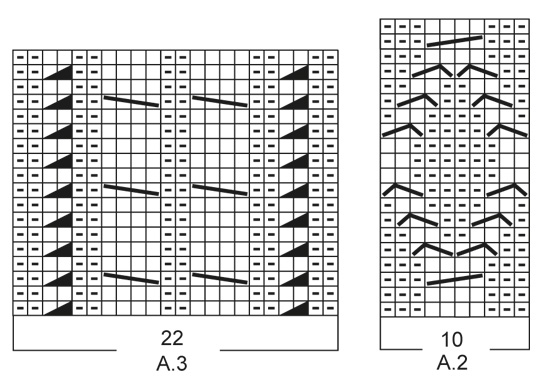
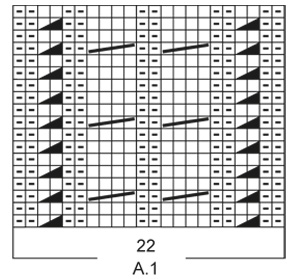
INFORMATION FOR THE PATTERN: SWEATER– SHORT OVERVIEW OF THE PIECE: The sleeve is worked upwards, continued onto the shoulder and along the neck, top back. The neck-stitches at the top of the sleeve are decreased towards the front piece and a small section of the sleeve is continued along the top of the back piece and later sewn together mid-back, so the neck is higher at the back than at the front – see Fig.1. RIDGE/GARTER STITCH (worked in the round): 1 ridge = 2 rounds. Knit 1 round and purl 1 round. PATTERN: See diagrams A.1 to A.4. The diagrams show all the rows in the pattern seen from the right side. INCREASE/DECREASE TIP (evenly spaced): To work out how to increase/decrease evenly, count the total number of stitches on the needle (e.g. 218 stitches) and divide by the number of increases/decreases to be made (e.g. 10) = 21.8. In this example, increase alternately after approx. every 21st and 22nd stitch by making 1 yarn over. On the next round, work the yarn overs twisted to avoid holes. If you are decreasing (in this example) knit together alternately approx. every 20th and 21st stitch and every 21st and 22nd stitch. INCREASE TIP (for sides in body and sleeves): Start 1 stitch before the marker, make 1 yarn over, knit 2 (the marker sits in the middle of these two stitches), make 1 yarn over. On the next round knit the yarn overs twisted to avoid holes. The new stitches are subsequently worked in stockinette stitch. BINDING OFF TIP: Decrease 1 stitch at the same time as binding off as follows: Knit 2 stitches together, knit 1 stitch, pass over (bind off) (= 1 extra stitch decreased). ---------------------------------------------------------- SWEATER: The piece is worked in the round with circular needle as far as the armholes, then the front and back pieces are worked back and forth separately. The sleeves are worked in the round with double pointed needles as far as the armholes, then the sleeves are worked back and forth. To finish, the sleeves are sewn into the armhole and shoulders on front and back pieces. BODY: Cast on 218-230-246-264-280-298-314 stitches with circular needle size 3.5 mm / US 4 and Merino Extra Fine. Work 2 RIDGES – see description above! Then work rib (knit 1 /purl 1). When the piece measures 5 cm / 2" work 1 ridge, AT THE SAME TIME as you increase 10-10-10-12-12-14-14 stitches evenly on the first round – read INCREASE/DECREASE TIP= 228-240-256-276-292-312-328 stitches. Insert 2 markers in the piece, one at the beginning of the round and one after 114-120-128-138-146-156-164 stitches (= in each side). Change to circular needle size 4 mm / US 6 and work PATTERN as follows – see description above: * Work 20-23-27-27-31-31-35 stitches stockinette stitch, A.1 (= 22 stitches), A.2 (= 10 stitches) over the next 30-30-30-40-40-50-50 stitches (= 3-3-3-4-4-5-5 repeats in width), A.3 (= 22 stitches), 20-23-27-27-31-31-35 stitches stockinette stitch, the marker sits here *, work from *-* 1 more time. REMEMBER THE GAUGE! Continue the pattern in this way. When the piece measures 9 cm / 3½" increase 1 stitch on both sides of the markers in each side – read INCREASE TIP (= 4 stitches increased). Increase in this way every 6-8-8-9-9-9-10 cm / 4" a total of 5 times = 248-260-276-296-312-332-348 stitches. When the piece measures 38-47-48-49-50-51-52 cm / 18½"-19"-19¼"-19¾"-20"-20½" bind off 6 stitches for the armhole in each side (bind off 3 stitches on both side of the markers in each side) and continue each piece separately. BACK PIECE: = 118-124-132-142-150-160-168 stitches. The piece is worked back and forth with circular needle. Continue with pattern, stockinette stitch and 1 edge stitch in garter stitch in each side, AT THE SAME TIME continue to bind off for armhole at the beginning of each row in each side as follows: 2 stitches 3-3-4-4-4-4-5 times and 1 stitch 1-0-1-1-2-2-2 times = 104-112-114-124-130-140-144 stitches. When the piece measures 49-59-61-63-65-67-69 cm / 23¼"-24"-24¾"-25½"-26⅜"-27⅛" bind off, AT THE SAME TIME as you decrease 20-20-20-22-18-24-24 stitches evenly over the stitches in diagrams A.1, A.2 and A.3 – read BINDING OFF TIP. FRONT PIECE: = 118-124-132-142-150-160-168 stitches. Continue with pattern, stockinette stitch and 1 edge stitch in garter stitch, AT THE SAME TIME as bind off for armhole as for back piece = 104-112-114-124-130-140-144 stitches. When the piece measures 46-56-58-60-62-64-66 cm / 22"-22¾"-23⅝"-24⅜"-25¼"-26" decrease 10-10-10-12-12-12 stitches evenly over the middle 40-40-40-48-48-48-48 stitches before these stitches are placed on a thread for the neck (= 30-30-30-36-36-36-36 stitches on thread). The shoulders are now finished separately. On the next row from the neck bind off 2 stitches = 30-34-35-36-39-44-46 stitches. When the piece measures 49-59-61-63-65-67-69 cm / 23¼"-24"-24¾"-25½"-26⅜"-27⅛" (adjust to match the back piece) bind off, AT THE SAME TIME as you decrease 5-5-4-5-3-6-6 stitches evenly over the 15-15-15-16-16-21-21 stitches towards the neck – remember BINDING OFF TIP. Work the other shoulder in the same way. RIGHT SLEEVE: The piece is worked in the round with double pointed needles. Cast on 56-58-60-62-64-66-68 stitches with double pointed needles size 3.5 mm / US 4 and Merino Extra Fine. Work 2 ridges. Then work rib (= knit 1 /purl 1) until the piece measures 10 cm / 4". Work 1 ridge, AT THE SAME TIME as you decrease 5 stitches evenly on row = 51-53-55-57-59-61-63 stitches. Insert 1 marker at the beginning of the round. Change to double pointed needles size 4 mm / US 6 and work pattern on the next round as follows: Stockinette stitch over the first 4-5-6-7-8-9-10 stitches, work A.4 over the next 42 stitches, work the first stitch in A.4, 4-5-6-7-8-9-10 stitches stockinette stitch. Continue this pattern upwards. AT THE SAME TIME when the piece measures 13-12-13-12-12-14-13 cm / 5"-4¾"-5"-4¾"-4¾"-5½"-5" increase 1 stitch on each side of the marker – remember INCREASE TIP! Increase in this way every 2-2½-2-2-2-1½-1½ cm / ¾"-⅞"-¾"-¾"-¾"-½"-½" a total of 14-15-16-17-18-19-20 times = 79-83-87-91-95-99-103 stitches. When the piece measures 45-50-50-49-49-48-48 cm / 19¾"-19¾"-19¼"-19¼"-19"-19" bind off 6 stitches mid under the sleeve (bind off 3 stitches on each side of the marker). Then work back and forth on the needle AT THE SAME TIME as you bind off for sleeve cap at the beginning of each row in each side as follows: 2 stitches 2-4-6-7-9-10-12 times and 1 stitch 12-10-8-8-6-6-4 times = 41 stitches left in all sizes. The piece measures 55-60-60-60-60-60-60 cm / 21½"-23½"-23½"-23½"-23½"-23½". NOW YOU MEASURE THE PIECE FROM HERE! Continue with pattern over the remaining stitches until the piece measures 12-14-13-15-17-18-19 cm / 4¾"-5½"-5"-6"-6⅔"-7"-7½". Then you bind off at the beginning of each row from the right side as follows: 19 stitches 1 time AT THE SAME TIME as 8 of these 19 stitches are knitted together 2 and 2 before they are bind off, 3 stitches 1 time, 2 stitches 1 time. Work 3 rows without decreases. Bind off 1 stitch on the next row = 16 stitches left in all sizes. Continue working until the piece measures 19-21-22-24-26-27-28 cm / 7½"-8¼"-8¾"-9½"-10¼"-10½"-11". The whole sleeve measures approx. 74-81-82-84-86-87-88 cm / 29"-32"-32¼"-33"-34"-34¼"-34½". LEFT SLEEVE: Worked as for right sleeve, but decreases at top are worked in opposite side, i.e. at the beginning of every row from the wrong side. ASSEMBLY: Sew the sleeves together mid back inside the bind off edge of each sleeve. Sew the sleeves to front and back piece on body in the outermost stitch as follows: Sew from the armhole and up along shoulder on back piece to mid back. Repeat on the other side. Sew in that same way from armhole and up along shoulder to the neck on the front piece. Repeat on the other side. NECKLINE: Knit up 94-94-108-108-108-108-108 stitches around the neck (including the stitches from the thread) with short circular needle size 3.5 mm / US 4 and Merino Extra Fine. Work 2 ridges, AT THE SAME TIME as you increase on the last round 22-22-26-26-26-26-26 stitches evenly = 116-116-134-134-134-134-134 stitches. Then work rib (= knit 1 /purl 1). When the rib measures 8 cm / 3⅛" work 1 ridge. Bind off. Fold the neck double and fasten on the inside, ridge to ridge. |
||||||||||||||||||||||
Diagram explanations |
||||||||||||||||||||||
|
||||||||||||||||||||||
 |
||||||||||||||||||||||
 |
||||||||||||||||||||||
 |
||||||||||||||||||||||
Have you finished this pattern?Tag your pictures with #dropspattern #siberiasweater or submit them to the #dropsfan gallery. Do you need help with this pattern?You'll find 29 tutorial videos, a Comments/Questions area and more by visiting the pattern on garnstudio.com. © 1982-2026 DROPS Design A/S. We reserve all rights. This document, including all its sub-sections, has copyrights. Read more about what you can do with our patterns at the bottom of each pattern on our site. |
||||||||||||||||||||||


With over 40 years in knitting and crochet design, DROPS Design offers one of the most extensive collections of free patterns on the internet - translated to 17 languages. As of today we count 324 catalogs and 12290 patterns - 12280 of which are translated into English (US/in).
We work hard to bring you the best knitting and crochet have to offer, inspiration and advice as well as great quality yarns at incredible prices! Would you like to use our patterns for other than personal use? You can read what you are allowed to do in the Copyright text at the bottom of all our patterns. Happy crafting!
Post a comment to pattern DROPS 185-2
We would love to hear what you have to say about this pattern!
If you want to leave a question, please make sure you select the correct category in the form below, to speed up the answering process. Required fields are marked *.