
Popular categories
Looking for a yarn?


Comments / Questions (35)
![]() PHILIP Caroline wrote:
PHILIP Caroline wrote:
Concernant la réalisation des carrés au crochet : 1ère question : Rang 2 : il est écrit "1 B dans la première m du rang précédent, 2 B dans chaque B du rang précédent ......" Faut-il faire les brides dans les BRIDES (B) du rang précédent ou dans les mailles (m) ?? Idem pour le rang 4. Il y a une confusion dans les explications entre "m" et "B" ?? 2ème question : à la fin de chaque rang, il est écrit "tourner". Pour quelle raison faut-il tourner l'ouvrage à chaque fois ?
27.02.2016 - 14:57DROPS Design answered:
Bonjour Mme Philip, au 1er rang, on n'a que des brides, ainsi, on va crocheter 1 B dans la 1ère B du rang précédent - (idem au rang 4). Le choix de tourner à la fin de chaque tour revient à la styliste. Bon crochet!
27.02.2016 - 16:23
![]() Sophie wrote:
Sophie wrote:
Bonjour, je suis en plein dans la réalisation de ce modèle que je trouve superbe, mais au niveau du dos et des côtés, je rencontre des difficultés car je ne vois pas très bien comment rabattre les emmanchures en ne crochetant pas 5.5 groupes de mailles de chaque côtés, j'aurais donc souhaité quelques précisions. Merci d'avance.
29.08.2015 - 12:50DROPS Design answered:
Bonjour Sophie, quand vous arrivez au niveau des emmanchures, vous pouvez soit couper le fil et reprendre après 5,5 groupes de B à partir du bord, soit sans couper le fil, faire des mc sur les 5,5 premiers groupes de B, continuez ensuite comme avant jusqu'à ce qu'il reste 5,5 groupes de B à la fin du rang, tournez sans crocheter ces mailles: vous avez le même nombre de groupes de B de chaque côté non travaillé pour les emmanchures. Bon crochet!
31.08.2015 - 10:20
![]() Loele Van Den Bergh wrote:
Loele Van Den Bergh wrote:
Als je de stokjes "tussen" de stokjes van de vorige ronde haakt komt het aantal stokjes prima uit. Na de ronde/toer wel telkens keren. In plaats van de losse heb ik elke toer een schuifknoop op de naald gezet en meteen een stokje gehaakt. Geen kleurverandering te zien. ipv TC Chenille gebruik ik karisma. Mooi patroon.
29.12.2014 - 16:00
![]() Berit wrote:
Berit wrote:
Den är 110 cm (2x55) se diagrammet längst ner.
27.07.2014 - 14:09
![]() Lene Jensen wrote:
Lene Jensen wrote:
Kunne godt tænke mig at vide hvad overvidden er i str. xl
26.07.2014 - 20:35DROPS Design answered:
Hej Lene. Det finder du nederst på målskitsen. Der tages ikke ind eller ud, så det er samme vidde som underkanten (45-50 eller 55 cm afhængig af størrelse).
04.08.2014 - 16:02
![]() Camilla wrote:
Camilla wrote:
Er der ikke en opskrift på dansk? Når jeg vælger det danske flag og vælger gå til opskrift kommet der en norsk opdkrift frem. Jeg ved bl.a ikke hvad staver er for nogle masker. Mvh Camilla
05.10.2013 - 16:17DROPS Design answered:
Hej Camilla. Det har du da ret i. Vi ser på sagen og sørger for der kommer et dansk monster på hurtigst muligt. Tak for meldingen
07.10.2013 - 21:11
![]() Gerd wrote:
Gerd wrote:
Hej! Minskningen på ärmen; ska man minska med 2 stolpgrupper i var sida vart 5:e varv? Det blir väldigt "hackigt" stora kliv liksom. lir himla svårt att få snyggt när det sedan ska virkas ihop med bak och framstycket. Eller har jag fattat fel?
16.05.2012 - 08:38DROPS Design answered:
Hej, som du ser i mönstret skall du: börjar och slutar det att virkas 2 stolpgr in från varje sida annars blir det för kompakt - det blir för mycket "tyg" under ärmen.
18.05.2012 - 08:25
![]() Annette wrote:
Annette wrote:
Ik kom nu met het aan elkaar haken toch niet uit met het extra stokje, om de hoeken mooi gelijk te krijgen moet het laatste stokje voor de hoeken van de 4de toer worden overgeslagen.
13.02.2012 - 09:38
![]() Annette wrote:
Annette wrote:
Ik heb net uitgeprobeerd om niet te keren, maar aan de goede kant door te blijven haken. Dit vind ik handiger en mooier, daarbij doe ik de laatste doorhaling van het laatste stokje van de vorige toer al met de nieuwe kleur. Zo valt de overgang naar de niuwe kleur bijna niet meer op.
10.02.2012 - 10:54
![]() Annette wrote:
Annette wrote:
Ik ben het met Loes eens dat het 7 stokjes moet zijn, of moet het laatste stokje van toer 4 voor de hoeken in toer 5 worden overgeslagen? Maar dan klopt het begin van de toer niet, want daar komen dan wel 7 stokjes (3 lossen, telt voor een stokje, + 6 stokjes = 7 stokjes) In ieder geval vind ik het resultaat met 7 stokjes mooier en logischer. M vr Gr, Annette
10.02.2012 - 10:16
|
|||||||||||||||||||||||||||||||||||||||||||||||||||||||
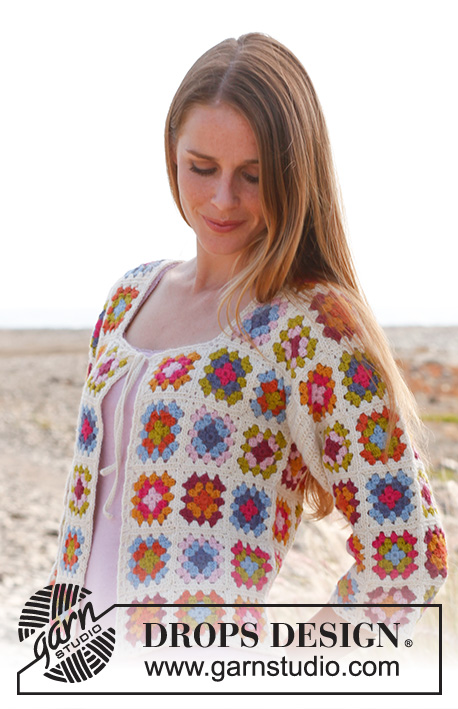
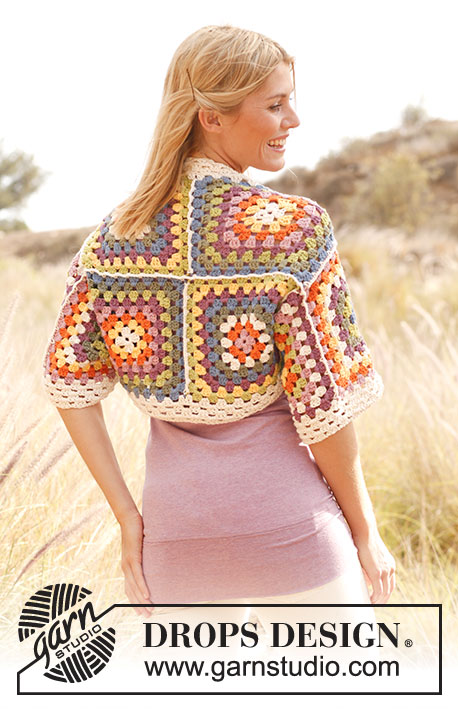
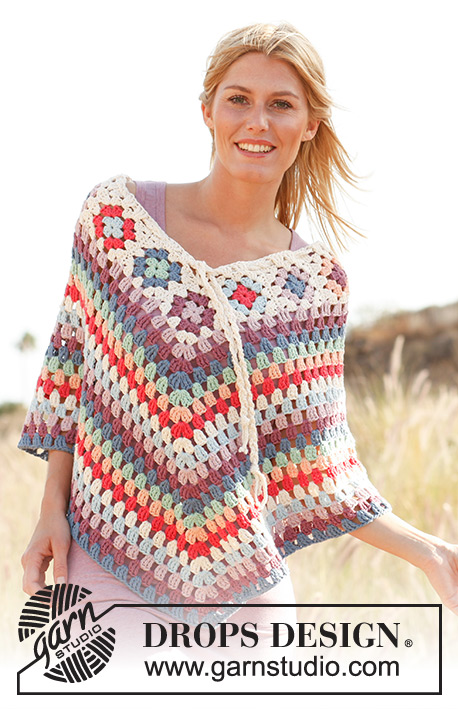
Bohemian Sunset |
|||||||||||||||||||||||||||||||||||||||||||||||||||||||
 |
 |
||||||||||||||||||||||||||||||||||||||||||||||||||||||
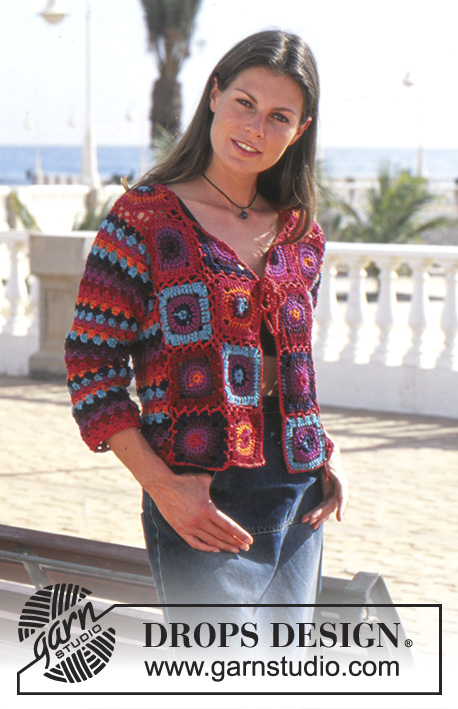
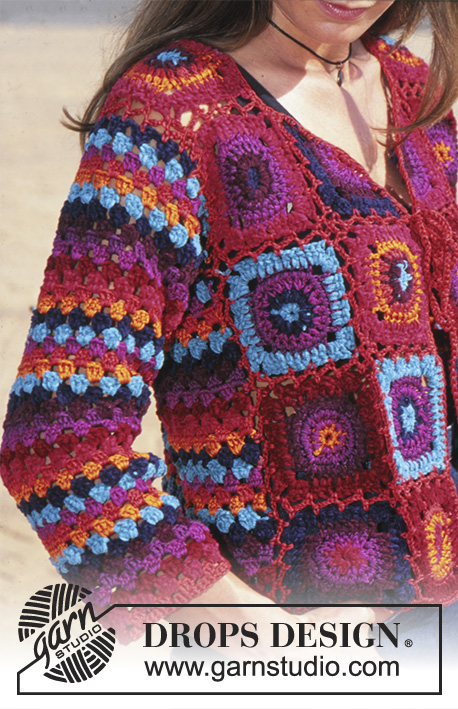
DROPS Crocheted Cardigan in Tynn Chenille and Muskat.
DROPS 68-21 |
|||||||||||||||||||||||||||||||||||||||||||||||||||||||
|
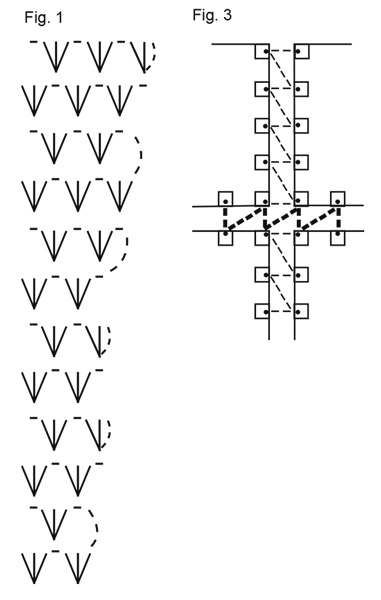
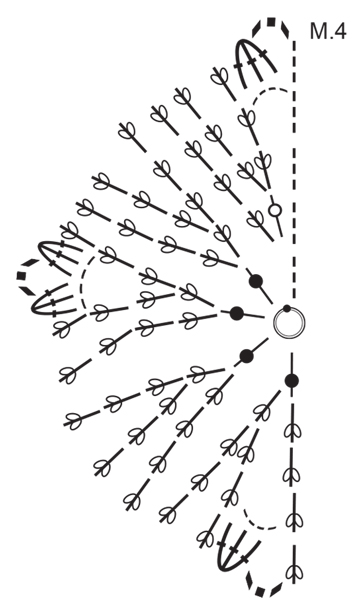
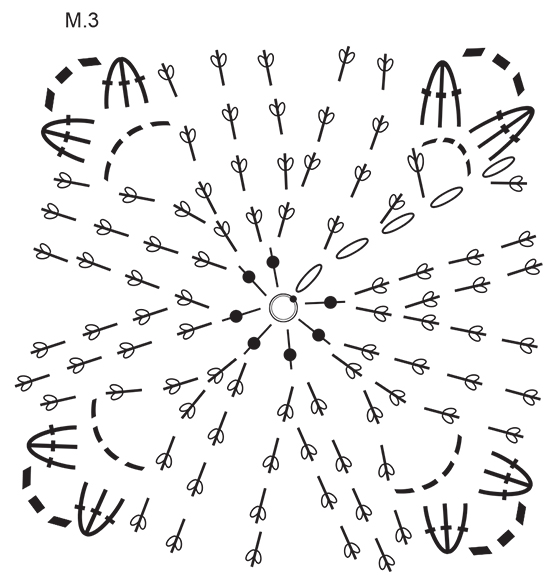
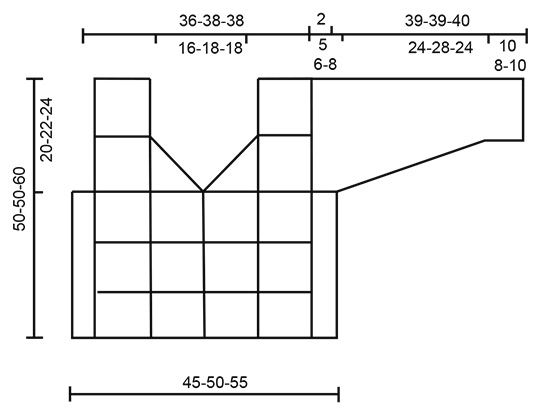
Crochet gauge: 1 square = approx. 9.5 x 9.5 cm = [3.75" x 3.75"]. 4.5 V-st groups x 10 rows of Pattern 1 = 10 x 10 cm [4" x 4"]. Pattern: See charts. 68. The pattern is seen from the right side. The chart for Pattern 1 shows the V-stitch pattern, which is crocheted in stripe pattern following the chart for Pattern 2. Color Combinations of Squares: Crochet 6 different squares: A, B, C, D, E and F. Square A (make 4-4-5): round 1: Petrol green Chenille nr 905, round 2: Burgundy Chenille nr 925, round 3: Rust Muskat nr 21, round 4: Dark orange Muskat nr 49, round 5: red Chenille nr 906. Square B (make 1-1-2 + 1 half square): round 1: Dark lilac Chenille nr 927, round 2: Burgundy Chenille nr 925, round 3: Light plum Muskat nr 33, round 4: raspberry Muskat nr 39, round 5: red Chenille nr 906. Square C (make 1-1-2): round 1: Rust Muskat nr 21, round 2: red Chenille nr 906, round 3: Dark orange Muskat nr 49, round 4: Rust Muskat nr 21, round 5: Dark red Chenille nr 924. Square D (make 4-4-5): round 1: Dark orange Muskat nr 49, round 2: raspberry Muskat nr 39, round 3: Light plum Muskat nr 33, round 4: Burgundy Chenille nr 925, round 5: Dark red Chenille nr 924. Square E (make 2-2-2 + 1 half square): round 1: red Chenille nr 906, round 2: raspberry Muskat nr 39, round 3: Light plum Muskat nr 33, round 4: Burgundy Chenille nr 925, round 5: Dark lilac Chenille nr 927. Square F (make 4-4-4): round 1: Petrol green Chenille nr 905, round 2: Dark lilac Chenille nr 927, round 3: raspberry Muskat nr 39, round 4: Light plum Muskat nr 33, round 5: Petrol green Chenille nr 905. ------------------------------------------------------- START THE PIECE HERE: ------------------------------------------------------- Crocheted Square: Make squares in color combinations as described above. Use crochet hook size 4 mm = US 6 and work diagram M.3 and M.4 or use the written pattern below. Square: Crochet 5 chain stitches with colour 1 and join together into a ring with 1 slip stitch. Ch 5 with color 1 and join into a ring with sl st. Round 1: color 1: ch 3, 7 dc in the ring and then 1 sl st in 3rd ch at beginning of row = 8 sts. Turn the work. Round 2: color 2: ch 3 + 1 dc in first st of previous row. * 2 dc in every st from previous row *, repeat from * - * a total of 7 times. Finish with 1 sl st in 3rd ch at beginning of row = 16 sts. Turn the work. Round 3: color 3: ch 3 + 1 dc in first st of previous row, 1 dc in the next st from previous row, * then crochet alternately 2 dc and 1 dc in every st from previous row *, repeat from * - * a total of 7 times = 23 st + 3 ch. Finish with 1 sl st in the 3rd ch at beginning of row. Turn the work. Round 4: color 4: ch 3 in first st of previous row, ch 4, 1 dc in the same st, * 1 dc in each of the following 6 dc, ch 4, 1 dc in the last of the 6 dc *, repeat from * - * a total of 3 times, 1 dc in each of the last 5 dc on row, finish with 1 sl st in the 3rd ch at beginning of row. Turn the work. Round 5: color 5: ch 3 in first st of previous row, 1 dc in each of the following 6 dc, * 3 dc in ch-st bow, ch 3, 3 dc in the same ch-st bow, 1 dc in each of the following 7 dc, * repeat from * - * a total of 3 times, 3 dc in the next ch-st bow, ch 3, 3 dc in the same ch-st bow, finish with 1 sl st in the 3rd ch at beginning of row. Fasten off. Half Square: Make squares in color combinations as described above. Ch 5 with color 1 and join into a ring with a sl st. Round 1: color 1: ch 3, 4 dc in the ring. Turn the work. Round 2: color 2: ch 3 + 1 dc in the 3 rd chain stitch from of previous row, 2 dc in each of the following dc from previous row = 10 sts. Turn the work. Round 3: color 3: ch 3 + 1 dc in first st of previous row, crochet alternately 1 dc and 2 dc in each dc from previous row = 15 sts. Turn the work. Round 4: color 4: ch 3, ch 4, 1 dc in the same st as the ch 3, * 1 dc in each of the following 7 dc, ch 4, 1 dc in the last of the 7 dc *, repeat from * - * a total of 2 times. Turn the work. Round 5: color 5: ch 6, 3 dc in ch-st bow, 1 dc in each of the following 7 dc from previous row, 3 dc in ch-st bow, ch 3, 3 dc in the same ch-st bow, 1 dc in each of the following 7 dc from previous row, 3 dc in ch-st bow, ch 3, 1 dc in the same ch-st bow. Cardigan: The fronts are made with squares, and the sleeves, back and sides are crocheted in stripes in Pattern 1. Back + sides: The Back and Sides are crocheted in one piece. Ch 98-114-130 loosely with rust Muskat. Turn and crochet 1 row sc = 97-113-129 sc. On the next row, begin Pattern 1 as follows: 3 dc in 1st sc, * ch 1, skip over 3 sc, 3 dc in the next sc *, repeat from * - * (= 24-28-32 V-groups + 3 dc on row). Continue to crochet Pattern 1 with stripes according to Pattern 2. Note: turn all rows with ch 3 + ch 1. When the piece measures approx. 30-28-36 cm [11.75"-11"-14⅛"] bind off for armhole by crocheting over 4-5.5-7.5 V-groups less at each side = 16-17-17 V-groups + 3 dc remain on back. When the piece measures approx. 48-48-58 cm [18⅞"-18⅞"-22⅞"] (there are now 2 rows remaining - adjust so that the last rows are crocheted with Muskat) bind off for the neck by not crocheting over the center 6.5-7.5-7.5 V-groups – crochet 1 row at each side of neck. Crochet the next row as follows: Pattern 1 over 4.5 V-groups, continue with sc over the neck opening - 1 sc in each dc - Pattern 1 over 4.5 V-groups. Fasten off, the piece measures approx. 50-50-60 cm [19.75"-19.75"-23⅝"]. Front: Make 4-4-5 squares of A, 1-1-2 squares of B, 1-1-2 squares of C, 4-4-5 squares of D, 2-2-2 squares of E and 4-4-4 squares of F = 16-16-20 squares - see instructions above. Then make 1 half square each of B and E (neckband). Crochet squares together with rust Muskat - see Figs. 2 and 3 - Fig. 3 shows how squares are crocheted together. First join in strips according to the thin line and then join strips according to the thick line. Sleeve: Ch 42-46-50 loosely with rust Muskat. Turn and work 1 row of sc = 41-45-49 sc. Begin Pattern 1 on the next row as follows: * 3 dc in 1st sc, ch 1, skip over 3 sc *, repeat from * - * a total of 10-11-12 times, finish with 3 dc in last sc. Crochet Pattern 1 with stripes according to Pattern 2. Note: turn all rows with ch 3 + ch 1. When the piece measures 10-8-10 cm [4"-3⅛"-4"] inc 1/2 V-group at each side - see Fig. 1 - a total of 6-7-8 times every 4-3-3 rows = 16-18-20 V-groups. When the piece measures 28 cm [11"] (13-13-14 cm [5⅛"-5⅛"-5.5"] remain to finished measurements) shape sleeve cap by beginning row 2 V-groups in from each side. Repeat this dec every 5 rows to finished dimensions. Finish when the piece measures approx. 39-39-40 cm [15.25"-15.25"-15.75"]. Assembly: All pieces are crocheted together with rust Muskat. Crochet shoulder and side seams in the same way as squares were crocheted together - see Fig. 3. Crochet the sleeve seam as follows: start at the bottom with * 1 sc in one side, ch 2, 1 sc in the other side, ch 2 *, repeat from * - * until 3-4-6 rows remain. Crochet the sleeve to the Body in the same way. Crochet 1 row sc around entire Body, up along button bands and around the neck. Neck ties: Make 2 chains approx. 30 cm [11.75"] long with 2 strands rust Muskat. Fasten 1 tie at each side of center front at start of neck shaping. Make 2 more ties and fasten these 1 square below the first ones. |
|||||||||||||||||||||||||||||||||||||||||||||||||||||||
Diagram explanations |
|||||||||||||||||||||||||||||||||||||||||||||||||||||||
|
|||||||||||||||||||||||||||||||||||||||||||||||||||||||
 |
|||||||||||||||||||||||||||||||||||||||||||||||||||||||
 |
|||||||||||||||||||||||||||||||||||||||||||||||||||||||
 |
|||||||||||||||||||||||||||||||||||||||||||||||||||||||
 |
|||||||||||||||||||||||||||||||||||||||||||||||||||||||
 |
|||||||||||||||||||||||||||||||||||||||||||||||||||||||
Have you finished this pattern?Tag your pictures with #dropspattern or submit them to the #dropsfan gallery. Do you need help with this pattern?You'll find 8 tutorial videos, a Comments/Questions area and more by visiting the pattern on garnstudio.com. © 1982-2026 DROPS Design A/S. We reserve all rights. This document, including all its sub-sections, has copyrights. Read more about what you can do with our patterns at the bottom of each pattern on our site. |
|||||||||||||||||||||||||||||||||||||||||||||||||||||||


With over 40 years in knitting and crochet design, DROPS Design offers one of the most extensive collections of free patterns on the internet - translated to 17 languages. As of today we count 324 catalogs and 12290 patterns - 12280 of which are translated into English (US/in).
We work hard to bring you the best knitting and crochet have to offer, inspiration and advice as well as great quality yarns at incredible prices! Would you like to use our patterns for other than personal use? You can read what you are allowed to do in the Copyright text at the bottom of all our patterns. Happy crafting!
Post a comment to pattern DROPS 68-21
We would love to hear what you have to say about this pattern!
If you want to leave a question, please make sure you select the correct category in the form below, to speed up the answering process. Required fields are marked *.