
Popular categories
Looking for a yarn?


Comments / Questions (177)
![]() Joana wrote:
Joana wrote:
Olá e obrigada pela resposta! Deixo duas sugestões: 1. Fazer um vídeo com esta parte específica (transição de A.1 para A.2 e depois A.3), uma vez que várias pessoas tiveram a mesma dúvida 2. Colocar uma fotografia das costas do modelo para se ver melhor o motivo, pois ajuda a ver melhor alguns pormenores (por ex. como fazer os cantos em A.3) Obrigada!
10.05.2016 - 10:08
![]() Joana wrote:
Joana wrote:
Será que me podem ajudar? Quando é que começo a trabalhar A.3? É após ter completado 1 repetição de A.2, o que significa que crocheto ao mesmo tempo A.2 (pois, segundo as instruções, tenho de repetir o motivo 4 vezes) e A.3? Ou é só depois de ter terminado as quatro repetições de A.2? Obrigada
07.05.2016 - 21:26DROPS Design answered:
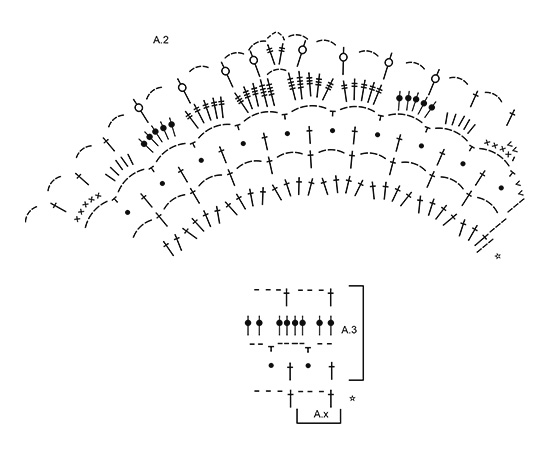
O diagrama A.2 tricota-se 4 vezes em largura ou seja 4 vezes na carreira (à volta do círculo) e apenas 1 vez em altura. Portanto, quando tiver terminado A.2, continua com A.3. Bom croché!
09.05.2016 - 11:32
![]() Annie Ricard wrote:
Annie Ricard wrote:
Bonjour, je ne comprend pas les coins de A3. Je ne sais pas où faire 1DB,3ml,3DB.
06.05.2016 - 20:32DROPS Design answered:
Bonjour Mme Ricard, les coins ont été formés à la fin de A.2 (1 DB, 4 ml, 1DB au milieu du diagramme A.2). Dans A.3, crochetez 1DB, 3 ml, 1 DB dans cet arceau. Bon crochet!
09.05.2016 - 09:09Vana Giannitsopoulou wrote:
Hello again what you mean by decreasing in this case is omitting 8 dc in every 3 rd round?
04.05.2016 - 15:40DROPS Design answered:
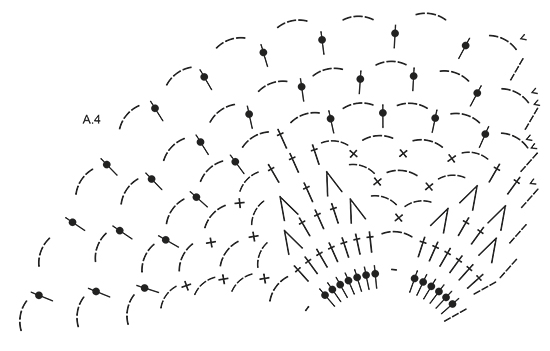
Dear Mrs Giannitsopoulou, dec 1 dc working 2 dc tog - see "DECREASE TIP" at the very beg of the pattern. ie you will then work 2 dc tog a total of 8 times evenly on row. Happy crocheting!
04.05.2016 - 15:54Vana Giannitsopoulou wrote:
Hello! I am having trouble with the sleeve. I do not understand what do you mean with decreasing 8dc on the 3rd round. Which round do you regard as 3rd? Please help me as it is the first time that one of your patterns is so complicated to figure out. Thank you
04.05.2016 - 07:08DROPS Design answered:
Dear Mrs Giannitsopoulou, you decrease 8 dc evenly on 3rd round in A.3 ( see here how to dec evenly) - 3rd row in A.3 is the one with only dc around ch-spaces. Happy crocheting!
04.05.2016 - 08:56
![]() Becky wrote:
Becky wrote:
When doing round 1 of A2 after round 5, do I put a tr into every tr/dtr including the corner?? Or do I skip the 2 dtr around ch3 in round 4?? I'm confused, I've tried following it but it just kept going round, getting bigger and I ended up with about 6 'corners' :/
29.04.2016 - 20:07DROPS Design answered:
Dear Becky, on round 1 in A.2 work (3ch = 1st tr), *3 ch, skip 2 tr* repeat from *-* around, ie repeat A.2 a total of 4 times in the round. Repeating A.2 a total of 4 times, you will then finish with 4 corners as in middle of A.2. Happy crocheting!
02.05.2016 - 09:13
![]() Maria wrote:
Maria wrote:
Me encanta, lo estoy haciendo para mí. Cuando lo termine pondré la foto en el grupo.
28.04.2016 - 17:58Vana Giannitsopoulou wrote:
Thank you very much for your help and your immediate response! Regards
25.04.2016 - 13:55
![]() Hanna Strandberg wrote:
Hanna Strandberg wrote:
Hej! Nu förstår jag ingenting... Jag har virkat ett helt varv med picoter från A.3 och har fått 18 picoter på varje sida (18x4) Det som händer när jag är klar med nästa varv efter picoterna med ökning är att jag endast får ihop 19 rapporter när det är 20 jag vill ha.. Snälla hjälp!
19.04.2016 - 21:10DROPS Design answered:
Hej Hanna. Er dit problem löst? Jeg ved godt det er laenge siden, men har du stadig brug for hjaelp, saa angiv hvilken str du laver og hvor du er i opskriften, saa skal jeg pröve at hjaelpe dig videre asap.
23.11.2016 - 16:33
![]() Christina Thage wrote:
Christina Thage wrote:
Jeg kan ikke finde ud af at få hjørnerne til at blive ordentlige i A3. Det ville være rigtig dejligt med et diagram der også viser hjørnerne. Ellers tak for en fantastisk side 😊
03.04.2016 - 14:09DROPS Design answered:
Hej Christina. Du har haeklet hjörnerne i A.2 (dbl-st om bue-4 lm-dbl-st om bue). Naar du saa haekler A.3 fortsaetter du som diagrammet, men i hvert hjörne (du kan evt markere dem) haekler du 1 dbl-st + 3 lm + 1 dbl-st (dvs om hjörnebuen fra sidste omg.)
20.05.2016 - 12:29
|
||||||||||||||||||||||||||||||||||||||||||||||
Janis#janissweater |
||||||||||||||||||||||||||||||||||||||||||||||
|
|
||||||||||||||||||||||||||||||||||||||||||||||
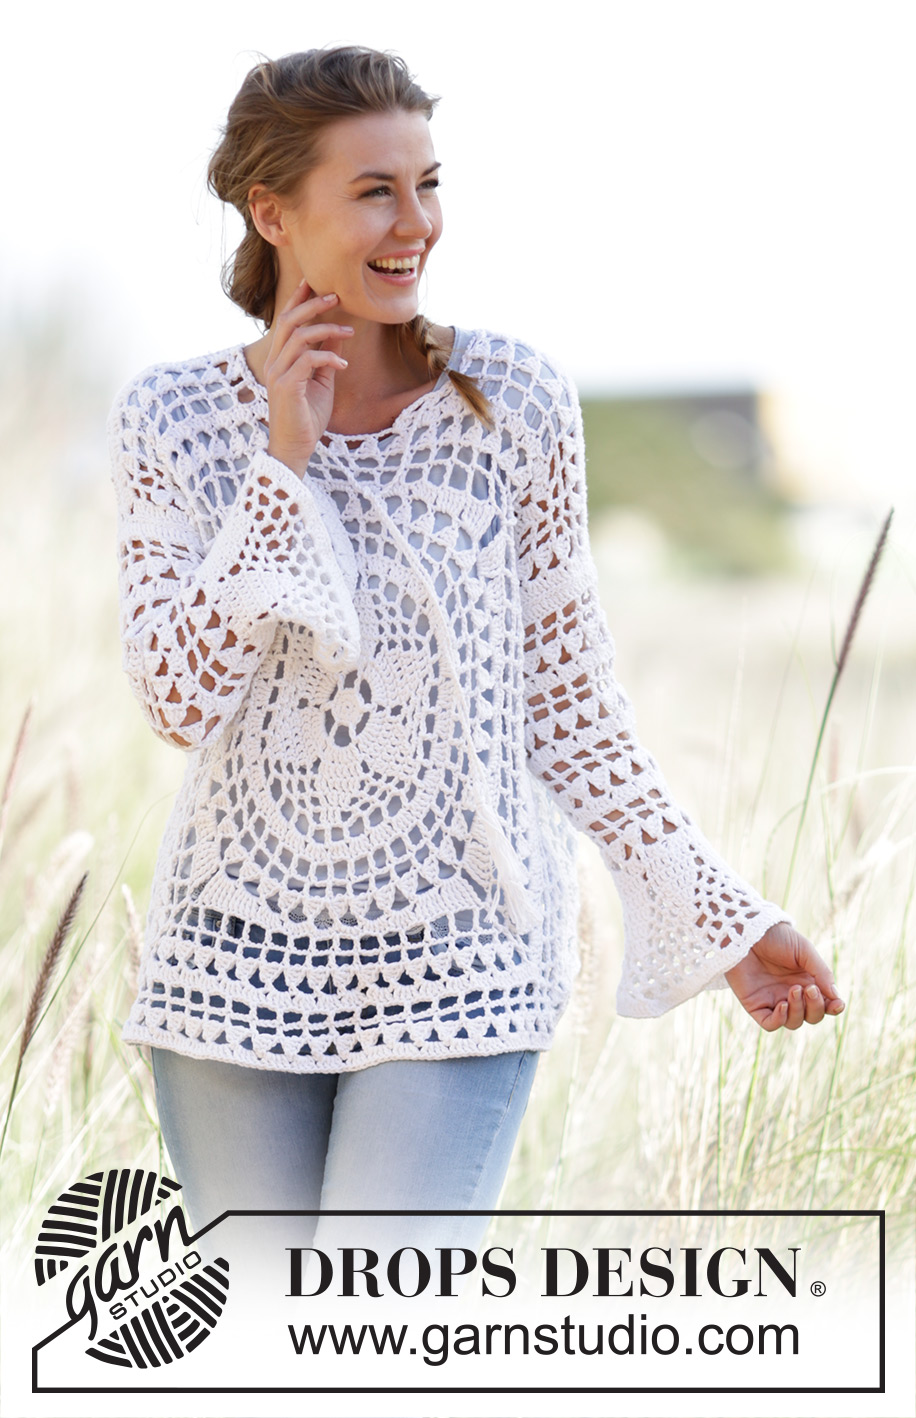
Crochet DROPS jumper worked in a square with flounce sleeves and lace pattern in ”Paris”. Size: S - XXXL.
DROPS 170-2 |
||||||||||||||||||||||||||||||||||||||||||||||
|
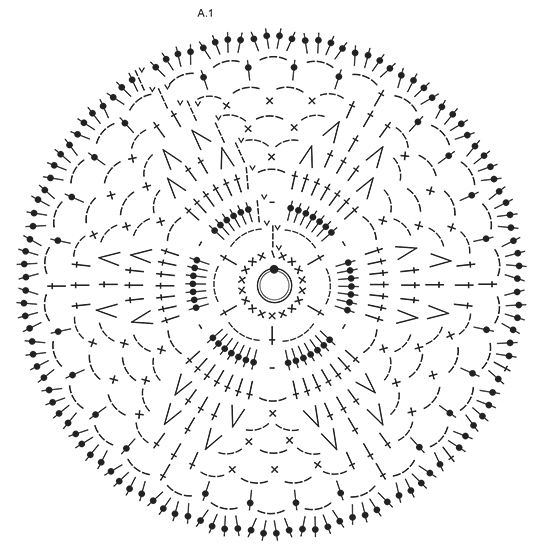
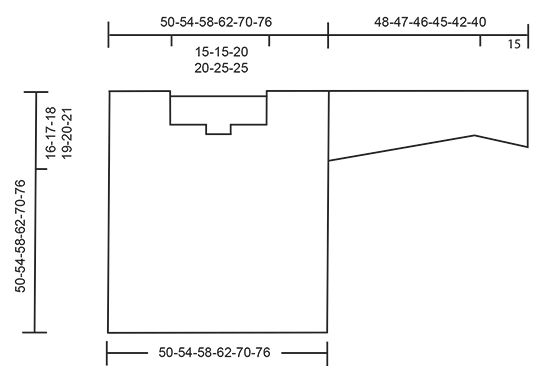
MAGIC CIRCLE: To avoid hole in the middle beg with this technique: Hold yarn end in the left hand and make a loop around left index finger (from left to right). Hold the loop with left thumb and index finger. Insert hook through loop, get the yarn from ball, pull yarn through loop, make 1 YO on hook and pull YO through st on hook = 1 sc, then work 8 sc around loop, finish with 1 sl st in first dc = 9 sc. Continue as explained in pattern – AT THE SAME TIME pull yarn end so that loop is tighten tog and the hole disappears. CROCHET INFO: Replace first sc on round with 1 ch. Finish round with one sl st in first ch from beg of round. Replace first dc on round/row with 3 ch. Finish round with one sl st in third ch from beg of round. PATTERN: See diagrams A.1 to A.4. TRIPLE TR: Make 4 YOs on hook, insert hook around ch-space and pull yarn around ch-space, * 1 YO on hook, pull yarn through the next 2 loops on hook *, repeat from *-* 4 more times = 1 loop on hook. DECREASE TIP: Dec 1 dc by working the next 2 dc tog as follows: Work 1 dc but wait with last pull through (= 2 loops on hook), then work next dc but on last pull through, pull yarn through all 3 loops on hook. ---------------------------------------------------------- JUMPER: BACK PIECE: Work back piece in a circle, then as a square from mid back. Work up along one side of square for shoulder/neck at the end. Work a MAGIC CIRCLE on hook size 4.5 mm/US 7 with Paris – see explanation above = 9 sc around circle. Then work according to A.1 (on first round in A1 work 2 sc in each of the 9 sc = 18 sc). REMEMBER THE CROCHET GAUGE! READ CROCHET INFO! When A.1 has been worked, there are 120 dc on round and piece measures approx. 22 cm / 8¾" in diameter. Then work according to A.2, work 4 repetitions of A.2 around the circle - beg on second round in A.2. NOTE: Sl sts at beg of A.2 are only worked at beg of round. When A.2 has been worked, continue according to A.3. A.x shows 1 repetition of A.3 in width. Work A.3, in every corner work 1 tr + 3 ch + 1 tr, work 2 repetitions more of A.3 between every corner for every round worked. Continue with A.3 until piece measures 23-25-27-29-33-36 cm / 9"-9¾"-10½"-11½"-13"-14¼" from middle (46-50-54-58-66-72 cm / 18"-19¾"-21¼"-22¾"-26"-28½" in total), there are now approx. 18-20-22-24-28-30 repetitions of A.3 along each side of square. Now work piece back and forth and dec for neck in the middle of the first side of square. Cut the yarn and skip the middle 6-6-8-8-10-10 repetitions (= neck) on the first side of square, continue A.3 with inc in the corners until row has been worked, do not work over the 6-6-8-8-10-10 repetitions skipped at beg of row. Fasten off, piece measures 25-27-29-31-35-38 cm / 9¾"-10½"-11½"-12¼"-13¾"-15" from middle (50-54-58-62-70-76 cm / 19¾"-21¼"-22¾"-24½"-27½"-30" in total), there are approx. 7-8-8-9-10-11 repetitions on each shoulder, and approx. 20-22-24-26-30-32 repetitions along each of the other 3 sides. Insert 1 marker in each side, 16-17-18-19-20-21 cm / 6¼"-6¾"-7"-7½"-8"-8¼" down from shoulder, this shows where sleeve is sewn in. FRONT PIECE: Work as back piece until piece measures 17-19-21-23-27-30 cm / 6¾"-7½"-8¼"-9"-10½"-11¾" from middle (32-36-40-44-52-58 cm / 12½"-14¼"-15¾"-17¼"-20½"-22¾" in total), there are now approx. 14-16-18-20-24-26 repetitions of A.3 along each side of square. Now work piece back and forth and dec for neck in the middle of the first side of square. Cut the yarn and skip the middle 2 repetitions (= neck) on the first side of square, continue with A.3 with inc in the corners until row has been worked, do not work over the 2 repetitions skipped at beg of row. Turn and work a row from WS. Cut the yarn, skip the first 2-2-3-3-4-4 repetitions, continue with A.3 and inc in the corners, but turn when 2-2-3-3-4-4 repetitions remain on row, 6-6-8-8-10-10 repetitions have been dec mid front for neck. Continue back and forth with A.3 and inc until piece measures 25-27-29-31-35-38 cm / 9¾"-10½"-11½"-12¼"-13¾"-15" from middle (50-54-58-62-70-76 cm / 19¾"-21¼"-22¾"-24½"-27½"-30" in total), there are approx. 7-8-8-9-10-11 repetitions on each shoulder, and approx. 20-22-24-26-30-32 repetitions along each of the other 3 sides, adjust according to back piece. Fasten off. Insert 1 marker in each side, 16-17-18-19-20-21 cm / 6¼"-6¾"-7"-7½"-8"-8¼" down from shoulder, this shows where sleeve is sewn in. SLEEVE: Sleeve is worked in the round, top down. Work 64-64-69-69-74-74 ch and form a ring with one sl st in first ch. Work 3 ch (= 1 dc), 1 dc in each of the next 6-6-3-3-0-0 ch, skip ch 1, * work 1 dc in each of the next ch 7, skip 1 st *, repeat from *-* the entire round = 56-56-60-60-64-64 dc. Remember CROCHET INFO! Then work in the round and according to A.3. On 3rd round in A.3 dec 8 dc evenly - READ DECREASE TIP. Repeat dec every time 3th round in diagram is worked 3 times in total = 32-32-36-36-40-40 dc. Work A.3 until piece measures 33-32-31-30-27-25 cm / 13"-12½"-12¼"-11¾"-10½"-9¾", finish after 2nd or 4th round in A.3. Work 40-40-40-48-48-48 dc in total around ch-spaces. Then work according to A.4 (5-5-5-6-6-6 repetitions in width, diagram shows 2 repetitions in width), work first round as follows: * Work 1 dc in each of the first 7 dc, ch 1, skip 1 dc *, repeat from *-* 4-4-4-5-5-5 more times. NOTE: Sl sts at beg of A.4 are only worked at beg of round. Work A.4 1 time vertically. Fasten off. Sleeve measures approx. 48-47-46-45-42-40 cm / 19"-18½"-18"-17¾"-16½"-15¾". Work another sleeve the same way. ASSEMBLY: Sew the shoulder seams. Sew side seams from markers in the side and down. Sew in sleeves. TWINED STRING: Cut 2 lengths of 3 metres/ 3¼ yds each. Twine the strands tog until they resist, fold the string double so that it twines again. Make a knot at each end. Thread tie up and down around the neck. Cut 8 lengths of yarn of 20 cm / 8". Thread the ends through the end of the tie and fold them double. Twine one of the strand around the top of tassel. Make another fringe in the other end of tie. |
||||||||||||||||||||||||||||||||||||||||||||||
Diagram explanations |
||||||||||||||||||||||||||||||||||||||||||||||
|
||||||||||||||||||||||||||||||||||||||||||||||
 |
||||||||||||||||||||||||||||||||||||||||||||||
 |
||||||||||||||||||||||||||||||||||||||||||||||
 |
||||||||||||||||||||||||||||||||||||||||||||||
 |
||||||||||||||||||||||||||||||||||||||||||||||
Have you finished this pattern?Tag your pictures with #dropspattern #janissweater or submit them to the #dropsfan gallery. Do you need help with this pattern?You'll find 16 tutorial videos, a Comments/Questions area and more by visiting the pattern on garnstudio.com. © 1982-2026 DROPS Design A/S. We reserve all rights. This document, including all its sub-sections, has copyrights. Read more about what you can do with our patterns at the bottom of each pattern on our site. |
||||||||||||||||||||||||||||||||||||||||||||||


With over 40 years in knitting and crochet design, DROPS Design offers one of the most extensive collections of free patterns on the internet - translated to 17 languages. As of today we count 324 catalogs and 12272 patterns - 12262 of which are translated into English (US/in).
We work hard to bring you the best knitting and crochet have to offer, inspiration and advice as well as great quality yarns at incredible prices! Would you like to use our patterns for other than personal use? You can read what you are allowed to do in the Copyright text at the bottom of all our patterns. Happy crafting!
Post a comment to pattern DROPS 170-2
We would love to hear what you have to say about this pattern!
If you want to leave a question, please make sure you select the correct category in the form below, to speed up the answering process. Required fields are marked *.