
Popular categories
Looking for a yarn?


Comments / Questions (9)
![]() Loretta wrote:
Loretta wrote:
Buonasera non e' chiaro come fare a riprendere le 114 maglie dal fondo del lavoro poi volevo chiedere se il filo e' continuativo e si uniscono le parti per fare un bordo unico a punto riso. Grazie
18.01.2025 - 16:46DROPS Design answered:
Buonasera Loretta, prima della lavorazione del bordo a picot viene spiegato come riprendere le maglie. Il bordo è unico. Buon lavoro!
19.01.2025 - 15:16
![]() Edith wrote:
Edith wrote:
Bonjour. Quand je fais le 1er rang taille M selon les explications soit 6m au point de riz + les 66 m du diagramme A-1 + les 8 m du diagramme A-2 + les 7m du diagramme A-3 et 6 m au poin de riz pour un total de 93 m, il reste 20 m Quoi faire avec les mailles restantes
13.07.2021 - 01:40DROPS Design answered:
Bonjour Édith, en taille S/M, tricotez les 105 mailles ainsi: 6 mailles point de riz, A.1 (= 6 m), répétez 10 fois A.2 (= 10 x 8 m = 80m), A.3 (= 7 m), 6 m point de riz, soit: 6+6+80+7+6=105 m. En espérant que ceci puisse vous aider, bon tricot!
13.07.2021 - 08:01
![]() Loulou18 wrote:
Loulou18 wrote:
Pourriez-vous m'expliquer un peu mieux la bordure de finition en picot? Je n'arrive pas à comprendre les explications entre parenthèses. Je suis allée voir pour trouver un tuto mais rien n'a réussi à répondre à mes questions, malheureusement. Toutefois le produit final sans la bordure est très joli. Merci
13.03.2019 - 15:52DROPS Design answered:
Bonjour Loulou18, cette vidéo montre comment tricoter la bordure picot en rabattant les mailles - répétez bien le motif comme dans les explications (soit 6 x de **à** et non 5 x comme dans la vidéo qui est générique). Bon tricot!
13.03.2019 - 16:14Estela Tracal wrote:
Podrán poner un tutorial de como tejer la orilla con remate de picot. Gracias.
11.07.2018 - 02:27DROPS Design answered:
Hola Estela. Pasaré tu sugerencia al departamento de video, en todos casos cada semana colgamos nuevos tutoriales.
18.07.2018 - 21:28
![]() Catharina wrote:
Catharina wrote:
Que veut dire 0-4-0-4 mailles jersey??
12.09.2017 - 19:55DROPS Design answered:
Bonjour Catharina, en taille S/M et XXL, vous ne tricotez pas de mailles jersey et en taille L/XL et XXXL, vous tricotez 4 mailles jersey. Bon tricot!
13.09.2017 - 08:32
![]() Ana Maria wrote:
Ana Maria wrote:
Quiero hacer este modelo con una lana mas fina y agujas del n.3 y 1/2. Cuantos puntos debo montar para una talla M/L?.
19.03.2016 - 22:07DROPS Design answered:
Hola Anna Maria. Para calcular el número de pts a montar haz una muestra de 10x10 cm en pt jersey con la lana y los ag que quieras utilizar (en este caso veo que son de 3,5 mm). Así podrás calcular cuantos pts aprox necesitas montar para tener 71 cm del ancho.
21.03.2016 - 10:21
![]() Sabine wrote:
Sabine wrote:
Gefällt mir sehr
13.01.2016 - 12:47Yraima Núñez wrote:
Me encanta, es muy lindo
08.01.2016 - 16:34
![]() Bodil wrote:
Bodil wrote:
Artig blomster mønster som jeg kribler av å prøve meg på! Flott bolero også!
26.12.2015 - 11:00
|
||||||||||||||||||||||
Beach Bolero#beachbolero |
||||||||||||||||||||||
 |
 |
|||||||||||||||||||||
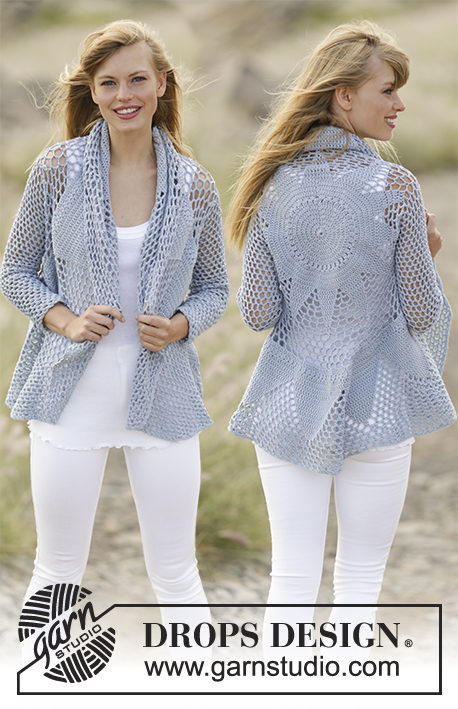
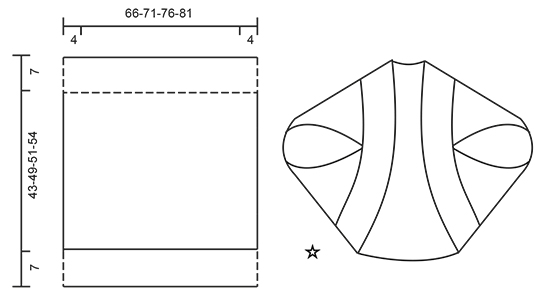
Knitted DROPS shoulder piece with lace pattern and seed st in ”Big Merino”. Size S-XXXL.
DROPS 168-10 |
||||||||||||||||||||||
|
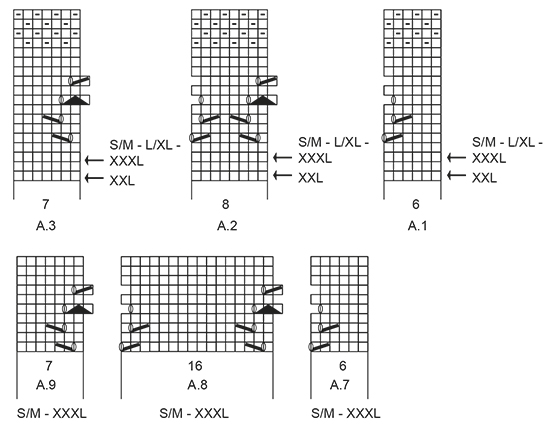
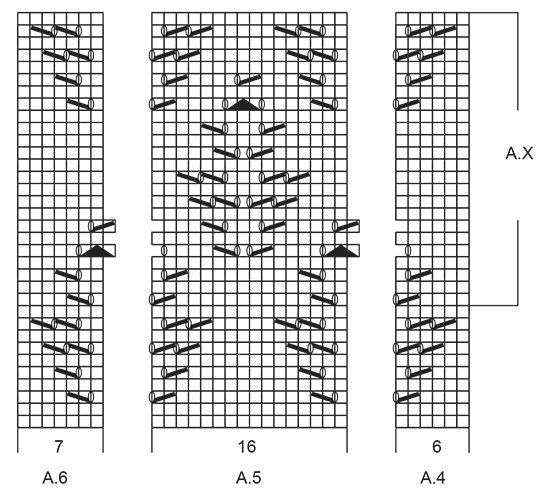
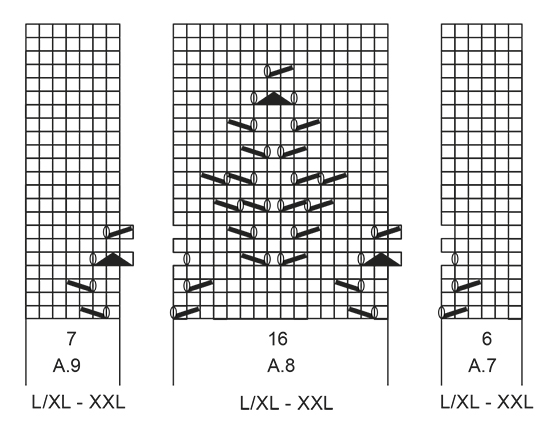
PATTERN: See diagrams A.1 to A.9. See diagram for correct size. The diagrams show all rows in pattern seen from RS. SEED ST: Row/round 1: * K 1, P 1 *, repeat from *-*. Row/round 2: K over P and P over K. Repeat 2nd row. ---------------------------------------------------------- SHOULDER PIECE: Worked back and forth on circular needle to make room for all the sts. Then work an edge in the round in seed st. Loosely cast on 105-113-121-129 sts on circular needle size 5 mm / US 8 with Big Merino. On 1st row (= RS) work pattern as follows: NOTE: Beg on row with arrow in diagram for correct size. Work 6 sts in SEED ST - see explanation above, A.1 (= 6 sts), work A.2 (= 8 sts) 10-11-12-13 times in width, A.3 (= 7 sts), work 6 sts in seed st (NOTE: P first st after A.3 so that the 6 sts in seed st in each side are opposite each other.). Work the outermost 6 sts in each side in seed st until finished measurements. When working in seed st on the last 4 rows in A.1-A.3, seed st should fit seed st on the 6 sts in each side. REMEMBER THE KNITTING GAUGE When A.1-A.3 have been worked vertically, work as follows: Work 6 sts in seed st as before, 0-4-0-4 sts in stockinette st, A.4 (= 6 sts), A.5 (= 16 sts) 5-5-6-6 times in width, A.6 (= 7 sts), 0-4-0-4 sts in stockinette st, 6 sts in seed st. When A.4-A.6 have been worked 1 time vertically, repeat A.X 1-1-1-2 more times vertically. Then work A.7 over A.4, A.8 over A.5 and A.9 over A.6 - find diagram for correct size. Continue to work 0-4-0-4 sts in stockinette st and 6 sts in seed st as before. When A.7-A.9 have been worked vertically, continue with 4 rows in seed st over all sts. Then work pattern as follows: Work 6 sts in seed st as before, A.1 (beg on row with arrow for correct size in diagram A.1-A.3), A.2 10-11-12-13 times in width, A.3, 6 sts in seed st. Finish before the last 4 rows in diagram A.1-A.3. Now piece measures approx. 43-49-51-54 cm / 17"-19¼"-20"-21¼". Then work as follows from RS: Work 1 row seed st, do not turn piece but continue to pick 106-114-120-130 sts from cast-on edge (seen from RS)= 211-227-241-259 sts on needle (i.e. fold the piece up before picking up sts along cast-on edge). Then work in the round on circular needle. Continue with seed st in the round until edge in seed st measures 6 cm / 2⅜". Work 2 rounds in stockinette st. Then bind off with picot edge. BIND OFF EDGE WITH PICOT: K 1, (* insert right needle in between the first 2 sts on left needle (i.e. between sts on needle, not through sts), make 1 YO on right needle, pull YO forwards between sts and slip YO on left needle *, repeat from *-* 2 more times (= 3 new sts on left needle). ** K first st on left needle, pass first st on right needle over last st worked **), repeat from **-** 6 times in total and repeat from (-) along the entire edge until 2 sts remain, bind off the last 2 sts. Fasten off. |
||||||||||||||||||||||
Diagram explanations |
||||||||||||||||||||||
|
||||||||||||||||||||||
 |
||||||||||||||||||||||
 |
||||||||||||||||||||||
 |
||||||||||||||||||||||
 |
||||||||||||||||||||||
Have you finished this pattern?Tag your pictures with #dropspattern #beachbolero or submit them to the #dropsfan gallery. Do you need help with this pattern?You'll find 14 tutorial videos, a Comments/Questions area and more by visiting the pattern on garnstudio.com. © 1982-2026 DROPS Design A/S. We reserve all rights. This document, including all its sub-sections, has copyrights. Read more about what you can do with our patterns at the bottom of each pattern on our site. |
||||||||||||||||||||||


With over 40 years in knitting and crochet design, DROPS Design offers one of the most extensive collections of free patterns on the internet - translated to 17 languages. As of today we count 324 catalogs and 12290 patterns - 12280 of which are translated into English (US/in).
We work hard to bring you the best knitting and crochet have to offer, inspiration and advice as well as great quality yarns at incredible prices! Would you like to use our patterns for other than personal use? You can read what you are allowed to do in the Copyright text at the bottom of all our patterns. Happy crafting!
Post a comment to pattern DROPS 168-10
We would love to hear what you have to say about this pattern!
If you want to leave a question, please make sure you select the correct category in the form below, to speed up the answering process. Required fields are marked *.