
Popular categories
Looking for a yarn?


Comments / Questions (21)
![]() Vicki Jakobsen wrote:
Vicki Jakobsen wrote:
Jeg har strikket trøjen, men den er slet ikk som på billedet. alt for kort og slidsen sidder latterligt højt oppe. den får jeg ikk brugt til noget. strikkefastheden er overholdt og målene passer med mønstret. det er mega ærgerligt og garnets struktur gør at jeg ikk kan trevle op og strikke den om.. Kan i ikk tjekke mønstret?
04.04.2016 - 13:29
![]() Isabel Martins wrote:
Isabel Martins wrote:
Penso que estas instruções não se referem a este modelo, bem como os fios e as agulhas. É possivel publicaram as instruções correctas? Obrigado.
29.03.2016 - 12:56DROPS Design answered:
Muito obtigado pela chamada de atenção. Efectivamente, havia uma troca de modelos que já foi devidamente corrigida. Mais uma vez obrigado e bom tricô!
01.04.2016 - 11:17
![]() Rosi wrote:
Rosi wrote:
Hi :) Ich bin mit dem Stricken fertig, hab aber ein großes Problem, was das Zusammennähen betrifft. Oben an den Schulternähten soll man im Maschenstich arbeiten, aber was sollen da die beiden Reihen kraus gestrickt? Diese Reihen müsste man beim Zusammennähen verschwinden lassen, um es schön aussehen zu lassen. Was verstehe ich da nicht? Bitte um Hilfe! Vielen Dank!
08.02.2016 - 15:43DROPS Design answered:
Liebe Rosi, ich habe bei der Designabteilung nachgefragt, tatsächlich scheint mir auch ein unsichtbares Zusammennähen einfacher, wenn keine Krausrippen gestrickt werden.
09.03.2016 - 14:31
![]() Vanda wrote:
Vanda wrote:
Mám dotaz ohledně síly jehlic. V návodu uvádíte č.7 a č.8, jedná se o jehlice síly 7mm a 8mm nebo je to v US číslování a je potřeba použít jehlice síly 4,5mm a 5mm?? AlpacuBoucle standardně pletu na jehlicích síly 5mm, tak teď si nejsem jistá. Děkuji za odpověď a zdravím V.
21.01.2016 - 10:10DROPS Design answered:
Dobrý den, Vando, ano, jde skutečně o jehlice síly 7 a 8 mm - úplet má být trochu volnější, ležérní. Hodně zdaru! Hana
22.01.2016 - 08:45
![]() Rosi wrote:
Rosi wrote:
Ich kann mir auch nicht vorstellen, dass 250 g genügen sollen ...
13.01.2016 - 22:23
![]() Nicole Grund wrote:
Nicole Grund wrote:
Ist das die richtige Anleitung? Oder ein falsches Foto?!
11.01.2016 - 20:29DROPS Design answered:
Die Anleitung ist nun passend zum Foto.
24.01.2016 - 20:57
![]() Simone Ruoff wrote:
Simone Ruoff wrote:
Die Anleitung bezieht sich auf ein Tuch, nicht auf diesen Pullover. Bitte prüfen Sie, ob hier eine Verwechslung vorliegt.
11.01.2016 - 13:23DROPS Design answered:
Nun finden Sie hier die korrekte Anleitung, danke für Ihren Hinweis.
24.01.2016 - 13:10
![]() Yvanne Pelletier wrote:
Yvanne Pelletier wrote:
J'adore ! en plus moi je suis un peu ronde ,il vas tres bien me faire mais dans une belle couleur d'été .
10.01.2016 - 16:57
![]() Weimer Sandra wrote:
Weimer Sandra wrote:
Bonjour model simple et naturel, vivement les explications :))
20.12.2015 - 12:43
![]() Sabine wrote:
Sabine wrote:
Hat was mittelalterliches. Ich finde den Pulli gut. Ist so ein "rumhäng-wohlfühl-Teil"........ ;-)
14.12.2015 - 11:36
|
|
Country Stroll#countrystrollsweater |
|
|
|
|
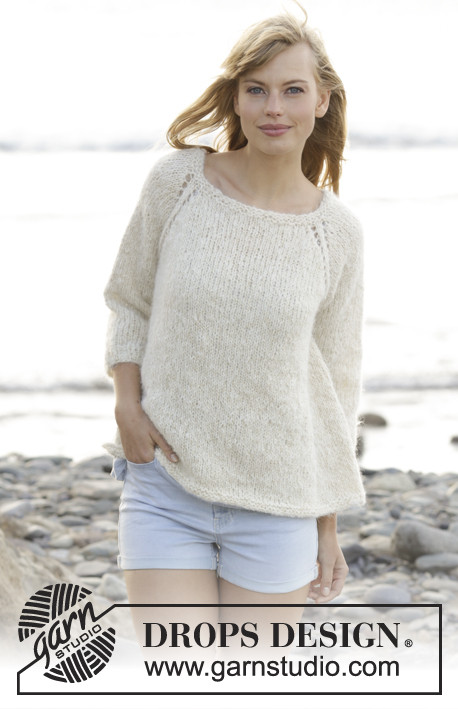
Knitted DROPS jumper in ”Alpaca Bouclé” with lacing at the front. Size: S - XXXL.
DROPS 167-38 |
|
|
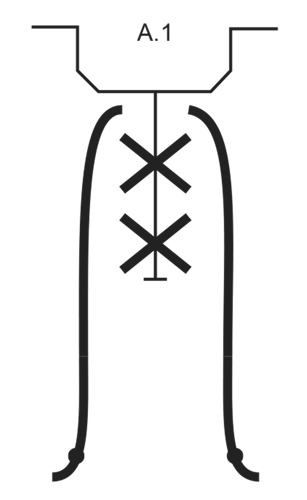
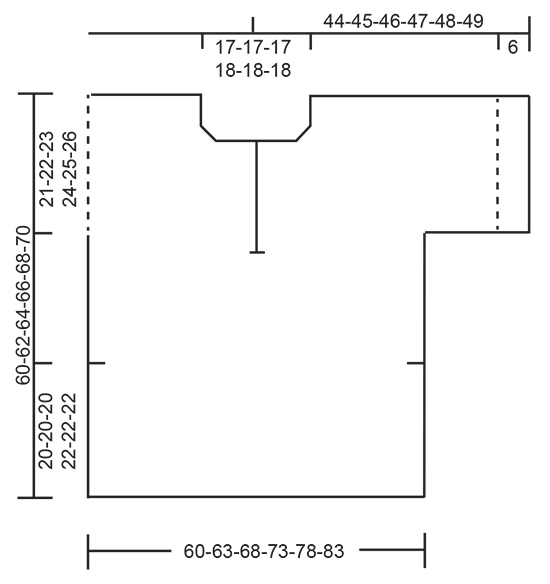
GARTER ST (back and forth): K all rows. 1 ridge = K2 rows. MEASURING TIP: All length measurements are done when piece is held up otherwise the garment will be to long according to measurements in chart. DECREASE TIP: Dec inside 3 edge sts in garter st. All dec are done from RS! Dec as follows before 3 edge st: K 2 tog. Dec after 3 edge st as follows: Slip 1 st as if to K, K 1, psso. ---------------------------------------------------------- BACK PIECE: The piece is worked back and forth on circular needle because of no of sts. Cast on 72-76-82-88-94-100 sts on circular needle size 7 mm / US 10.75 with Alpaca Bouclé. Work 2 ridges in GARTER ST - see explanation above. Switch to circular needle size 8 mm / US 11 and work in stockinette st with 3 edge sts in garter st in each side for vents. REMEMBER THE KNITTING GAUGE When piece measures 20-20-20-22-22-22 cm / 8"-8"-8"-8¾"-8¾" - READ MEASURING TIP, vents ends and cast on 1 new st at the end of the next 2 rows for seam = 74-78-84-90-96-102 sts. AT THE SAME TIME now work 2 ridges over the outermost 4 sts in each side (continue the other sts in stockinette st). Continue in stockinette st with 1 edge st in garter st in each side. When piece measures 39-40-41-42-43-44 cm / 15¼"-15¾"-16⅛"-16½"-17"-17¼" - remember MEASURING TIP, cast on 23-22-20-19-17-15 new sts at the end of the next 2 rows for sleeves = 120-122-124-128-130-132 sts. Continue in stockinette st with 3 edge sts in garter st in each side. When piece measures 56-58-60-62-64-66 cm / 22"-22¾"-23⅝"-24⅜"-25¼"-26", work 2 ridges over the middle 24-24-24-26-26-26 sts (work the other sts as before). On first row from RS after ridges, bind off the middle 18-18-18-20-20-20 sts for neck and finish each shoulder separately. Continue in stockinette st with 3 edge sts in garter st in each side. AT THE SAME TIME on first row from RS, dec 1 st for neck - READ DECREASE TIP = 50-51-52-53-54-55 sts. When piece measures 59-61-63-65-67-69 cm / 23¼"-24"-24¾"-25½"-26⅜"-27⅛" (adjust so that next row is worked from RS), switch to circular needle size 7 mm / US 10.75. Work 1 ridge back and forth over all sts and LOOSELY bind off K from RS. Repeat in the other side. FRONT PIECE: Cast on and work as back piece. When piece measures 32-33-34-35-36-37 cm / 12½"-13½"-13⅜"-13¾"-14¼"-14½" - remember MEASURING TIP, work 2 ridges over the middle 6 sts (work the other sts as before). On next row from RS keep the first 37-39-42-45-48-51 sts on needle and slip the last 37-39-42-45-48-51 sts on a stitch holder. Finish each part separately. LEFT FRONT PIECE: Continue with stockinette st, 1 edge st in garter st towards the side and 3 edge sts in garter st towards mid front. When piece measures 39-40-41-42-43-44 cm / 15¼"-15¾"-16⅛"-16½"-17"-17¼", cast on 23-22-20-19-17-15 new sts for sleeve at the end of row from WS = 60-61-62-64-65-66 sts. Now work in stockinette st with 3 edge sts in garter st in each side. When piece measures 48-50-52-52-54-56 cm / 19"-19¾"-20½"-20½"-21¼"-22", work 2 ridges over the outermost 9 sts towards mid front (work the other sts as before). On first row from WS after ridges bind off the first 6 sts for neck. Continue in stockinette st with 3 sts in garter st in each side. AT THE SAME TIME dec 1 st on every row towards the neck from RS 4-4-4-5-5-5 times in total - READ DECREASE TIP = 50-51-52-53-54-55 sts. Continue in stockinette st with 3 edge sts in garter st in each side until piece measures 59-61-63-65-67-69 cm / 23¼"-24"-24¾"-25½"-26⅜"-27⅛", adjust so that next row is worked from RS. Switch to circular needle size 7 mm / US 10.75, work 1 ridge back and forth over all sts and LOOSELY bind off K from RS. RIGHT FRONT PIECE: Slip the 37-39-42-45-48-51 sts back on circular needle 8 mm and work as left front piece but reversed - NOTE: Work 1st row from mid front. Beg by picking up 1 st in first st on left front piece and work this tog with first st on needle. This is done to avoid a nick at the bottom of vent. NOTE: When casting on new sts for sleeve, this is done at the end of row from RS and when binding off 6 sts for neck, this is done at the beg of row from RS. ASSEMBLY: Sew shoulder seams with grafting/kitchener sts inside bind-off edge. Sew underarm and side seams in one inside 1 edge st down to ridges on vents, then sew over 2 ridges but now sew in outer loop of edge sts. Fold the bottom 6 cm / 2⅜" upwards on each sleeve and fasten sleeve edge with a couple of stitches mid under sleeve and mid on top of sleeve. TIES: Cut 2 strands Belle of 4 meters/4¼ yds each, twine them tog until they resist, fold the string double so that it twines again. Tie a knot in each end at desired length and cut the ends (ties on picture is approx. 120 cm / 47"). Cross the tie over neck split at the front on jumper as shown in A.1. |
|
 |
|
 |
|
Have you finished this pattern?Tag your pictures with #dropspattern #countrystrollsweater or submit them to the #dropsfan gallery. Do you need help with this pattern?You'll find 18 tutorial videos, a Comments/Questions area and more by visiting the pattern on garnstudio.com. © 1982-2026 DROPS Design A/S. We reserve all rights. This document, including all its sub-sections, has copyrights. Read more about what you can do with our patterns at the bottom of each pattern on our site. |


With over 40 years in knitting and crochet design, DROPS Design offers one of the most extensive collections of free patterns on the internet - translated to 17 languages. As of today we count 324 catalogs and 12290 patterns - 12280 of which are translated into English (US/in).
We work hard to bring you the best knitting and crochet have to offer, inspiration and advice as well as great quality yarns at incredible prices! Would you like to use our patterns for other than personal use? You can read what you are allowed to do in the Copyright text at the bottom of all our patterns. Happy crafting!
Post a comment to pattern DROPS 167-38
We would love to hear what you have to say about this pattern!
If you want to leave a question, please make sure you select the correct category in the form below, to speed up the answering process. Required fields are marked *.