
Popular categories
Looking for a yarn?


Comments / Questions (52)
![]() Jill White wrote:
Jill White wrote:
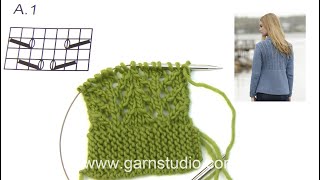
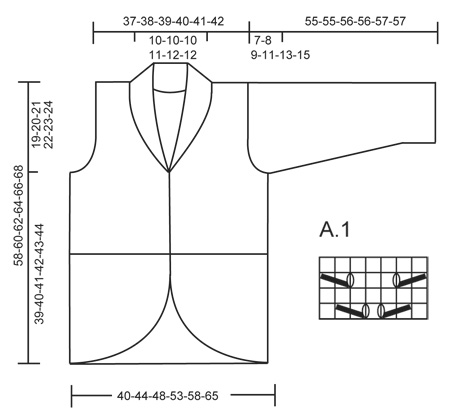
Drops Dinner Date. I can never understand charts! Chart A1 - does it read:- row 1: K1, K2 tog, yarn forward, K1, yarn forward, K2 tog, K1 row 2: purl row 3: K2 tog, yarn forward, K3, yarn forward, K2 together row 4: purl Please correct me by writing out the pattern for me if required. I have looked at the video, but I can't really see what is happening as the continental style of knitting is used rather than the "throw" method used in the UK. Many thanks.
09.08.2017 - 21:50DROPS Design answered:
Dear Mrs White, on row 1 you work K1, K2 tog, YO (= yarn forward), K1, YO (= yarn forward), slip 1 as if to K, K1, psso, K1. On row 3 you work: K2 tog, YO, K3, YO, slip 1 as if to K, K1, psso. On row 3 and 4 P all sts. Happy knitting!
10.08.2017 - 09:13
![]() Colleen Pierrynowski wrote:
Colleen Pierrynowski wrote:
I am ting to ask, my first ever question and I get that I am a spammer or I have asked too many questions. Extremely disappointed !
17.06.2017 - 15:57DROPS Design answered:
Dear Mrs Pierrynowski, you may have used a banned word in your first question, try to avoid any link nor and feel free to ask your question here. Happy knitting!
19.06.2017 - 09:15
![]() Mechthild Thier wrote:
Mechthild Thier wrote:
Beim Rückenteil soll man für Gr. M 52 Maschen anschlagen. Dies soll dannlaut Diagramm eine Breite von 44 cm ergeben. Dies passt aber nicht mit der Maschenprobe von 21M. =10cm Breite zusammen und die 52 M. wirken viel zu schmal für das Rückenteil. Was verstehe ich da nicht? LG
16.04.2017 - 12:32DROPS Design answered:
Liebe Frau Thier, das untere Teil von Rückenteil wird quer gestrickt, dh die 52 M sind der Höhe von diesem Teil, die stricken Sie bis 44 cm = Breite. Viel Spaß beim stricken!
18.04.2017 - 10:51
![]() Christina wrote:
Christina wrote:
Ich habe gerade angefangen diese Jacke im Originalgarn Lima zu stricken. Leider komme ich mit der Strickschrift nicht zurecht. Gibt es diese auch in Textform?
19.01.2017 - 15:36DROPS Design answered:
Liebe Christina, es gibt hier nur Strickschrift, hier lesen Sie mehr über Diagramme. Viel Spaß beim stricken!
19.01.2017 - 16:37
![]() Danielle wrote:
Danielle wrote:
Bonsoir, Je m'apprête à tricoter ce modèle. Or je me pose la question du nombre de mailles. S'il faut 21 m pour 10 cm (échantillon), il me semble qu'il me faudrait 64 m pour 40 cm (diagramme). Les explications indiquent 47 m, cela me semble petit. A moins qu'il y ait une astuce qui m'échappe? En vous remerciant.
01.12.2016 - 19:33DROPS Design answered:
Bonjour Danielle, en taille S, le bas du dos se tricote dans le sens de la longueur: on monte 47 m et on tricote pendant 40 cm (= largeur du bas du dos - cf schéma) puis on relève les mailles le long du côté de cette pièce pour tricoter le haut du dos (emmanchures et encolure). Bon tricot!
02.12.2016 - 08:11
![]() Christine wrote:
Christine wrote:
Bonjour, Je viens de finir ce merveilleux pull. Il tombe parfaitement. Je l'ai tricoté en 3,5. J'ai adapté le haut de la manche à l'ouverture de l'emmanchure du dos et du devant que j'avais cousus ensemble afin que le haut de la manche corresponde exactement. Très beau modèle. Merci.
07.08.2016 - 18:07
![]() Irmgardt Marquardt wrote:
Irmgardt Marquardt wrote:
Vielen Dank für die Antwort. DROPS 165-24-- bei dieser Jacke habe ich die rechte untere Seite mit der Rundung verkürzte Reihen fertig gestrickt.Dadurch entsteht ja das Muster mit den kleinen Schlaufen auf der Rückseite. Wie stricke ich dann die linke Seite gegen verkert so das dass Muster genau so aussieht wie bei der rechten Seite. Wenn ich die linke Seite stricke sind die Schlaufen auf der Oberseite.Was mache ich falsch. Danke
23.07.2016 - 14:02DROPS Design answered:
Liebe Irmgardt, haben Sie unsere Videotutorials zu den verkürzten Reihen angeschaut? Wenn Sie nach dieser Methode arbeiten, sollten gar keine Schlaufen entstehen.
28.07.2016 - 16:09
![]() Marquardt Irmgard wrote:
Marquardt Irmgard wrote:
Habe die rechte unten gestrickt komme jetzt nicht mit der linken Seite also Spiegelbild nicht zurecht. Wer kann mir helfen
18.07.2016 - 23:15DROPS Design answered:
Liebe Irmgard, könnten Sie uns etwas genauer schildern, womit Sie Probleme haben?
19.07.2016 - 15:31
![]() Joanne wrote:
Joanne wrote:
Is there a reason why this is knitted on a circular needle rather than a pair of straight needles? Thank you.
13.06.2016 - 00:02DROPS Design answered:
Dear Joanne, we worked here with circular needle to have enough room for all sts. Read more here. Happy knitting!
13.06.2016 - 09:35
![]() Karin wrote:
Karin wrote:
Eine einmalige Jacke! Ein wahres Schmuckstück! Passt perfekt. Danke für die genaue Anleitung. Lima ist ein herrliches Garn! Ich habe noch ein drittes Knopfloch eingearbeitet. Das sieht noch schöner aus.
31.05.2016 - 10:03
|
|||||||||||||
Dinner Date#dinnerdatecardigan |
|||||||||||||
 |
 |
||||||||||||
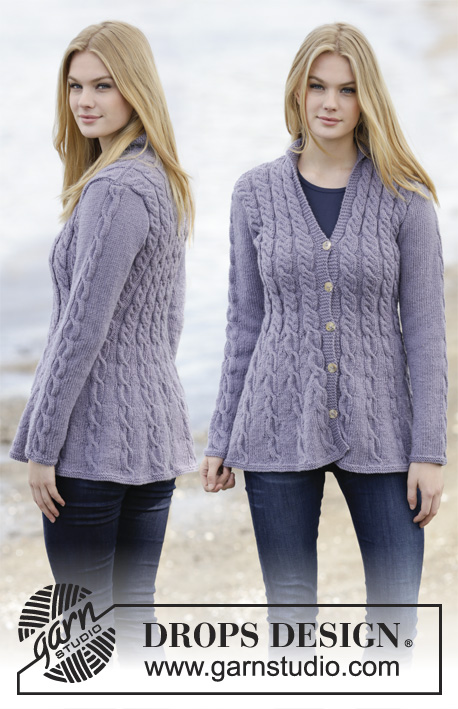
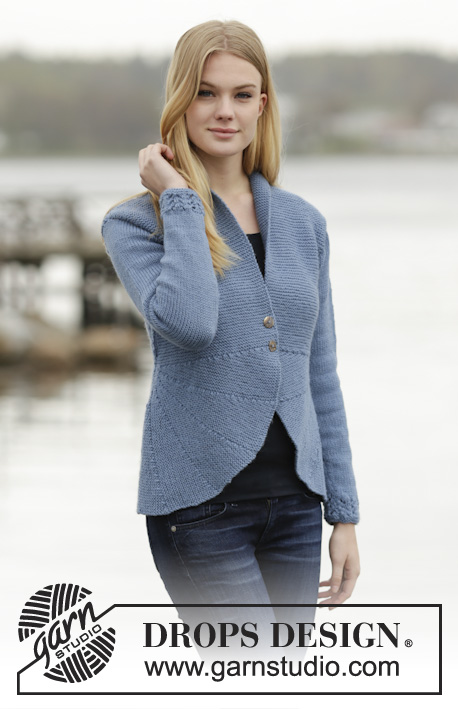
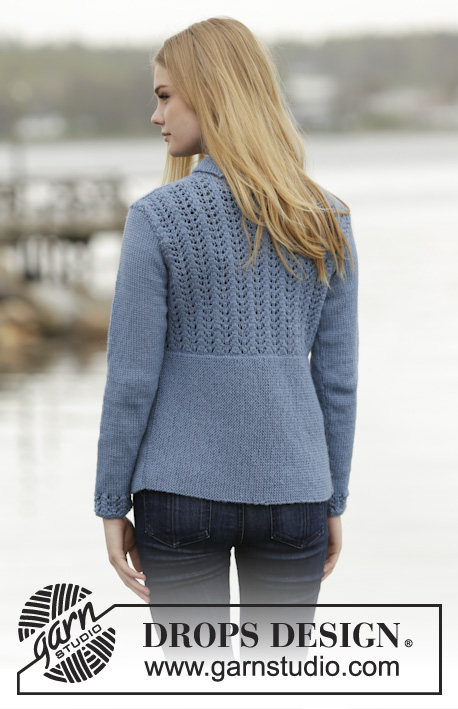
Knitted DROPS jacket with short rows, lace pattern and shawl collar in ”Lima”. Size: S - XXXL.
DROPS 165-24 |
|||||||||||||
|
GARTER ST (back and forth): K all rows. 1 ridge = K2 rows. PATTERN: See diagram A.1. Diagram shows all rows in pattern from RS. SHORT ROWS: Work short rows on front piece to get a rounded edge on the piece. Work short rows as follows: Row 1-2: Work 45-50-55-60-65-70 sts, turn piece and work back. Row 3-4: Work 42-47-52-57-62-67 sts, turn piece and work back. Row 5-6: Work 40-45-50-55-60-65 sts, turn piece and work back. Row 7-8: Work 37-42-47-52-57-62 sts, turn piece and work back. Row 9-10: Work 35-40-45-50-55-60 sts, turn piece and work back. Continue like this by working alternately 2 and 3 sts less on every turn until: SIZE S: Row 35-36: Work 2 sts, turn and work back. Repeat from row 1. Row 37-38: Work over all 47 sts, turn and work back. SIZE M: Row 39-40: Work 2 sts, turn and work back. Row 41-42: Work over all 52 sts, turn and work back. Repeat from row 1. SIZE L: Row 43-44: Work 2 sts, turn and work back. Row 45-46: Work over all 57 sts, turn and work back. Repeat from row 1. SIZE XL: Row 47-48: Work 2 sts, turn and work back. Row 49-50: Work over all 62 sts, turn and work back. Repeat from row 1. SIZE XXL: Row 51-52: Work 2 sts, turn and work back. Row 53-54: Work over all 67 sts, turn and work back. Repeat from row 1. SIZE XXXL: Row 55-56: Work 2 sts, turn and work back. Row 57-58: Work over all 72 sts, turn and work back. Repeat from row 1. BUTTONHOLES: Dec for buttonholes on right band. 1 buttonhole = K tog 2nd and 3rd st from mid front, then make 1 YO. Dec for buttonholes when piece measures 1 and 5 cm / ⅜" and 2" in all sizes (after short rows are done). ---------------------------------------------------------- BACK PIECE: Worked in 2 parts. BOTTOM PART: Cast on 47-52-57-62-67-72 sts on circular needle size 4 mm / US 6 with Lima. Work ridges in GARTER ST – see explanation above – back and forth over all sts until piece measures 40-44-48-53-58-65 cm / 15¾"-17¼"-19"-21"-22¾"-25½". REMEMBER THE KNITTING GAUGE bind off. TOP PART: Pick up 1 st in every ridge along on long side on bottom part. On next row (K from WS) adjust no of sts to 86-93-100-114-121-135. Continue to work as follows (from RS): 1 edge st in garter st, A.1 over the next 84-91-98-112-119-133 sts, 1 edge st in garter st. Work until piece measures 39-40-41-42-43-44 cm / 15¼"-15¾"-16⅛"-16½"-17"-17¼" in total (measured in the side from bottom of jacket). Now bind off in each side for armholes. Bind off at beg of every row: 3 sts 1-1-1-2-2-2 times, 2 sts 0-1-2-3-4-6 times and 1 st 1-1-2-3-3-5 times = 78-81-82-84-87-89 sts. Continue to work until piece measures 56-58-60-62-64-66 cm / 22"-22¾"-23⅝"-24⅜"-25¼"-26". Now bind off the middle 18-19-20-20-21-23 sts for neck. On next row bind off 1 st towards the neck = 29-30-30-31-32-32 sts remain on each shoulder. Continue to work until piece measures 58-60-62-64-66-68 cm / 22¾"-23⅝"-24⅜"-25¼"-26"-26¾". Bind off. RIGHT FRONT PIECE: Worked back and forth on needle in garter st, i.e. K all rows. Cast on 47-52-57-62-67-72 sts on circular needle size 4 mm / US 6 with Lima. Work SHORT ROWS - see explanation above (1st row = RS). Work Short rows (1st to 38th-42nd-46th-50th-54th-58th row) 5 times in total, the curved edge measures approx. 45-50-55-60-64-69 cm / 17¾"-19¾"-21½"-23½"-25¼"-27" at the edge. Then work back and forth over all sts. Dec for BUTTONHOLES - see explanation above. Work until piece measures 39-40-41-42-43-44 cm / 15¼"-15¾"-16⅛"-16½"-17"-17¼" (measured in the side from bottom of jacket). On next row from WS beg bind off for armhole in the side as on back piece = 43-46-48-47-50-49 sts. Continue to work until piece measures 58-60-62-64-66-68 cm / 22¾"-23⅝"-24⅜"-25¼"-26"-26¾". Now bind off the outermost 29-30-30-31-32-32 sts in the side for shoulder = 14-16-18-16-18-17 sts remain on needle for collar. Work rest of row. Then work short rows as follows (1st row = RS): * Work back and forth over all sts, work back and forth over 7-8-9-8-9-8 sts towards mid front *, repeat from *-* until collar measures approx. 7-7-7-8-8-9 cm / 2¾"-2¾"-2¾"-3"-3"-3½" (measured in the shorter side) from where shoulder was bind off. Bind off. LEFT FRONT PIECE: Cast on 47-52-57-62-67-72 sts on circular needle size 4 mm / US 6 with Lima. K 1 row from RS. Then work as right front piece but reversed (1st row in short rows is from WS). SLEEVE: The sleeve is worked back and forth on circular needle. Cast on 44-44-51-51-58-58 sts (includes 1 edge st in each side) on circular needle size 4 mm / US 6 with Lima. Work 2 ridges, then work as follows: 1 edge st in garter st, A.1 over the next 42-42-49-49-56-56 sts, finish with 1 edge st in garter st. Work A.1 3 times vertically, then work in stockinette st with 1 st in garter st in each side. When piece measures 8 cm / 3⅛", inc 1 st in each side, repeat inc every 3-2½-2½-2-2-1½ cm / 1"-⅞"-⅞"-¾"-¾"-½" 11-14-13-16-16-19 more times = 68-74-79-85-92-98 sts. When piece measures 48-47-47-46-46-44 cm / 19"-18½"-18½"-18"-18"-17¼" (NOTE! Shorter measurements in the larger sizes because of longer sleeve cap and wider shoulders), bind off in each side for sleeve cap. Bind off at beg of every row as follows: 3 sts 1 time and 2 sts 4-4-5-5-6-6 times and 1 st 0-1-1-1-1-3 times. Then bind off 2 sts in each side until piece measures 54-54-55-55-56-56 cm / 21¼"-21¼"-21½"-21½"-22"-22", bind off 3 sts in each side 1 time. Bind off the remaining sts, piece measures approx. 55-55-56-56-57-57 cm / 21⅝"-21⅝"-22"-22"-22½"-22½". Make another sleeve. ASSEMBLY: Sew the shoulder seams. Sew in sleeves. Sew sleeve and side seams in one inside 1 edge st. Sew collar tog mid back and sew the neck dec on back piece. Sew the buttons on to left front piece. |
|||||||||||||
Diagram explanations |
|||||||||||||
|
|||||||||||||
 |
|||||||||||||
Have you finished this pattern?Tag your pictures with #dropspattern #dinnerdatecardigan or submit them to the #dropsfan gallery. Do you need help with this pattern?You'll find 18 tutorial videos, a Comments/Questions area and more by visiting the pattern on garnstudio.com. © 1982-2026 DROPS Design A/S. We reserve all rights. This document, including all its sub-sections, has copyrights. Read more about what you can do with our patterns at the bottom of each pattern on our site. |
|||||||||||||


With over 40 years in knitting and crochet design, DROPS Design offers one of the most extensive collections of free patterns on the internet - translated to 17 languages. As of today we count 325 catalogs and 12298 patterns - 12288 of which are translated into English (US/in).
We work hard to bring you the best knitting and crochet have to offer, inspiration and advice as well as great quality yarns at incredible prices! Would you like to use our patterns for other than personal use? You can read what you are allowed to do in the Copyright text at the bottom of all our patterns. Happy crafting!
Post a comment to pattern DROPS 165-24
We would love to hear what you have to say about this pattern!
If you want to leave a question, please make sure you select the correct category in the form below, to speed up the answering process. Required fields are marked *.