
Popular categories
Looking for a yarn?


Comments / Questions (21)
![]() Roswitha wrote:
Roswitha wrote:
Das Diagramm sind nur hin Reihen ? Und in der Rückreihe? Die Maschen wie sie erscheinen?
22.06.2021 - 17:08DROPS Design answered:
Liebe Roswitha, die Diagramme zeigen alle Reihen, von der Vorderseite gesehen, z.B. 1. Reihe = rechts, 2. Reihe = links, 3. Reihe = links, 4. Reihe = rechts... 1 leeres Kästchen = 1 Masche glatt rechts; 1 x = 1 Maschen links bei der Hinreihe und rechts bei der Rückreihe (= sieht wie links von der Vorderseite). Viel Spaß beim stricken!
23.06.2021 - 08:25
![]() Braun wrote:
Braun wrote:
J adore en plus il y a les explications en français le seul problème c est la bordure au crochet et le crochet je sais pas faire
29.03.2021 - 23:01
![]() Anita Nanninga wrote:
Anita Nanninga wrote:
Er staat een fout in dit patroon. Bij de Mouw staat dat er elke 4CM moet worden gemeerderd. Volgens mij moet dit elke 4e NAALD zijn.
17.06.2020 - 17:45
![]() Susanna Malmsten wrote:
Susanna Malmsten wrote:
Vid montering, vad gör jag med bakstyckets halsringningen? Ska det bara lämnas med avmaskade maskor?
03.04.2018 - 00:57DROPS Design answered:
Hei Susanna. Halsringen blir ferdig under felling, da bakstykket er strikket i riller trengs det ikke kant og det skal derfor ikke gjøres noe med halsen bak under monteringen. God fornøyelse.
03.04.2018 - 11:52Sara wrote:
Should be: "In words...3 times, p 1 row, knit 4 rows"
25.06.2013 - 17:39
![]() Jackie wrote:
Jackie wrote:
There is a word explanation of the pattern stitch at the beginning of the instructions. There is also a chart for the pattern, and to me, it doesn't seem like the chart matches the words. Please advise. Thanks.
25.06.2013 - 15:39DROPS Design answered:
Dear Jackie, diagram shows pattern from RS, so that you will have from RS : K2 rows, P1 row, ie, starting with K1 row from RS, you then P3 rows (= 1xP from WS = K from RS + 1xP from RS = P from RS + 1xP from WS=K from RS), K3 rows (= 1xK from RS= K from RS + 1 x K from WS= P from WS + 1xK from RS=K from RS), etc.. repeat as written or follow diagram as you prefer. Happy knitting!
25.06.2013 - 17:13
![]() Gro Minken wrote:
Gro Minken wrote:
Hvordan i alle dager er det dette mønstreret skal strikkes så enkelt egentlig men . Kan noen forklare.
10.06.2013 - 22:18
![]() Drops Design wrote:
Drops Design wrote:
Hver 2.pind i diagrammet strikker du fra retsiden og hver 2.pind i diagrammet strikker du fra vrangen. Tom firkant = ret fra retsiden og vrang fra vrangen. X = vrang fra retsiden og ret fra vrangen. Du starter med at strikke diagrammet nederst i højre hjørne. God fornøjelse!
10.09.2009 - 08:58
![]() Lise wrote:
Lise wrote:
Jeg forstår simpelthen ikke M1. Mønstret er set fra retsiden, hvad skal jeg så strikke på vrangen? Ret hele vejen... eller følge mønstret... eller vrang... eller? HJÆÆÆÆÆÆÆÆÆÆLP :-) På forhånd tak.
10.09.2009 - 07:47
![]() DROPS / Lena wrote:
DROPS / Lena wrote:
The english translation is written within the pattern. Look at the lines starting with = signs.
07.01.2008 - 15:50
|
|||||||
DROPS 69-9 |
|||||||
|
|
|||||||
DROPS Short wide cardigan in Muskat.
DROPS 69-9 |
|||||||
|
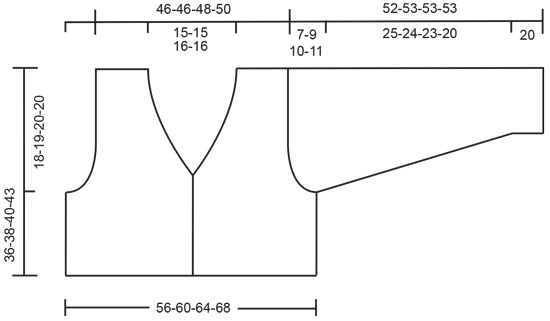
Gauge: 20 sts x 39 rows = 10 x 10 cm [4" x 4"] on larger needles in garter st. Garter st, when knitting flat: Knit all sts, all rows. Pattern: See chart. The pattern is seen from the right side. (In words, the pattern is: K 1 row, * P 3 rows, K 3 rows *, repeat * - * a total of 3 times, K 1 row, P 1 row, K 4 rows.) Knitting tips (for neck): All decs are made from right side inside 4 edge sts = 3 sts in garter st + P 1 (seen from the right side). Dec 1 st as follows; After 4 edge sts: K 2 tog. Before 4 edge sts: sl 1, K 1, psso. Back: Cast on 104-112-120-128 sts on smaller needles. Knit garter st, after 3 cm [1.25"] inc (right side row) 10 sts evenly distributed on the row = 114-122-130-138 sts. Continue in garter st until the piece measures 5 cm [2"]. Change to larger needles and knit Pattern 1 time, then knit garter st to finished dimensions. When the piece measures 18-19-20-23 cm [7"-7.5"-7⅞"-9"] bind off for armhole at each side every other row: 3 sts 1-1-1-1 time, 2 sts 1-3-4-4 times and 1 st 6-6-6-8 times = 92-92-96-100 sts. When the piece measures 34-36-38-41 cm [13⅜"-14⅛"-14⅞"-16⅛"] bind off the center 26-26-28-28 sts for the neck. Then dec 1 st at each neck edge every other row 2-2-2-2 times - see knitting tips. Bind off the remaining 31-31-32-34 sts on each shoulder when the piece measures 36-38-40-43 cm [14⅛"-14⅞"-15.75"-16⅞"]. Right front: Cast on 57-61-65-69 sts on smaller needles. Knit garter st, but knit the 4 button band sts as follows from center front edge (right side row): K 3, P 1 (seen from the right side – on wrong side rows you will K 4). When the piece measures 5 cm [2"] change to larger needles and knit Pattern 1 one time - button bands knit as explained above to finished dimensions. After Pattern 1 knit garter st. Read the entire next section before knitting Armholes: When the piece measures 18-19-20-23 cm [7"-7.5"-7⅞"-9"] bind off for armhole at the side as on back = 46-46-48-50 sts. Neck shaping: When the piece measures 19-20-21-24 cm [7.5"-7⅞"-8.25"-9.5"] dec 1 st for the neck - see knitting tips: 10-10-11-11 times every other row, then 5-5-5-5 times every 4 rows. Bind off the remaining 31-31-32-34 sts on shoulder when the piece measures 36-38-40-43 cm [14⅛"-14⅞"-15.75"-16⅞"]. Left front: Cast on and knit the same as the right, reversing all shaping. Sleeve: Cast on 60-62-64-66 sts on smaller needles. Knit 6 rows garter st, change to larger needles and knit Pattern 1 one time. Then knit garter st. When the piece measures 20 cm [7⅞"] inc 1 st at each side 5-6-7-6 times every 5-4-3-3 cm [2"-1.5"-1.25"-1.25"] = 70-74-78-78 sts. When sleeve measures 45-44-43-40 cm [17.75"-17.25"-16⅞"-15.75"] bind off for sleeve cap at each side every other row: 3 sts 1-1-1-1 time, 2 sts 2-1-1-1 time, 1 st 8-14-16-17 times, then bind off 2 sts at each side until the piece measures 52-53-53-53 cm [20.5"-20⅞"-20⅞"-20⅞"]. Bind off the remaining sts. Assembly: Sew in sleeves. Sew sleeve and side seams using edge sts as a seam allowance. Crochet three buttonhole loops along right button band as follows: start at the top with 1 sc, ch 3, fasten with 1 sc 1 cm [⅜"] lower, turn and crochet 3 sc in ch-loop, tie off. Make 2 more buttonhole loops with 5 cm [2"] between each. Sew on buttons. |
|||||||
Diagram explanations |
|||||||
|
|||||||
 |
|||||||
 |
|||||||
Have you finished this pattern?Tag your pictures with #dropspattern or submit them to the #dropsfan gallery. Do you need help with this pattern?You'll find 16 tutorial videos, a Comments/Questions area and more by visiting the pattern on garnstudio.com. © 1982-2026 DROPS Design A/S. We reserve all rights. This document, including all its sub-sections, has copyrights. Read more about what you can do with our patterns at the bottom of each pattern on our site. |
|||||||


With over 40 years in knitting and crochet design, DROPS Design offers one of the most extensive collections of free patterns on the internet - translated to 17 languages. As of today we count 324 catalogs and 12290 patterns - 12280 of which are translated into English (US/in).
We work hard to bring you the best knitting and crochet have to offer, inspiration and advice as well as great quality yarns at incredible prices! Would you like to use our patterns for other than personal use? You can read what you are allowed to do in the Copyright text at the bottom of all our patterns. Happy crafting!
Post a comment to pattern DROPS 69-9
We would love to hear what you have to say about this pattern!
If you want to leave a question, please make sure you select the correct category in the form below, to speed up the answering process. Required fields are marked *.