
Popular categories
Looking for a yarn?




























Comments / Questions (164)
 Christina wrote:
As soon as I posted my last comment/ question the answer appeared below my original question. It definitely wasnt there before cos I looked carefully. Anyway thank you.
28.09.2026 - 22:06
Christina wrote:
Please could someone answer my question from the 23/9 as it doesnt say which size hook to use for the loops. Is it a 3mm or a 5mm. Really this pattern is not at all clear.
28.09.2026 - 22:03DROPS Design answered:
Hi Christina, We have answered your question and you should have been notified via e mail. If you look at the comments and answers at the bottom of the page, you will see our answer - you work the loops with a 5 mm hook. Regards, Drops Team.
29.09.2026 - 06:12
Christina wrote:
I'm about to crochet the loops but it doesnt say what size hook to use. Is it the 3mm or 5mm hook. I take it that I use a 5mm for the ties in chain stitch as I did for the ties at the neck/shoulder.
23.09.2026 - 22:45DROPS Design answered:
Hi Christina, Yes, the loops are worked using crochet hook size 5 mm. Regards, Drops Team.
24.09.2026 - 07:29
Christina wrote:
Ok, thanks. I just did slip stitches at the beginning of M2 to get to M3 and also slip stitches at each beginning row of M3 to decrease and for each new shorter row.Your previous reply on 10/9 said to turn when I have done M3. But then when should I do M4? I went straight from M3 to crochet halfway across M4 to the central point and then turned and went crocheted back across M4 and M3. I couldnt see any other way to do it.
23.09.2026 - 22:41
Christina wrote:
Ok, I'll work dble crochet AGAIN along the top of M2 to get to the start of M3 but this will be row 6 of M2. Why doesnt it show this on the graph? But then you say to turn after M3. Dont I have to work M4 after M3 to get to the halfway point. None of this makes any sense to me!
13.09.2026 - 01:17DROPS Design answered:
Dear Christina, we don't show it in the chart because you can simply cut the thread and rejoin it in M.3. Otherwise, you could also work slip stitches, to avoid cutting the thread but still stitches small enough that it won't look as if M.2 has a 6th row. The M.3 after this first M.2 is worked as before; however, there is an M.3 which is worked before M.2, at the end of the row, previously. For this M.3, instead of working slip stitches, you simply turn the piece and leave unworked the stitches in the final M.2 (as opposed to the initial M.2, which was explained above). Happy crochetting!
14.09.2026 - 00:06
Christina wrote:
Thanks for your reply but I still dont understand. Im at ghe end of row5 so if I work a double crochet in each M2 stitch now, then I will have two rows of double crochet instead of one as shown on the pattern. It clearly says in the instructions that M2 has only 5 rows. How do I get to the start of M3 without doing another M2 row? There's nothing to say in the instructions.
09.09.2026 - 22:18DROPS Design answered:
Dear Christina, at the beginning of the row you work M.2 = 1 dc in each st to the beg of M.3, then when you have done M.3, just turn leaving the last stitches M.2 unworked at the end of the row and continue with M.3 as shown in the diagram. Happy crocheting!
10.09.2026 - 09:45
Christina wrote:
I dont want to break and rejoin the yarn as that's a bit messy but the pattern doesn't show to do any slip stitches to make my way from the end of M2 to the beginning of row 6 of M3.
08.09.2026 - 01:18
Christina wrote:
I dont want to break and rejoin the yarn as that's a bit messy but the pattern doesn't show to do any slip stitches to make my way from the end of M2 to the beginning of row 6 of M3.
07.09.2026 - 22:52
Christina wrote:
Sorry didnt mean to send it twice. I thought it hadnt been sent
07.09.2026 - 22:49
Christina wrote:
I'm at the end of row 5 of M2. How to I get to the beginning of row 6 of M3 and M4? Do I have to break off the yarn and retie each time or can I slip stitch until I get to the start of M3? Also what do I do when I reach the middle of M4? Do I turn and work back and forth over that half and then crochet the other half separately.
07.09.2026 - 22:44DROPS Design answered:
Dear Christina, work 1 double crochet (UK crochet terminology - see 2nd symbol under diagram text) in each stitch in M.2 to M.3 - when you reach the middle of M.4 you will finish each part separately, without breaking yarn just work one side to the end then join yarn again to finish the 2nd side. Happy crocheting!
08.09.2026 - 09:24
|
|||||||||||||
Sidney |
|||||||||||||
 |
 |
||||||||||||
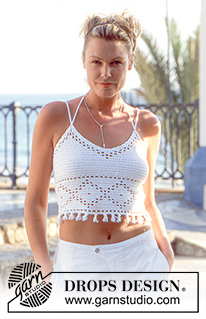
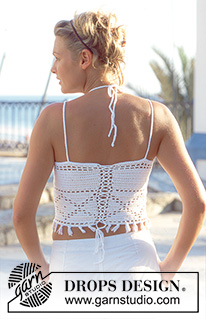
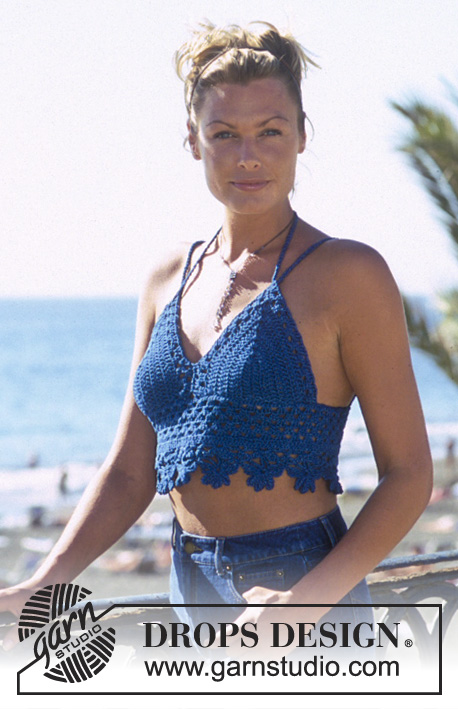
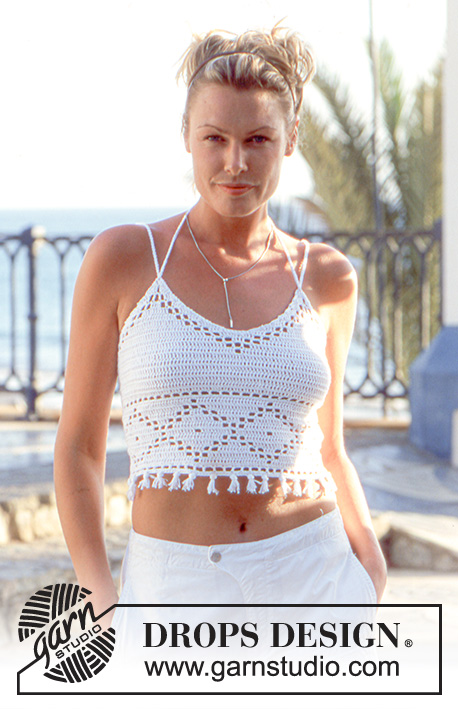
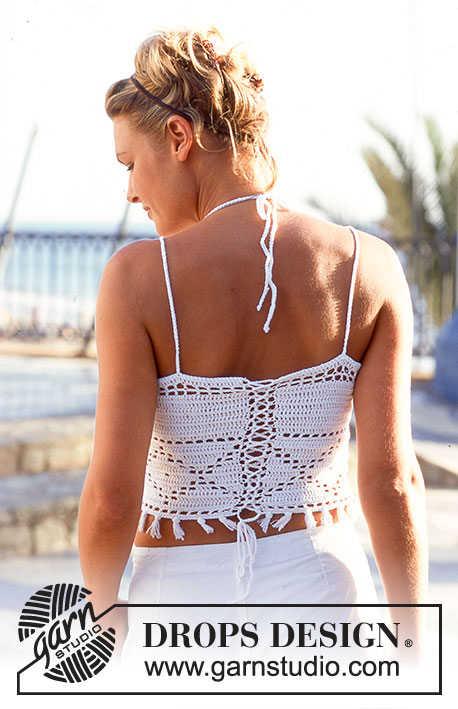
DROPS Crocheted top in Safran.
DROPS 69-1 |
|||||||||||||
|
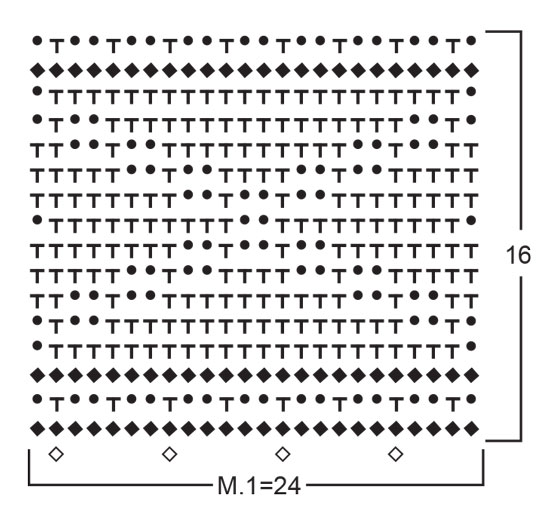
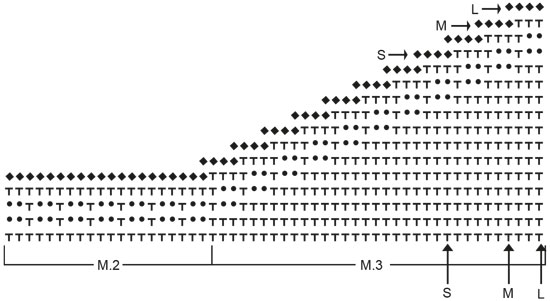
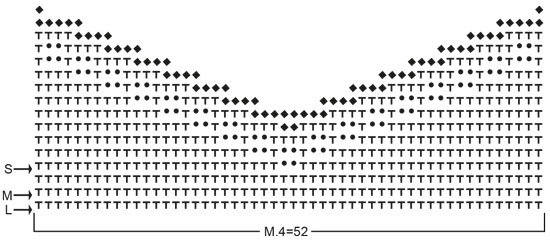
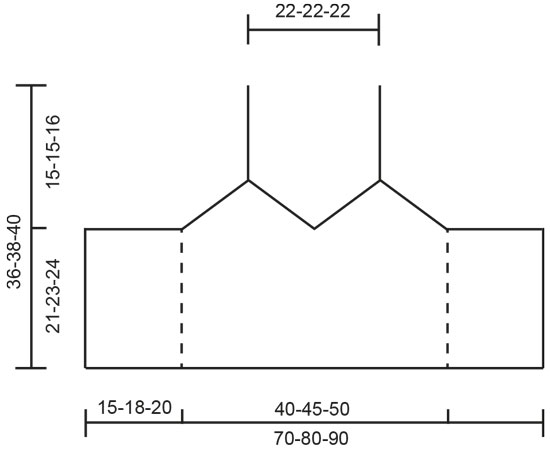
Crochet gauge: 24 dc x 12 rows in pattern with smaller hook = 10 x 10 cm [4" x 4"]. Pattern: See charts. Diagram Pattern 1 and Pattern 2 = 1 repeat. The charts for Patterns 3 and 4 have arrows indicating different sizes. Crochet tips: For turning piece crochet as follows: 2 ch replacing 1 dc and 1 ch replacing 1 sc. Top: Ch 169-193-217 with smaller hook. Turn and crochet Pattern 1 - see Crochet tips = 168-192-216 sts. After Pattern 1 continue with dc over all sts, but: Sizes S and M: inc 4 sts evenly distributed on 1st row after Pattern 1. Size L: dec 2 sts evenly distributed on 1st row after Pattern 1 = 172-196-214 sts. When you have crocheted a total of 22-24-25 rows (incl. Pattern 1) the piece measures approx. 18-20-21 cm [7"-7⅞"-8.25"]. Now continue as follows: Crochet Pattern 2 - start at lower edge at left side of chart and crochet toward the right side - over 36-42-48 sts, Pattern 3 start at lower edge at left side of chart and crochet toward the right sides - over the next 24-30-33 sts, Pattern 4 (52-52-52 sts), Pattern 3 - start at lower edge at right side of chart at appropriate arrow and crochet toward the left side - over 24-30-33 sts and Pattern 2 start at lower edge at right side of chart and crochet toward the left side - over the last 36-42-48 sts. Continue in pattern as established. After 5 rows Pattern 2 is complete - continue with Pattern 3 and Pattern 4 until chart is completed. Assembly: Strap: start approx. 9 cm [3.5"] in from top edge on right side of piece (= on the back). Make a chain approx. 90 cm [35⅜"] long with double strands of yarn and larger hook. Thread in strap at the top of the point in front. Repeat on the other side. The length of the strap is adjusted when tied at the back of the neck. Loops: Crochet loops along each side of piece (center back). Start at the top and crochet as follows: * 1 sc, ch 3, skip 1 cm [⅜"] *, repeat from * - * ending at the bottom. Chain-st a cord approx. 150 cm [59"] long. Thread cord through loops - start at the top and criss-cross down the back, tie at bottom. Fringe tufts: 1 fringe tuft = 4 strands of yarn 8 cm [3⅛"] long. Fold strands double and pull folded yarn through the first row of lower edge, then loose ends of yarn through the loop formed - see placement on the chart for Pattern 1. Fasten 28-32-36 fringe tufts. |
|||||||||||||
Diagram explanations |
|||||||||||||
|
|||||||||||||
 |
|||||||||||||
 |
|||||||||||||
 |
|||||||||||||
 |
|||||||||||||
Have you finished this pattern?Tag your pictures with #dropspattern or submit them to the #dropsfan gallery. Do you need help with this pattern?You'll find 8 tutorial videos, a Comments/Questions area and more by visiting the pattern on garnstudio.com. © 1982-2026 DROPS Design A/S. We reserve all rights. This document, including all its sub-sections, has copyrights. Read more about what you can do with our patterns at the bottom of each pattern on our site. |
|||||||||||||






With over 40 years in knitting and crochet design, DROPS Design offers one of the most extensive collections of free patterns on the internet - translated to 17 languages. As of today we count 333 catalogs and 12532 patterns - 12522 of which are translated into English (US/in).
We work hard to bring you the best knitting and crochet have to offer, inspiration and advice as well as great quality yarns at incredible prices! Would you like to use our patterns for other than personal use? You can read what you are allowed to do in the Copyright text at the bottom of all our patterns. Happy crafting!
Post a comment to pattern DROPS 69-1
We would love to hear what you have to say about this pattern!
If you want to leave a question, please make sure you select the correct category in the form below, to speed up the answering process. Required fields are marked *.