
Popular categories
Looking for a yarn?


Comments / Questions (36)
![]() Heidi Cecilie Brandshaug Løken wrote:
Heidi Cecilie Brandshaug Løken wrote:
Takk for svar vedrørende viften, men da blir jo prosedyren egentlig en helt annen enn når man hekler 2. rad? Her må man jo hekle luftmasker mellom viftene i tillegg - som ikke står forklart på 2. Rad
08.06.2017 - 18:00DROPS Design answered:
Hei igjen. Nei, det er allerede 2 luftmasker i viften (3 st + 2 lm + 3 st). Det skal ikke hekles luftmasker mellom viftene. Du hekler en ny vifte i de 2 luftmaskene fra forrige vifte. God Fornøyelse!
09.06.2017 - 07:58
![]() Heidi Cecilie Brandshaug Løken wrote:
Heidi Cecilie Brandshaug Løken wrote:
Jeg forstår ikke viften. Man hekler tre st + 2 lm + 2 st rundt luftmasker. Denne er grei. Men så står det at man skal fortsette med denne omgangen til arbeidet måler 13 cm. Det er bare det at når man skal fortsette så finnes det ingen luftmaskebue å hekle rundt. Betyr det at man skal hekle i stavene heretter? Prøver, men mønsteret blir ikke som på bildet.
07.06.2017 - 19:34DROPS Design answered:
Hei Heidi. Når du skal gjenta 2. rad til arbeidet måler 13 cm, så hekler du viften om de 2 luftmaskene i viften fra 2. rad (de 2 luftmaskene = luftmaskebuen). Se også videoen som ligger under oppskriften: "Hvordan hekle et enkelt viftemønster". God Fornøyelse!
08.06.2017 - 07:41
![]() Therese wrote:
Therese wrote:
Hei.Får det ikke til å stemne med økning etter at det er satt merketråder.Står at du skal øke i hver merketråd =12 økte staver,men det blir jo 16 hvis man følger oppskrift og på neste omgang står det øk med 16st.Er det feil i oppskrift.
24.04.2017 - 13:39DROPS Design answered:
Hei Therese. Det er riktig slik det står i oppskriften. Selv om du øker med 4 masker på 1.rad hekler du disse 4 maskene i en eksisterende maske = da blir det 3 nye masker. Når du øker på 2.rad økes det om en luftmaskebue og da blir det 16 helt nye masker. Litt vasnkelig å forklare, men håper dette gir noen mening for deg. God Fornøyelse!
26.04.2017 - 10:27
![]() Therese wrote:
Therese wrote:
Får det ikke til å stemme med øking etter festing av merketråder.Står øk ved hver merketråd=12 økte staver,men 4x4 er da 16 og omgangen etter står det fortsett å øk i hver merketråd og da skal du ha 16 staver økt.Er det feil i oppskrift?
23.04.2017 - 20:06
![]() Linn wrote:
Linn wrote:
Dum fråga kanske, men ska man klippa tråden efter varje varv eller ska man vända så att det blir varannat varv aviga och varannat räta? Ser bra ut i övre delen men solfjäderdelen börjar se lite konstig ut när jag gör på det sistnämnda viset... Tack för svar!
21.04.2017 - 14:52DROPS Design answered:
Hei Linn. Du hekler frem og tilbake, ikke klipp tråden etter hver rad. Dette står det i oppskriften: KOFTA: Arb virkas uppifrån och ned. Det virkas fram och tillbaka från mitt fram. God Fornøyelse!
26.04.2017 - 14:41Therese Janus wrote:
In body section of lovely Rose, 12 th line down, instruction does not make sense in English. I.e. "Work this rows a time" can you please clarify this.
13.03.2017 - 00:28DROPS Design answered:
Dear Mrs Janus, this mean you have to work this row only 1 time. Happy crocheting!
13.03.2017 - 11:09
![]() DRIGO wrote:
DRIGO wrote:
Merci de bien vouloir me faire connaître comment vous trouvez 12 brides augmentées alors que je trouve bien mes 90 brides (pour 5/6)
30.10.2016 - 21:05DROPS Design answered:
Bonjour Mme Drigo, dans chaque ms avec un marqueur, on fait 2B,2ml,2B (= 3 augmentations) x 4 marqueurs = 12 B augmentées. Bon crochet!
31.10.2016 - 11:23
![]() Veronika wrote:
Veronika wrote:
Raglan - beste was es gibt. Ich häckle gerne in Raglan
10.10.2016 - 21:49Esther Miranda Zuñiga wrote:
Esta marca de estambre lo puedo encontrar en Mexico y cual esel domicilio? Gracias
10.08.2016 - 00:24DROPS Design answered:
Hola Esther. De momento no hay distribuidores de DROPS en Mexico. Puedes hacer el pedido online en las tiendas con envío internacional: https://www.garnstudio.com/findastore.php?s=w&cid=23
10.08.2016 - 21:21
![]() Sarah Conrad wrote:
Sarah Conrad wrote:
De sidste par gange, jeg her ønsket at lave et drops mønstre har jeg opgivet, fordi jeg ikke kan få teststykket til at passe. Jeg hækler normalt, har den rigtig størrelse hæklekrog og originalgarnet, men jeg får kun16 st. pr. 10 cm. Det kan ikke passe at jeg skal bruge en mindre krog til dette garn...
22.07.2016 - 17:07
|
|
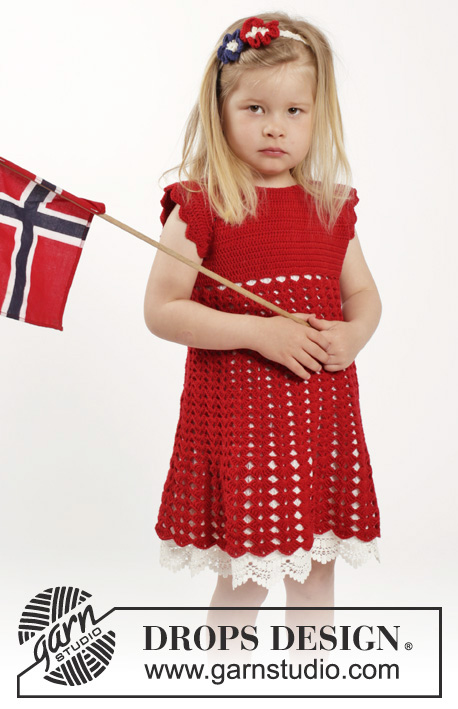
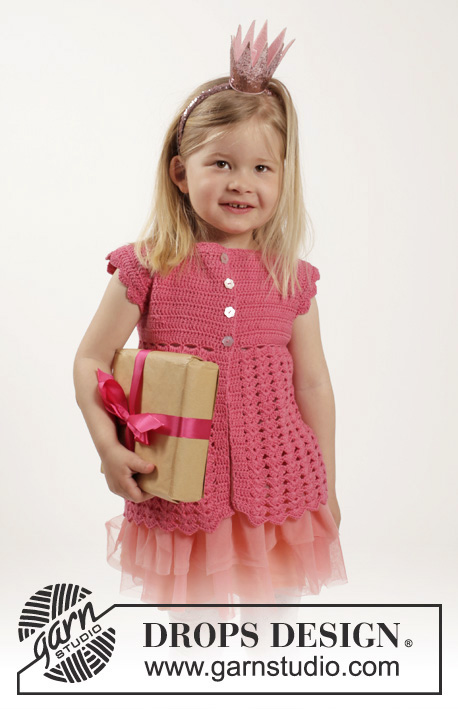
Lovely Rose#lovelyrosecardigan |
|
 |
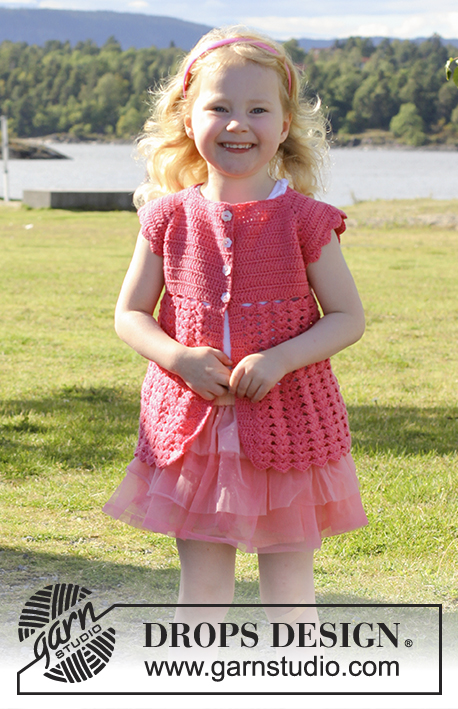 |
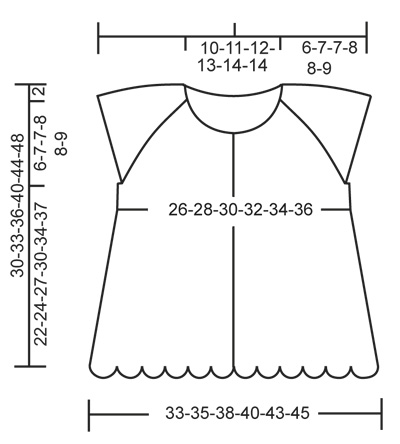
Crochet cardigan with raglan, short sleeves and fan edges, worked top down in DROPS Cotton Merino or DROPS Belle. Size children 1 - 10 years.
DROPS Children 26-1 |
|
|
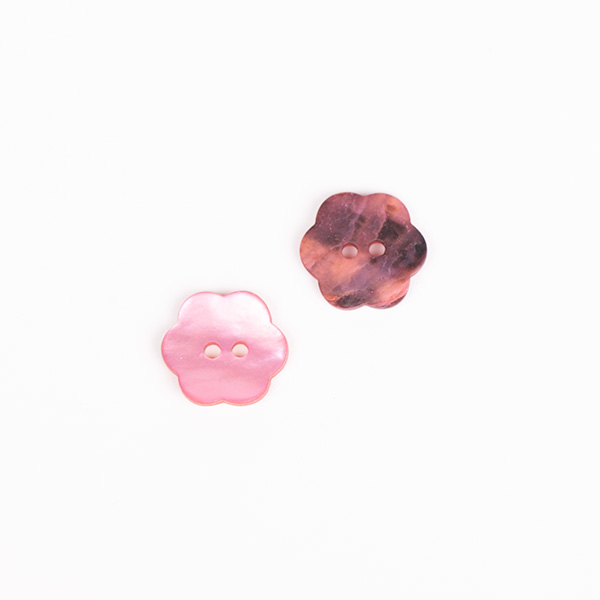
CROCHET INFO: Replace 1st dc at beg of every dc row with 3 ch. INCREASE TIP: Inc 1 dc by working 2 dc in same st. ---------------------------------------------------------- JACKET: The piece is worked top down. Worked back and forth from mid front. YOKE: Work 67-71-75-79-83-83 loose ch (includes 1 ch to turn with) on hook size 3.5 mm/E/4 with Cotton Merino or Belle. Work 1 sc in 2nd ch from hook, then work 1 sc in every ch the entire row = 66-70-74-78-82-82 sc on row. Now insert 4 markers in piece for raglan as follows (beg mid front – NOTE: Do NOT work while inserting markers): Skip 15-16-17-18-19-19 sc (= right front piece), insert 1 marker in next sc, skip 6 sc (= sleeve), insert 1 marker in next sc, skip 20-22-24-26-28-28 sc (= back piece), insert 1 marker in next sc, skip 6 sc (= sleeve) and insert last marker in next sc (there are now 15-16-17-18-19-19 sc on left front piece after last marker). READ ALL OF THE FOLLOWING SECTION BEFORE CONTINUING: READ CROCHET INFO and work next row as follows from RS: Work 1 dc in every sc but in every sc with marker work 2 dc + 2 ch + 2 dc = 78-82-86-90-94-94 dc on row (= 12 dc inc on row). Then inc for raglan: Continue with dc, and work 2 dc + 2 ch + 2 dc in every ch-space in every raglan line (= 16 dc inc on row). Repeat inc on every row 4-5-5-6-6-7 more times (= 5-6-6-7-7-8 times in total) = 158-178-182-202-206-222 dc on row. REMEMBER THE CROCHET GAUGE! Work next row as follows from RS: Work 1 dc in each of the first 26-29-30-33-34-36 dc (= right front piece), skip the next 32-36-36-40-40-44 dc (= sleeve), work 8 ch, work 1 dc in each of the next 42-48-50-56-58-62 dc (= back piece), skip the next 32-36-36-40-40-44 dc (= sleeve), work 8 ch and work 1 dc in each of the last 26-29-30-33-34-36 dc (= left front piece). Sleeve caps are now done. BODY: Work 1 row with dc (work 1 dc in every dc from previous row and 1 dc in every ch under each sleeve – remember CROCHET INFO) = 110-122-126-138-142-150 sts on row. NOW MEASURE PIECE FROM HERE! Continue with 1 dc in every dc until piece measures 3-4-4-4-5-5 cm / 1"-1½"-1½"-1½"-2"-2", on last row inc 4-2-3-1-2-4 dc evenly - READ INCREASE TIP = 114-124-129-139-144-154 dc. Now work fan pattern as follows: ROW 1: 1 sc in each of the first 5 dc (= band), *4 ch, skip 4 dc, 1 sc in next dc *, repeat from *-*, finish with ch 4, skip 4 sc and 1 sc in each of the last 5 dc (= band) = 21-23-24-26-27-29 ch-spaces. ROW 2: 1 dc in each of the first 5 sc, 3 dc + 2 ch + 3 dc in every ch-space, 1 dc in each of the last 5 sc. Repeat 2nd row until piece measures 13-15-17-18-20-21 cm / 5"-6"-6¾"-7"-8"-8¼". WORK NEXT ROW AS FOLLOWS: 1 dc in each of the first 5 dc, 4 dc + 2 ch + 4 dc in every ch-space, 1 dc in each of the last 5 dc. Repeat this row until piece measures 21-23-26-29-33-36 cm / 8¼"-9"-10¼"-11½"-13"-14¼". WORK NEXT ROW AS FOLLOWS: 1 dc in each of the first 5 dc, 4 tr + 2 ch + 4 tr in every ch-space, 1 dc in each of the last 5 dc. Work this rows a time, fasten off. ADJUSTING NECKLINE: To get a better fit work to adjust the neckline. Insert 1 marker in st in each corner in neck, i.e. at beg of every raglan line. Work on hook size 3.5 mm/E/4 as follows: Beg mid front and work 1 sc in every st until 1 st remain before st with marker, work 1 hdc in next st, 1 dc in st with marker and 1 hdc in next st, then work 1 sc in every st until 1 st remain before next st with marker, 1 hdc in next st, 1 dc in st with marker and 1 hdc in next st, then work 1 sc in every st until 1 st remain before st with marker, work 1 hdc in next st, 1 dc in st with marker and 1 hdc in next st, then work 1 sc in every st until 1 st remain before next st with marker, 1 hdc in next st, 1 dc in st with marker and 1 hdc in next st, work 1 sc in every sc until mid front. Turn piece and work 1 sc in every sc back to mid front but at every marker work 3 sc tog, i.e. work 1 sc in hdc but wait with last YO and pull through, work 1 sc in st with marker but wait with last YO and pull through, work 1 sc in next hdc but now pull last YO through all 4 sts on hook (= 8 sc dec). NECK EDGE: Work around the neck as follows: 1 sc in first st, * ch 3, skip 2 sts, 1 sc in next st *, repeat from *-* the entire row, fasten off. FAN EDGE AROUND SLEEVE CAPS: Work as follows: Work 1 sc in each of the 8 sts mid under sleeve, then work fan edge around the sleeve opening as follows: * Skip 2 dc, in next st work 3 dc + 2 ch + 3 dc, skip 2 dc, 1 sc in next st *, repeat from *-* and finish with 1 sl st in first sc from beg of round (= approx. 9-9-10-10-11 fans along sleeve cap). Fasten off. Repeat at the bottom around the other sleeve cap. Fasten 4 buttons evenly on the left piece. The buttons will be closed trough 2 dc on the right band. |
|
 |
|
Have you finished this pattern?Tag your pictures with #dropspattern #lovelyrosecardigan or submit them to the #dropsfan gallery. Do you need help with this pattern?You'll find 9 tutorial videos, a Comments/Questions area and more by visiting the pattern on garnstudio.com. © 1982-2026 DROPS Design A/S. We reserve all rights. This document, including all its sub-sections, has copyrights. Read more about what you can do with our patterns at the bottom of each pattern on our site. |
|


With over 40 years in knitting and crochet design, DROPS Design offers one of the most extensive collections of free patterns on the internet - translated to 17 languages. As of today we count 324 catalogs and 12290 patterns - 12280 of which are translated into English (US/in).
We work hard to bring you the best knitting and crochet have to offer, inspiration and advice as well as great quality yarns at incredible prices! Would you like to use our patterns for other than personal use? You can read what you are allowed to do in the Copyright text at the bottom of all our patterns. Happy crafting!
Post a comment to pattern DROPS Children 26-1
We would love to hear what you have to say about this pattern!
If you want to leave a question, please make sure you select the correct category in the form below, to speed up the answering process. Required fields are marked *.