
Popular categories
Looking for a yarn?


Comments / Questions (12)
![]() Janet wrote:
Janet wrote:
I cannot work with charts does this pattern come written?
23.05.2025 - 11:22DROPS Design answered:
Dear Janet, we only have diagrams to this pattern, but you will find explanations on how to read crochet diagrams here. Happy crocheting!
23.05.2025 - 13:30
![]() Charlotte wrote:
Charlotte wrote:
This pattern is not good. The squares turn out almost round/bulky and have to be stretchen to become somewhat square. There are too few stitches in the corners. I had to make my own pattern which meant using more yarn.
06.09.2024 - 09:16
![]() Andrea Hauer wrote:
Andrea Hauer wrote:
Köszönöm a mintát megérkezett a fonal hozza alig várom hogy elkezdjem.
07.10.2019 - 14:08
![]() Claudia wrote:
Claudia wrote:
Hello I would like to know how many skeins of yarn is needed to make the bag in 1 color Thanks
29.08.2019 - 16:07DROPS Design answered:
Dear Claudia, we are unfortunately not able to get the amount of yarn of this pattern since it has been worked with several colours - and we do not have the design anymore. Please contact your DROPS store for any further individual assistance. Happy crocheting!
30.08.2019 - 08:28
![]() Lillian wrote:
Lillian wrote:
Hei, jeg skjønner heller ikke hvordan jeg skal starte på andre omgang. Jeg må vel starte med tre luftmasker som tilsvarer 1 stav, men hvordan skal jeg da gå frem for å hekle to staver sammen? Blir det tre staver tilsammen i starten?
03.08.2018 - 18:36DROPS Design answered:
Hei Lillian. Du starter omgangen med en kjedemaske om luftmaskebuen (se hekleinfo), videre erstatter du første stav med 3 luftmasker. Du hekler derfor slik: 3 luftmasker, 1 stav om luftmaskebuen, 3 luftmasker, 2 staver sammen om luftmaskebuen osv. God fornøyelse.
21.08.2018 - 14:05
![]() Cat wrote:
Cat wrote:
Je pense sue cela a été signaler mais pas en français tour n°2 :2b ens ,3ml, et la 2 ( et non 3 !) b ens , 3ml ,4b dans les. ... mais j'adore votre site et travail . je suis fan
20.05.2017 - 19:28DROPS Design answered:
Bonjour Cat et merci, la correction a été faite. Bon crochet!
22.05.2017 - 09:59
![]() Beate wrote:
Beate wrote:
Ich habe auch eine Frage zur 2. Rd. Wie soll ich gleich am Anfang zwei Stäbchen zusammenhäkeln, wenn ich zu Beginn jeder Rd. mit Stäbchen das 1. Stäbchen durch 3 Luftmaschen ersetzen soll. Oder muss ich nur die "normalen" Stäbchen am Anfang mit 3 Lm ersetzen und nicht die Stb. welche zusammengehäkelt werden....Anders funktioniert es nicht.
05.03.2017 - 16:58DROPS Design answered:
Liebe Beate, zu Begin jeder Rd mit Stb wird das 1. Stb durch 3 Lm ersetzt. Zu Begin der 2. Runde werden Sie das 1. Stb auch durch 3 Lm ersetzen. Viel Spaß beim häkeln!
06.03.2017 - 09:57
![]() Mona wrote:
Mona wrote:
Ich verstehe nicht ganz wie ich mit der 2. Rd beginne. Wenn ich die erste fertig habe, bin ich dich vor den 3 Stb. Der ersten Reihe und nach dem LM Bogen. Wie Soll ich dann die 2. Rd mit einer kettenmasche in den 1. Lm-Bogen beginnen? Oder vernäht ich türkis von der ersten Rd so, dass ich keine Masche mehr auf der Nadel habe und am 1 LM Bogen mit weiss ganz neu beginne? LG
26.02.2017 - 11:14DROPS Design answered:
Liebe Mona, jede Rd wird in einem anderen Farbe gehäkelt, ab 2. Rde mit einer kettenmasche enden und Kettenmaschen bis Ecke, dann in der Ecke die nächste Runde häkeln. Viel Spaß beim häkeln!
27.02.2017 - 10:50
![]() Karin wrote:
Karin wrote:
Hallo! Ich hätte eine Frage zur Fertigstellung: Ich nähe erst die Quadrate aneinander, bevor ich sie zusammenhäkle? Und was heißt mit kurzen Stichen zusammennähen? Und lege ich sie links a u f e i n a n d e r , oder n e b e n e i n a n d e r und nähe sie dann zusammen? Ok, das waren jetzt 3 Fragen. Aber ich hoffe ihr versteht mein Dilemma. Herzliche Grüße. Karin
30.05.2016 - 22:05DROPS Design answered:
Liebe Karin, die Quadrate werden nur zusammengenäht. Der Rand wird um die Öffnung gehäkelt. Ich würde die Quadrate beim Zusammennähen nebeneinander legen, so ist es leichter eine flache Naht zu erreichen.
01.06.2016 - 08:29
![]() Gaelle wrote:
Gaelle wrote:
Hi, The symbols for Round 14 of the squares are wrong, aren't they? They are dc into stitches, not dc around stitches, so they should be "V" shaped, not "T" shaped, right? Thanks, G.
25.05.2016 - 09:47DROPS Design answered:
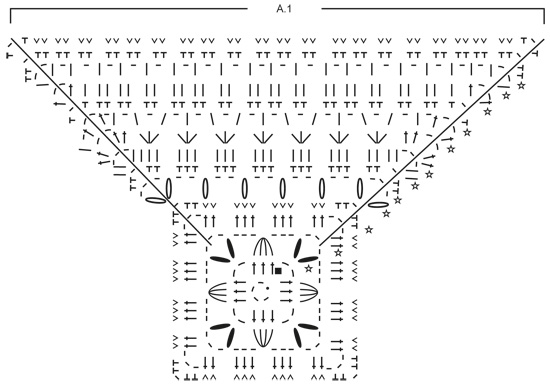
Dear Gaelle, on last round (= round 14) in A.1, you have to work 1 dc in each dc - Design department will be informed about this symbol. Happy crocheting!
25.05.2016 - 10:17
|
|||||||||||||||||||||||||||||||
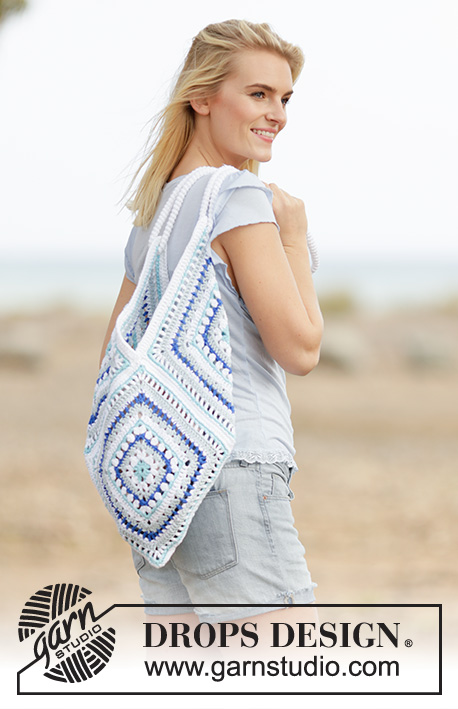
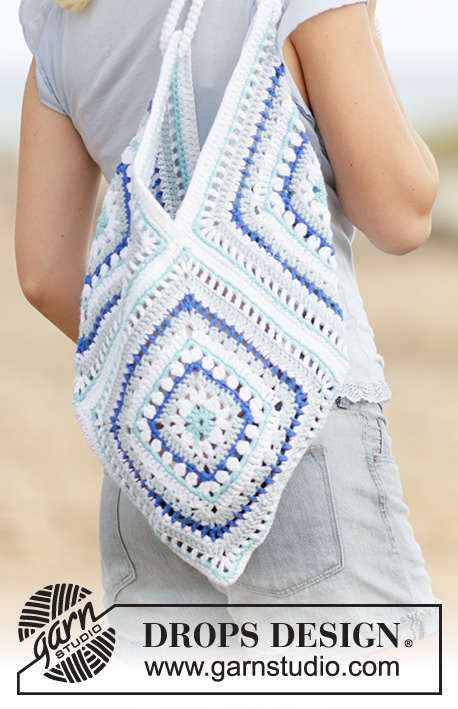
Boho Blue#bohobluebag |
|||||||||||||||||||||||||||||||
 |
 |
||||||||||||||||||||||||||||||
Crochet DROPS bag with square pattern in ”Paris”.
DROPS 162-33 |
|||||||||||||||||||||||||||||||
|
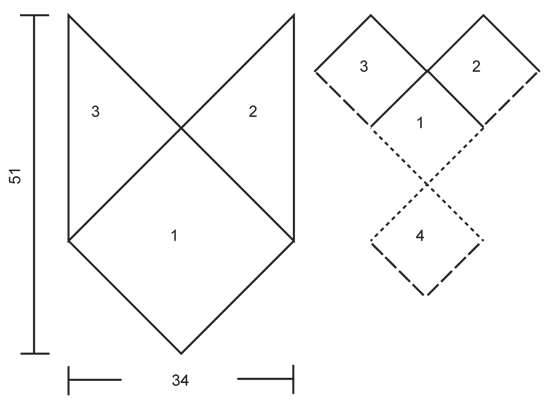
PATTERN: See diagram A.1. Diagram shows 1st– 4th round, then 1 repetition of square (= 1 side), at the same time it shows 2 corners (1 repetition only has one square). PATTERN COLORS: ROUND 1: Light turquoise ROUND 2: White ROUND 3: Light ice blue ROUND 4: Strong blue ROUND 5: White ROUND 6: Light turquoise ROUND 7: White ROUND 8: Light ice blue ROUND 9: Strong blue ROUND 10: White ROUND 11: Light ice blue ROUND 12: White ROUND 13: Light turquoise ROUND 14: White CROCHET INFO: Beg every round from and with 2nd round with 1 sl st in first corner. Replace first dc at beg of every dc round with 3 ch. Finish round with 1 sl st in 3rd ch at beg of round, fasten off Replace first sc at beg of every sc round with 1 ch. Finish round with 1 sl st in 1 sc at beg of round, fasten off 4 dc TOG: Work 1 dc in first dc but wait with last pull through, work 2 dc in next dc, but wait the last pull through, work 1 dc in next dc but now pull last YO through all 5 sts on hook 3 dc TOG: Work 1 dc but wait with last pull through, work 1 dc around same ch/same sc, but wait the last pull through, work 1 dc around same ch/same sc but now pull last YO through all 4 sts on hook 2 dc TOG: Work 2 dc into 1 dc: Work 1 dc around ch but wait with last YO and pull through, work 1 dc in same ch but pull last YO through all 3 sts on hook. SC IN A CIRCLE (applies to shoulder strap): After last sc on 1st round, work 1 sc in next sc (= 1st sc from beg of 1st round), then work in the round with 1 sc in every sc. ---------------------------------------------------------- BAG: Bag consists of 4 equal squares that are worked tog at the end. SQUARE: Crochet 4 ch on hook size 4 mm / G/6 with light turquoise and form a ring with 1 sl st in first ch. Work PATTERN according to diagram A.1, i.e. work as follows: ROUND 1:READ PATTERN COLORS AND CROCHET INFO. * 3 dc in ring, 2 ch (= corner) *, repeat from *-* 3 more times. ROUND 2: * In the corner work 2 dc TOG – see explanation above + 3 ch (= corner) + 2 dc tog, ch 3, in the next 3 dc work 4 dc TOG - see explanation above, 3 ch *, repeat from *-* 3 more times. ROUND 3: * In the corner work 2 dc + 3 ch (= corner) + 2 dc, work 3 dc in each of the next 2 ch-spaces *, repeat from *-* 3 more times. ROUND 4: * In the corner work 2 sc + 1 ch (= corner) + 2 sc, work 1 sc in each of the next 10 dc *, repeat from *-* 3 more times. ROUND 5: * In the corner work 3 dc TOG – see explanation above + 3 ch (= corner) + 3 dc tog, work (2 ch, skip 2 sc, 3 dc tog in next sc) over the next 12 sc, work 2 ch *, repeat from *-* 3 more times. ROUND 6: * In the corner work 2 sc + 1 ch (= corner) + 2 sc, work 3 sc in each of the next 5 ch-spaces *, repeat from *-* 3 more times. REMEMBER THE CROCHET GAUGE! ROUND 7: * In the corner work 2 dc + 3 ch (= corner) + 2 dc, work 1 dc in each of the next 19 sc *, repeat from *-* 3 more times. ROUND 8: * In the corner work 2 dc + 2 ch (= corner) + 2 dc, work as follows (skip 2 dc, 3 dc in next dc) over the next 21 dc, work 2 dc *, repeat from *-* 3 more times. ROUND 9: * In the corner work 1 dc + 2 ch (= corner) + 1 dc, work ch 1, then work (1 dc in next dc, ch 1, skip 1 dc) over the next 25 dc, work 1 ch *, repeat from *-* 3 more times. ROUND 10: * In the corner work 1 sc + 1 ch (= corner) + 1 sc, work 2 sc in each of the next 14 ch *, repeat from *-* 3 more times. ROUND 11: * In the corner work 1 dc + 2 ch (= corner) + 1 dc, work 1 dc in each of the next 30 sc *, repeat from *-* 3 more times. ROUND 12: * In the corner work 1 dc + 2 ch (= corner) + 1 dc, work ch 1, 1 dc in next dc, ch 1, work (1 dc in next dc, ch 1, skip 1 dc) over the next 31 dc *, repeat from *-* 3 more times. ROUND 13: * In the corner work 2 sc + 1 ch (= corner) + 2 sc, work 2 sc in each of the next 18 ch *, repeat from *-* 3 more times. ROUND 14: * In the corner work 1 sc + 1 ch (= corner) + 1 sc, work 1 sc in each of the next 40 sc *, repeat from *-* 3 more times. Square measures approx. 24 x 24 cm / 9½" x 9½". Work 3 squares more the same way. ASSEMBLY: Sew squares tog edge to edge with small stitches as follows: Sew chart - sew square 4 to square 1 and 3, then sew square 4 to square 1 and 2 (see dotted lines). Then work an edge around the opening. EDGE: REMEMBER CROCHET INFO! Beg at the top of corner on square 2. Work with white as follows: * Work 3 dc in corner, work 1 dc in each of the next 41 sc, work 3 dc tog as follows: 1 dc in next sc, 1 dc in ch-space in corner on square 1, work 1 dc in first sc on square 3, then work with 1 dc in every sc along the edge on square 3 until next corner *, repeat from *-* then along edge on square 3 and in corner on square 4 and then along edge on square 2. SHOULDER STRAP: Worked in the round. Work 5 ch with white and form a ring with 1 sl st in first ch. Work 1 sc in every ch = 5 sc. Then work SC IN A CIRCLE - Read explanation above - for approx. 180 cm / 70 3/4'', fasten off. Thread the shoulder strap through the upper corner on one side of the bag and the upper corner on the other side of bag. Sew ends on shoulder strap tog. |
|||||||||||||||||||||||||||||||
Diagram explanations |
|||||||||||||||||||||||||||||||
|
|||||||||||||||||||||||||||||||
 |
|||||||||||||||||||||||||||||||
 |
|||||||||||||||||||||||||||||||
Have you finished this pattern?Tag your pictures with #dropspattern #bohobluebag or submit them to the #dropsfan gallery. Do you need help with this pattern?You'll find 10 tutorial videos, a Comments/Questions area and more by visiting the pattern on garnstudio.com. © 1982-2026 DROPS Design A/S. We reserve all rights. This document, including all its sub-sections, has copyrights. Read more about what you can do with our patterns at the bottom of each pattern on our site. |
|||||||||||||||||||||||||||||||


With over 40 years in knitting and crochet design, DROPS Design offers one of the most extensive collections of free patterns on the internet - translated to 17 languages. As of today we count 324 catalogs and 12291 patterns - 12281 of which are translated into English (US/in).
We work hard to bring you the best knitting and crochet have to offer, inspiration and advice as well as great quality yarns at incredible prices! Would you like to use our patterns for other than personal use? You can read what you are allowed to do in the Copyright text at the bottom of all our patterns. Happy crafting!
Post a comment to pattern DROPS 162-33
We would love to hear what you have to say about this pattern!
If you want to leave a question, please make sure you select the correct category in the form below, to speed up the answering process. Required fields are marked *.